最近准备一个技术分享,看到以前做的一个语音转文字的功能,放在slides上落灰了,索性整理到这里和大家分享下。
从技术选型,到方案设计,到实际落地,可以说把全链路都覆盖到了。
- 语音转写流程图
- PC端浏览器如何录音
- 录音完毕后语音如何发送
- 语音发送和实时转写
- 通用录音组件
- 总结
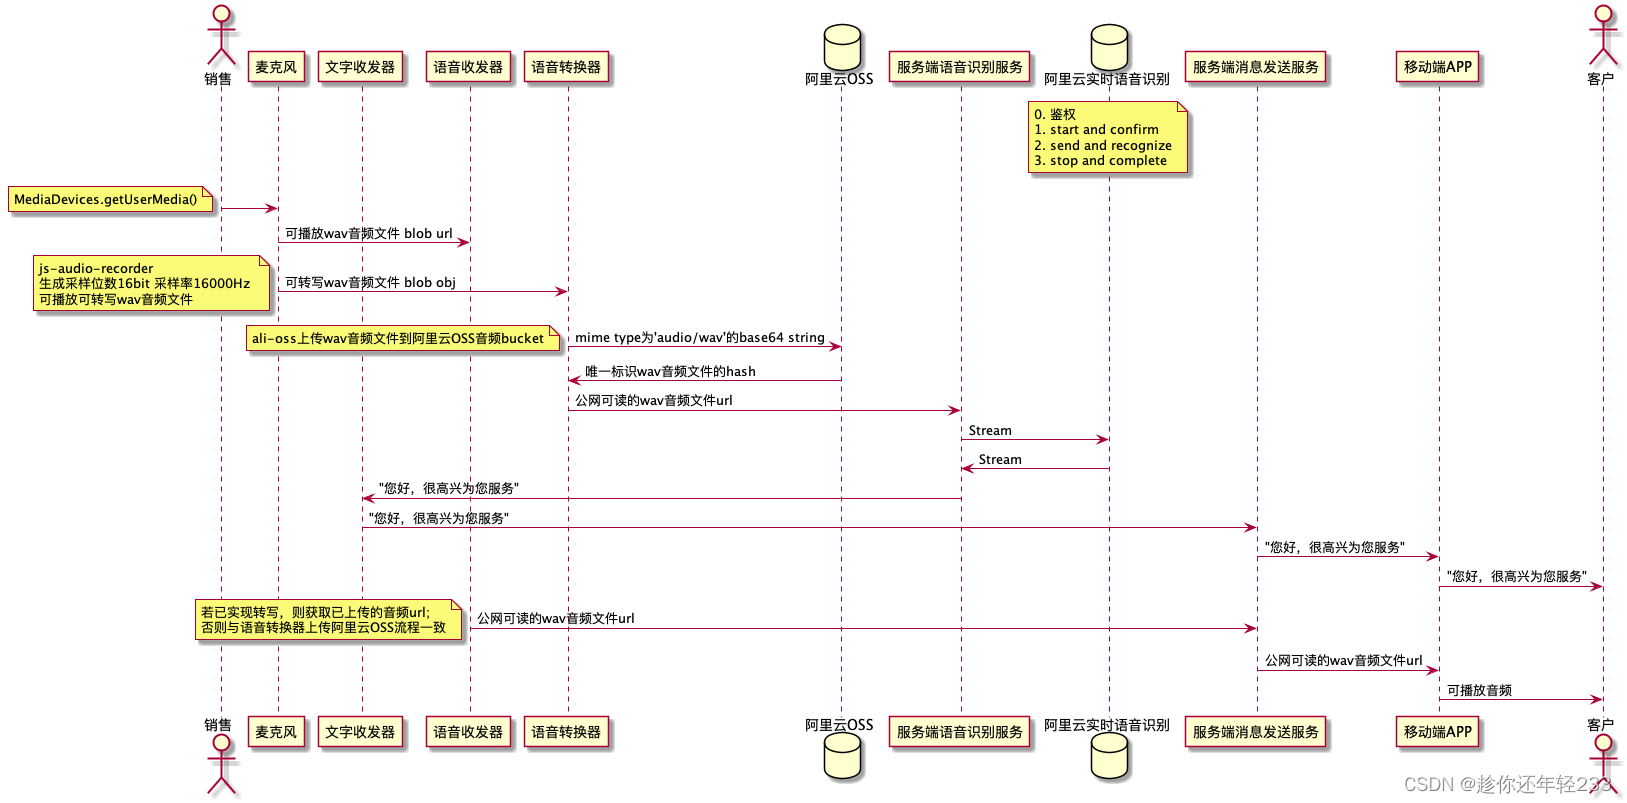
语音转写流程图

PC端浏览器如何录音
AudioContext,AudioNode是什么?
MediaDevice.getUserMedia()是什么?
为什么localhost能播放,预生产不能播放?
js中的数据类型TypedArray知多少?
js-audio-recorder源码分析
代码实现
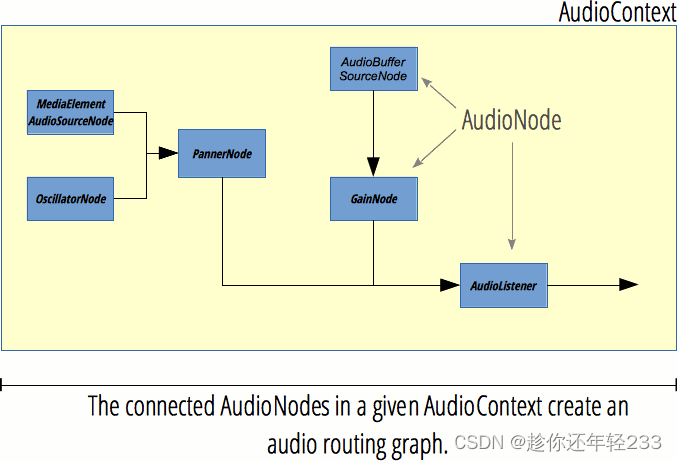
AudioContext是什么?
AudioContext接口表示由链接在一起的音频模块构建的音频处理图形,每个模块由一个AudioNode表示。
一个audio context会控制所有节点的创建和音频处理解码的执行。所有事情都是在一个上下文中发生的。
ArrayBuffer:音频二进制文件
decodeAudioData:解码
AudioBufferSourceNode:
connect用于连接音频文件
start播放音频
AudioContext.destination:扬声器设备
AudioNode是什么?

- AudioNode是用于音频处理的一个基类,包括context,numberOfInputs,channelCount,connect
- 上文讲到的用于连接音频文件的AudioBufferSourceNode继承了AudioNode的connect和start方法
- 用于设置音量的GainNode也继承于AudioNode
- 用于连接麦克风设备的MediaElementAudioSourceNode也继承于AudioNode
- 用于滤波的OscillationNode间接继承于AudioNode
- 表示音频源信号在空间中的位置和行为的PannerNode也继承于AudioNode
- AudioListener接口表示听音频场景的唯一的人的位置和方向,并用于音频空间化
- 上述节点可以通过装饰者模式一层层connect,AudioBufferSourceCode可以先connect到GainNode,GainNode再connect到AudioContext.destination扬声器去调节音量
初见:MediaDevice.getUserMedia()是什么
MediaStream MediaStreamTrack audio track
demo演示:https://github.com/FrankKai/nodejs-rookie/issues/54
<button onclick="record()">开始录音</button>
<script>
function record () {
    navigator.mediaDevices.getUserMedia({
        audio: true
    }).then(mediaStream => {
        console.log(mediaStream);
    }).catch(err => {
        console.error(err);
    })  ;
}
相识:MediaDevice.getUserMedia()是什么
MediaStream MediaStreamTrack audio track
- MediaStream接口代表media content stream
- MediaStreamTrack接口代表的是在一个stream内部的单media track
- track可以理解为音轨,所以audio track就是音频音轨的意思
- 提醒用户”是否允许代码获得麦克风的权限“。若拒绝,会报错DOMException: Permission denied;若允许,返回一个由audio track组成的MediaStream,其中包含了audio音轨上的详细信息
为什么localhost能播放,预生产不能播放?
没招了,在stackOverflow提了一个问题
Why navigator.mediaDevice only works fine on localhost:9090?
网友说只能在HTTPS环境做测试。
嗯,生产是HTTPS,可以用。???但是我localhost哪里来的HTTPS环境???所以到底是什么原因?
终于从chromium官方更新记录中找到了答案
https://sites.google.com/a/chromium.org/dev/Home/chromium-security/deprecating-powerful-features-on-insecure-origins

Chrome 47以后,getUserMedia API只能允许来自“安全可信”的客户端的视频音频请求,如HTTPS和本地的Localhost。如果页面的脚本从一个非安全源加载,navigator对象中则没有可用的mediaDevices对象,Chrome抛出错误。
语音功能预生产,预发需要以下配置:
地址栏输入chrome://flags
搜索:insecure origins treated as secure
配置:http://foo.test.gogo.com
生产的https://foo.gogo.com是完全OK的
js中的数据类型TypedArray知多少?
typed array基本知识: TypedArray Buffer ArrayBuffer View Unit8Array Unit16Array Float64Array
- 用来处理未加工过的二进制数据
- TypedArray分为buffers和views两种
- buffer(通过ArrayBuffer类实现)指的是一个数据块对象;buffer没有固定的格式;buffer中的内容是不能访问到的。
- buffer中内存的访问权限,需要用到view;view提供了一个上下文(包括数据类型,初始位置,元素数量),这个上下文将数据转换为typed array
https://github.com/FrankKai/FrankKai.github.io/issues/164
typed array使用例子
// 创建一个16字节定长的buffer
let buffer = new ArrayBuffer(16);

处理音频数据前置知识点
struct someStruct {
  unsigned long id; // long 32bit
  char username[16];// char 8bit
  float amountDue;// float 32bit
};
let buffer = new ArrayBuffer(24);
// ... read the data into the buffer ...
let idView = new Uint32Array(buffer, 0, 1);
let usernameView = new Uint8Array(buffer, 4, 16);
let amountDueView = new Float32Array(buffer, 20, 1);
偏移量为什么是1,4,20?
因为32/8 = 4。0到3属于idView。8/8 =1。4到19属于usernameView。32/8 = 4。20到23属于amountView。
代码实现及源码分析
一、代码实现
流程图:1.初始化recorder 2.开始录音 3.停止录音
设计思路:录音器,录音器助手,语音构造器,语音转换器
二、尝试过的技术方案
1.人人网某前端开发
https://juejin.im/post/5b8bf7e3e51d4538c210c6b0
无法灵活指定采样位数,采样频率和声道数;不能输出多种格式的音频;因此弃用。
2.js-audio-recorder
可以灵活指定采样位数,采样频率和声道数;可输出多种格式的音频;提供多种易用的API。
github地址:https://github.com/2fps/recorder
没学过语音相关的知识,因此只能参考前辈的成果边学边做!
代码实现及源码分析
一、录音过程拆解
1.初始化录音实例
initRecorderInstance() {
// 采样相关
  const sampleConfig = {
    sampleBits: 16, // 采样位数,讯飞实时语音转写 16bits
    sampleRate: 16000, // 采样率,讯飞实时语音转写 16000kHz
    numChannels: 1, // 声道,讯飞实时语音转写 单声道
  };
  this.recorderInstance = new Recorder(sampleConfig);
},
2.开始录音
startRecord() {
  try {
    this.recorderInstance.start();
    // 回调持续输出时长
    this.recorderInstance.onprocess = (duration) => {
      this.recorderHelper.duration = duration;
    };
  } catch (err) {
    this.$debug(err);
  }
},
3.停止录音
stopRecord() {
  this.recorderInstance.stop();
  this.recorder.blobObjMP3 = new Blob([this.recorderInstance.getWAV()], { type: 'audio/mp3' });
  this.recorder.blobObjPCM = this.recorderInstance.getPCMBlob();
  this.recorder.blobUrl = URL.createObjectURL(this.recorder.blobObjMP3);
  if (this.audioAutoTransfer) {
    this.$refs.audio.onloadedmetadata = () => {
      this.audioXFTransfer();
    };
  }
},
二、设计思路
- 录音器实例recorderInstance
- js-audio-recorder
- 录音器助手RecorderHelper
- blobUrl,blobObjPCM,blobObjMP3
- hearing,tip,duration
- 编辑器Editor
- transfered,tip,loading
- 语音器Audio
- urlPC,urlMobile,size
- 转换器Transfer
- text
三、源码分析之初始化实例-constructor
/**
 * @param {Object} options 包含以下三个参数:
 * sampleBits,采样位数,一般8,16,默认16
 * sampleRate,采样率,一般 11025、16000、22050、24000、44100、48000,默认为浏览器自带的采样率
 * numChannels,声道,1或2
 */
constructor(options: recorderConfig = {}) {
    // 临时audioContext,为了获取输入采样率的
    let context = new (window.AudioContext || window.webkitAudioContext)();

    this.inputSampleRate = context.sampleRate;     // 获取当前输入的采样率
    // 配置config,检查值是否有问题
    this.config = {
        // 采样数位 8, 16
        sampleBits: ~[8, 16].indexOf(options.sampleBits) ? options.sampleBits : 16,
        // 采样率
        sampleRate: ~[11025, 16000, 22050, 24000, 44100, 48000].indexOf(options.sampleRate) ? options.sampleRate : this.inputSampleRate,
        // 声道数,1或2
        numChannels: ~[1, 2].indexOf(options.numChannels) ? options.numChannels : 1,
    };
    // 设置采样的参数
    this.outputSampleRate = this.config.sampleRate;     // 输出采样率
    this.oututSampleBits = this.config.sampleBits;      // 输出采样数位 8, 16
    // 判断端字节序
    this.littleEdian = (function() {
        var buffer = new ArrayBuffer(2);
        new DataView(buffer).setInt16(0, 256, true);
        return new Int16Array(buffer)[0] === 256;
    })();
}
new DataView(buffer).setInt16(0, 256, true)怎么理解?
控制内存存储的大小端模式。
true是littleEndian,也就是小端模式,地位数据存储在低地址,Int16Array uses the platform’s endianness。
所谓大端模式,指的是低位数据高地址,0x12345678,12存buf[0],78(低位数据)存buf[3](高地址)。也就是常规的正序存储。
小端模式与大端模式相反。0x12345678,78存在buf[0],存在低地址。
三.源码分析之初始化实例-initRecorder
/**
 * 初始化录音实例
 */
initRecorder(): void {
    if (this.context) {
        // 关闭先前的录音实例,因为前次的实例会缓存少量数据
        this.destroy();
    }
    this.context = new (window.AudioContext || window.webkitAudioContext)();

    this.analyser = this.context.createAnalyser();  // 录音分析节点
    this.analyser.fftSize = 2048;                   // 表示存储频域的大小

    // 第一个参数表示收集采样的大小,采集完这么多后会触发 onaudioprocess 接口一次,该值一般为1024,2048,4096等,一般就设置为4096
    // 第二,三个参数分别是输入的声道数和输出的声道数,保持一致即可。
    let createScript = this.context.createScriptProcessor || this.context.createJavaScriptNode;
    this.recorder = createScript.apply(this.context, [4096, this.config.numChannels, this.config.numChannels]);

    // 兼容 getUserMedia
    this.initUserMedia();
    // 音频采集
    this.recorder.onaudioprocess = e => {
        if (!this.isrecording || this.ispause) {
            // 不在录音时不需要处理,FF 在停止录音后,仍会触发 audioprocess 事件
            return;
        }
        // getChannelData返回Float32Array类型的pcm数据
        if (1 === this.config.numChannels) {
            let data = e.inputBuffer.getChannelData(0);
            // 单通道
            this.buffer.push(new Float32Array(data));
            this.size += data.length;
        } else {
            /*
                * 双声道处理
                * e.inputBuffer.getChannelData(0)得到了左声道4096个样本数据,1是右声道的数据,
                * 此处需要组和成LRLRLR这种格式,才能正常播放,所以要处理下
                */
            let lData = new Float32Array(e.inputBuffer.getChannelData(0)),
                rData = new Float32Array(e.inputBuffer.getChannelData(1)),
                // 新的数据为左声道和右声道数据量之和
                buffer = new ArrayBuffer(lData.byteLength + rData.byteLength),
                dData = new Float32Array(buffer),
                offset = 0;

            for (let i = 0; i < lData.byteLength; ++i) {
                dData[ offset ] = lData[i];
                offset++;
                dData[ offset ] = rData[i];
                offset++;
            }

            this.buffer.push(dData);
            this.size += offset;
        }
        // 统计录音时长
        this.duration += 4096 / this.inputSampleRate;
        // 录音时长回调
        this.onprocess && this.onprocess(this.duration);
    }
}
三.源码分析之开始录音-start
/**
 * 开始录音
 *
 * @returns {void}
 * @memberof Recorder
 */
start(): void {
    if (this.isrecording) {
        // 正在录音,则不允许
        return;
    }
    // 清空数据
    this.clear();
    this.initRecorder();
    this.isrecording = true;

    navigator.mediaDevices.getUserMedia({
        audio: true
    }).then(stream => {
        // audioInput表示音频源节点
        // stream是通过navigator.getUserMedia获取的外部(如麦克风)stream音频输出,对于这就是输入
        this.audioInput = this.context.createMediaStreamSource(stream);
    }, error => {
        // 抛出异常
        Recorder.throwError(error.name + " : " + error.message);
    }).then(() => {
        // audioInput 为声音源,连接到处理节点 recorder
        this.audioInput.connect(this.analyser);
        this.analyser.connect(this.recorder);
        // 处理节点 recorder 连接到扬声器
        this.recorder.connect(this.context.destination);
    });
}
三.源码分析之停止录音及辅助函数
/**
 * 停止录音
 *
 * @memberof Recorder
 */
stop(): void {
    this.isrecording = false;
    this.audioInput && this.audioInput.disconnect();
    this.recorder.disconnect();
}

// 录音时长回调
this.onprocess && this.onprocess(this.duration);
/**
 * 获取WAV编码的二进制数据(dataview)
 *
 * @returns {dataview}  WAV编码的二进制数据
 * @memberof Recorder
 */
private getWAV() {
    let pcmTemp = this.getPCM(),
        wavTemp = Recorder.encodeWAV(pcmTemp, this.inputSampleRate,
            this.outputSampleRate, this.config.numChannels, this.oututSampleBits, this.littleEdian);

    return wavTemp;
}
/**
 * 获取PCM格式的blob数据
 *
 * @returns { blob }  PCM格式的blob数据
 * @memberof Recorder
 */
getPCMBlob() {
    return new Blob([ this.getPCM() ]);
}
/**
 * 获取PCM编码的二进制数据(dataview)
 *
 * @returns {dataview}  PCM二进制数据
 * @memberof Recorder
 */
private getPCM() {
    // 二维转一维
    let data = this.flat();
    // 压缩或扩展
    data = Recorder.compress(data, this.inputSampleRate, this.outputSampleRate);
    // 按采样位数重新编码
    return Recorder.encodePCM(data, this.oututSampleBits, this.littleEdian);
}
四.源码分析之核心算法-encodeWAV
static encodeWAV(bytes: dataview, inputSampleRate: number, outputSampleRate: number, numChannels: number, oututSampleBits: number, littleEdian: boolean = true) {
    let sampleRate = Math.min(inputSampleRate, outputSampleRate),
        sampleBits = oututSampleBits,
        buffer = new ArrayBuffer(44 + bytes.byteLength),
        data = new DataView(buffer),
        channelCount = numChannels, // 声道
        offset = 0;

    // 资源交换文件标识符
    writeString(data, offset, 'RIFF'); offset += 4;
    // 下个地址开始到文件尾总字节数,即文件大小-8
    data.setUint32(offset, 36 + bytes.byteLength, littleEdian); offset += 4;
    // WAV文件标志
    writeString(data, offset, 'WAVE'); offset += 4;
    // 波形格式标志
    writeString(data, offset, 'fmt '); offset += 4;
    // 过滤字节,一般为 0x10 = 16
    data.setUint32(offset, 16, littleEdian); offset += 4;
    // 格式类别 (PCM形式采样数据)
    data.setUint16(offset, 1, littleEdian); offset += 2;
    // 声道数
    data.setUint16(offset, channelCount, littleEdian); offset += 2;
    // 采样率,每秒样本数,表示每个通道的播放速度
    data.setUint32(offset, sampleRate, littleEdian); offset += 4;
    // 波形数据传输率 (每秒平均字节数) 声道数 × 采样频率 × 采样位数 / 8
    data.setUint32(offset, channelCount * sampleRate * (sampleBits / 8), littleEdian); offset += 4;
    // 快数据调整数 采样一次占用字节数 声道数 × 采样位数 / 8
    data.setUint16(offset, channelCount * (sampleBits / 8), littleEdian); offset += 2;
    // 采样位数
    data.setUint16(offset, sampleBits, littleEdian); offset += 2;
    // 数据标识符
    writeString(data, offset, 'data'); offset += 4;
    // 采样数据总数,即数据总大小-44
    data.setUint32(offset, bytes.byteLength, littleEdian); offset += 4;

    // 给wav头增加pcm体
    for (let i = 0; i < bytes.byteLength;) {
        data.setUint8(offset, bytes.getUint8(i));
        offset++;
        i++;
    }

    return data;
}
四.源码分析之核心算法-encodePCM
/**
 * 转换到我们需要的对应格式的编码
 *
 * @static
 * @param {float32array} bytes      pcm二进制数据
 * @param {number}  sampleBits      采样位数
 * @param {boolean} littleEdian     是否是小端字节序
 * @returns {dataview}              pcm二进制数据
 * @memberof Recorder
 */
static encodePCM(bytes, sampleBits: number, littleEdian: boolean = true)  {
    let offset = 0,
        dataLength = bytes.length * (sampleBits / 8),
        buffer = new ArrayBuffer(dataLength),
        data = new DataView(buffer);

    // 写入采样数据
    if (sampleBits === 8) {
        for (var i = 0; i < bytes.length; i++, offset++) {
            // 范围[-1, 1]
            var s = Math.max(-1, Math.min(1, bytes[i]));
            // 8位采样位划分成2^8=256份,它的范围是0-255;
            // 对于8位的话,负数*128,正数*127,然后整体向上平移128(+128),即可得到[0,255]范围的数据。
            var val = s < 0 ? s * 128 : s * 127;
            val = +val + 128;
            data.setInt8(offset, val);
        }
    } else {
        for (var i = 0; i < bytes.length; i++, offset += 2) {
            var s = Math.max(-1, Math.min(1, bytes[i]));
            // 16位的划分的是2^16=65536份,范围是-32768到32767
            // 因为我们收集的数据范围在[-1,1],那么你想转换成16位的话,只需要对负数*32768,对正数*32767,即可得到范围在[-32768,32767]的数据。
            data.setInt16(offset, s < 0 ? s * 0x8000 : s * 0x7FFF, littleEdian);
        }
    }

    return data;
}
语音发送和实时转写
- 音频文件存哪里?
- Blob Url那些事儿
- 实时语音转写服务服务端需要做什么?
- 前端代码实现
音频文件存哪里?
语音录一次往阿里云OSS传一次吗?
这样做显示是浪费资源的。
编辑状态:存本地,当前浏览器端可访问即可
发送状态:存OSS,公网可访问
如何存本地?Blob Url的方式保存
如何存OSS?从cms获取token,上传到OSS的xxx-audio bucket,然后得到一个hash
Blob Url那些事儿
Blob Url长什么样?

blob:http://localhost:9090/39b60422-26f4-4c67-8456-7ac3f29115ec
blob对象在前端开发中是非常常见的,下面我将列举几个应用场景:
canvas toDataURL后的base64格式属性,会超出标签属性值有最大长度的限制
<input type="file" />上传文件之后的File对象,最初只想在本地留存,时机合适再上传到服务器
创建BlobUrl:URL.createObjectURL(object)
释放BlobUrl:URL.revokeObjectURL(objectURL)
Blob Url那些事儿
URL的生命周期在vue组件中如何表现?
vue的单文件组件共有一个document,这也是它被称为单页应用的原因,因此可以在组件间直接通过blob URL进行通信。
在vue-router采用hash模式的情况下,页面间的路由跳转,不会重新加载整个页面,所以URL的生命周期非常强力,因此在跨页面(非新tab)的组件通信,也可以使用blob URL。
需要注意的是,在vue的hash mode模式下,需要更加注意通过URL.revokeObjectURL()进行的内存释放
<!--组件发出blob URL-->
<label for="background">上传背景</label>
<input type="file" style="display: none"
           id="background" name="background"
           accept="image/png, image/jpeg" multiple="false"
           @change="backgroundUpload"
>
backgroundUpload(event) {
  const fileBlobURL = window.URL.createObjectURL(event.target.files[0]);
  this.$emit('background-change', fileBlobURL);
  // this.$bus.$emit('background-change', fileBlobURL);
},

<!--组件接收blob URL-->
<BackgroundUploader @background-change="backgroundChangeHandler"></BackgroundUploader>
// this.$bus.$on("background-change", backgroundChangeHandler);
backgroundChangeHandler(url) {
    // some code handle blob url...
},
URL的生命周期在vue组件中如何表现?
vue的单文件组件共有一个document,这也是它被称为单页应用的原因,因此可以在组件间直接通过blob URL进行通信。
在vue-router采用hash模式的情况下,页面间的路由跳转,不会重新加载整个页面,所以URL的生命周期非常强力,因此在跨页面(非新tab)的组件通信,也可以使用blob URL。
需要注意的是,在vue的hash mode模式下,需要更加注意通过URL.revokeObjectURL()进行的内存释放
https://github.com/FrankKai/FrankKai.github.io/issues/138
实时语音转写服务服务端需要做什么?
提供一个传递存储音频Blob对象的File实例返回文字的接口。
this.recorder.blobObjPCM = this.recorderInstance.getPCMBlob();

transferAudioToText() {
  this.editor.loading = true;
  const formData = new FormData();
  const file = new File([this.recorder.blobObjPCM], `${+new Date()}`, { type: this.recorder.blobObjPCM.type });
  formData.append('file', file);
  apiXunFei
    .realTimeVoiceTransliterationByFile(formData)
    .then((data) => {
      this.xunfeiTransfer.text = data;
      this.editor.tip = '发送文字';
      this.editor.transfered = !this.editor.transfered;
      this.editor.loading = false;
    })
    .catch(() => {
      this.editor.loading = false;
      this.$Message.error('转写语音失败');
    });
},
/**
* 获取PCM格式的blob数据
*
* @returns { blob }  PCM格式的blob数据
* @memberof Recorder
*/
getPCMBlob() {
    return new Blob([ this.getPCM() ]);
}
服务端需要如何实现呢?

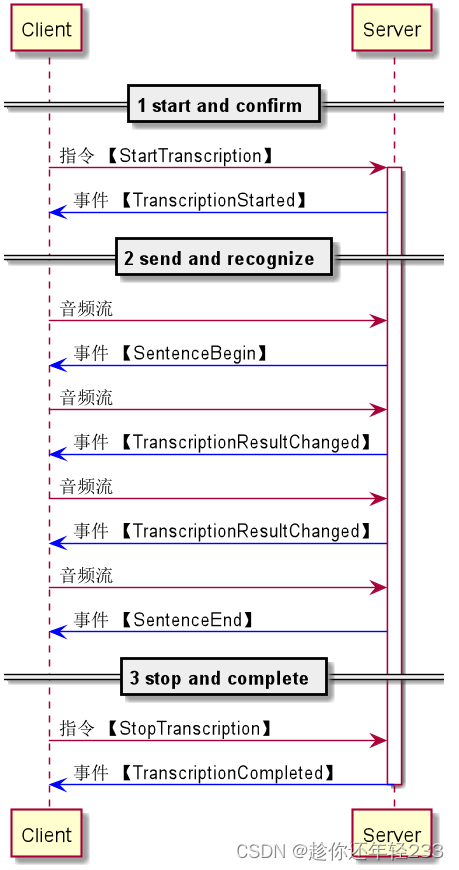
1.鉴权
客户端在与服务端建立WebSocket链接的时候,需要使用Token进行鉴权
2.start and confirm
客户端发起请求,服务端确认请求有效
3.send and recognize
循环发送语音数据,持续接收识别结果
- stop and complete
通知服务端语音数据发送完成,服务端识别结束后通知客户端识别完毕
阿里OSS提供了java,python,c++,ios,android等SDK
https://help.aliyun.com/document_detail/84428.html?spm=a2c4g.11186623.6.574.10d92318ApT1T6
前端代码实现
// 发送语音
async audioSender() {
  const audioValidated = await this.audioValidator();
  if (audioValidated) {
    this.audio.urlMobile = await this.transferMp3ToAmr(this.recorder.blobObjMP3);
    const audioBase64Str = await this.transferBlobFileToBase64(this.recorder.blobObjMP3);
    this.audio.urlPC = await this.uploadAudioToOSS(audioBase64Str);
    this.$emit('audio-sender', {
      audioPathMobile: this.audio.urlMobile,
      audioLength: parseInt(this.$refs.audio.duration * 1000),
      transferredText: this.xunfeiTransfer.text,
      audioPathPC: this.audio.urlPC,
    });
    this.closeSmartAudio();
  }
},

// 生成移动端可以发送的amr格式音频
transferMp3ToAmr() {
  const formData = new FormData();
  const file = new File([this.recorder.blobObjMP3], `${+new Date()}`, { type: this.recorder.blobObjMP3.type });
  formData.append('file', file);
  return new Promise((resolve) => {
    apiXunFei
      .mp32amr(formData)
      .then((data) => {
        resolve(data);
      })
      .catch(() => {
        this.$Message.error('mp3转换amr格式失败');
      });
  });
},

// 转换Blob对象为Base64 string,以供上传OSS
async transferBlobFileToBase64(file) {
  return new Promise((resolve) => {
    const reader = new FileReader();
    reader.readAsDataURL(file);
    reader.onloadend = function onloaded() {
      const fileBase64 = reader.result;
      resolve(fileBase64);
    };
  });
},
通用录音组件
1.指定采样位数,采样频率,声道数

2.指定音频格式

3.指定音频计算单位Byte,KB,MB

4.自定义开始和停止来自iView的icon,类型、大小

5.返回音频blob,音频时长和大小

6.指定最大音频时长和音频大小, 达到二者其一自动停止录制
通用组件代码分析
/*
 * * 设计思路:
 * * 使用到的库:js-audio-recorder
 * * 功能:
 * * 1.指定采样位数,采样频率,声道数
 * * 2.指定音频格式
 * * 3.指定音频计算单位Byte,KB,MB
 * * 4.自定义开始和停止来自iView的icon,类型、大小
 * * 5.返回音频blob,音频时长和大小
 * * 6.指定最大音频时长和音频大小, 达到二者其一自动停止录制
 * * Author: 高凯
 * * Date: 2019.11.7
 */

 <template>
  <div class="audio-maker-container">
    <Icon :type="computedRecorderIcon" @click="recorderVoice" :size="iconSize" />
  </div>
</template>


 <script>
import Recorder from 'js-audio-recorder';
/*
 * js-audio-recorder实例
 * 在这里新建的原因在于无需对recorderInstance在当前vue组件上创建多余的watcher,避免性能浪费
 */
let recorderInstance = null;
/*
* 录音器助手
* 做一些辅助录音的工作,例如记录录制状态,音频时长,音频大小等等
*/
const recorderHelperGenerator = () => ({
  hearing: false,
  duration: 0,
  size: 0,
});
export default {
  name: 'audio-maker',
  props: {
    sampleBits: {
      type: Number,
      default: 16,
    },
    sampleRate: {
      type: Number,
    },
    numChannels: {
      type: Number,
      default: 1,
    },
    audioType: {
      type: String,
      default: 'audio/wav',
    },
    startIcon: {
      type: String,
      default: 'md-arrow-dropright-circle',
    },
    stopIcon: {
      type: String,
      default: 'md-pause',
    },
    iconSize: {
      type: Number,
      default: 30,
    },
    sizeUnit: {
      type: String,
      default: 'MB',
      validator: (unit) => ['Byte', 'KB', 'MB'].includes(unit),
    },
    maxDuration: {
      type: Number,
      default: 10 * 60,
    },
    maxSize: {
      type: Number,
      default: 1,
    },
  },
  mounted() {
    this.initRecorderInstance();
  },
  beforeDestroy() {
    recorderInstance = null;
  },
  computed: {
    computedSampleRate() {
      const audioContext = new (window.AudioContext || window.webkitAudioContext)();
      const defaultSampleRate = audioContext.sampleRate;
      return this.sampleRate ? this.sampleRate : defaultSampleRate;
    },
    computedRecorderIcon() {
      return this.recorderHelper.hearing ? this.stopIcon : this.startIcon;
    },
    computedUnitDividend() {
      const sizeUnit = this.sizeUnit;
      let unitDividend = 1024 * 1024;
      switch (sizeUnit) {
        case 'Byte':
          unitDividend = 1;
          break;
        case 'KB':
          unitDividend = 1024;
          break;
        case 'MB':
          unitDividend = 1024 * 1024;
          break;
        default:
          unitDividend = 1024 * 1024;
      }
      return unitDividend;
    },
    computedMaxSize() {
      return this.maxSize * this.computedUnitDividend;
    },
  },
  data() {
    return {
      recorderHelper: recorderHelperGenerator(),
    };
  },
  watch: {
    'recorderHelper.duration': {
      handler(duration) {
        if (duration >= this.maxDuration) {
          this.stopRecord();
        }
      },
    },
    'recorderHelper.size': {
      handler(size) {
        if (size >= this.computedMaxSize) {
          this.stopRecord();
        }
      },
    },
  },
  methods: {
    initRecorderInstance() {
      // 采样相关
      const sampleConfig = {
        sampleBits: this.sampleBits, // 采样位数
        sampleRate: this.computedSampleRate, // 采样频率
        numChannels: this.numChannels, // 声道数
      };
      recorderInstance = new Recorder(sampleConfig);
    },
    recorderVoice() {
      if (!this.recorderHelper.hearing) {
        // 录音前重置录音状态
        this.reset();
        this.startRecord();
      } else {
        this.stopRecord();
      }
      this.recorderHelper.hearing = !this.recorderHelper.hearing;
    },
    startRecord() {
      try {
        recorderInstance.start();
        // 回调持续输出时长
        recorderInstance.onprogress = ({ duration }) => {
          this.recorderHelper.duration = duration;
          this.$emit('on-recorder-duration-change', parseFloat(this.recorderHelper.duration.toFixed(2)));
        };
      } catch (err) {
        this.$debug(err);
      }
    },
    stopRecord() {
      recorderInstance.stop();
      const audioBlob = new Blob([recorderInstance.getWAV()], { type: this.audioType });
      this.recorderHelper.size = (audioBlob.size / this.computedUnitDividend).toFixed(2);
      this.$emit('on-recorder-finish', { blob: audioBlob, size: parseFloat(this.recorderHelper.size), unit: this.sizeUnit });
    },
    reset() {
      this.recorderHelper = recorderHelperGenerator();
    },
  },
};
</script>

 <style lang="scss" scoped>
.audio-maker-container {
  display: inline;
  i.ivu-icon {
    cursor: pointer;
  }
}
</style>
https://github.com/2fps/recorder/issues/21
通用组件使用
import AudioMaker from '@/components/audioMaker';
<AudioMaker
  v-if="!recorderAudio.blobUrl"
  @on-recorder-duration-change="durationChange"
  @on-recorder-finish="recorderFinish"
  :maxDuration="audioMakerConfig.maxDuration"
  :maxSize="audioMakerConfig.maxSize"
  :sizeUnit="audioMakerConfig.sizeUnit"
></AudioMaker>

durationChange(duration) {
  this.resetRecorderAudio();
  this.recorderAudio.duration = duration;
},
recorderFinish({ blob, size, unit }) {
  this.recorderAudio.blobUrl = window.URL.createObjectURL(blob);
  this.recorderAudio.size = size;
  this.recorderAudio.unit = unit;
},
releaseBlobMemory(blorUrl) {
  window.URL.revokeObjectURL(blorUrl);
},
总结

最后
以上就是淡淡画板最近收集整理的关于前端语音转文字实践总结的全部内容,更多相关前端语音转文字实践总结内容请搜索靠谱客的其他文章。


发表评论 取消回复