一、前言
前几篇博客,对springcloud的注册中心Eureka做了说明,并且提供者可以注册到注册中心上,客户端可以面向服务的调用Restful接口。有的时候我们需要对提供者做负载均衡,SpringCloudRibbon就为我们提供了负载均衡调用。下面我们就来见识一下Ribbon。
二 、Ribbon是什么?
为负载均衡而生
Spring Cloud Ribbon 是基于HTTP和TCP调用的负载均衡工具,是基于Netflix Ribbon实现的。
我们可以通过Spring Cloud Ribbon把直接从提供者调用的面向服务的调用替换成客户端负载均衡调用。
使用Ribbon也非常简单,就三步:
1.引入Ribbon的依赖 spring-cloud-starter-ribbon
2.消费者通过用@LoadBalanced修饰RestTemplete来调用进行面向服务接口REST调用
3.服务端建立多个实例
三、代码
3.1 架构
-
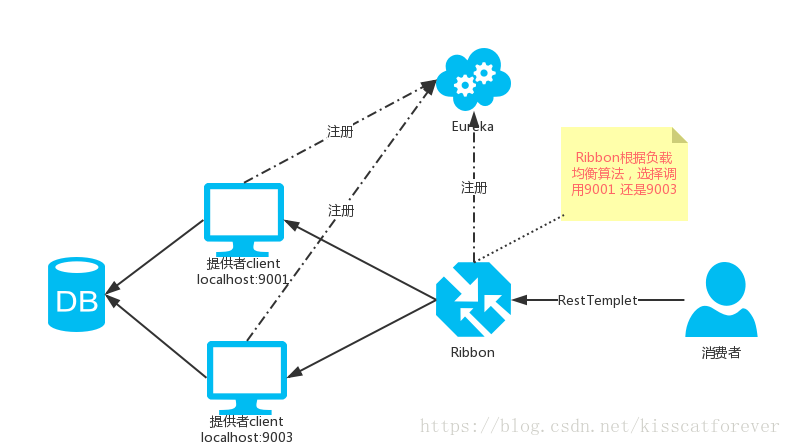
架构中,提供者建立两个,名字都是client1,端口分别是9001和9003.
-
消费者通过RestTempelet来访问,Ribbon通过负载均衡来指导请求去访问那个提供者
3.2 准备工作
-
注册中心 Eureka
-
两台client,端口分别为9001和9003
-
负载均衡 Ribbon
3.3 创建注册中心
这个创建方法,跟前两篇博客一样,就不进行代码展示。
##3.4 创建提供者
client:
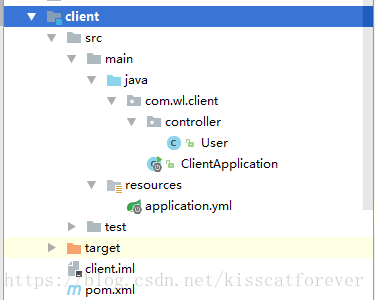
配置文件:
server:
  port: 9001
eureka:
  client:
    serviceUrl:
      defaultZone: http://localhost:8761/eureka/
spring:
  application:
    name: client1
controller方法:
package com.wl.client.controller;

import org.springframework.web.bind.annotation.GetMapping;
import org.springframework.web.bind.annotation.RequestParam;
import org.springframework.web.bind.annotation.RestController;

/**
 * Created by Ares on 2018/4/11.
 */
@RestController
public class User {

    @GetMapping("/user/findById")
    public String findById(@RequestParam("id")String id){
        return "这个是springcloud的客户端1----"+id;
    }


}
clientc:
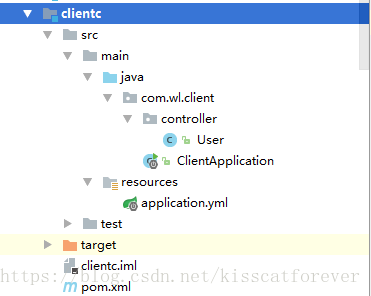
配置文件:
server:
  port: 9003
eureka:
  client:
    serviceUrl:
      defaultZone: http://localhost:8761/eureka/
spring:
  application:
    name: client1
controller:
package com.wl.client.controller;

import org.springframework.web.bind.annotation.GetMapping;
import org.springframework.web.bind.annotation.RequestParam;
import org.springframework.web.bind.annotation.RestController;

/**
 * Created by Ares on 2018/4/11.
 */
@RestController
public class User {

    @GetMapping("/user/findById")
    public String findById(@RequestParam("id")String id){
        return "这个是springcloud的客户端3----"+id;
    }


}
两个的配置文件application.name是相同的,端口号不同。为了在显示的时候区分那个是那个服务,所以在controller上的/user/findById显示的不一样,1为client,3为clientc。
3.5 创建负载均衡ribbon
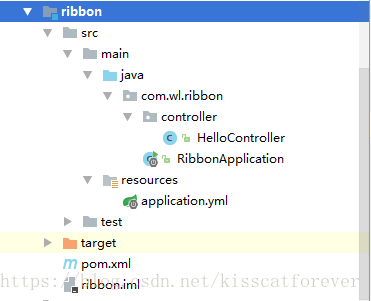
pom文件:
添加spring-cloud-starter-eureka和spring-cloud-starter-ribbon两个坐标。
<?xml version="1.0" encoding="UTF-8"?>
<project xmlns="http://maven.apache.org/POM/4.0.0" xmlns:xsi="http://www.w3.org/2001/XMLSchema-instance"
	xsi:schemaLocation="http://maven.apache.org/POM/4.0.0 http://maven.apache.org/xsd/maven-4.0.0.xsd">
	<modelVersion>4.0.0</modelVersion>

	<groupId>com.wl</groupId>
	<artifactId>ribbon</artifactId>
	<version>0.0.1-SNAPSHOT</version>
	<packaging>jar</packaging>

	<name>ribbon</name>
	<description>Demo project for Spring Boot</description>

	<parent>
        <groupId>org.springframework.boot</groupId>
        <artifactId>spring-boot-starter-parent</artifactId>
        <version>1.5.2.RELEASE</version>
        <relativePath/> <!-- lookup parent from repository -->
    </parent>
<properties>
        <project.build.sourceEncoding>UTF-8</project.build.sourceEncoding>
        <project.reporting.outputEncoding>UTF-8</project.reporting.outputEncoding>
        <java.version>1.8</java.version>
    </properties>
<dependencies>
        <dependency>
            <groupId>org.springframework.cloud</groupId>
            <artifactId>spring-cloud-starter-eureka</artifactId>
        </dependency>
        <dependency>
            <groupId>org.springframework.cloud</groupId>
            <artifactId>spring-cloud-starter-ribbon</artifactId>
        </dependency>
        <dependency>
            <groupId>org.springframework.boot</groupId>
            <artifactId>spring-boot-starter-web</artifactId>
        </dependency>
<dependency>
            <groupId>org.springframework.boot</groupId>
            <artifactId>spring-boot-starter-test</artifactId>
            <scope>test</scope>
        </dependency>
    </dependencies>
<dependencyManagement>
        <dependencies>
            <dependency>
                <groupId>org.springframework.cloud</groupId>
                <artifactId>spring-cloud-dependencies</artifactId>
                <version>Dalston.RC1</version>
                <type>pom</type>
                <scope>import</scope>
            </dependency>
        </dependencies>
    </dependencyManagement>
<build>
        <plugins>
            <plugin>
                <groupId>org.springframework.boot</groupId>
                <artifactId>spring-boot-maven-plugin</artifactId>
            </plugin>
        </plugins>
    </build>
<repositories>
        <repository>
            <id>spring-milestones</id>
            <name>Spring Milestones</name>
            <url>https://repo.spring.io/milestone</url>
            <snapshots>
                <enabled>false</enabled>
            </snapshots>
        </repository>
    </repositories>
</project>
RibbonApplication:
在工程的启动类中,通过@EnableEurekaClient向服务中心注册;并且向程序的ioc注入一个bean: restTemplate;并通过@LoadBalanced注解表明这个restRemplate开启负载均衡的功能。
package com.wl.ribbon;

import org.springframework.boot.SpringApplication;
import org.springframework.boot.autoconfigure.SpringBootApplication;
import org.springframework.cloud.client.loadbalancer.LoadBalanced;
import org.springframework.cloud.netflix.eureka.EnableEurekaClient;
import org.springframework.context.annotation.Bean;
import org.springframework.web.client.RestTemplate;

@SpringBootApplication
@EnableEurekaClient
public class RibbonApplication {

	public static void main(String[] args) {
		SpringApplication.run(RibbonApplication.class, args);
	}


	@Bean
	@LoadBalanced
	RestTemplate restTemplate(){
		return new RestTemplate();
	}
}
HelloController:
写一个controller用于用户访问,这里注入了resttempelet,通过resttempelet的方法进行相关的服务调用。这里url中CLIENT1是服务的名字,因为在前文中的提供者的application.name为CLIENT1,所以我们这里要写这个。
package com.wl.ribbon.controller;

import org.springframework.beans.factory.annotation.Autowired;
import org.springframework.web.bind.annotation.RequestMapping;
import org.springframework.web.bind.annotation.RequestParam;
import org.springframework.web.bind.annotation.RestController;
import org.springframework.web.client.RestTemplate;

/**
 * Created by Ares on 2018/4/18.
 */
@RestController
public class HelloController {

    @Autowired
    RestTemplate restTemplate;

    @RequestMapping(value = "/hi")
    public String hi(@RequestParam("id") String id){
        return  restTemplate.getForObject("http://CLIENT1/user/findById?id="+id,String.class);

    }
}
application.yml:
eureka:
  client:
    service-url:
     defaultZone: http://localhost:8761/eureka/
server:
  port: 7000
spring:
  application:
    name: servie-ribbon
3.6 启动
依次启动Eureka ,client,clientc,ribbon。
在Eureka的监控界面可以看到:两个提供者和ribbon都注册上来了。
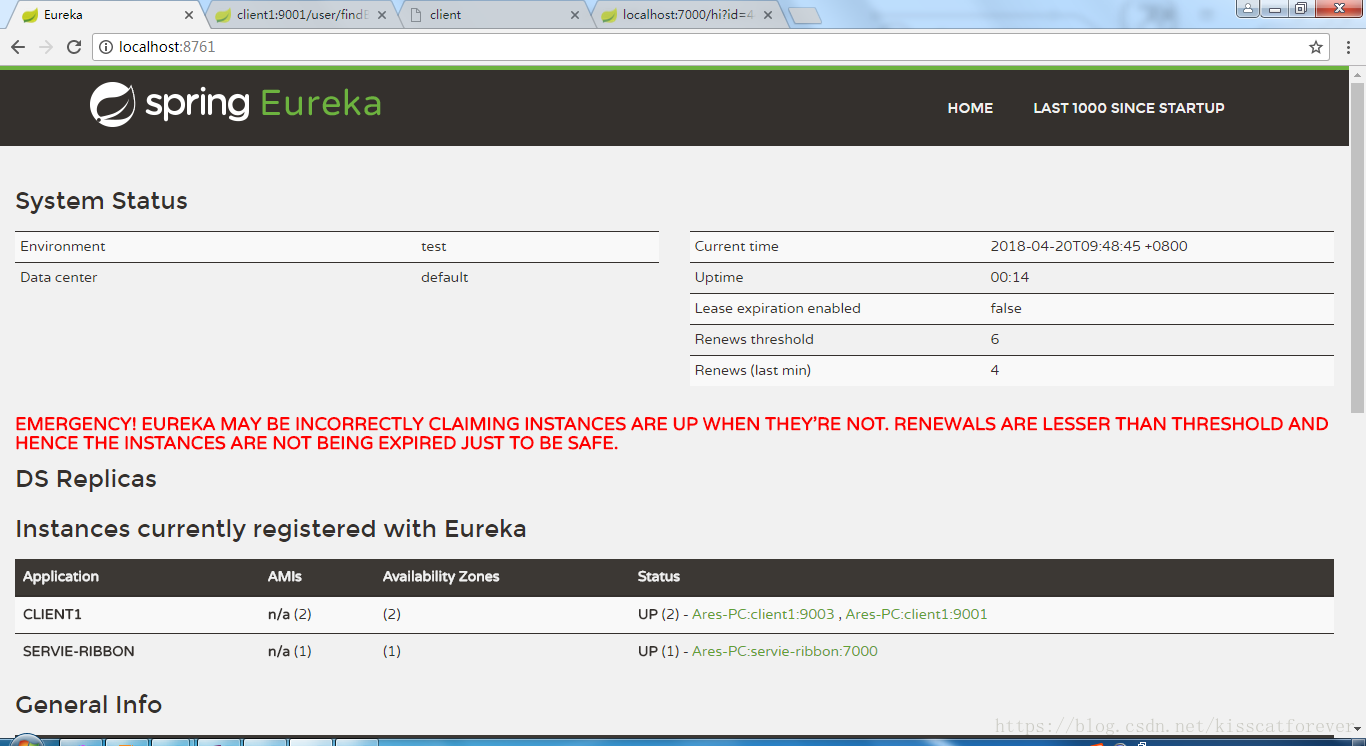
通过http://localhost:7000/hi?id=wl多次访问,会看到依次出现
这个是springcloud的客户端3wl

这个是springcloud的客户端1wl

多次访问,多次访问不同的提供者,这样就实现了负载均衡。
四、小结
通过这次操练,可以很好的熟悉springcloud中的这个核心组件ribbon。下面会向大家带来,ribbon的负载均衡策略。
最后
以上就是安详唇彩最近收集整理的关于【Spring Cloud】分布式必学springcloud(四)——客户端负载均衡Ribbon一、前言二 、Ribbon是什么?三、代码四、小结的全部内容,更多相关【Spring内容请搜索靠谱客的其他文章。


发表评论 取消回复