感觉Dubbo涉及的知识点非常多,在这里我们以学习为目的,遇到相关知识点都展开来详细介绍,这也是一个学习的过程。
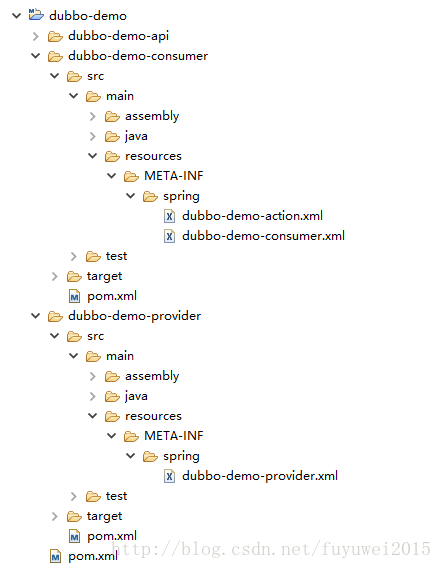
由于Dubbo的启动注册都是依赖Spring的加载来实现的,我们先来分析下Spring Bean的加载过程。在Dubbo的源码中有个dubbo-demo工程

Spring 可扩展Schema
在继续之前我们先学习下如何通过配置文件生成实现类对象
基于 Spring 可扩展 Schema 提供自定义配置支持
在很多情况下,我们需要为系统提供可配置化支持,简单的做法可以直接基于Spring的标准Bean来配置,但配置较为复杂或者需要更多丰富控制的时候,会显得非常笨拙。一般的做法会用原生态的方式去解析定义好的xml文件,然后转化为配置对象,这种方式当然可以解决所有问题,但实现起来比较繁琐,特别是是在配置非常复杂的时候,解析工作是一个不得不考虑的负担。Spring提供了可扩展Schema的支持,这是一个不错的折中方案,完成一个自定义配置一般需要以下步骤:
1、设计配置属性和JavaBean
2、编写XSD文件
3、编写NamespaceHandler和BeanDefinitionParser完成解析工作
4、编写spring.handlers和spring.schemas串联起所有部件
5、在Bean文件中应用
1、设计配置属性和JavaBean
id默认需要
public class People {
    private String id;
    private String name;
    private Integer age;
}
2、编写XSD文件
为上一步设计好的配置项编写XSD文件,XSD是schema的定义文件,配置的输入和解析输出都是以XSD为契约,本例中XSD如下:
<?xml version="1.0" encoding="UTF-8"?>
<xsd:schema
    xmlns="http://blog.csdn.net/fuyuwei2015/schema/people"
    xmlns:xsd="http://www.w3.org/2001/XMLSchema"
    xmlns:beans="http://www.springframework.org/schema/beans"
    targetNamespace="http://blog.csdn.net/fuyuwei2015/schema/people"
    elementFormDefault="qualified"
    attributeFormDefault="unqualified">
    <xsd:import namespace="http://www.springframework.org/schema/beans" />
    <xsd:element name="people">
        <xsd:complexType>
            <xsd:complexContent>
                <xsd:extension base="beans:identifiedType">
                    <xsd:attribute name="name" type="xsd:string" />
                    <xsd:attribute name="age" type="xsd:int" />
                </xsd:extension>
            </xsd:complexContent>
        </xsd:complexType>
    </xsd:element>
</xsd:schema>
关于xsd:schema的各个属性具体含义就不作过多解释,可以参见http://www.w3school.com.cn/schema/schema_schema.asp
对应着配置项节点的名称,因此在应用中会用people作为节点名来引用这个配置
和对应着配置项people的两个属性名,因此在应用中可以配置name和age两个属性,分别是string和int类型完成后需把xsd存放在classpath下,一般都放在META-INF目录下(本例就放在这个目录下)
3、编写NamespaceHandler和BeanDefinitionParser完成解析工作
public class MyNamespaceHandler extends NamespaceHandlerSupport {
    public void init() {
        registerBeanDefinitionParser("people", new PeopleBeanDefinitionParser());
    }
}
其中registerBeanDefinitionParser(“people”, new PeopleBeanDefinitionParser());就是用来把节点名和解析类联系起来,在配置中引用people配置项时,就会用PeopleBeanDefinitionParser来解析配置。PeopleBeanDefinitionParser就是本例中的解析类:
import org.springframework.beans.factory.support.BeanDefinitionBuilder;
import org.springframework.beans.factory.xml.AbstractSingleBeanDefinitionParser;
import org.springframework.util.StringUtils;
import org.w3c.dom.Element;
public class PeopleBeanDefinitionParser extends AbstractSingleBeanDefinitionParser {
    protected Class getBeanClass(Element element) {
        return People.class;
    }
    protected void doParse(Element element, BeanDefinitionBuilder bean) {
        String name = element.getAttribute("name");
        String age = element.getAttribute("age");
        String id = element.getAttribute("id");
        if (StringUtils.hasText(id)) {
            bean.addPropertyValue("id", id);
        }
        if (StringUtils.hasText(name)) {
            bean.addPropertyValue("name", name);
        }
        if (StringUtils.hasText(age)) {
            bean.addPropertyValue("age", Integer.valueOf(age));
        }
    }
}
其中element.getAttribute就是用配置中取得属性值,bean.addPropertyValue就是把属性值放到bean中。
http://blog.csdn.net/fuyuwei2015/schema/people=study.schemaExt.MyNamespaceHandler以上表示当使用到名为”http://blog.csdn.net/fuyuwei2015/schema/people“的schema引用时,
会通过study.schemaExt.MyNamespaceHandler来完成解析
spring.schemas如下所示:
http://blog.csdn.net/fuyuwei2015/schema/people.xsd=META-INF/people.xsd以上就是载入xsd文件
4、编写spring.handlers和spring.schemas串联起所有部件
到此为止一个简单的自定义配置以完成,可以在具体应用中使用了。使用方法很简单,和配置一个普通的spring bean类似,只不过需要基于我们自定义schema,本例中引用方式如下所示:
<beans xmlns="http://www.springframework.org/schema/beans"
    xmlns:xsi="http://www.w3.org/2001/XMLSchema-instance"
    xmlns:fuyuwei2015="http://blog.csdn.net/fuyuwei2015/schema/people"
    xsi:schemaLocation="
http://www.springframework.org/schema/beans http://www.springframework.org/schema/beans/spring-beans-2.5.xsd
http://blog.csdn.net/fuyuwei2015/schema/people http://blog.csdn.net/fuyuwei2015/schema/people.xsd">
    <cutesource:people id="fuyuwei2015" name="孙悟空" age="500"/>
</beans> 其中xmlns:fuyuwei2015=”http://blog.csdn.net/fuyuwei2015/schema/people”是用来指定自定义schema,xsi:schemaLocation用来指定xsd文件。<fuyuwei2015:people id="fuyuwei2015" name="孙悟空" age="500"/>是一个具体的自定义配置使用实例。最后就可以在具体程序中使用基本的bean载入方式来载入我们的自定义配置对象了,如:
5、在Bean文件中应用
ApplicationContext ctx = new ClassPathXmlApplicationContext("application.xml");
People p = (People)ctx.getBean("cutesource");
System.out.println(p.getId());
System.out.println(p.getName());
System.out.println(p.getAge());
看完上面那个例子我们再来分析下dubbo加载过程可能就有点眉目了。
我们先来分析下dubbo-demo-provider,首先我们看下dubbo-demo-provider的配置
<beans xmlns="http://www.springframework.org/schema/beans"
    xmlns:xsi="http://www.w3.org/2001/XMLSchema-instance"
    xmlns:dubbo="http://code.alibabatech.com/schema/dubbo"
    xsi:schemaLocation="http://www.springframework.org/schema/beans http://www.springframework.org/schema/beans/spring-beans-2.5.xsd
    http://code.alibabatech.com/schema/dubbo http://code.alibabatech.com/schema/dubbo/dubbo.xsd">

    <bean id="demoService" class="com.alibaba.dubbo.demo.provider.DemoServiceImpl" />

    <dubbo:service interface="com.alibaba.dubbo.demo.DemoService" ref="demoService" />

</beans>
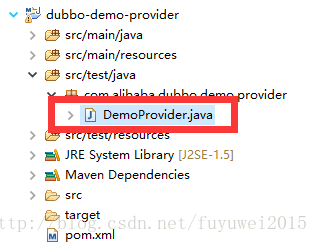
我们来看下这个配置文件时在什么地方加载的,在dubbo-demo-provider中有个DemoProvider.java

源码如下
public class DemoProvider {
    public static void main(String[] args) {
        com.alibaba.dubbo.container.Main.main(args);
    }
}
我们进一步看下Main.main实现过程
public class Main {
    public static final String CONTAINER_KEY = "dubbo.container";
    public static final String SHUTDOWN_HOOK_KEY = "dubbo.shutdown.hook";

    private static final Logger logger = LoggerFactory.getLogger(Main.class);
    private static final ExtensionLoader<Container> loader = ExtensionLoader.getExtensionLoader(Container.class);

    private static volatile boolean running = true;
    /**
     * 启动发布
     * @author fuyuwei
     * 2017年6月4日 下午10:01:16
     * @param args
     */
    public static void main(String[] args) {
        try {
            // 开始判断main函数的传入参数,在args参数为空的情况下,从部署环境中取得dubbo.container属性,
            if (args == null || args.length == 0) {
                // 读取dubbo.properties中dubbo.container属性值,为空时通过loader.getDefaultExtensionName()获取默认值
                String config = ConfigUtils.getProperty(CONTAINER_KEY, loader.getDefaultExtensionName());
                args = Constants.COMMA_SPLIT_PATTERN.split(config);
            }

            final List<Container> containers = new ArrayList<Container>();
            // 遍历获取指定名称的扩展加入到列表中
            for (int i = 0; i < args.length; i ++) {
                containers.add(loader.getExtension(args[i]));
            }
            logger.info("Use container type(" + Arrays.toString(args) + ") to run dubbo serivce.");

            // 添加jvm关闭的钩子,用来在jvm关闭时关闭容器
            if ("true".equals(System.getProperty(SHUTDOWN_HOOK_KEY))) {
                Runtime.getRuntime().addShutdownHook(new Thread() {
                    public void run() {
                        for (Container container : containers) {
                            try {
                                container.stop();
                                logger.info("Dubbo " + container.getClass().getSimpleName() + " stopped!");
                            } catch (Throwable t) {
                                logger.error(t.getMessage(), t);
                            }
                            synchronized (Main.class) {
                                running = false;
                                Main.class.notify();
                            }
                        }
                    }
                });
            }

            // 启动服务
            for (Container container : containers) {
                container.start();
                logger.info("Dubbo " + container.getClass().getSimpleName() + " started!");
            }
            System.out.println(new SimpleDateFormat("[yyyy-MM-dd HH:mm:ss]").format(new Date()) + " Dubbo service server started!");
        } catch (RuntimeException e) {
            e.printStackTrace();
            logger.error(e.getMessage(), e);
            System.exit(1);
        }
        synchronized (Main.class) {
            while (running) {
                try {
                    Main.class.wait();
                } catch (Throwable e) {
                }
            }
        }
    }
看到这里我们发现程序一旦启动就一直在运行,但是我们还是没有到如何加载dubbo-demo-provider配置文件的,不要着急,我们继续看start和stop方法
public class SpringContainer implements Container {
    private static final Logger logger = LoggerFactory.getLogger(SpringContainer.class);
    public static final String SPRING_CONFIG = "dubbo.spring.config";

    public static final String DEFAULT_SPRING_CONFIG = "classpath*:META-INF/spring/*.xml";
    static ClassPathXmlApplicationContext context;

    public static ClassPathXmlApplicationContext getContext() {
        return context;
    }
    public void start() {
        String configPath = ConfigUtils.getProperty(SPRING_CONFIG);
        if (configPath == null || configPath.length() == 0) {
            configPath = DEFAULT_SPRING_CONFIG;
        }
        context = new ClassPathXmlApplicationContext(configPath.split("[,\s]+"));
        context.start();
    }
    public void stop() {
        try {
            if (context != null) {
                context.stop();
                context.close();
                context = null;
            }
        } catch (Throwable e) {
            logger.error(e.getMessage(), e);
        }
    }
}
终于找到了加载dubbo-demo-provider.xml地方,这里是通过ClassPathXmlApplicationContext来启动和停止的。Spring在解析xml文件时遇到dubbo名称空间时,会回调DubboNamespaceHandler,对所有dubbo的标签,都统一用DubboBeanDefinitionParser进行解析,基于一对一属性映射,将XML标签解析为Bean对象。例如

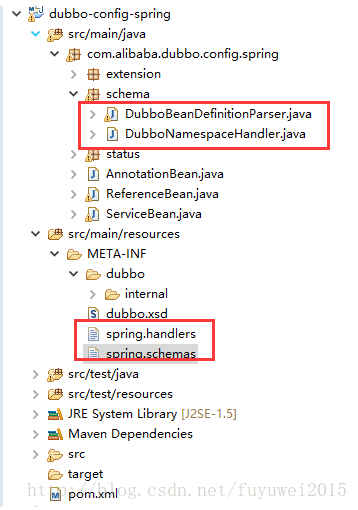
1、基于dubbo.jar内的META-INF/spring.handlers配置,Spring在遇到dubbo名称空间时,会回调DubboNamespaceHandler。
2、所有dubbo的标签,都统一用DubboBeanDefinitionParser进行解析,基于一对一属性映射,将XML标签解析为Bean对象。
3、在ServiceConfig.export()或ReferenceConfig.get()初始化时,将Bean对象转换URL格式,所有Bean属性转成URL的参数。
4、然后将URL传给Protocol扩展点,基于扩展点的Adaptive机制,根据URL的协议头,进行不同协议的服务暴露或引用。
我们看下DubboNamespaceHandler和DubboBeanDefinitionParser源码实现
public class DubboNamespaceHandler extends NamespaceHandlerSupport {
    static {
        Version.checkDuplicate(DubboNamespaceHandler.class);
    }
    /**
     * 用来把节点名和解析类联系起来,在配置中引用<dubbo:service等配置项时,就会用DubboBeanDefinitionParser来解析配置
     */
    public void init() {
        registerBeanDefinitionParser("application", new DubboBeanDefinitionParser(ApplicationConfig.class, true));
        registerBeanDefinitionParser("module", new DubboBeanDefinitionParser(ModuleConfig.class, true));
        registerBeanDefinitionParser("registry", new DubboBeanDefinitionParser(RegistryConfig.class, true));
        registerBeanDefinitionParser("monitor", new DubboBeanDefinitionParser(MonitorConfig.class, true));
        registerBeanDefinitionParser("provider", new DubboBeanDefinitionParser(ProviderConfig.class, true));
        registerBeanDefinitionParser("consumer", new DubboBeanDefinitionParser(ConsumerConfig.class, true));
        registerBeanDefinitionParser("protocol", new DubboBeanDefinitionParser(ProtocolConfig.class, true));
        registerBeanDefinitionParser("service", new DubboBeanDefinitionParser(ServiceBean.class, true));
        registerBeanDefinitionParser("reference", new DubboBeanDefinitionParser(ReferenceBean.class, false));
        registerBeanDefinitionParser("annotation", new DubboBeanDefinitionParser(AnnotationBean.class, true));
    }
}
从这里也可以看到,对应的支持的标签其实不多。所有的 Parser 都封装到了DubboBeanDefinitionParser 中。对应的 class,就是传入的 beanClass。比如 application 的就是ApplicationConfig。 module 的就是 ModuleConfig。经过 Parser 的转换, provider.xml 大概可以
变成如下的样子(具体的解析不多解释了)
<bean id="hello-world-app" class="com.alibaba.dubbo.config.ApplicationConfig"/>
<bean id="registryConfig" class="com.alibaba.dubbo.config.RegistryConfig">
<property name="address" value="10.125.195.174:2181"/>
<property name="protocol" value="zookeeper"/>
</bean>
<bean id="dubbo" class="com.alibaba.dubbo.config.ProtocolConfig">
<property name="port" value="20880"/>
</bean>
<bean id="demo.service.DemoService" class="com.alibaba.dubbo.config.spring.ServiceBean">
<property name="interface" value="demo.service.DemoService"/>
<property name="ref" ref="demoService"/>
</bean>
<bean id="demoService" class="demo.service.DemoServiceImpl" />
DubboBeanDefinitionParser就类似我们上面提到的例子PeopleBeanDefinitionParser 来解析配置文件,由于Dubbo的配置比较复杂,PeopleBeanDefinitionParser 的解析方法也尤为复杂我们可以简单看下这里就不一一解释
  @SuppressWarnings("unchecked")
    private static BeanDefinition parse(Element element, ParserContext parserContext, Class<?> beanClass, boolean required) {
        RootBeanDefinition beanDefinition = new RootBeanDefinition();
        beanDefinition.setBeanClass(beanClass);
        beanDefinition.setLazyInit(false);
        String id = element.getAttribute("id");
        if ((id == null || id.length() == 0) && required) {
            String generatedBeanName = element.getAttribute("name");
            if (generatedBeanName == null || generatedBeanName.length() == 0) {
                if (ProtocolConfig.class.equals(beanClass)) {
                    generatedBeanName = "dubbo";
                } else {
                    generatedBeanName = element.getAttribute("interface");
                }
            }
            if (generatedBeanName == null || generatedBeanName.length() == 0) {
                generatedBeanName = beanClass.getName();
            }
            id = generatedBeanName;
            int counter = 2;
            while(parserContext.getRegistry().containsBeanDefinition(id)) {
                id = generatedBeanName + (counter ++);
            }
        }
        if (id != null && id.length() > 0) {
            if (parserContext.getRegistry().containsBeanDefinition(id))  {
                throw new IllegalStateException("Duplicate spring bean id " + id);
            }
            parserContext.getRegistry().registerBeanDefinition(id, beanDefinition);
            beanDefinition.getPropertyValues().addPropertyValue("id", id);
        }
        if (ProtocolConfig.class.equals(beanClass)) {
            for (String name : parserContext.getRegistry().getBeanDefinitionNames()) {
                BeanDefinition definition = parserContext.getRegistry().getBeanDefinition(name);
                PropertyValue property = definition.getPropertyValues().getPropertyValue("protocol");
                if (property != null) {
                    Object value = property.getValue();
                    if (value instanceof ProtocolConfig && id.equals(((ProtocolConfig) value).getName())) {
                        definition.getPropertyValues().addPropertyValue("protocol", new RuntimeBeanReference(id));
                    }
                }
            }
        } else if (ServiceBean.class.equals(beanClass)) {
            String className = element.getAttribute("class");
            if(className != null && className.length() > 0) {
                RootBeanDefinition classDefinition = new RootBeanDefinition();
                classDefinition.setBeanClass(ReflectUtils.forName(className));
                classDefinition.setLazyInit(false);
                parseProperties(element.getChildNodes(), classDefinition);
                beanDefinition.getPropertyValues().addPropertyValue("ref", new BeanDefinitionHolder(classDefinition, id + "Impl"));
            }
        } else if (ProviderConfig.class.equals(beanClass)) {
            parseNested(element, parserContext, ServiceBean.class, true, "service", "provider", id, beanDefinition);
        } else if (ConsumerConfig.class.equals(beanClass)) {
            parseNested(element, parserContext, ReferenceBean.class, false, "reference", "consumer", id, beanDefinition);
        }
        Set<String> props = new HashSet<String>();
        ManagedMap parameters = null;
        for (Method setter : beanClass.getMethods()) {
            String name = setter.getName();
            if (name.length() > 3 && name.startsWith("set")
                    && Modifier.isPublic(setter.getModifiers())
                    && setter.getParameterTypes().length == 1) {
                Class<?> type = setter.getParameterTypes()[0];
                String property = StringUtils.camelToSplitName(name.substring(3, 4).toLowerCase() + name.substring(4), "-");
                props.add(property);
                Method getter = null;
                try {
                    getter = beanClass.getMethod("get" + name.substring(3), new Class<?>[0]);
                } catch (NoSuchMethodException e) {
                    try {
                        getter = beanClass.getMethod("is" + name.substring(3), new Class<?>[0]);
                    } catch (NoSuchMethodException e2) {
                    }
                }
                if (getter == null
                        || ! Modifier.isPublic(getter.getModifiers())
                        || ! type.equals(getter.getReturnType())) {
                    continue;
                }
                if ("parameters".equals(property)) {
                    parameters = parseParameters(element.getChildNodes(), beanDefinition);
                } else if ("methods".equals(property)) {
                    parseMethods(id, element.getChildNodes(), beanDefinition, parserContext);
                } else if ("arguments".equals(property)) {
                    parseArguments(id, element.getChildNodes(), beanDefinition, parserContext);
                } else {
                    String value = element.getAttribute(property);
                    if (value != null) {
                        value = value.trim();
                        if (value.length() > 0) {
                            if ("registry".equals(property) && RegistryConfig.NO_AVAILABLE.equalsIgnoreCase(value)) {
                                RegistryConfig registryConfig = new RegistryConfig();
                                registryConfig.setAddress(RegistryConfig.NO_AVAILABLE);
                                beanDefinition.getPropertyValues().addPropertyValue(property, registryConfig);
                            } else if ("registry".equals(property) && value.indexOf(',') != -1) {
                                parseMultiRef("registries", value, beanDefinition, parserContext);
                            } else if ("provider".equals(property) && value.indexOf(',') != -1) {
                                parseMultiRef("providers", value, beanDefinition, parserContext);
                            } else if ("protocol".equals(property) && value.indexOf(',') != -1) {
                                parseMultiRef("protocols", value, beanDefinition, parserContext);
                            } else {
                                Object reference;
                                if (isPrimitive(type)) {
                                    if ("async".equals(property) && "false".equals(value)
                                            || "timeout".equals(property) && "0".equals(value)
                                            || "delay".equals(property) && "0".equals(value)
                                            || "version".equals(property) && "0.0.0".equals(value)
                                            || "stat".equals(property) && "-1".equals(value)
                                            || "reliable".equals(property) && "false".equals(value)) {
                                        // 兼容旧版本xsd中的default值
                                        value = null;
                                    }
                                    reference = value;
                                } else if ("protocol".equals(property)
                                        && ExtensionLoader.getExtensionLoader(Protocol.class).hasExtension(value)
                                        && (! parserContext.getRegistry().containsBeanDefinition(value)
                                                || ! ProtocolConfig.class.getName().equals(parserContext.getRegistry().getBeanDefinition(value).getBeanClassName()))) {
                                    if ("dubbo:provider".equals(element.getTagName())) {
                                        logger.warn("Recommended replace <dubbo:provider protocol="" + value + "" ... /> to <dubbo:protocol name="" + value + "" ... />");
                                    }
                                    // 兼容旧版本配置
                                    ProtocolConfig protocol = new ProtocolConfig();
                                    protocol.setName(value);
                                    reference = protocol;
                                } else if ("monitor".equals(property)
                                        && (! parserContext.getRegistry().containsBeanDefinition(value)
                                                || ! MonitorConfig.class.getName().equals(parserContext.getRegistry().getBeanDefinition(value).getBeanClassName()))) {
                                    // 兼容旧版本配置
                                    reference = convertMonitor(value);
                                } else if ("onreturn".equals(property)) {
                                    int index = value.lastIndexOf(".");
                                    String returnRef = value.substring(0, index);
                                    String returnMethod = value.substring(index + 1);
                                    reference = new RuntimeBeanReference(returnRef);
                                    beanDefinition.getPropertyValues().addPropertyValue("onreturnMethod", returnMethod);
                                } else if ("onthrow".equals(property)) {
                                    int index = value.lastIndexOf(".");
                                    String throwRef = value.substring(0, index);
                                    String throwMethod = value.substring(index + 1);
                                    reference = new RuntimeBeanReference(throwRef);
                                    beanDefinition.getPropertyValues().addPropertyValue("onthrowMethod", throwMethod);
                                } else {
                                    if ("ref".equals(property) && parserContext.getRegistry().containsBeanDefinition(value)) {
                                        BeanDefinition refBean = parserContext.getRegistry().getBeanDefinition(value);
                                        if (! refBean.isSingleton()) {
                                            throw new IllegalStateException("The exported service ref " + value + " must be singleton! Please set the " + value + " bean scope to singleton, eg: <bean id="" + value+ "" scope="singleton" ...>");
                                        }
                                    }
                                    reference = new RuntimeBeanReference(value);
                                }
                                beanDefinition.getPropertyValues().addPropertyValue(property, reference);
                            }
                        }
                    }
                }
            }
        }
        NamedNodeMap attributes = element.getAttributes();
        int len = attributes.getLength();
        for (int i = 0; i < len; i++) {
            Node node = attributes.item(i);
            String name = node.getLocalName();
            if (! props.contains(name)) {
                if (parameters == null) {
                    parameters = new ManagedMap();
                }
                String value = node.getNodeValue();
                parameters.put(name, new TypedStringValue(value, String.class));
            }
        }
        if (parameters != null) {
            beanDefinition.getPropertyValues().addPropertyValue("parameters", parameters);
        }
        return beanDefinition;
    }
下面我们分析下ServiceConfig.export和ReferenceConfig.get何时调用,ServiceBean.java和ReferenceBean.java分别继承了这两个类,ServiceBean.java是服务提供方的类
public class ServiceBean<T> extends ServiceConfig<T> implements InitializingBean, DisposableBean, ApplicationContextAware,
ApplicationListener, BeanNameAware ServiceBean继承了ServiceConfig,并且实现了一些列的Spring接口。实现了InitializingBean,所以在bean的创建过程中,每个接口配置<dubbo:service ...>被解析成ServiceBean实例, 其在初始化后,会调用afterPropertiesSet()方法完成整个dubbo配置的加载过程;实现了ApplicationListener,所以会在整个Spring容器加载完成后接收到消息,完成onApplicationEvent()方法的调用,该方法就会将该ServiceBean配置的接口等服务进行发布和注册。
afterPropertiesSet代码如下:
public void afterPropertiesSet() throws Exception {
        if (getProvider() == null) {
            Map<String, ProviderConfig> providerConfigMap = applicationContext == null ? null  : BeanFactoryUtils.beansOfTypeIncludingAncestors(applicationContext, ProviderConfig.class, false, false);
            if (providerConfigMap != null && providerConfigMap.size() > 0) {
                Map<String, ProtocolConfig> protocolConfigMap = applicationContext == null ? null  : BeanFactoryUtils.beansOfTypeIncludingAncestors(applicationContext, ProtocolConfig.class, false, false);
                if ((protocolConfigMap == null || protocolConfigMap.size() == 0)
                        && providerConfigMap.size() > 1) { // 兼容旧版本
                    List<ProviderConfig> providerConfigs = new ArrayList<ProviderConfig>();
                    for (ProviderConfig config : providerConfigMap.values()) {
                        if (config.isDefault() != null && config.isDefault().booleanValue()) {
                            providerConfigs.add(config);
                        }
                    }
                    if (providerConfigs.size() > 0) {
                        setProviders(providerConfigs);
                    }
                } else {
                    ProviderConfig providerConfig = null;
                    for (ProviderConfig config : providerConfigMap.values()) {
                        if (config.isDefault() == null || config.isDefault().booleanValue()) {
                            if (providerConfig != null) {
                                throw new IllegalStateException("Duplicate provider configs: " + providerConfig + " and " + config);
                            }
                            providerConfig = config;
                        }
                    }
                    if (providerConfig != null) {
                        setProvider(providerConfig);
                    }
                }
            }
        }
由于类实现了ApplicationListener接口,如下
public interface ApplicationListener
    extends EventListener
{
    public abstract void onApplicationEvent(ApplicationEvent applicationevent);
}
所以在Spring容器加载完毕之后会调用onApplicationEvent方法,代码如下
    public void onApplicationEvent(ApplicationEvent event) {
        if (ContextRefreshedEvent.class.getName().equals(event.getClass().getName())) {
            if (isDelay() && ! isExported() && ! isUnexported()) {
                if (logger.isInfoEnabled()) {
                    logger.info("The service ready on spring started. service: " + getInterface());
                }
                export();
            }
        }
    }
在这里我们看到了export()方法。
下面我看服务消费方的ReferenceBean.java
public class ReferenceBean<T> extends ReferenceConfig<T> implements FactoryBean, ApplicationContextAware, InitializingBean, DisposableBean ReferenceBean继承了ReferenceConfig,原理对应ServiceBean和ServiceConfig。不同之处在于,服务提供方ServiceBean需要在Spring启动的时候就提供服务,所以是通过onApplicationEvent在容器初始化完成之后立即就发布和注册了服务;但是服务消费方ReferenceBean是在程序需要的时候才会去执行,如果通过配置在Spring启动的过程中完成初始化是并不是合适的做法,而是在应用程序需要用到的时候,再去创建,所以ReferenceBean实现了FactoryBean,实现了接口方法getObject(),那么在spring容器getBean()方法获取对象实例其实调用的是ReferenceBean的getObject()方法完成消费地址的注册以及服务的订阅;
public interface FactoryBean
{
    public abstract Object getObject()
        throws Exception;
    public abstract Class getObjectType();
    public abstract boolean isSingleton();
}
我们看些getObject的实现
 public Object getObject() throws Exception {
        return get();
    }
在这里我们看到get方法。至此,ServiceConfig.export()和ReferenceConfig.get()方法我们都已经找到,这就是dubbo源码中Spring Bean加载的大致过程,还有很多细节值得我们去探讨。
最后
以上就是苗条冥王星最近收集整理的关于精通Dubbo——dubbo2.0源码中Spring Bean的加载Spring 可扩展Schema的全部内容,更多相关精通Dubbo——dubbo2.0源码中Spring内容请搜索靠谱客的其他文章。


发表评论 取消回复