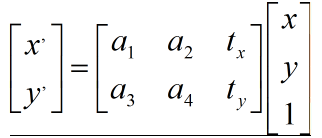
这几天再看STN网络,即空间变换网络,里面设计到双线性插值。算法虽老,但是并没有去看过,只是简单使用opencv调用过。闲来无事,就使用numpy库实现下整个流程。我认为只有代码才能让我清楚了解里面的每一步,现在对整个代码进行注释分析,方便大家理解双线性插值算法。大家可以查看这篇文章:https://blog.csdn.net/sinat_33718563/article/details/78825971。图像空间坐标变化公式如下:

a表示图像坐标选择缩放等等仿射参数,t参数表示图像偏移信息量。有了这个(2,3)的仿射矩阵,就可以得到图像的空间变化坐标信息。

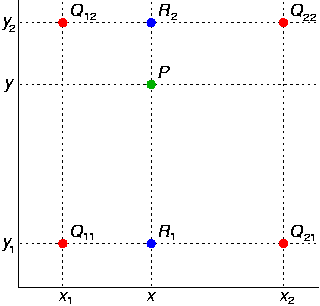
双线性插值,就是已知Q12,22,21,11的坐标的像素值,去求p点的像素值。其中公式如下:

因为我们是在挑选边长为1的正方形的四个角的像素值,所以(x2-x1)(y2-y1)的值为1,故公式可以简化。具体代码可以看下面的注释,如有不太明白,请留言反馈。
#coding:utf-8
import numpy as np
import cv2
#######该函数建立目标图像的像素网格,网格大小为图像高×宽,取值范围为-1,1.返回值为形状为(3,h*w)的numpy矩阵
#######[0,:]为x轴网格点   [1,:]为y轴网格点    [2,:]为1  为了进行矩阵相乘,相当与偏置
def regular_grids(img_h,img_w):
    x_linspace = np.linspace(-1,1,img_w)
    y_linspace = np.linspace(-1,1,img_h)
    x_coord,y_coord = np.meshgrid(x_linspace,y_linspace)
    x_coord = x_coord.flatten()
    y_coord = y_coord.flatten()
    ones = np.ones_like(x_coord)
    x_y_grid = np.concatenate([x_coord,y_coord,ones],axis=0)
    return np.reshape(x_y_grid,(3,img_h*img_w))
########输入参数:原图,变化后的坐标(x,y),输出图片的尺寸
def interpolation(img,sample_grid,output_size):

    height,width,num_channels = img.shape
    x = sample_grid[0,:].astype(np.float32) ####sample_grid分别保存了输出图片的网格dot仿射矩阵后的新坐标(x,y)
    y = sample_grid[1,:].astype(np.float32)
    x = 0.5 *(x+1.0)*float(width)  ####网格初始取值范围(-1,1)  +1乘以w除以0.5 变化到对应原始图片坐标
    y = 0.5 *(y+1.0)*float(height)
    x_0 = x.astype(np.int32)   ####向下取整   x_0,x_1,y_0,y_1分别代表左上和右下坐标点
    x_1 = x_0+1               #####加1
    y_0 = y.astype(np.int32)
    y_1 = y_0+1
    max_x = width-1
    max_y = height-1
    ##########进行剪裁,防止(x,y)索引超过原始图片的宽高
    x_0 = np.clip(x_0,0,max_x)
    x_1 = np.clip(x_1,0,max_x)
    y_0 = np.clip(y_0,0,max_y)
    y_1 = np.clip(y_1,0,max_y)
    #########建立索引矩阵,用于挑选原始图像中的像素值 大小为输出图像的宽×高
    base = np.zeros(shape=(output_size[0],output_size[1]),dtype='int32').flatten()

    base_y0 = base+(y_0*width) ######找到y_0,y_1在原始矩阵中的索引   因为y代表图像第y行 所以需要乘以原始图片的宽,
    base_y1 = base+(y_1*width)
    #######加上x轴坐标,找到原始图片的具体像素值索引位置
    indices_a = base_y0+x_0  ###左上像素索引位置
    indices_b = base_y1+x_0  ###左下像素索引位置
    indices_c = base_y0+x_1  ###右上
    indices_d = base_y1+x_1  ###右下
    ########挑选出对应索引位置的像素信息值
    img_flatten = np.reshape(img,newshape=(-1,num_channels))
    pixel_values_a = img_flatten[indices_a,:]
    pixel_values_b = img_flatten[indices_b,:]
    pixel_values_c = img_flatten[indices_c,:]
    pixel_values_d = img_flatten[indices_d,:]
    #####转换为float型进行计算
    x_0 = x_0.astype(np.float32)
    x_1 = x_1.astype(np.float32)
    y_0 = y_0.astype(np.float32)
    y_1 = y_1.astype(np.float32)
    #####计算各个区域的值,area_a+area_b+area_c+area_d 的值非0即1
    area_a = np.expand_dims(((x_1 - x) * (y_1 - y)), 1)  ###单位面积1的方格中,右下部分面积
    area_b = np.expand_dims(((x_1 - x) * (y - y_0)), 1)  ####右上面积
    area_c = np.expand_dims(((x - x_0) * (y_1 - y)), 1)  ####左下面积
    area_d = np.expand_dims(((x - x_0) * (y - y_0)), 1)  ####左上面积
    values_a = area_a * pixel_values_a  ### 右下面积乘以左上像素值
    values_b = area_b * pixel_values_b  ### 右上面积乘以左下像素值
    values_c = area_c * pixel_values_c  ### 左下面积乘以右上像素值
    values_d = area_d * pixel_values_d  ### 左上面积乘以右下像素值
    ###相加就是实际插入像素值
    return values_a + values_b + values_c + values_d
def transform(img,affine_matrix,output_size):
    num_channels = img.shape[2]
    ###affine_matrix.shape = (2,3)
    regular_grid = regular_grids(*output_size)
    sample_grid = np.dot(affine_matrix,regular_grid)
    final_img = interpolation(img,sample_grid,output_size)
    final_img = final_img.astype(np.uint8)
    final_img = np.reshape(final_img,(output_size[0],output_size[1],num_channels))
    return final_img
if __name__ == '__main__':
    affine_matrix = np.array([[1.5,0,0],[0,1.5,0]])
    img = cv2.imread('./test.jpg',1)
    final =transform(img,affine_matrix,output_size=(500,500))
    # cv2.imshow('img',final)
    # cv2.waitKey()
test图片,该图片是用于字符定位的素材,平常也做一些该方面的实验。

最后
以上就是知性芝麻最近收集整理的关于双线性插值代码讲解(bilinear_interpolation)的全部内容,更多相关双线性插值代码讲解(bilinear_interpolation)内容请搜索靠谱客的其他文章。
本图文内容来源于网友提供,作为学习参考使用,或来自网络收集整理,版权属于原作者所有。


发表评论 取消回复