《编写自己的Photon游戏服务器》 |
| 版本 | 作者 | 参与者 | 完成日期 | 备注 |
| Photon_MyServer_V01_1.0 | 严立钻 |
| 2019.01.28 |
|
|
|
|
|
|
|
##《编写自己的Photon游戏服务器》发布说明:
++++“编写自己的Photon游戏服务器”:是对PhotonServer的一个升级(搭建自己的服务器);(产品从单机到联网是一个跨域,联网框架从UNet到Photon,再到KBEngine,最后自己搭建C++服务器)
++++“编写自己的Photon游戏服务器”:定位在一个实战类拓展,是对PhotonServer知识的一个探索总结与实践;
++++PhotonServer的Github:
++++Photon的官网(全球):https://www.photonengine.com/
++++Photon中国网:https://vibrantlink.com/
++++KBEngine的Github:https://github.com/435886030/kbengine
++++YanlzServer的Github:
##《编写自己的Photon游戏服务器》目录
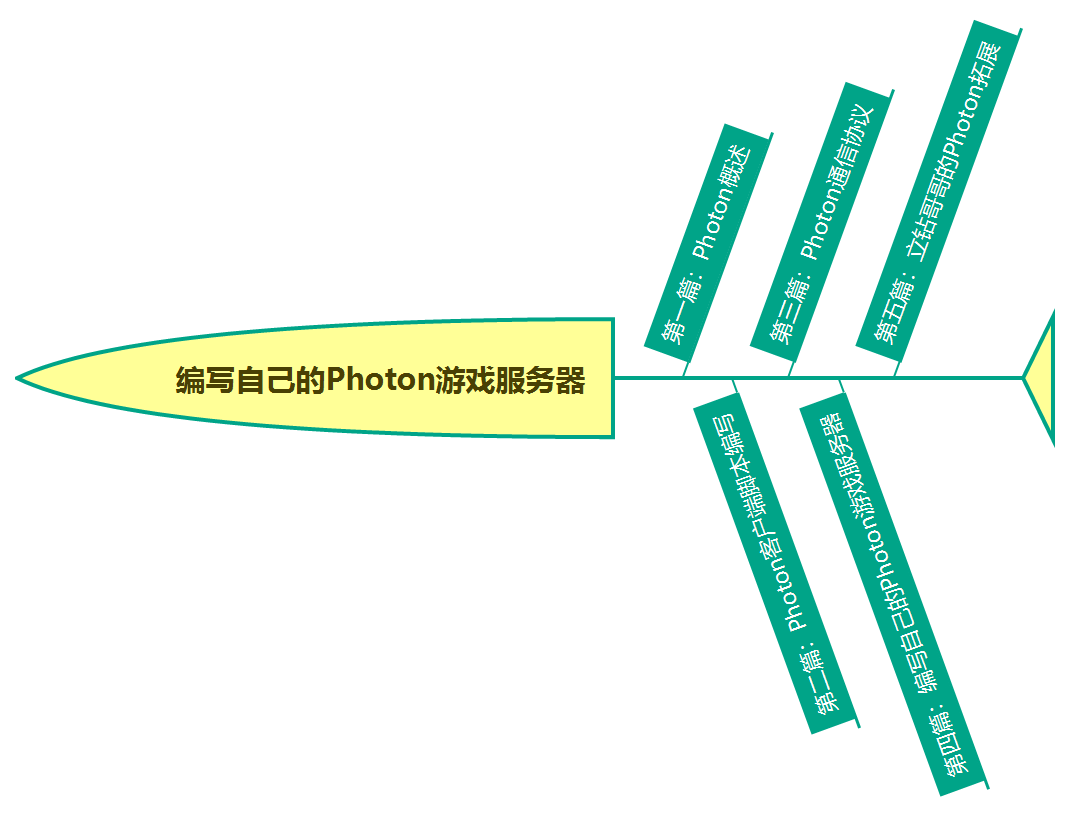
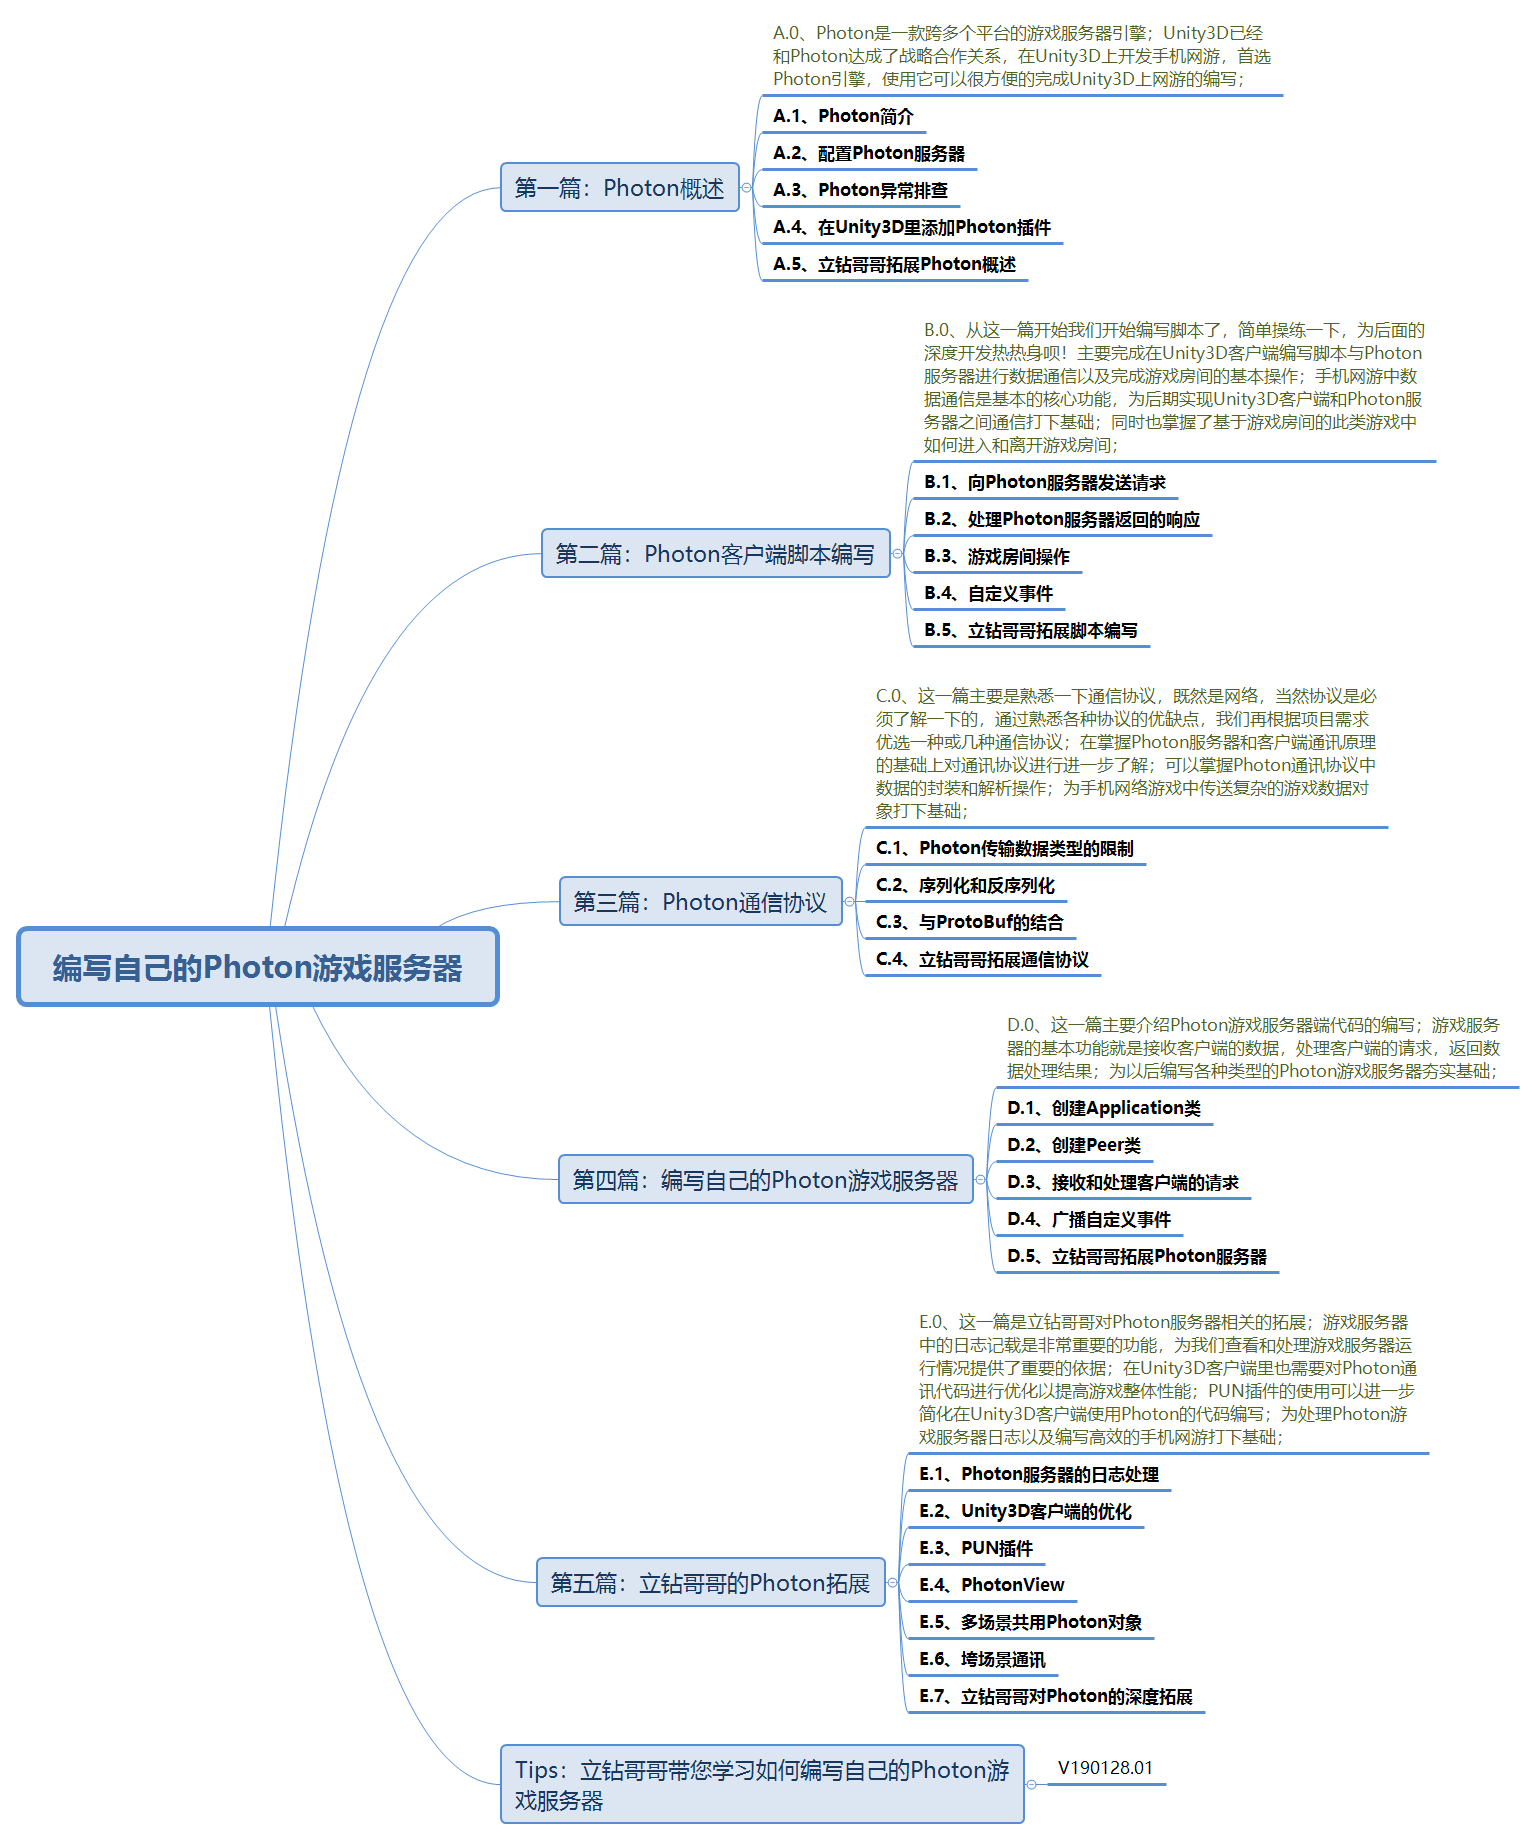
#第一篇:Photon概述
#第二篇:Photon客户端脚本编写
#第三篇:Photon通信协议
#第四篇:编写自己的Photon游戏服务器
#第五篇:立钻哥哥的Photon拓展
#第一篇:Photon概述
#第一篇:Photon概述 |
#第一篇:Photon概述
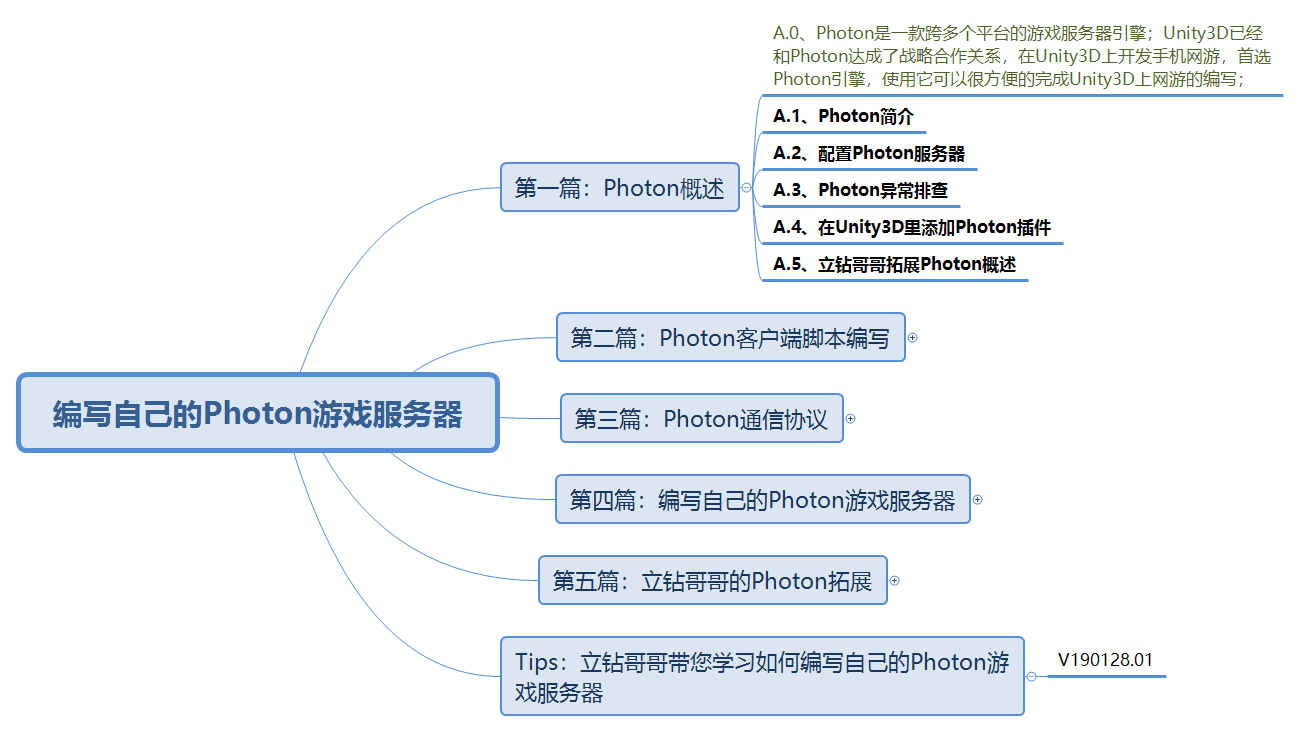
++++立钻哥哥:Photon是一款跨多个平台的游戏服务器引擎;Unity3D已经和Photon达成了战略合作关系,在Unity3D上开发手机网游,首选Photon引擎,使用它可以很方便的完成Unity3D上网游的编写;
++++A.1、Photon简介
++++A.2、配置Photon服务器
++++A.3、Photon异常排查
++++A.4、在Unity3D里添加Photon插件
++++A.5、立钻哥哥拓展Photon概述
##A.1、Photon简介
##A.1、Photon简介 |
++A.1、Photon简介
++++立钻哥哥:简要介绍Photon的基本情况以及它的应用场景;
++Photon简介
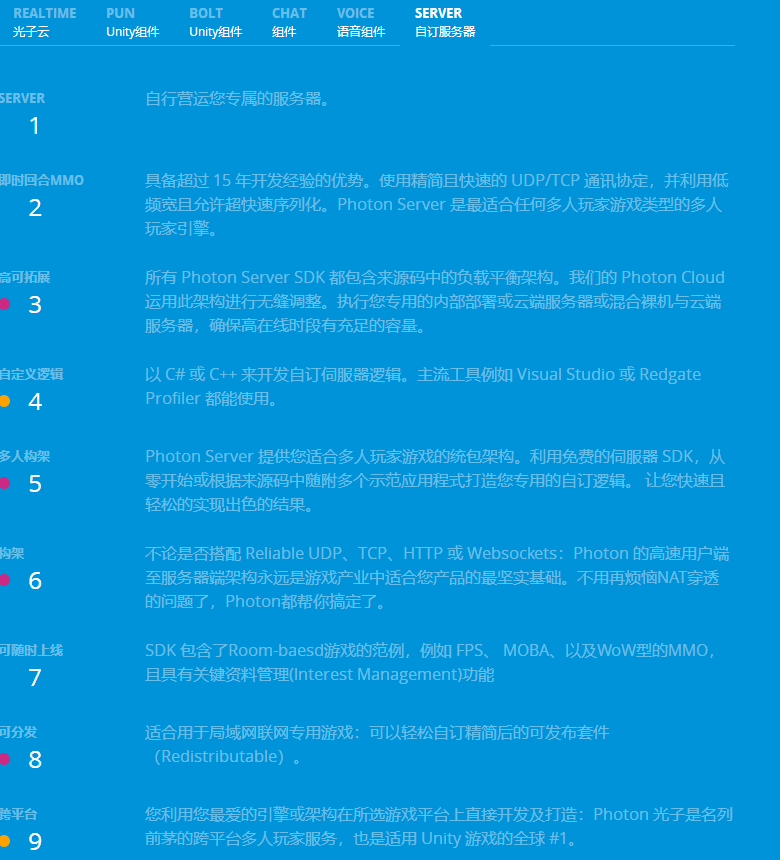
++++立钻哥哥:Photon英文愿意是指光量子,在这里是指Exit Game公司的服务器网络游戏引擎;
++++Photon引擎是一款实时的Socket服务器和开发框架,其使用方便、容易扩展;
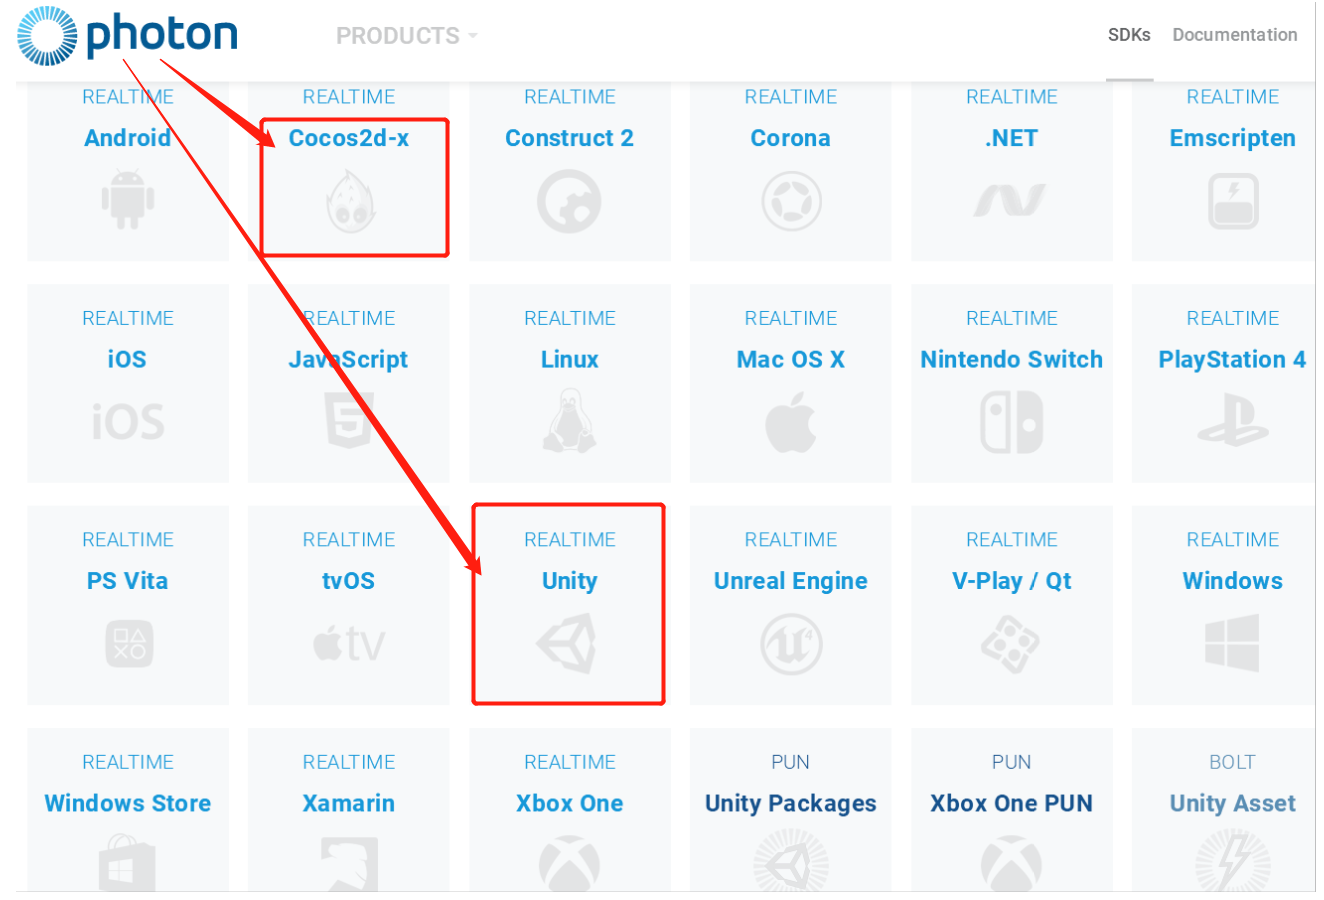
++++Photon包含两个部分:一部分是一个Socket服务器;另一部分是其针对各个平台编写的SDK;
++++服务器架构在Windows系统平台上,采用C#语言编写;客户端SDK提供了多种平台的开发API,其中就包括Unity3D客户端;
++Photon引擎的特点
++++立钻哥哥:Photon引擎的特点如下:
++++1、架构于Windows平台下原生态性能高度优化的系统;
++++2、经过证明适用于众多商业游戏;
++++3、服务器端游戏逻辑采用C#语言实现;
++++4、采用纤程处理消息机制以避免采用线程导致的问题;
++++5、部署简单,支持云端服务;
++++6、采用小尺寸的二进制协议,可根据需要使用有序可靠的UDP;
++++7、封装了每个客户端平台的网络层模块;
| Tips:【纤程】:纤程包含独立目态栈,寄存器状态的控制信息;目态控制的纤程转接要求较高的编程经验;由于纤程属于目态对象,一个纤程被封锁意味着所有线程被封锁; ++++纤程(Fiber)相当于用户级别的线程或轻进程; |
++Photon的应用场景
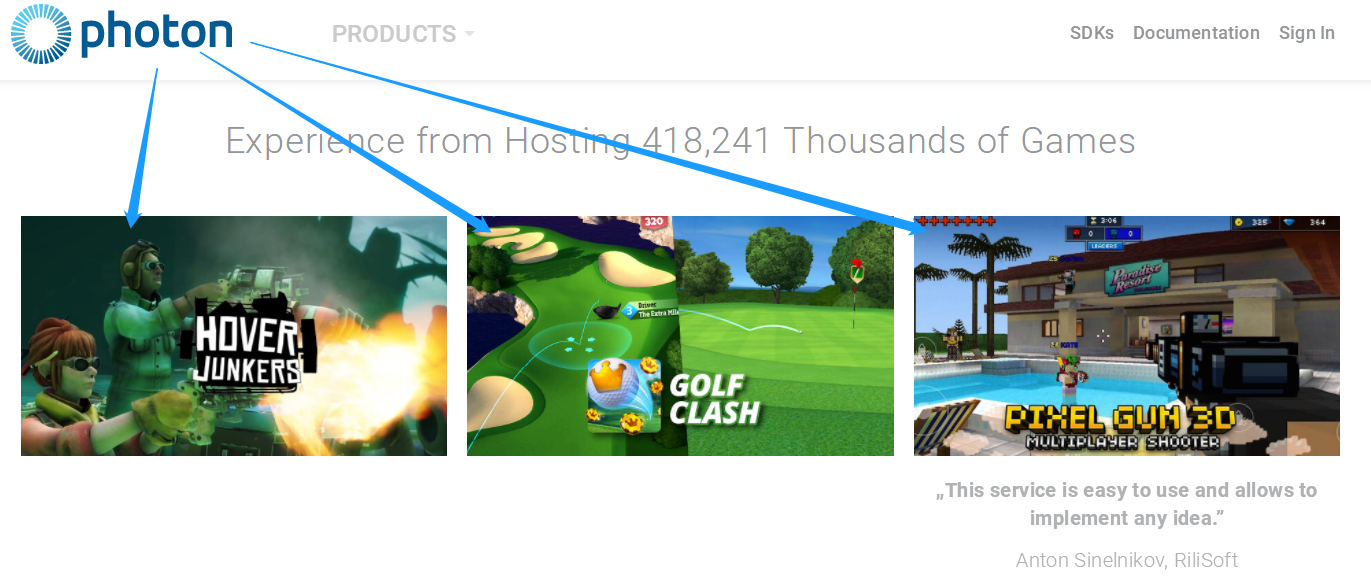
++++立钻哥哥:Photon主要用于手机网游:

##A.2、配置Photon服务器
##A.2、配置Photon服务器 |
++A.2、配置Photon服务器
++++立钻哥哥:这节主要熟悉如何配置Photon服务器;
++++A.2.1、安装Photon SDK
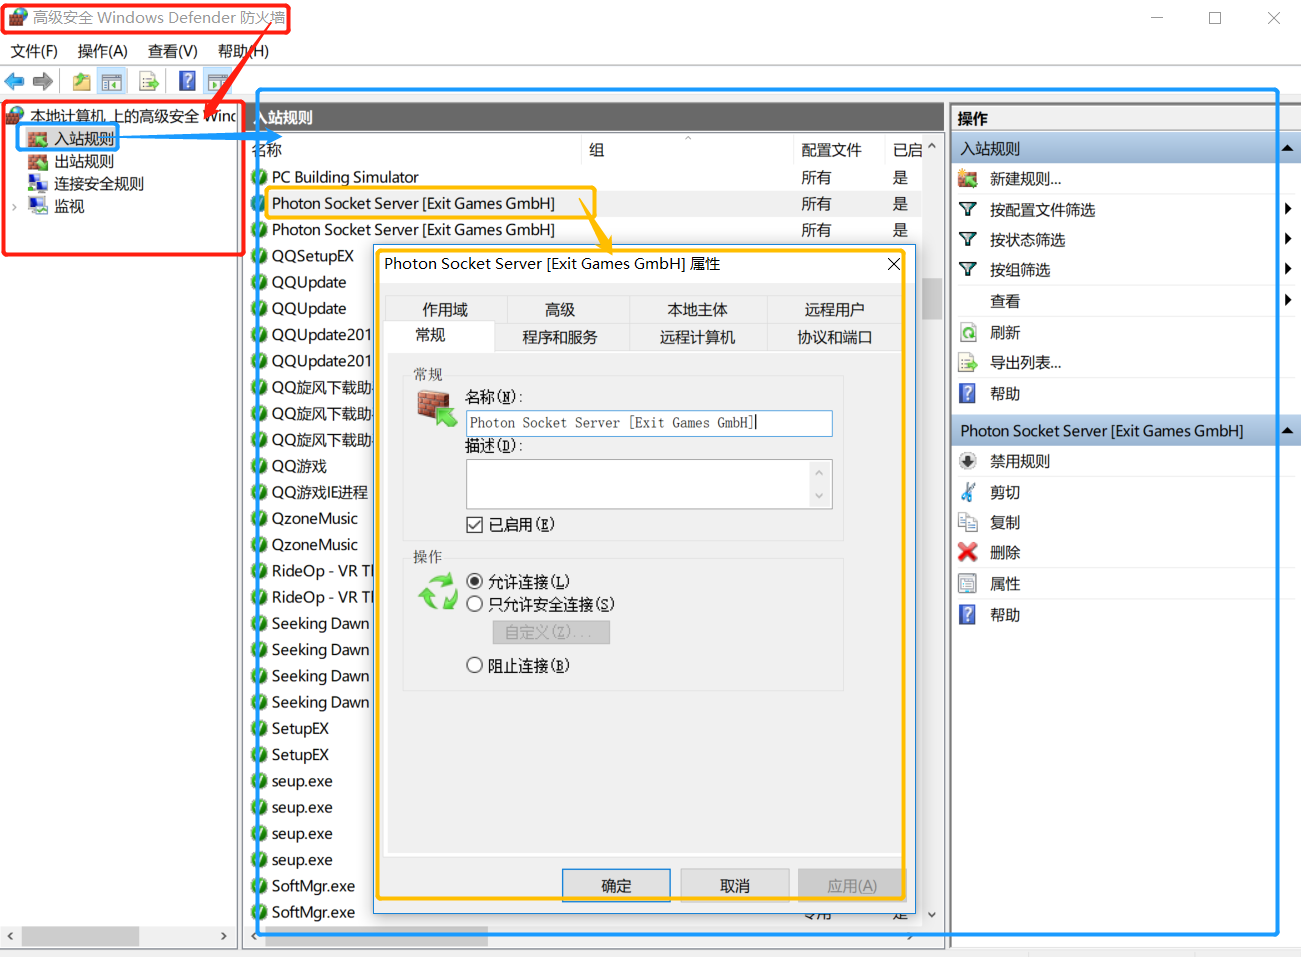
++++A.2.2、检查Windows系统里的端口和防火墙设置
++++A.2.3、设置Photon的配置文件
++++A.2.4、运行PhotonControl.exe文件
++A.2.1、安装Photon SDK
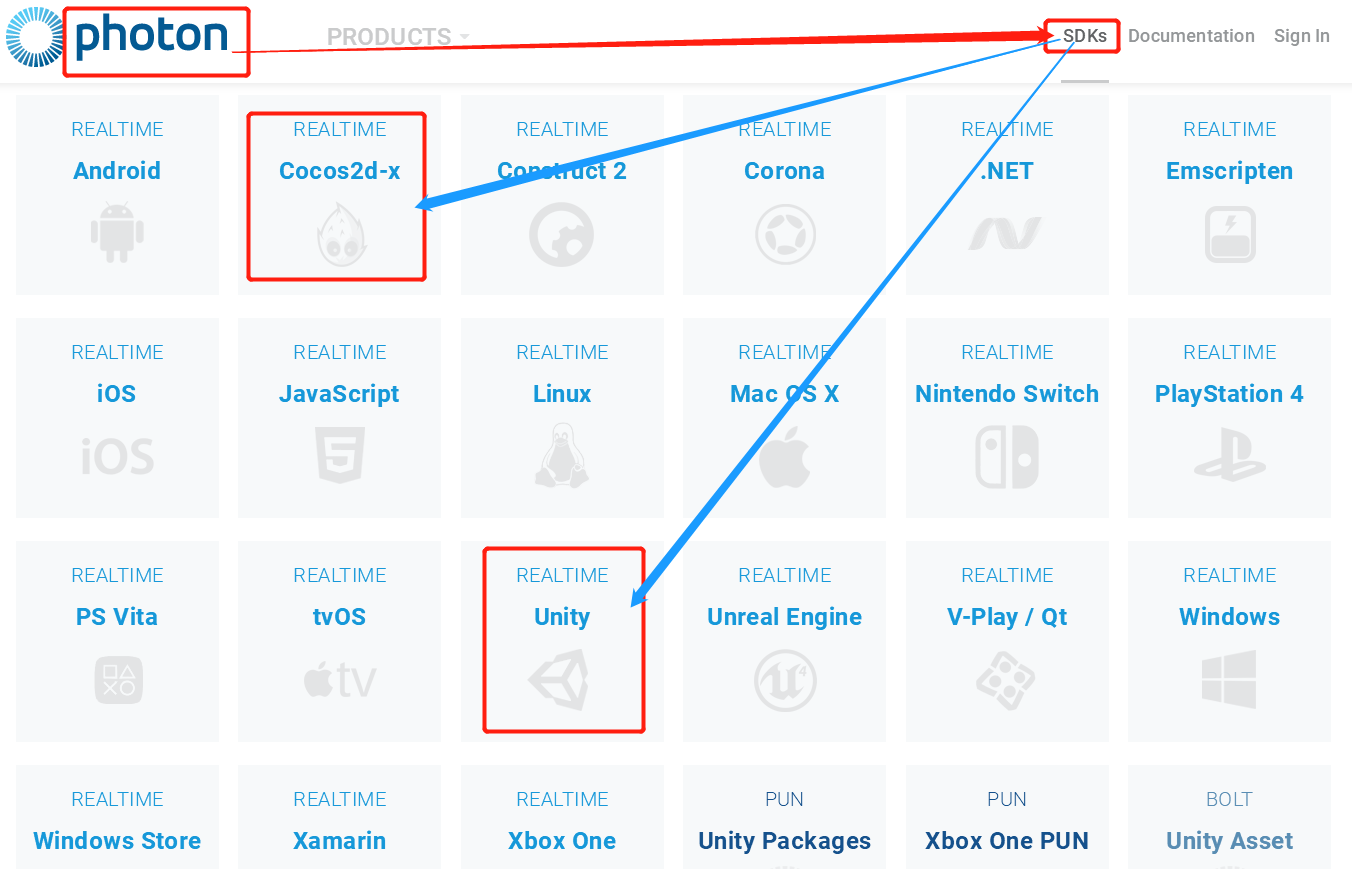
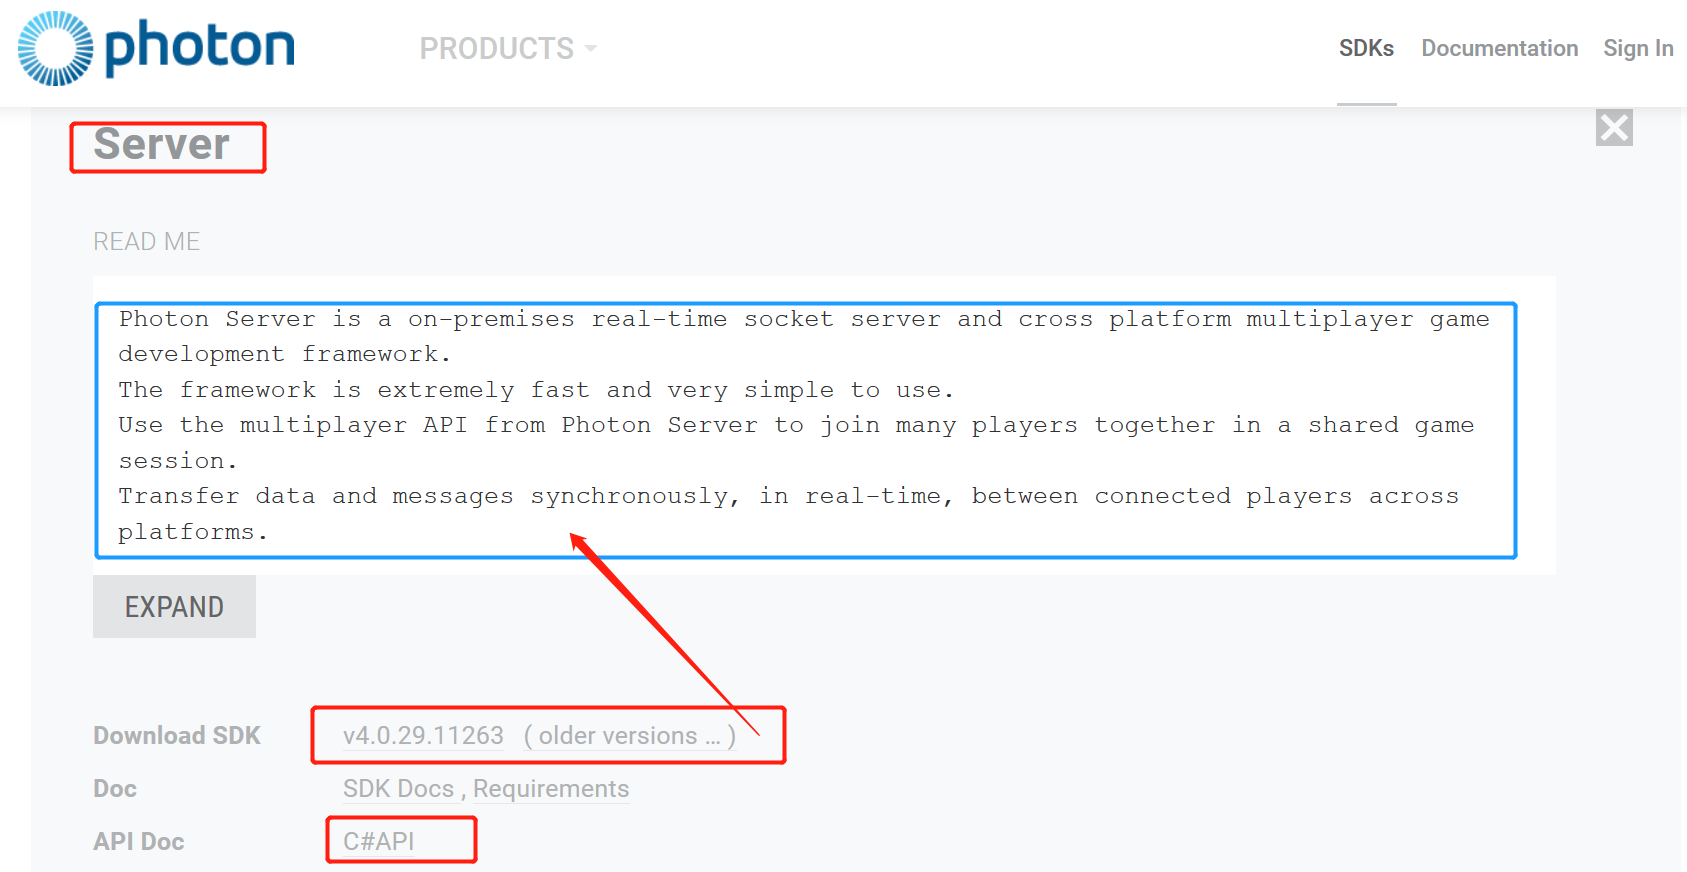
++++立钻哥哥:好吧,先下载SDK吧;
++++Photon的官网(全球):https://www.photonengine.com/
++解压SDK查看目录结构
++++立钻哥哥:下载了SDK,我们解压查看一下吧:

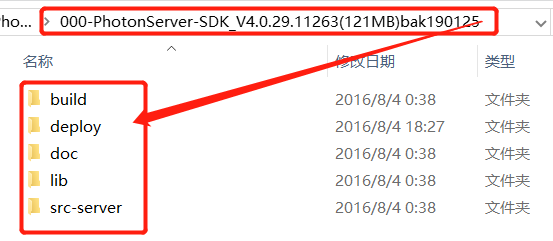
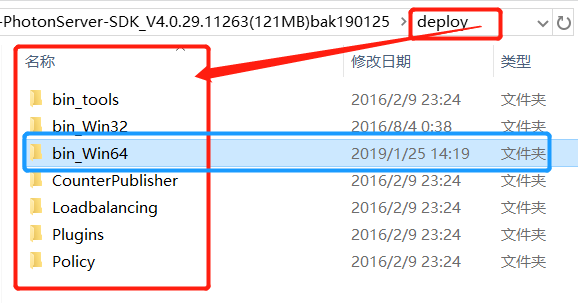
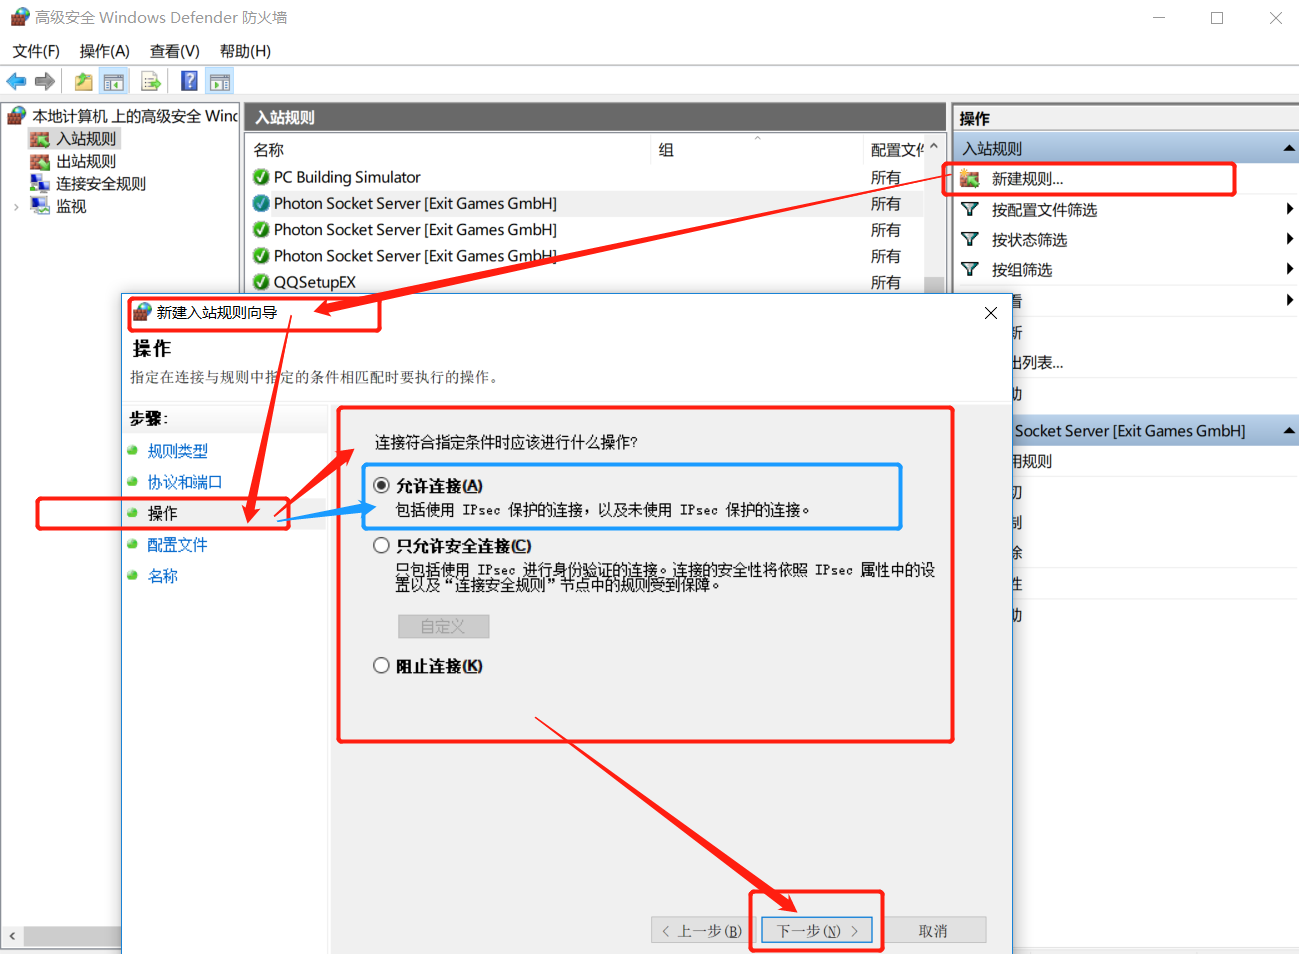
++A.2.2、检查Windows系统里的端口和防火墙设置
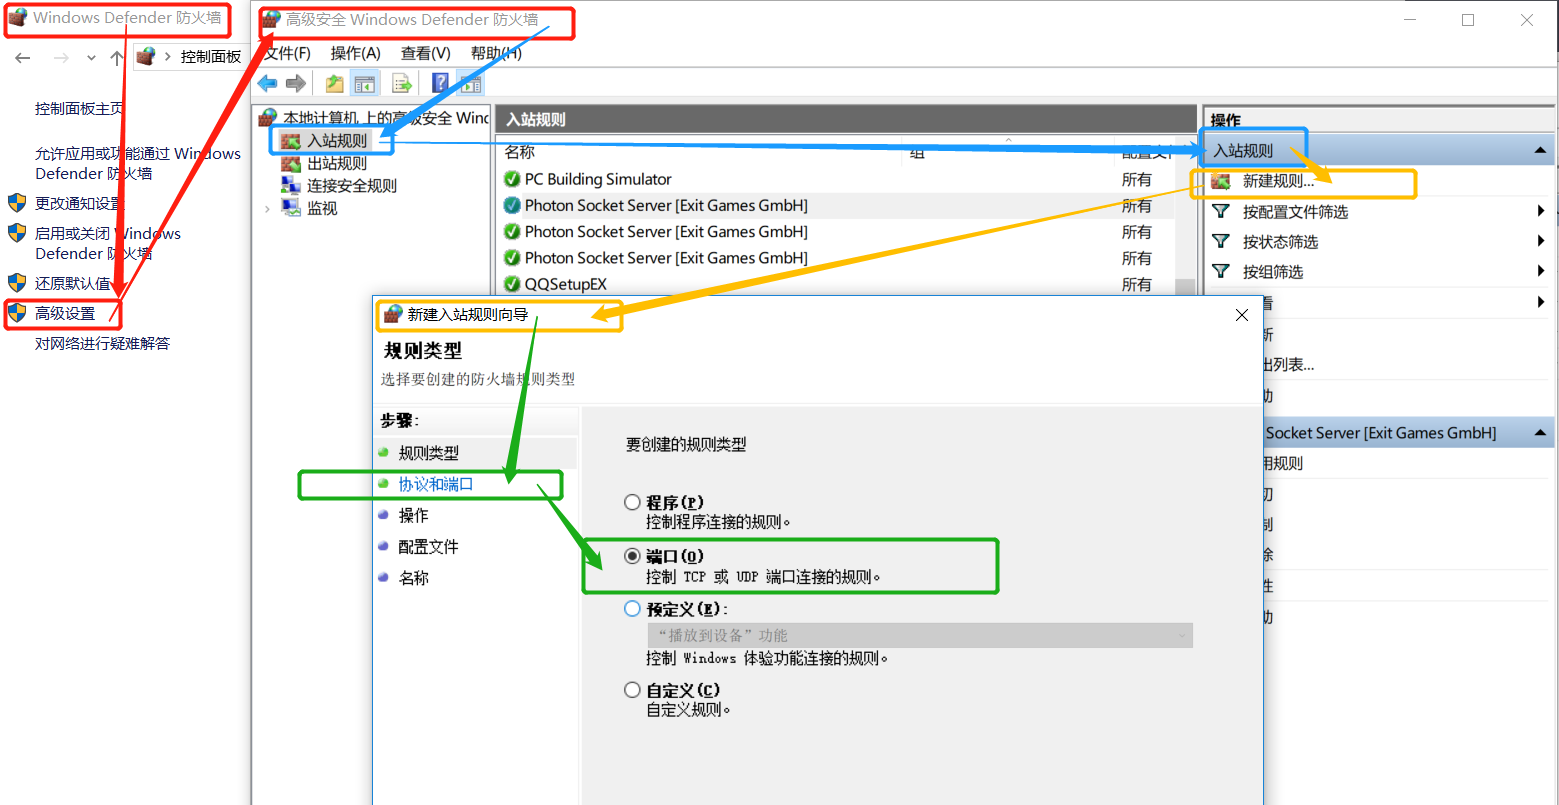
++++立钻哥哥:【防火墙】=>【高级设置】=>【入站规则】=>?查看入站规则列表?
++A.2.3、设置Photon的配置文件
++++立钻哥哥:PhotonServer-SDK_V4.0.29.11263deploybin_Win64PhotonServer.config

| <?xml version=”1.0” encoding=”Windows-1252”?> <!-- (c) 2015 by Exit Game GmbH, http://www.exitgames.com Photon server configuration file. For details see the photon-config.pdf.
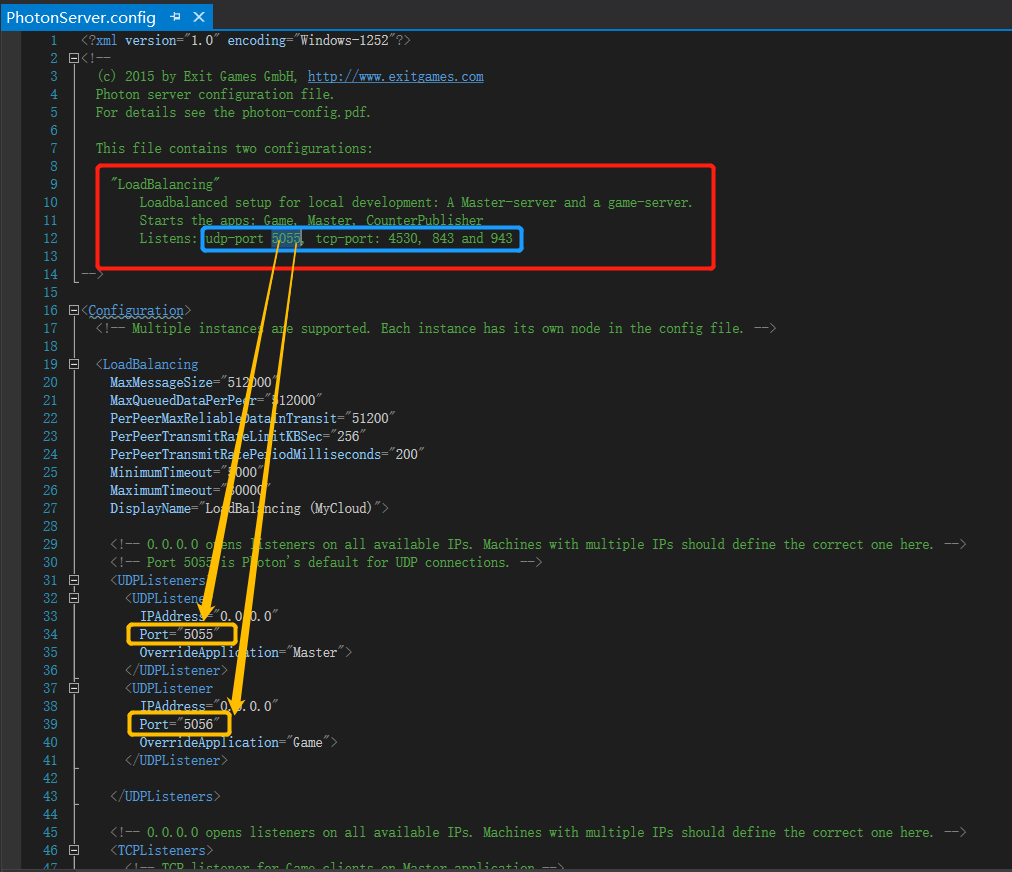
This file contains two configurations: “LoadBalancing” Loadbalanced setup for local development: A Master-server and a game-server. Starts the apps: Game, Master, CounterPublisher Listens: upd-port 5055, tcp-port: 4530, 843 and 943 (立钻哥哥:“loadbalance” 本地开发的负载平衡设置:主服务器和游戏服务器。 启动应用程序:游戏、Master、CounterPublisher 监听:upd端口5055,tp端口4530,843和943) -->
<Configuration> <!-- Multiple instance are supported. Each instance has its own node in the config file.(立钻哥哥:支持多个实例。每个实例在配置文件中都有自己的节点。) -->
<LoadBalancing MaxMessageSize=“512000” MaxQueuedDataPerPeer=”512000” PerPeerMaxReliableDataInTransit=”51200” PerPeerTransmitRateLimitKBSec=”256” PerPeerTransmitRatePeriodMilliseconds=”200” MinimumTimeOut=”5000” MaximumTimeOut=”30000” DisplayName=”LoadBalancing (MyCloud)”>
<!-- 0.0.0.0 opens listeners on all available IPs. Machines with multiple IPs should define the correct one here.(立钻哥哥:0.0.0.0打开所有可用ip上的侦听器。具有多个ip的机器应该在这里定义正确的ip。)--> <!-- Port 5055 is Photon’s default for UDP connections.(立钻哥哥:端口5055是光子用于UDP连接的默认端口。)--> <UDPListeners> </UDPListeners>
<!-- 0.0.0.0 opens listeners on all available IPs. Machines with multiple IPs should define the correct one here.(立钻哥哥:0.0.0.0打开所有可用ip上的侦听器。具有多个ip的机器应该在这里定义正确的ip。) --> <TCPListeners> </TCPListeners>
<!-- Policy request listener for Unity and Flash (port 843) and Silverlight (port 943).(立钻哥哥:Unity和Flash(端口843)以及Silverlight(端口943)的策略请求监听器。) --> <PolicyFileListeners> </PolicyFileListeners>
<!-- WebSocket (and Flash-Fallback) compatible listener.(立钻哥哥:兼容WebSocket(和flash回退)的侦听器。) --> <WebSocketListeners> </WebSocketListeners>
<!-- Defines the Photon Runtime Assembly to use.(立钻哥哥:定义要使用的光子运行时程序集。) --> <Runtime > </Runtime>
<!-- Defines which applications are loaded on start and which of them is used by default. Make sure the default application is defined.(立钻哥哥:定义在启动时加载哪些应用程序,以及默认情况下使用哪些应用程序。确保定义了默认应用程序。) --> <!-- Application-folders must be located in the same folder as the bin_win32 folders. The BaseDirectory must include a “bin” folder.(立钻哥哥:应用程序文件夹必须位于与bin_win32文件夹相同的文件夹中。基目录必须包括一个“bin”文件夹。) --> <Applications Default=”Master”> </Applications>
</LoadBalancing>
<!-- Instance settings.(立钻哥哥:实例设置。) --> <MMoDemo MaxMessageSize=”512000” MaxQueuedDataPeer=”512000” PerPeerMaxReliableDataInTransit=”51200” PerPeerTransmitRateLimitKBSec=”256” PerPeerTransmitRatePeriodMilliseconds=”200” MinimumTimeout=”5000” MaximumTimeout=”30000” DisplayName=”MMO Demo” >
<!-- 0.0.0.0 opens listeners on all available IPs. Machines with multiple IPs should define the correct one here.(立钻哥哥:0.0.0.0打开所有可用ip上的侦听器。具有多个ip的机器应该在这里定义正确的ip。) --> <!-- Port 5055 is Photon’s default for UDP connections.(立钻哥哥:端口5055是光子用于UDP连接的默认端口。) --> <UDPListeners> </UDPListeners>
<!-- 0.0.0.0 opens listeners on all available IPs. Machines with multiple IPs should define the correct one here.(立钻哥哥:0.0.0.0打开所有可用ip上的侦听器。具有多个ip的机器应该在这里定义正确的ip。) --> <!-- Port 4530 is Photon’s default for TCP connections.(立钻哥哥:端口4530是TCP连接的默认端口。) --> <!-- A Policy application is defined in case that policy requests are sent to this listener (known bug of some some flash clients) .(立钻哥哥:如果策略请求被发送到这个侦听器(某些flash客户机的已知bug),则定义策略应用程序。)--> <TCPListeners> </TCPListeners>
<!-- Policy request listener for Unity and Flash (port 843) and Silverlight (port 943).(立钻哥哥:Unity和Flash(端口843)以及Silverlight(端口943)的策略请求监听器。) --> <PolicyFileListeners> </PolicyFileListeners>
<!-- WebSocket (and Flash-Fallback) compatible listener.(立钻哥哥:兼容WebSocket(和flash回退)的侦听器。) --> <WebSocketListeners> </WebSocketListeners>
<!-- Defines the Photon Runtime Assembly to use.(立钻哥哥:定义要使用的光子运行时程序集。) --> <Runtime > </Runtime>
<!-- Defines which applications are loaded on start and which of them is used by default. Make sure the default application is defined.(立钻哥哥:定义在启动时加载哪些应用程序,以及默认情况下使用哪些应用程序。确保定义了默认应用程序。) --> <!-- Application-folders must be located in the same folder as the bin_win32 folders. The BaseDirectory must include a “bin” folder.(立钻哥哥:应用程序文件夹必须位于与bin_win32文件夹相同的文件夹中。基目录必须包括一个“bin”文件夹。) --> <Applications Default=”MMoDemo”> </Applications>
</MMoDemo>
</Configuration> |
++<LoadBalancing> ... </LoadBalancing>
++++立钻哥哥:LoadBalancing:负载平衡;
| <?xml version=”1.0” encoding=”Windows-1252”?>
<Configuration> <LoadBalancing MaxMessageSize=“512000” MaxQueuedDataPerPeer=”512000” PerPeerMaxReliableDataInTransit=”51200” PerPeerTransmitRateLimitKBSec=”256” PerPeerTransmitRatePeriodMilliseconds=”200” MinimumTimeOut=”5000” MaximumTimeOut=”30000” DisplayName=”LoadBalancing (MyCloud)”>
<UDPListeners>...</UDPListeners> <TCPListeners>...</TCPListeners> <PolicyFileListeners>...</PolicyFileListeners> <WebSocketListeners>...</WebSocketListeners> <Runtime >...</Runtime> <Applications Default=”Master”>...</Applications> </LoadBalancing>
<!-- Instance settings.(立钻哥哥:实例设置。) --> <MMoDemo></MMoDemo>
</Configuration> |
++<LoadBalancing>/<UDPListeners>...</UDPListeners>
++++立钻哥哥:负载均衡/UDP监听(UDPListeners);
| <?xml version=”1.0” encoding=”Windows-1252”?>
<Configuration>
<LoadBalancing MaxMessageSize=“512000” MaxQueuedDataPerPeer=”512000” PerPeerMaxReliableDataInTransit=”51200” PerPeerTransmitRateLimitKBSec=”256” PerPeerTransmitRatePeriodMilliseconds=”200” MinimumTimeOut=”5000” MaximumTimeOut=”30000” DisplayName=”LoadBalancing (MyCloud)”>
<!-- 0.0.0.0 opens listeners on all available IPs. Machines with multiple IPs should define the correct one here.(立钻哥哥:0.0.0.0打开所有可用ip上的侦听器。具有多个ip的机器应该在这里定义正确的ip。)--> <!-- Port 5055 is Photon’s default for UDP connections.(立钻哥哥:端口5055是光子用于UDP连接的默认端口。)--> <UDPListeners> <UDPListener IPAddress=”0.0.0.0” Port=”5055” OverrideApplication=”Master”> </UDPListener> <UDPListener IPAddress=”0.0.0.0” Port=”5056” OverrideApplication=”Game”> </UDPListener> </UDPListeners>
<TCPListeners>...</TCPListeners> <PolicyFileListeners>...</PolicyFileListeners> <WebSocketListeners>...</WebSocketListeners> <Runtime >...</Runtime>
<Applications Default=”Master”>...</Applications> </LoadBalancing>
<MMoDemo>...</MMoDemo>
</Configuration> |
++<LoadBalancing>/<TCPListeners>...</TCPListeners>
++++立钻哥哥:负载均衡/TCP监听(TCPListeners);
| <?xml version=”1.0” encoding=”Windows-1252”?>
<Configuration>
<LoadBalancing MaxMessageSize=“512000” MaxQueuedDataPerPeer=”512000” PerPeerMaxReliableDataInTransit=”51200” PerPeerTransmitRateLimitKBSec=”256” PerPeerTransmitRatePeriodMilliseconds=”200” MinimumTimeOut=”5000” MaximumTimeOut=”30000” DisplayName=”LoadBalancing (MyCloud)”>
<UDPListeners>...</UDPListeners>
<!-- 0.0.0.0 opens listeners on all available IPs. Machines with multiple IPs should define the correct one here.(立钻哥哥:0.0.0.0打开所有可用ip上的侦听器。具有多个ip的机器应该在这里定义正确的ip。) --> <TCPListeners> <!-- TCP Listener for Game clients on Master application.(立钻哥哥:用于主应用程序上的游戏客户机的TCP侦听器。) --> <TCPListener IPAddress=”0.0.0.0” Port=”4530” OverrideApplication=”Master” PolicyFile=”Policyassetssocket-policy.xml” InactivityTimeout=”10000” > </TCPListener>
<TCPListener IPAddress=”0.0.0.0” Port=”4531” OverrideApplication=”Game” PolicyFile=”Policyassetssocket-policy.xml” InactivityTimeout=”10000”> </TCPListener>
<!-- DON’T SENDTHIS. TCP listener for GameServers on Master application.(立钻哥哥:不要SENDTHIS。用于主应用程序上的GameServers的TCP侦听器。) --> <TCPListener IPAddress=”0.0.0.0” Port=”4520” </TCPListener>
</TCPListeners>
<PolicyFileListeners>...</PolicyFileListeners> <WebSocketListeners>...</WebSocketListeners> <Runtime >...</Runtime> <Applications Default=”Master”>...</Applications> </LoadBalancing>
<!-- Instance settings.(立钻哥哥:实例设置。) --> <MMoDemo>...</MMoDemo>
</Configuration> |
++<LoadBalancing>/<PolicyFileListeners>...</PolicyFileListeners>
++++立钻哥哥:负载均衡/协议文件监听(PolicyFileListeners);
| <?xml version=”1.0” encoding=”Windows-1252”?>
<Configuration> <!-- Multiple instance are supported. Each instance has its own node in the config file.(立钻哥哥:支持多个实例。每个实例在配置文件中都有自己的节点。) -->
<LoadBalancing MaxMessageSize=“512000” MaxQueuedDataPerPeer=”512000” PerPeerMaxReliableDataInTransit=”51200” PerPeerTransmitRateLimitKBSec=”256” PerPeerTransmitRatePeriodMilliseconds=”200” MinimumTimeOut=”5000” MaximumTimeOut=”30000” DisplayName=”LoadBalancing (MyCloud)”>
<UDPListeners>...</UDPListeners> <TCPListeners>...</TCPListeners>
<!-- Policy request listener for Unity and Flash (port 843) and Silverlight (port 943).(立钻哥哥:Unity和Flash(端口843)以及Silverlight(端口943)的策略请求监听器。) --> <PolicyFileListeners> <!-- multiple Listeners allowed for different ports.(立钻哥哥:允许多个侦听器用于不同的端口。) --> <PolicyFileListener IPAddress=”0.0.0.0” Port=”843” PolicyFile=”Policyassetssocket-policy.xml”> </PolicyFileListener> <PolicyFileListener IPAddress=”0.0.0.0” Port=”943” PolicyFile=”Policyassetssocket-policy.xml”> </PolicyFileListener> </PolicyFileListeners>
<WebSocketListeners>...</WebSocketListeners> <Runtime >...</Runtime> <Applications Default=”Master”>...</Applications>
</LoadBalancing>
<!-- Instance settings.(立钻哥哥:实例设置。) --> <MMoDemo>...</MMoDemo>
</Configuration> |
++<LoadBalancing>/<WebSocketListeners>...</WebSocketListeners>
++++立钻哥哥:负载均衡/WebSocket监听(WebSocketListeners);
| <?xml version=”1.0” encoding=”Windows-1252”?>
<Configuration>
<LoadBalancing MaxMessageSize=“512000” MaxQueuedDataPerPeer=”512000” PerPeerMaxReliableDataInTransit=”51200” PerPeerTransmitRateLimitKBSec=”256” PerPeerTransmitRatePeriodMilliseconds=”200” MinimumTimeOut=”5000” MaximumTimeOut=”30000” DisplayName=”LoadBalancing (MyCloud)”>
<UDPListeners>...</UDPListeners> <TCPListeners>...</TCPListeners> <PolicyFileListeners>...</PolicyFileListeners>
<!-- WebSocket (and Flash-Fallback) compatible listener.(立钻哥哥:兼容WebSocket(和flash回退)的侦听器。) --> <WebSocketListeners> <WebSocketListener IPAddress=”0.0.0.0” Port=”9090” DisableNagle=”true” InactivityTimeout=”10000” OverrideApplication=”Master”> </WebSocketListener>
<WebSocketListener IPAddress=”0.0.0.0” Port=”9091” DisableNagle=”true” InactivityTimeout=”10000” OverrideApplication=”Game”> </WebSocketListener>
</WebSocketListeners>
<Runtime >...</Runtime> <Applications Default=”Master”>...</Applications>
</LoadBalancing>
<!-- Instance settings.(立钻哥哥:实例设置。) --> <MMoDemo>... </MMoDemo>
</Configuration> |
++<LoadBalancing>/<Runtime>...</Runtime>
++++立钻哥哥:负载均衡/运行时(Runtime);
| <?xml version=”1.0” encoding=”Windows-1252”?>
<Configuration>
<LoadBalancing MaxMessageSize=“512000” MaxQueuedDataPerPeer=”512000” PerPeerMaxReliableDataInTransit=”51200” PerPeerTransmitRateLimitKBSec=”256” PerPeerTransmitRatePeriodMilliseconds=”200” MinimumTimeOut=”5000” MaximumTimeOut=”30000” DisplayName=”LoadBalancing (MyCloud)”>
<UDPListeners>...</UDPListeners> <TCPListeners>...</TCPListeners> <PolicyFileListeners>...</PolicyFileListeners> <WebSocketListeners>...</WebSocketListeners>
<!-- Defines the Photon Runtime Assembly to use.(立钻哥哥:定义要使用的光子运行时程序集。) --> <Runtime Assembly=”PhotonHostRuntime, Culture=neutral” Type=”PhotonHostRuntime.PhotonDomainManager” UnhandledExceptionPolicy=”Ignore”> </Runtime>
<Applications Default=”Master”>...</Applications>
</LoadBalancing>
<!-- Instance settings.(立钻哥哥:实例设置。) --> <MMoDemo>... </MMoDemo>
</Configuration> |
++<LoadBalancing>/<Applications>...</Applications>
++++立钻哥哥:负载均衡/应用程序(Applications);
| <?xml version=”1.0” encoding=”Windows-1252”?>
<Configuration>
<LoadBalancing MaxMessageSize=“512000” MaxQueuedDataPerPeer=”512000” PerPeerMaxReliableDataInTransit=”51200” PerPeerTransmitRateLimitKBSec=”256” PerPeerTransmitRatePeriodMilliseconds=”200” MinimumTimeOut=”5000” MaximumTimeOut=”30000” DisplayName=”LoadBalancing (MyCloud)”>
<UDPListeners>....</UDPListeners> <TCPListeners>...</TCPListeners> <PolicyFileListeners>...</PolicyFileListeners> <WebSocketListeners>...</WebSocketListeners> <Runtime >...</Runtime>
<!-- Defines which applications are loaded on start and which of them is used by default. Make sure the default application is defined.(立钻哥哥:定义在启动时加载哪些应用程序,以及默认情况下使用哪些应用程序。确保定义了默认应用程序。) --> <!-- Application-folders must be located in the same folder as the bin_win32 folders. The BaseDirectory must include a “bin” folder.(立钻哥哥:应用程序文件夹必须位于与bin_win32文件夹相同的文件夹中。基目录必须包括一个“bin”文件夹。) --> <Applications Default=”Master”> <Application Name=”Master” BaseDirectory=”LoadBalancingMaster” Assembly=”Photon.LoadBalancing” Type=”Photon.LoadBalancing.MasterServer.MasterApplication” ForceAutoRestart=”true” WatchFiles=”dll;config” ExcludeFiles=”log4net.config” > </Application> <Application Name=”Game” BaseDirectory=”LoadBalancingGameServer” Assembly=”Photon.LoadBalancing” Type=”Photon.LoadBalancing.GameServer.GameApplication” ForceAutoRestart=”true” WatchFiles=”dll;config” ExcludeFiles=”log4net.config” > </Application>
<!-- CounterPublisher Application. --> <Application Name=”CounterPublisher” BaseDirectory=”CounterPublisher” Assembly=”CounterPublisher” Type=”Photon.CounterPublisher.Application” ForceAutoRestart=”true” WatchFiles=”dll;config” ExcludeFiles=”log4net.config” > </Application>
</Applications>
</LoadBalancing>
<!-- Instance settings.(立钻哥哥:实例设置。) --> <MMoDemo>... </MMoDemo>
</Configuration> |
++<MMoDemo>...</MMoDemo>
++++立钻哥哥:MMO(Massive Multiplayer Online)大型多人在线;
| <?xml version=”1.0” encoding=”Windows-1252”?>
<Configuration> <LoadBalancing>...</LoadBalancing>
<!-- Instance settings.(立钻哥哥:实例设置。) --> <MMoDemo MaxMessageSize=”512000” MaxQueuedDataPeer=”512000” PerPeerMaxReliableDataInTransit=”51200” PerPeerTransmitRateLimitKBSec=”256” PerPeerTransmitRatePeriodMilliseconds=”200” MinimumTimeout=”5000” MaximumTimeout=”30000” DisplayName=”MMO Demo” >
<UDPListeners>...</UDPListeners> <TCPListeners>...</TCPListeners> <PolicyFileListeners>...</PolicyFileListeners> <WebSocketListeners>...</WebSocketListeners> <Runtime >...</Runtime> <Applications Default=”MMoDemo”>...</Applications>
</MMoDemo>
</Configuration> |
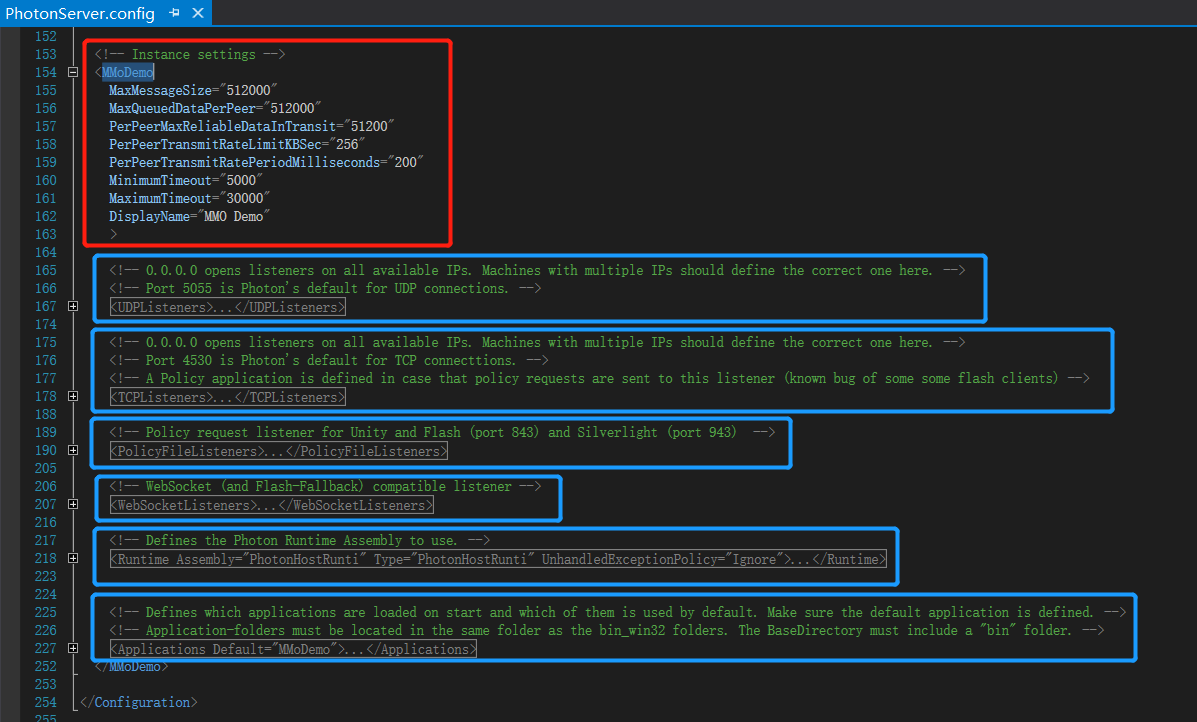
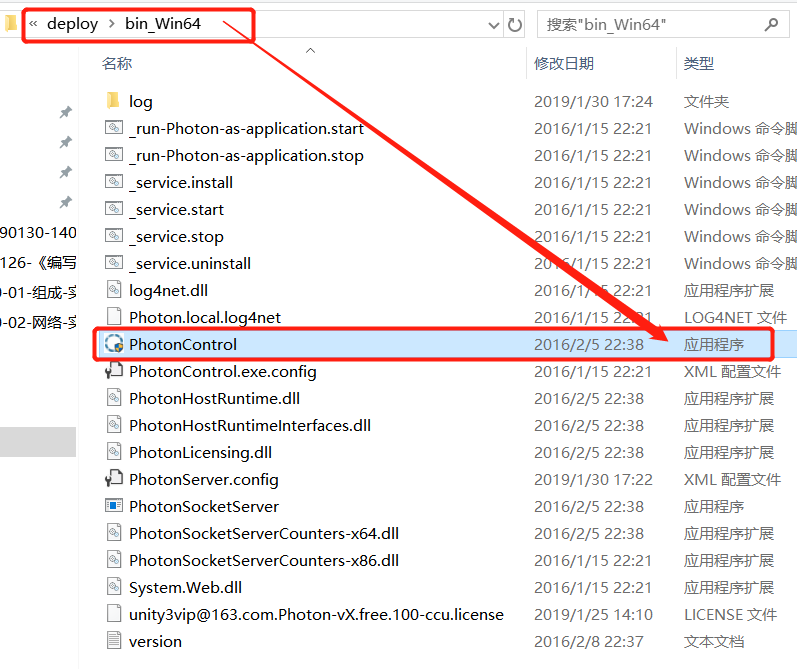
++A.2.4、运行PhotonControl.exe文件
++++立钻哥哥:PhotonServerdeploybin_Win64PhotonControl.exe
##A.3、Photon异常排查
##A.3、Photon异常排查 |
++A.3、Photon异常排查
++++立钻哥哥:程序都会有bug,那我们就来Debug一下;这节将介绍当Photon服务器不能启动的时候,如何检查和处理;
++++A.3.1、如何检查Photon服务器运行需要开放的端口
++++A.3.2、如何检查Windows系统里的端口和防火墙设置
++++A.3.3、如何检查Photon异常日志
++++A.3.4、立钻哥哥Debug经验谈
++A.3.1、如何检查Photon服务器运行需要开放的端口
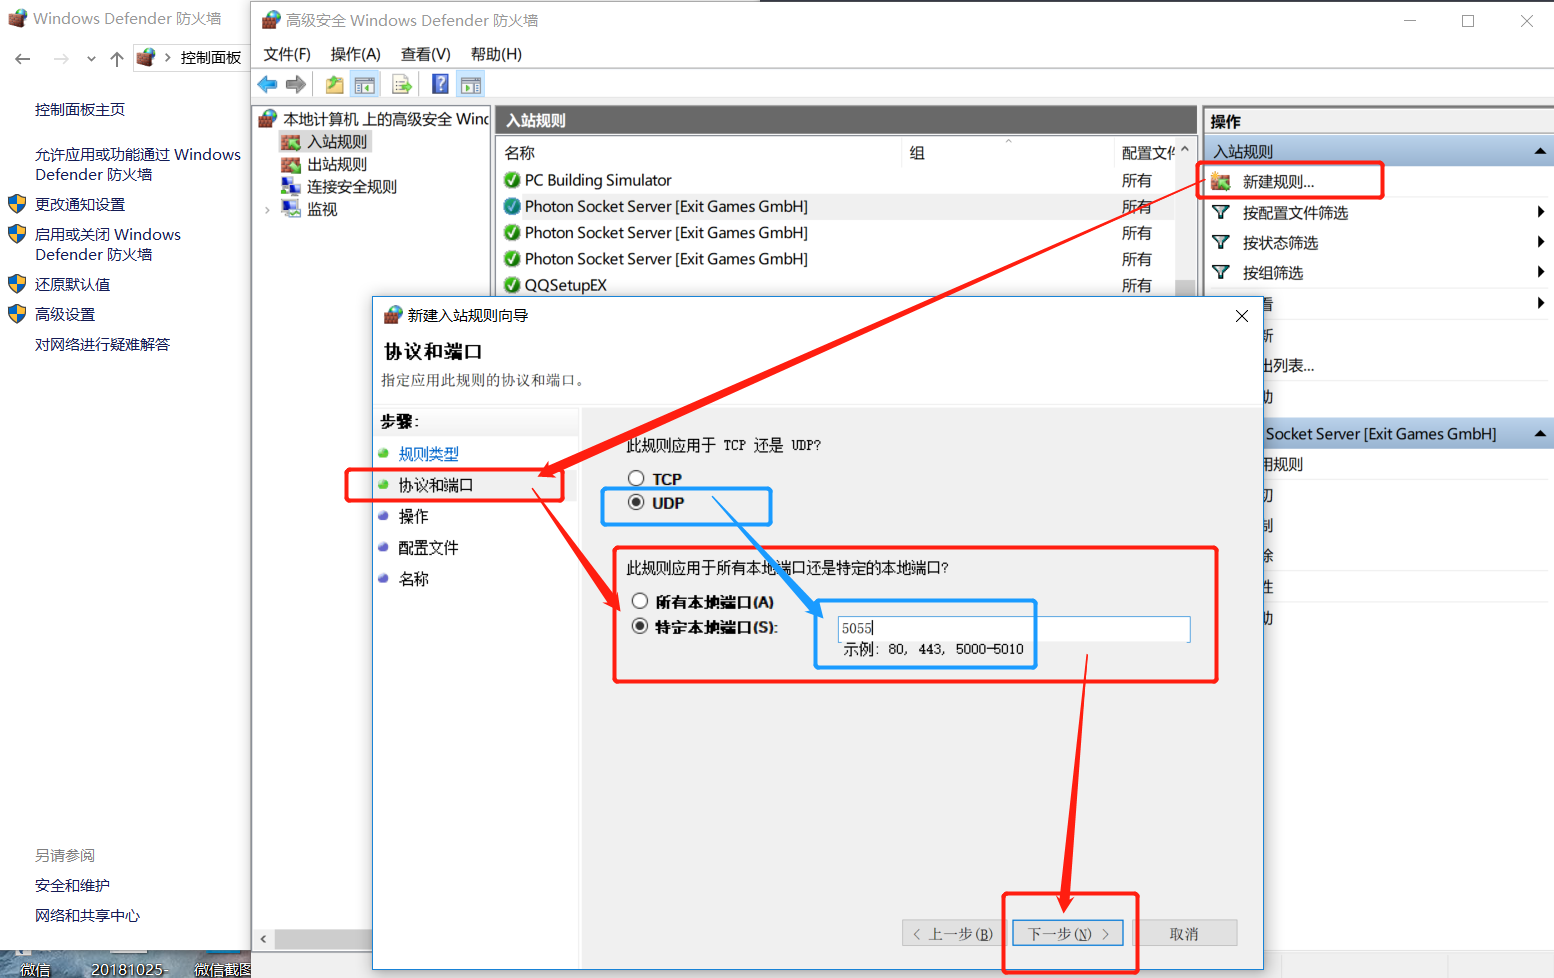
++++立钻哥哥:【udp-port: 5055】,【tcp-port: 4530, 843, 943】等;
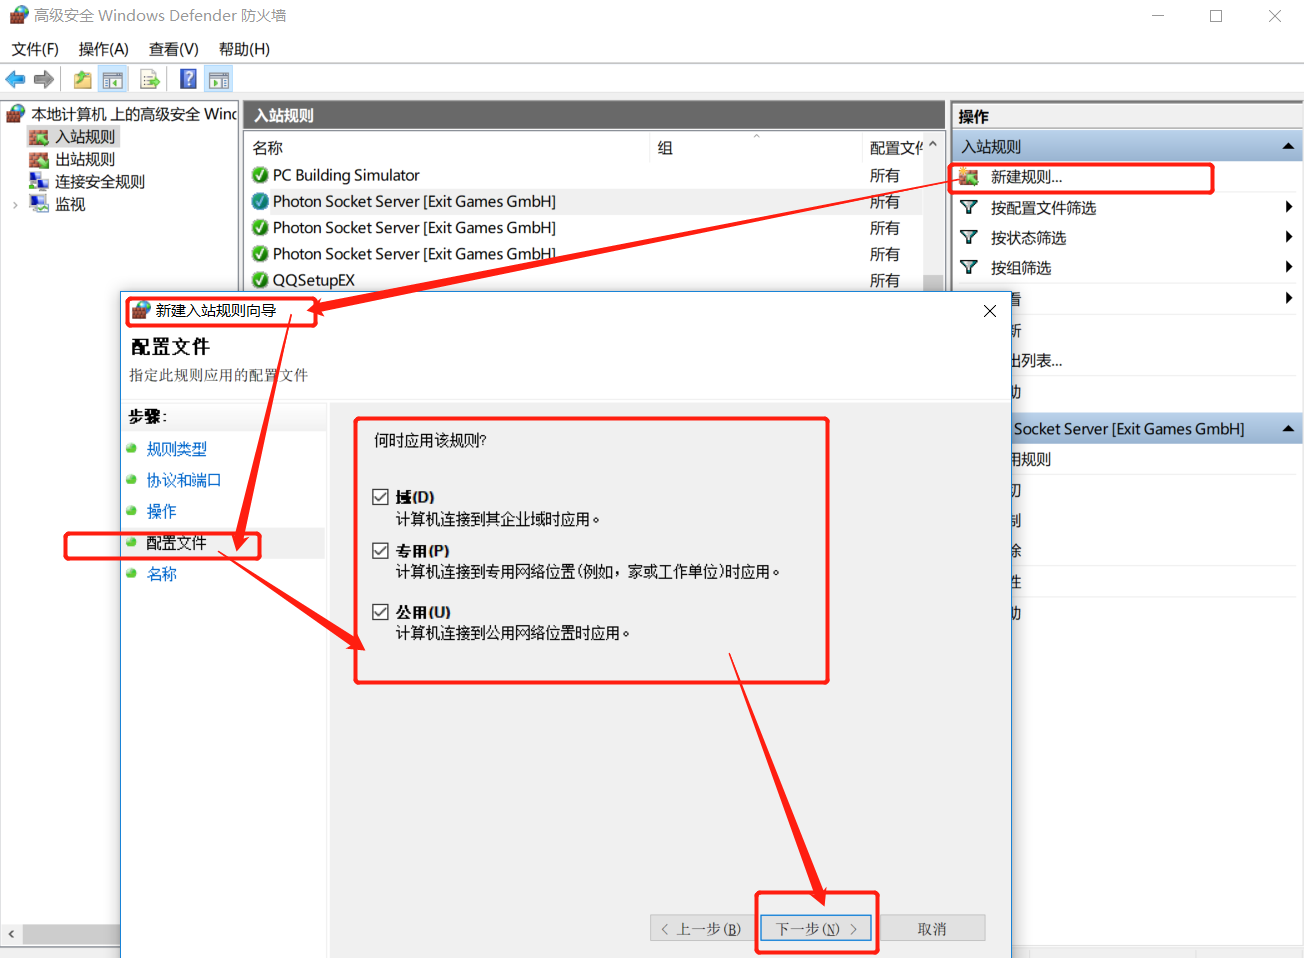
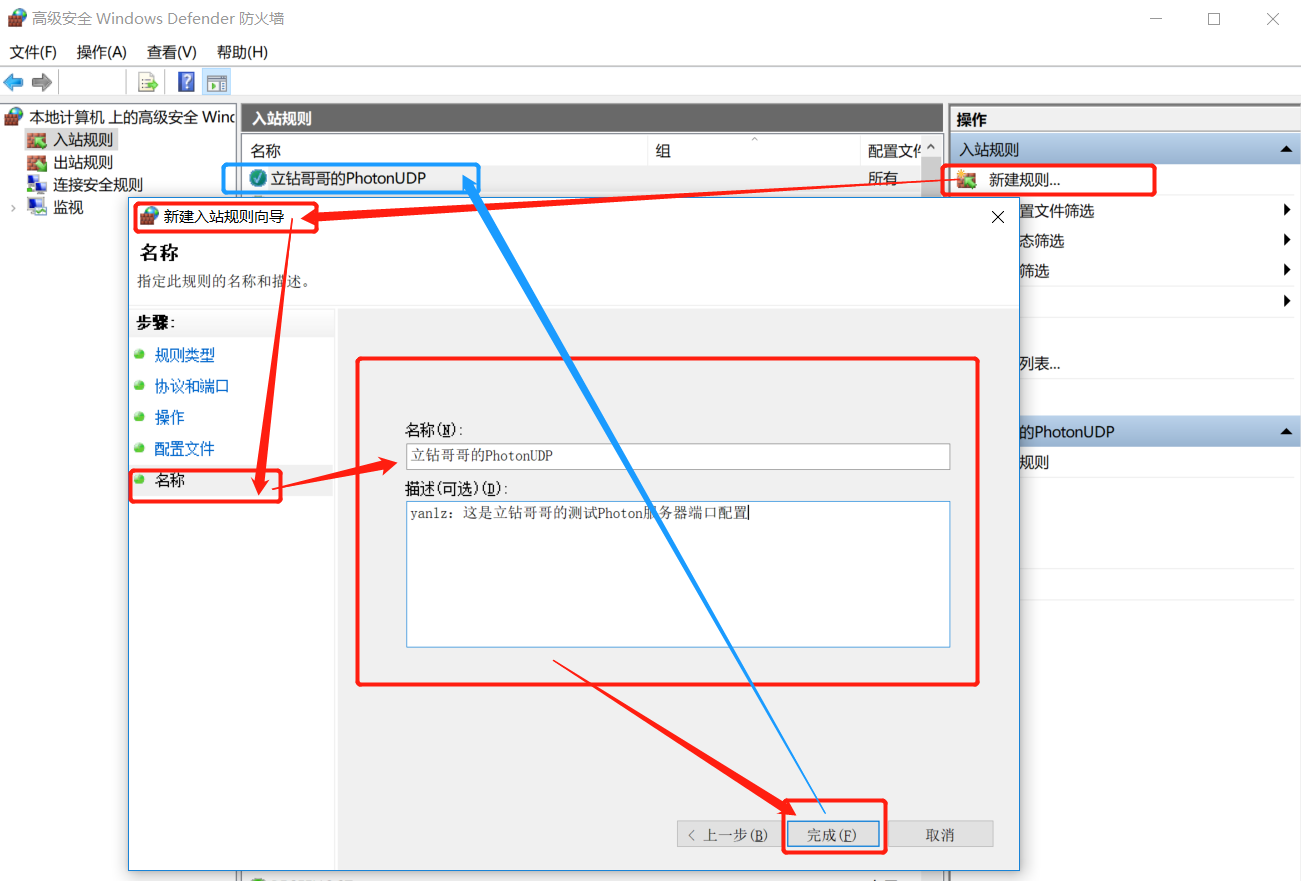
++A.3.2、如何检查Windows系统里的端口和防火墙设置
++++立钻哥哥:【防火墙】=>【高级设置】=>【入站规则】=>【新建规则】;
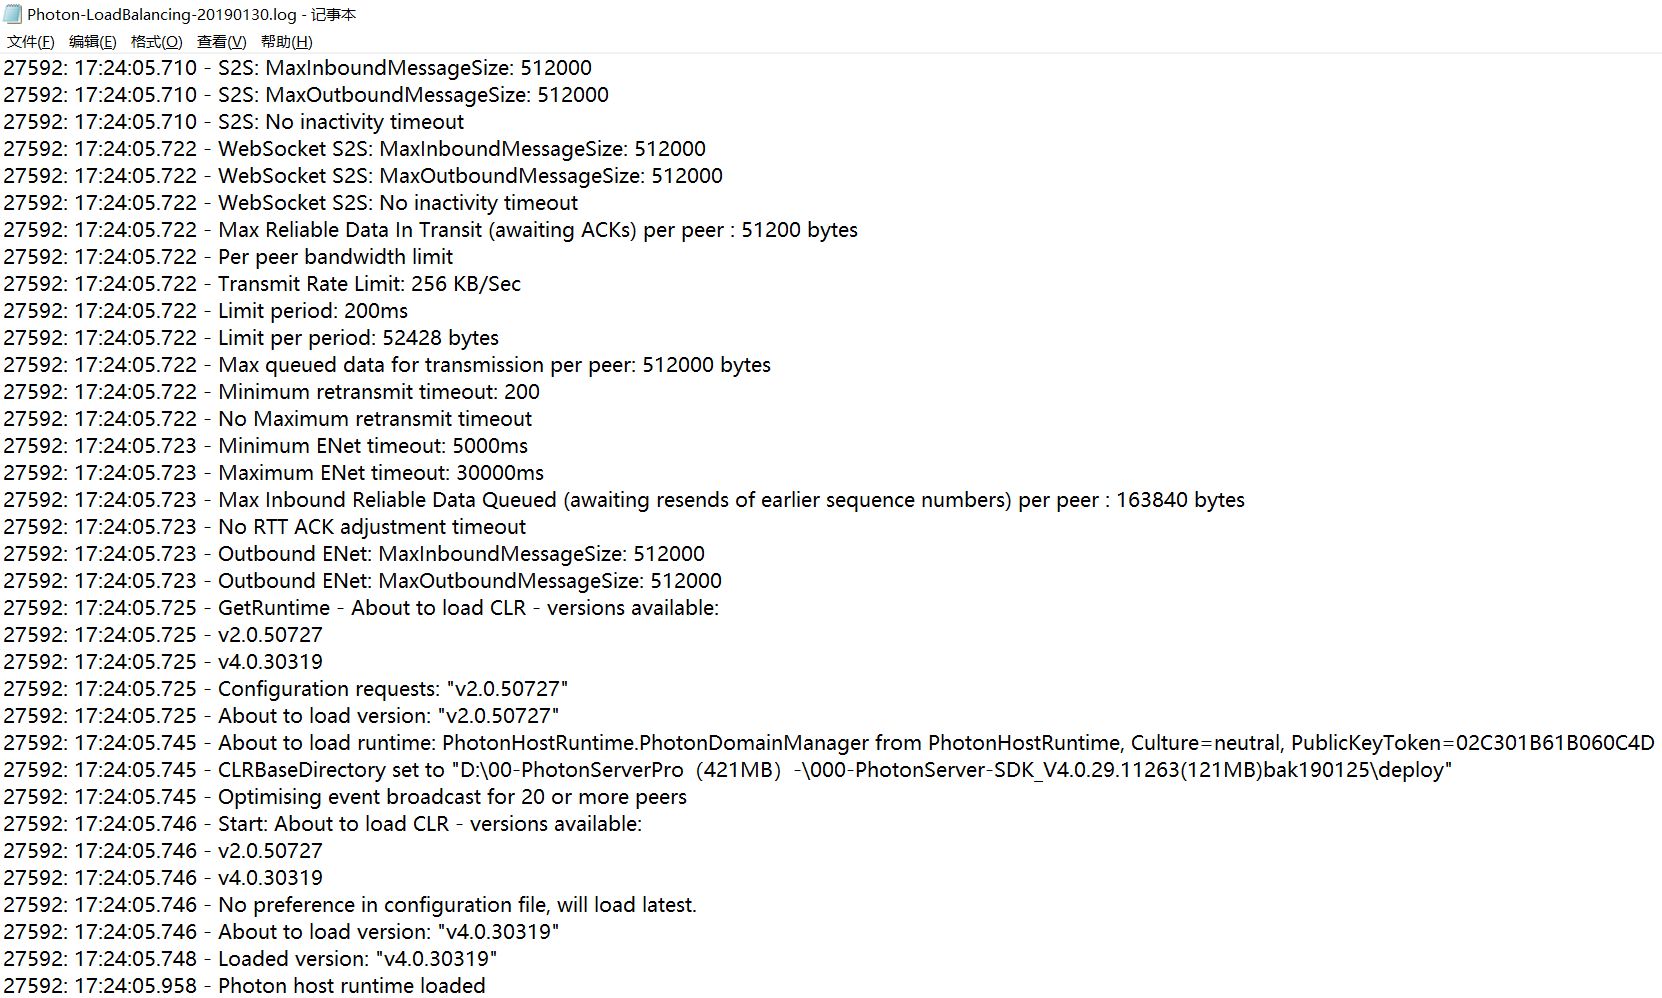
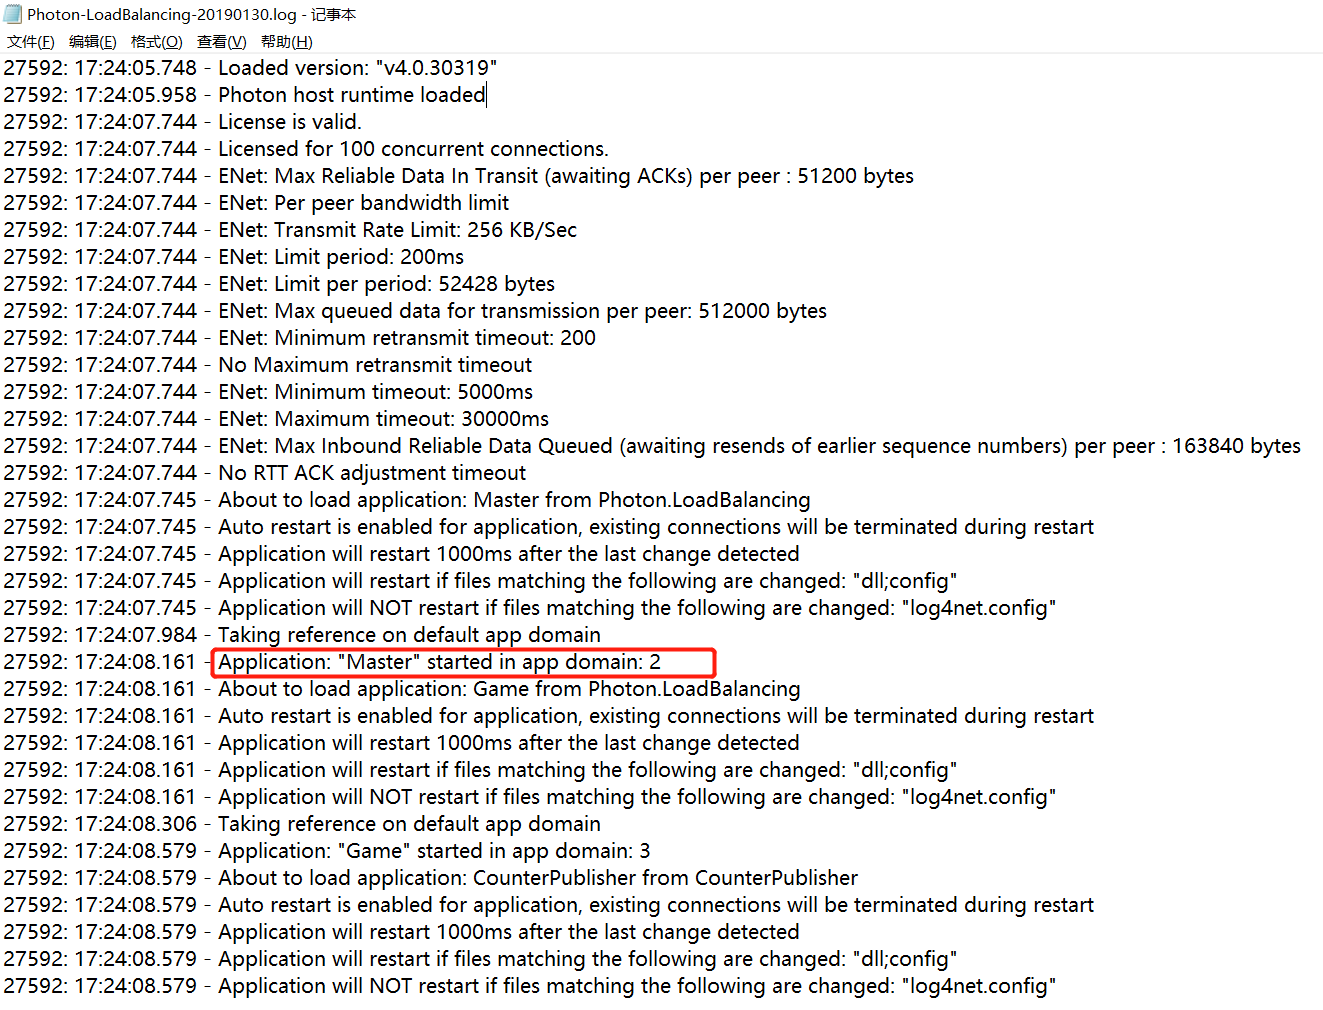
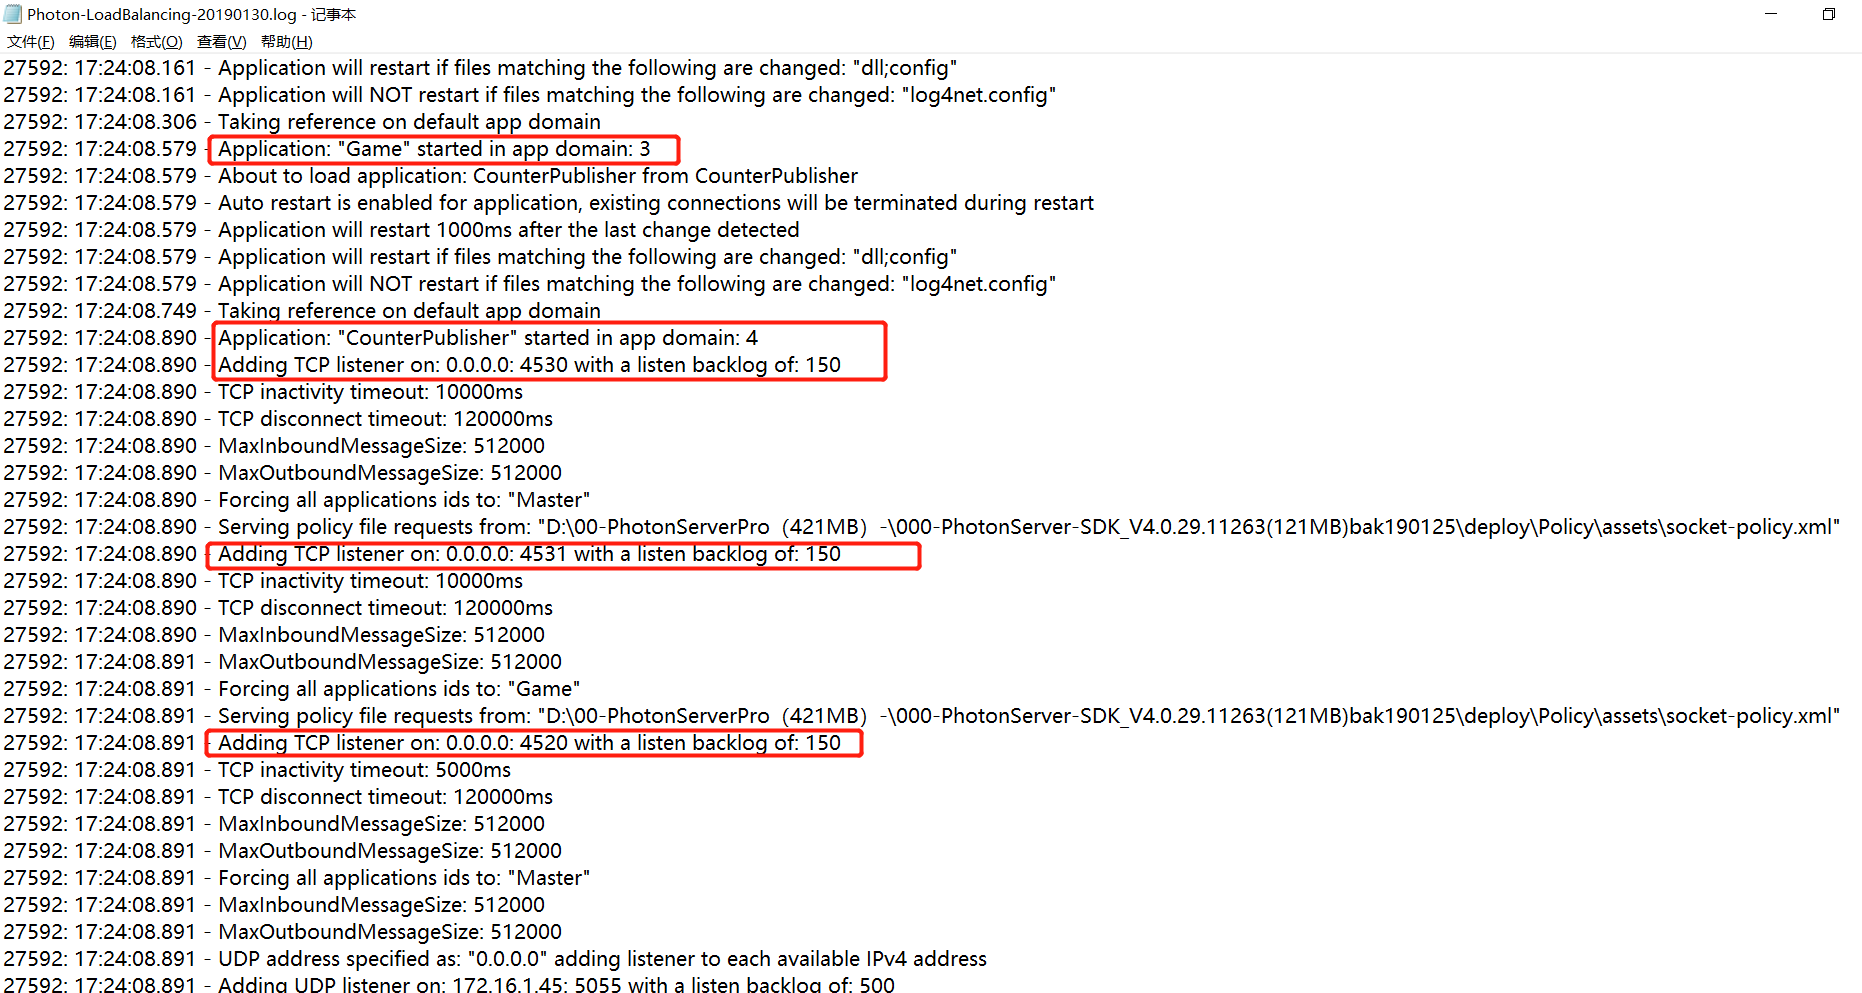
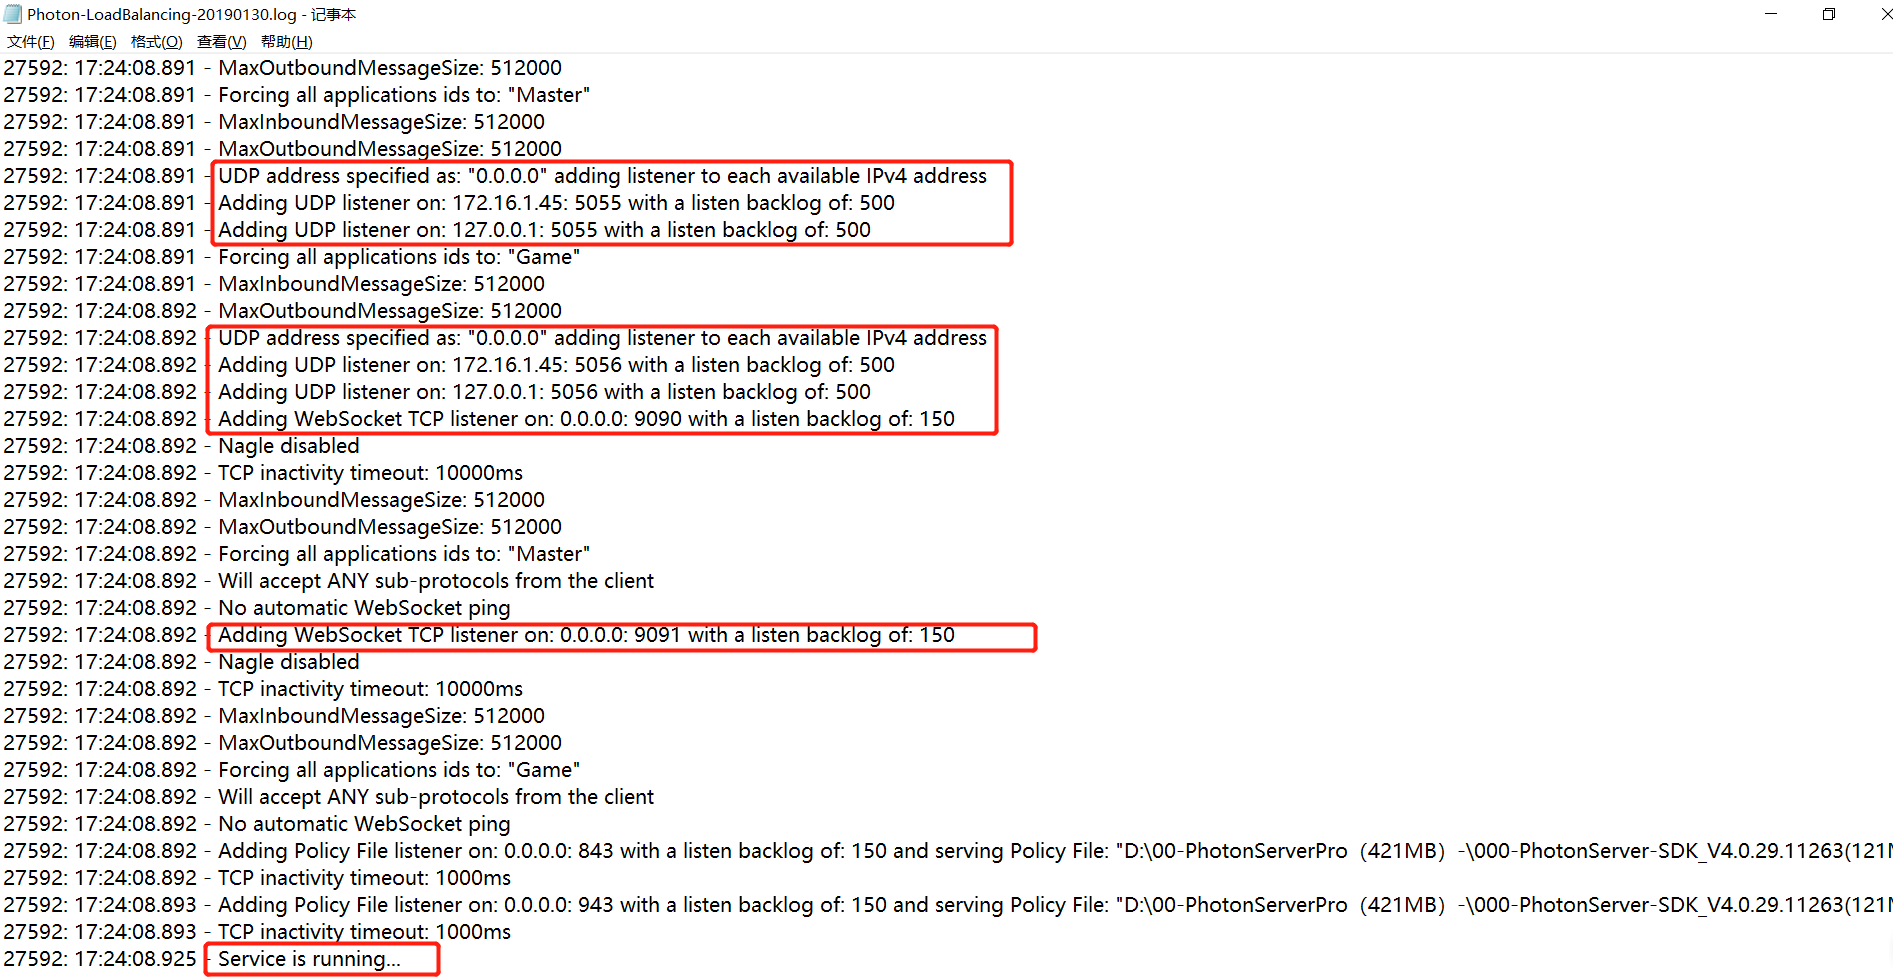
++A.3.3、如何检查Photon异常日志
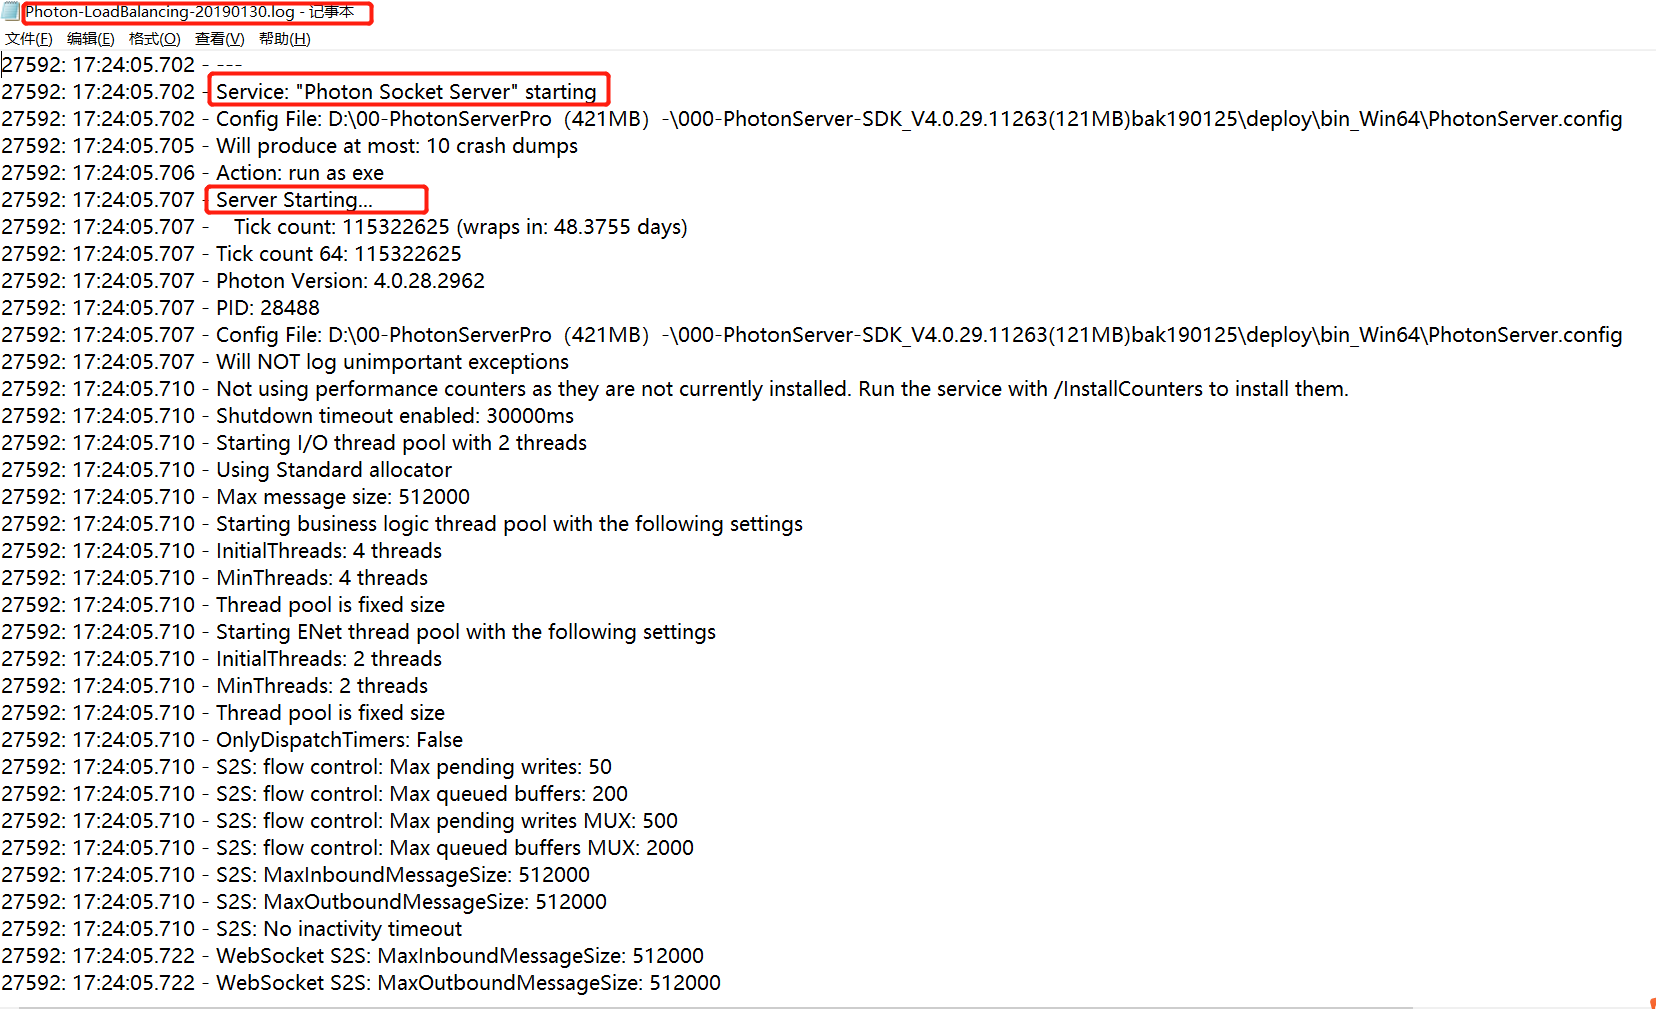
++++立钻哥哥:异常排查的一个有效途径就是看Log,当然引擎必须提供日志系统,这样才能有记录可查,要不自己写一个日志系统记录引擎的相关日志;当然,作为牛逼引擎的Photon提供了完整的日志记录系统,所以我们就可以直接查看分析了;
++++PhotonServer-SDKdeploylog

++++PhotonServer-SDKdeploybin_Win64log

++Photon-LoadBalancing-20190130.log
++++立钻哥哥:Photondeploybin_Win64logPhoton-LoadBalancing-20190130.log
++A.3.4、立钻哥哥Debug经验谈
++++立钻哥哥:作为资深的游戏开发人员,看Log分析的能力是要有的;根据业务编写自己的日志跟踪系统也是要有的;当然作为网络项目,日志的上传接收等后台记录系统也是要有的;
++++日志系统在一个成熟项目中是必须有的,作为前期项目更是锦上添花的功能;
##A.4、在Unity3D里添加Photon插件
##A.4、在Unity3D里添加Photon插件 |
++A.4、在Unity3D里添加Photon插件
++++立钻哥哥:这节将介绍如何在Unity3D里添加Photon插件,使其能在Unity3D里被正常使用;
++++A.4.1、Photon插件在Unity3D里添加后的文件内容及结构
++++A.4.2、Photon插件在Unity3D上的使用方法
++++A.4.3、如何编写脚本代码,与Photon服务器连接
++++A.4.4、立钻哥哥对Photon插件的理解与使用
++A.4.1、Photon插件在Unity3D里添加后的文件内容及结构
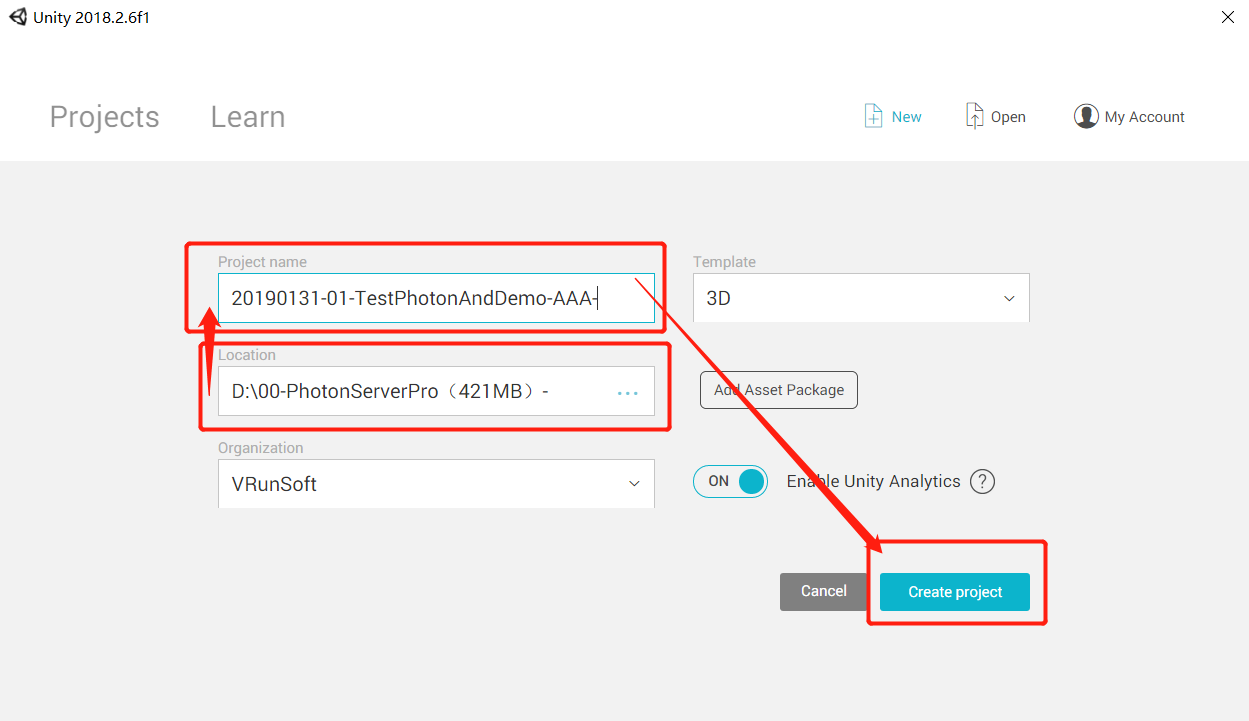
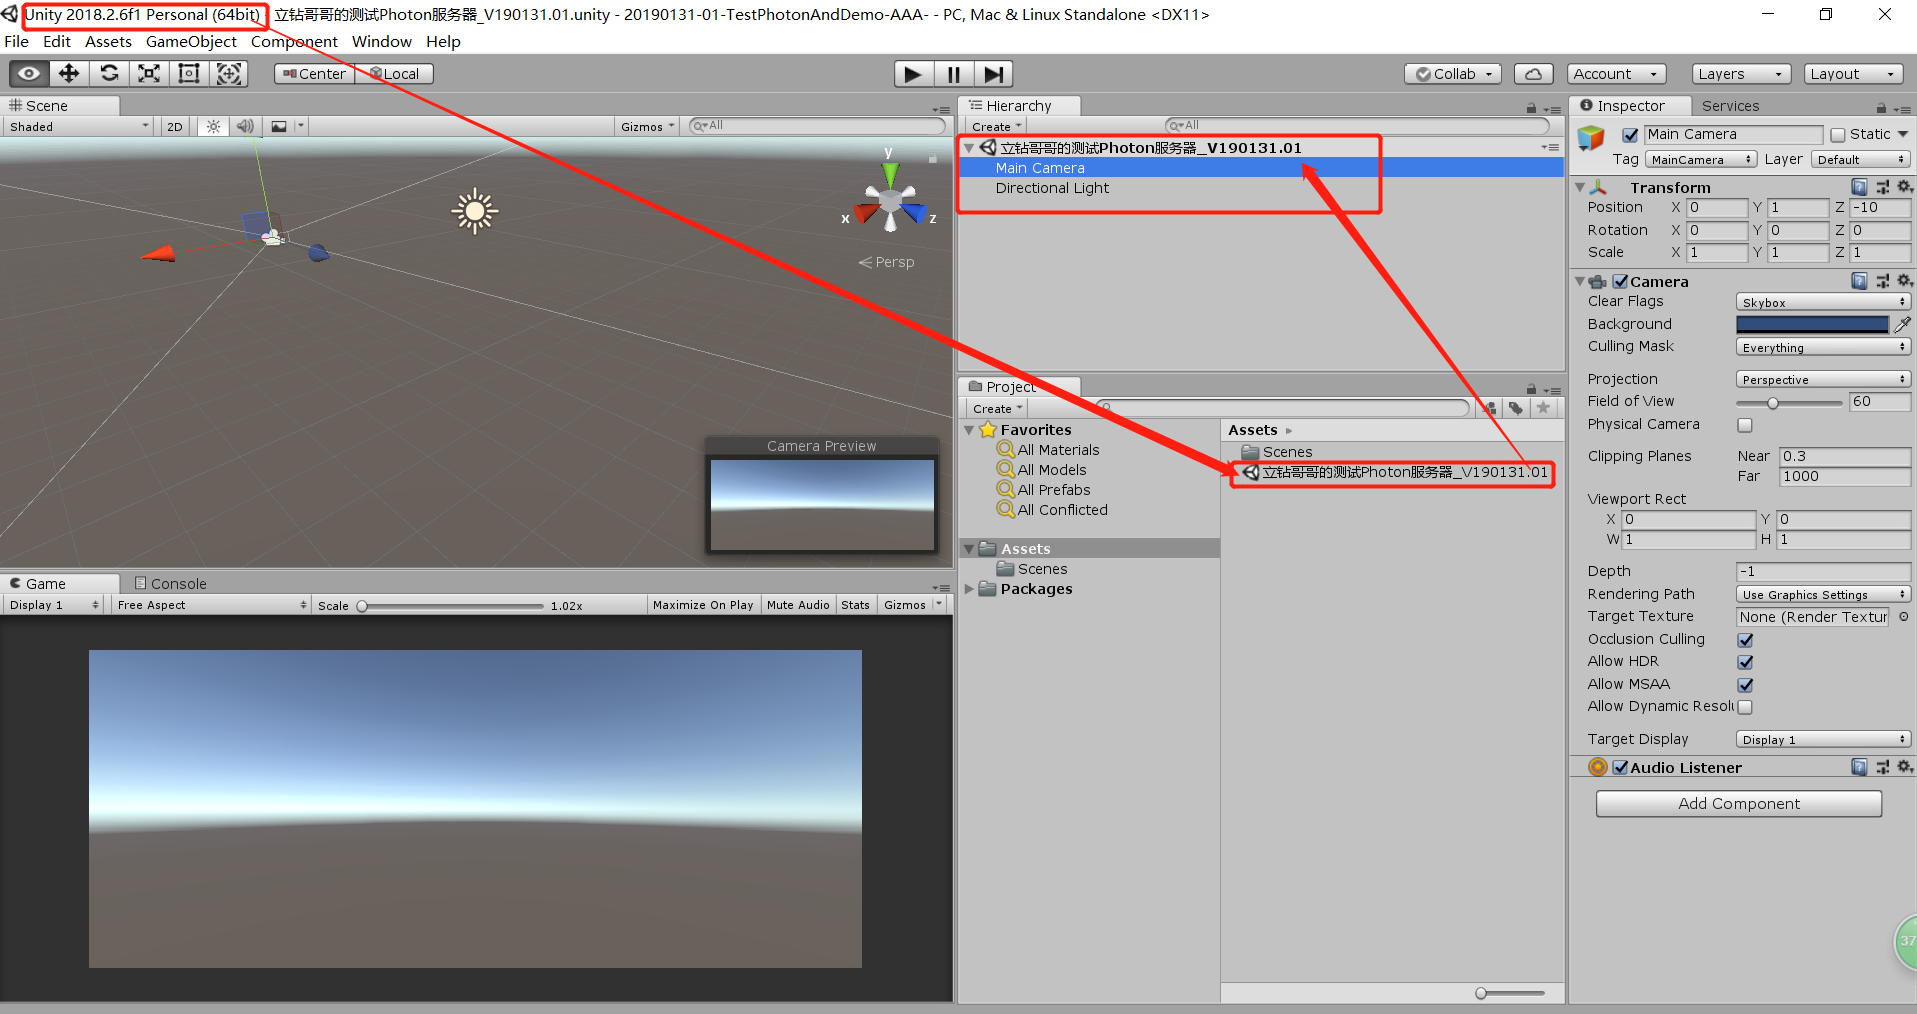
++++立钻哥哥:好吧,让我们新建一个Unity工程吧;
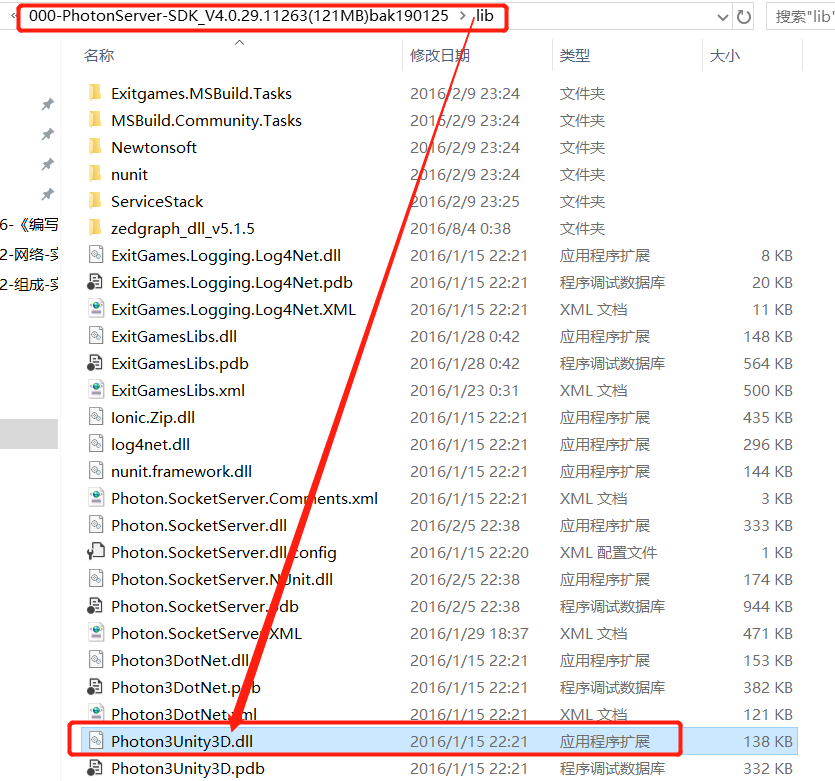
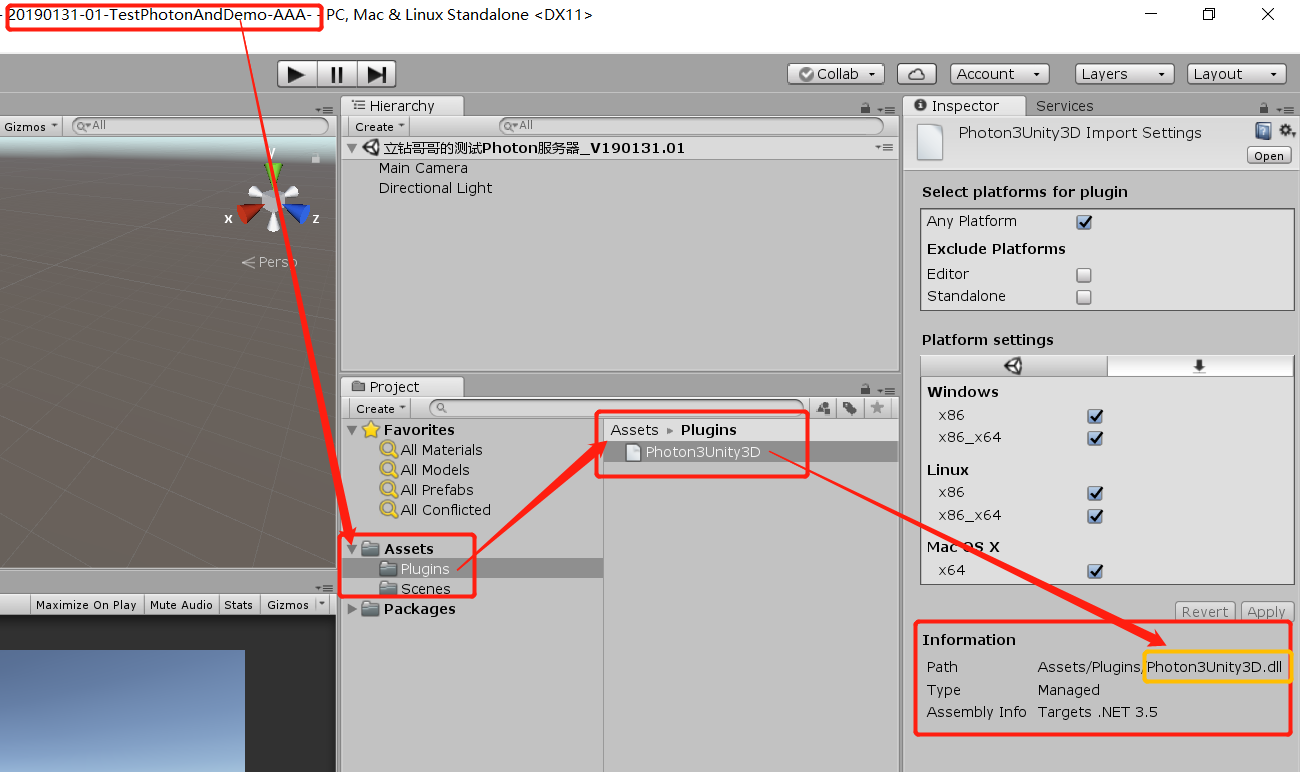
++++添加“Photon3Unity3D.dll”到Unity工程的Plugins/下:

++A.4.2、Photon插件在Unity3D上的使用方法
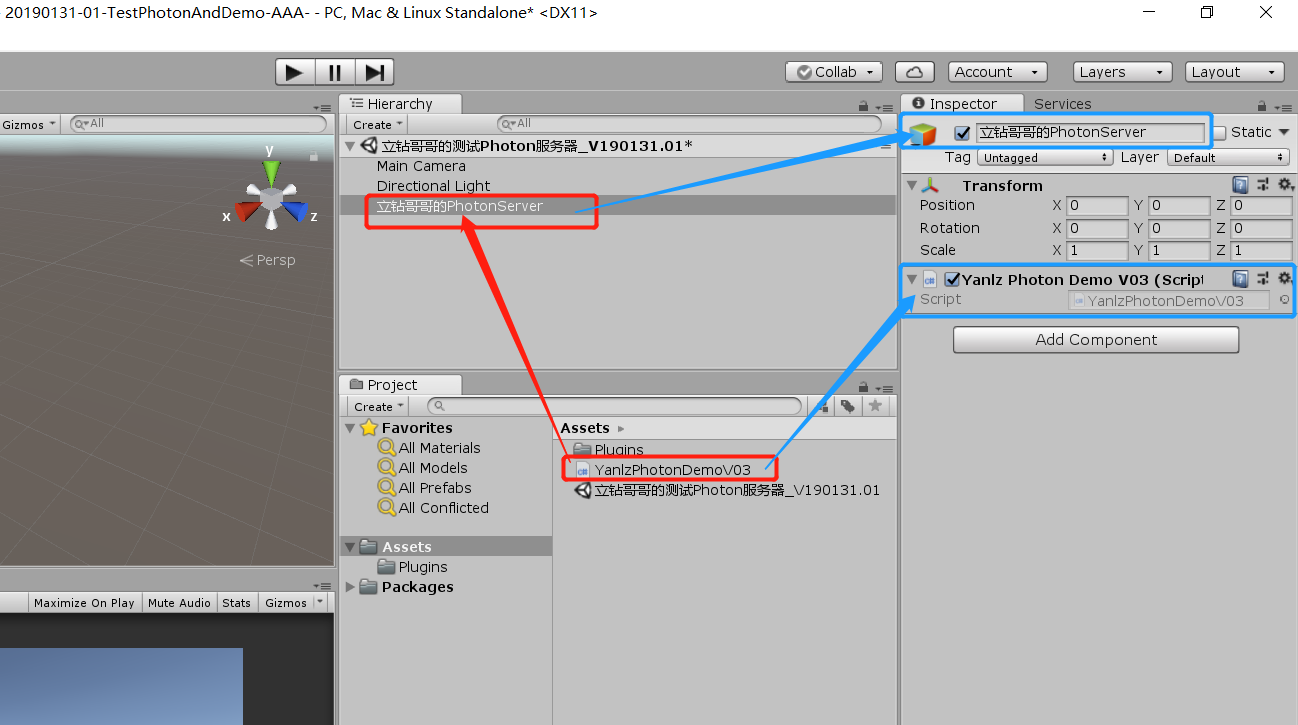
++++立钻哥哥:好吧,Dll添加进Unity工程了,那我们就开始使用吧;
++++新建一个脚本,挂载到任何物体(“立钻哥哥的PhotonServer”)上吧:
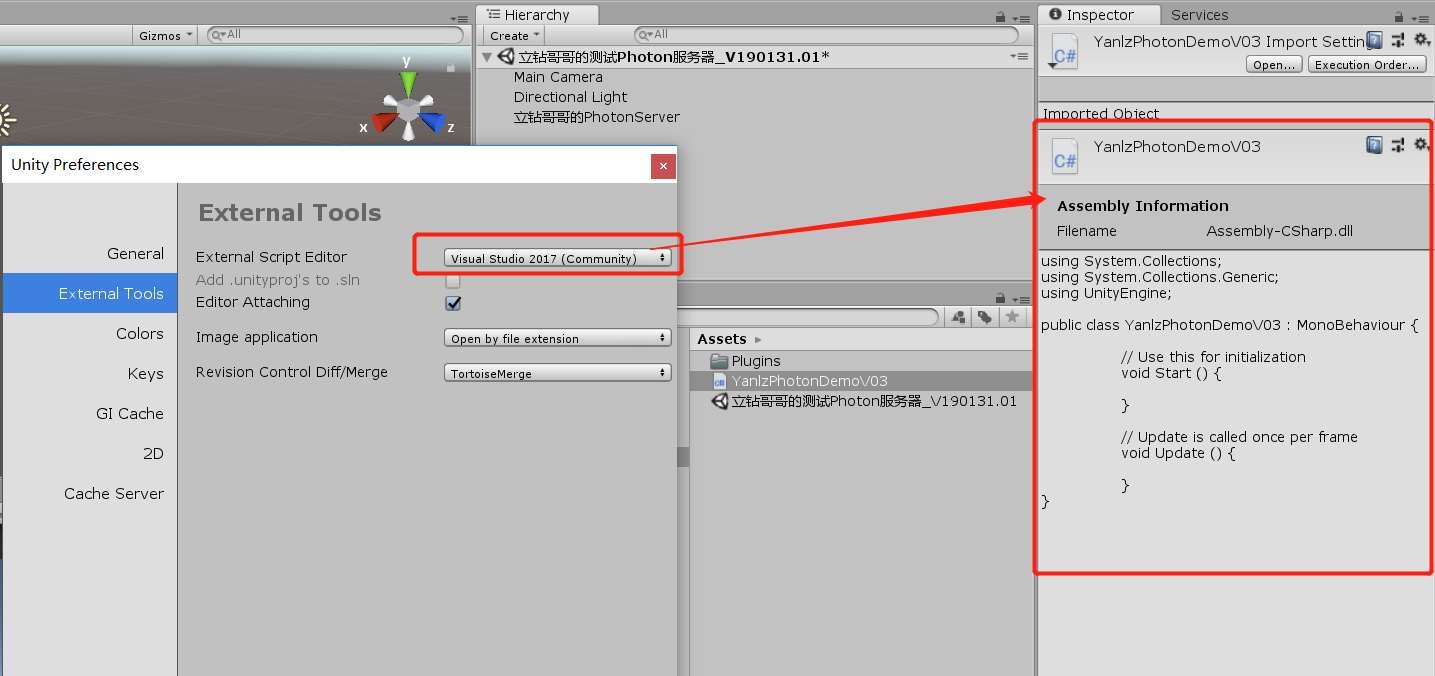
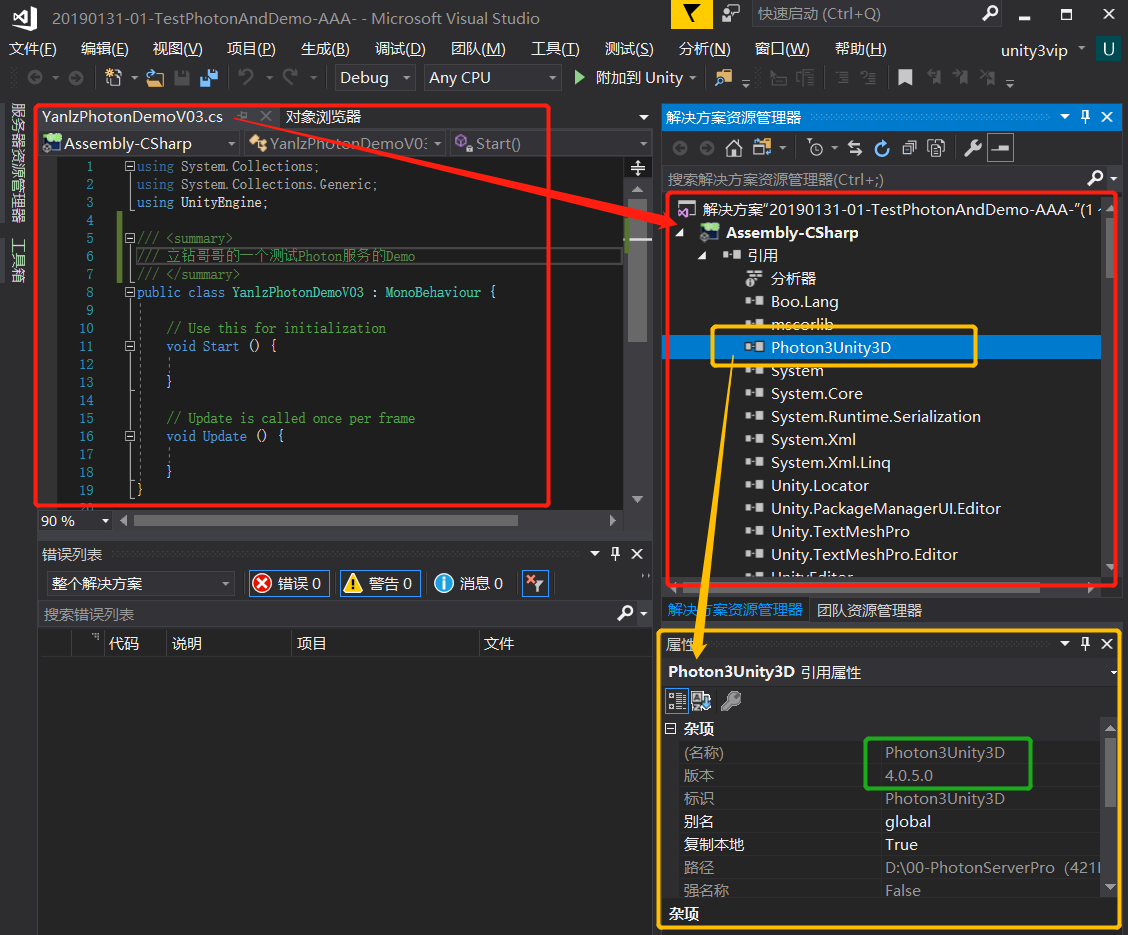
++推荐使用VS打开脚本
++++立钻哥哥:Unity支持Mono编辑器,但使用Photon引擎时,建议使用VS,可以查看到解决方案之类的细节,谁让VS牛逼呢!
++A.4.3、如何编写脚本代码,与Photon服务器连接
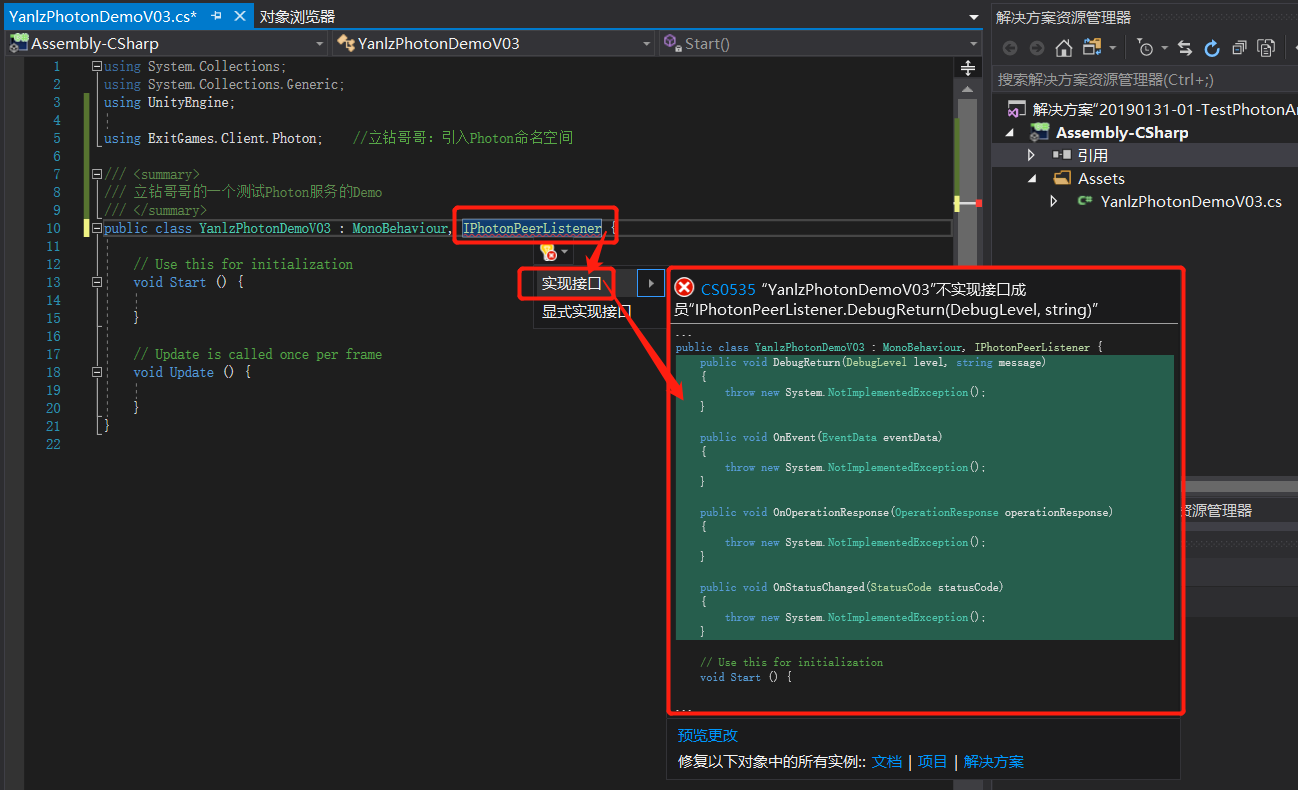
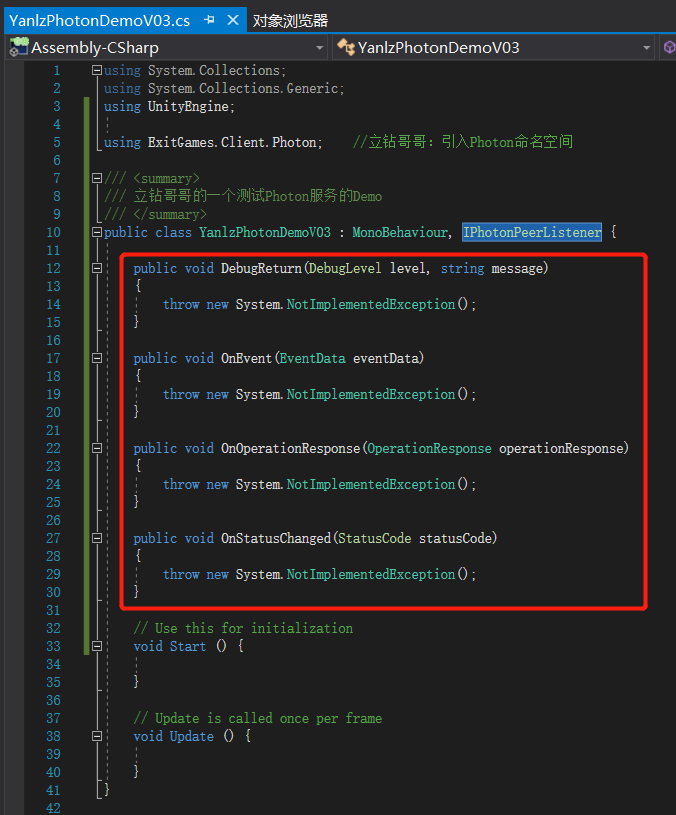
++++立钻哥哥:好吧,开始编写代码咯,验证一下吧;
| using System.Collections; using System.Collections.Generic; using UnityEngine;
using ExitGames.Client.Photon; //立钻哥哥:引入Photon命名空间
//立钻哥哥的一个测试Photon服务的Demo public class YanlzPhotonDemoV03 : MonoBehaviour, IPhotonPeerListener{ public void DebugReturn(DebugLevel level, string message){} public void OnEvent(EventData eventData){} public void OnOperationResponse(OperationResponse operationResponse){} public void OnStatusChanged(StatusCode statusCode){}
void Start(){} void Update(){} } //立钻哥哥:public class YanlzPhotonDemoV03{} |

++连接Photon服务器
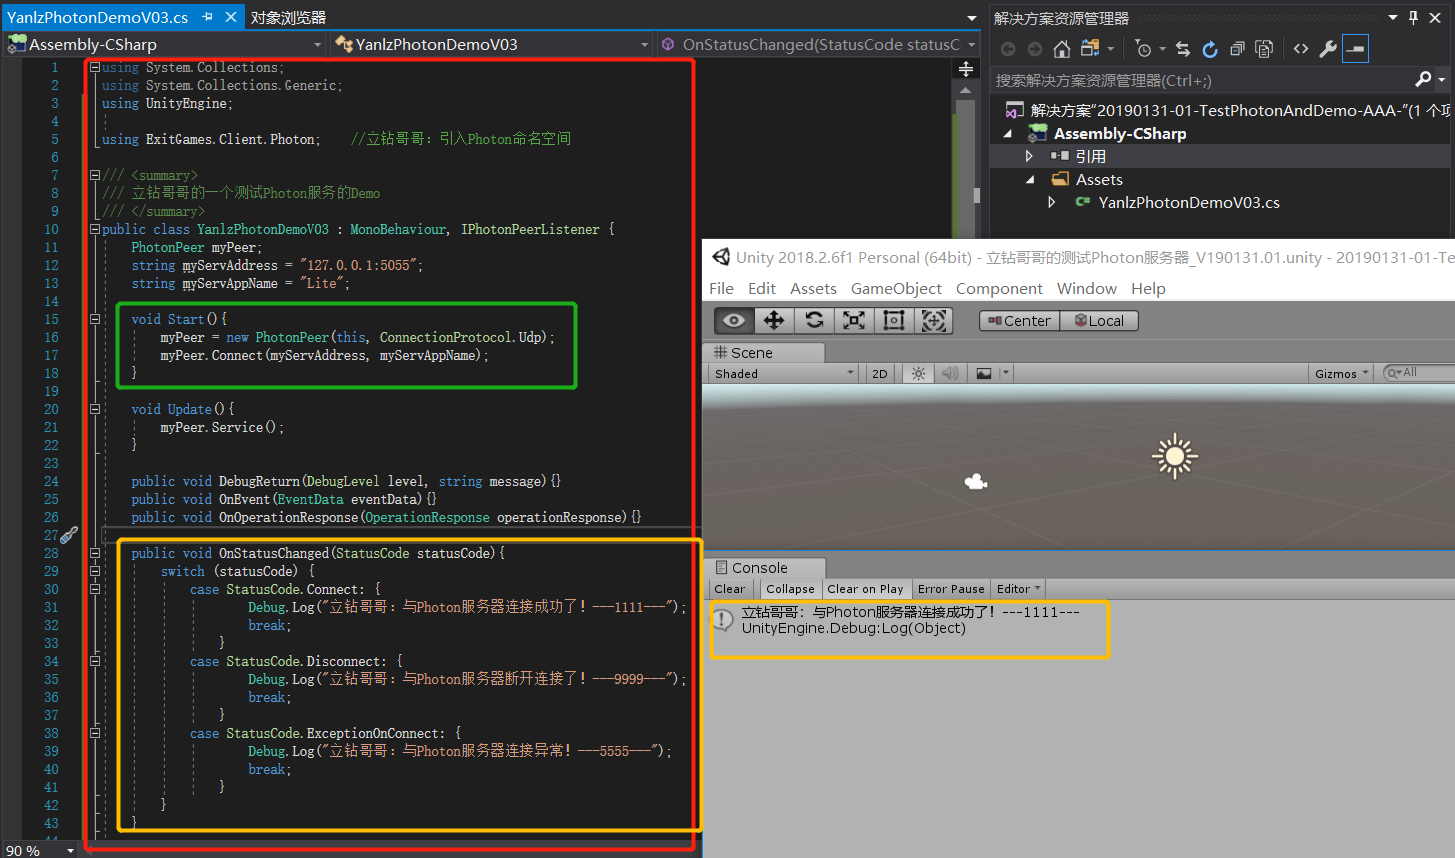
++++立钻哥哥:编写简单业务,尝试连接Photon服务器;
++++[new PhotonPeer(this, ConnectionProtocol.Udp);]
++++[myPeer.Connect(myServAddress, myServAppName);]
++++[myPeer.Service();]
++++[public void OnStatusChanged(StatusCode statusCode){}]
| using System.Collections; using System.Collections.Generic; using UnityEngine;
using ExitGame.Client.Photon; //立钻哥哥:引入Photon命名空间
//立钻哥哥的一个测试Photon服务的Demo public class YanlzPhotonDemoV03 : MonoBehaviour, IPhotonPeerListener{ PhotonPeer myPeer; string myServAddress = “127.0.0.1:5055”; string myServAppName = “Lite”;
void Start(){ myPeer = new PhotonPeer(this, ConnectionProtocol.Udp); myPeer.Connect(myServAddress, myServAppName); }
void Update(){ myPeer.Service(); }
public void DebugReturn(DebugLevel level, string message){} public void OnEvent(EventData eventData){} public void OnOperationResponse(OperationResponse operationResponse){}
public void OnStatusChanged(){ switch(statusCode){ case StatusCode.Connect:{ Debug.Log(“立钻哥哥:连接成功!---1111---”); break; } case StatusCode.Disconnect:{ Debug.Log(“立钻哥哥:断开连接!---9999---”); break; } case StatusCode.ExceptionOnConnect:{ Debug.Log(“立钻哥哥:连接异常! ---5555---”); break; } } } //立钻哥哥:public void OnStatusChanged(){}
} //立钻哥哥:public class YanlzPhotonDemoV03{} |
++A.4.4、立钻哥哥对Photon插件的理解与使用
++++立钻哥哥:到目前为止已经把Photon插件初步与Unity对接上了,是不是很刺激呢?接下来会更刺激,那就继续往下看吧!
#第二篇:Photon客户端脚本编写
#第二篇:Photon客户端脚本编写 |
#第二篇:Photon客户端脚本编写
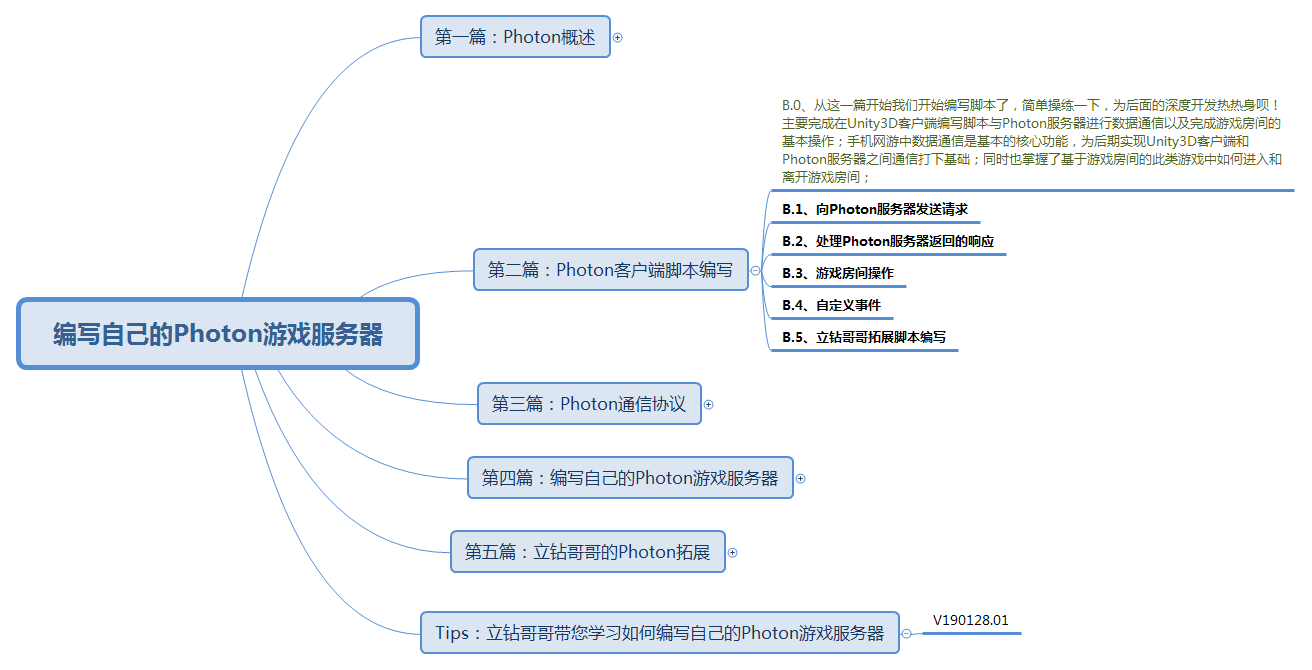
++++立钻哥哥:从这一篇开始我们开始编写脚本了,简单操练一下,为后面的深度开发热热身呗!主要完成在Unity3D客户端编写脚本与Photon服务器进行数据通信以及完成游戏房间的基本操作;手机网游中数据通信是基本的核心功能,为后期实现Unity3D客户端和Photon服务器之间通信打下基础;同时也掌握了基于游戏房间的此类游戏中如何进入和离开游戏房间;
++++B.1、向Photon服务器发送请求
++++B.2、处理Photon服务器返回的响应
++++B.3、游戏房间操作
++++B.4、自定义事件
++++B.5、立钻哥哥拓展脚本编写
##B.1、向Photon服务器发送请求
##B.1、向Photon服务器发送请求 |
++B.1、向Photon服务器发送请求
++++立钻哥哥:本节将介绍如何从Unity3D客户端发送请求到Photon服务器;这就开始进入使用Photon开发网络游戏了;
++++B.1.1、如何实现消息发送函数SendMessage
++++B.1.2、如何调用Photon服务函数Service
++B.1.1、如何实现消息发送函数SendMessage
++++立钻哥哥:myPeer.OpCustom(LiteOpKey.GameID, para, true);
++++class LiteOpKey{}:
| namespace ExitGames.Client.Photon.Lite{ public static class LiteOpKey{ public const byte ActorList = 252; public const byte ActorNr = 254; public const byte ActorProperties = 249; public const byte Add = 238; [Obsolete(“Use GameId”)] public const byte Asid = 255; public const byte Broadcast = 250; public const byte Cache = 247; public const byte Code = 244; public const byte Data = 245; public const byte GameId = 255; public const byte GameProperties = 248; public const byte Group = 240; public const byte Properties = 251; public const byte ReceiverGroup = 246; public const byte Remove = 239; [Obsolete(“Use GameId”)] public const byte RoomName = 255; public const byte TargetActorNr = 253; } //立钻哥哥:public static class LiteOpKey{} } //立钻哥哥:namespace ExitGames.Client.Photon.Lite{} |
++++SendMessage(){}:
| using ExitGame.Client.Photon; //立钻哥哥:引入Photon命名空间
//立钻哥哥的一个测试Photon服务的Demo public class YanlzPhotonDemoV03 : MonoBehaviour, IPhotonPeerListener{ PhotonPeer myPeer; string myServAddress = “127.0.0.1:5055”; string myServAppName = “Lite”;
void Start(){ myPeer = new PhotonPeer(this, ConnectionProtocol.Udp); myPeer.Connect(myServAddress, myServAppName); }
void Update(){ myPeer.Service(); }
Void SendMyMessage(){ Dictionary<byte, object> para = new Dictionary<byte, object>(); Para[LiteOpKey.GameId] = “1”; myPeer.OpCustom(LiteOpKey.GameId, para, true); }
Void OnGUI(){ If(GUI.Button(new Rect(Screen.width/2 - 50, 100, 100, 30), “设置游戏编号”)){ SendMyMessage(); } }
public void DebugReturn(DebugLevel level, string message){}
public void OnEvent(EventData eventData){ Debug.Log(“立钻哥哥:触发了事件:” + eventData.ToStringFull()); }
public void OnOperationResponse(OperationResponse operationResponse){ Debug.Log(“立钻哥哥:服务器返回响应:” + operationResponse.ToStringFull()); }
public void OnStatusChanged(){ switch(statusCode){ case StatusCode.Connect:{ Debug.Log(“立钻哥哥:连接成功!---1111---”); break; } case StatusCode.Disconnect:{ Debug.Log(“立钻哥哥:断开连接!---9999---”); break; } case StatusCode.ExceptionOnConnect:{ Debug.Log(“立钻哥哥:连接异常! ---5555---”); break; } } } //立钻哥哥:public void OnStatusChanged(){}
} //立钻哥哥:public class YanlzPhotonDemoV03{} |

++立钻哥哥推荐的拓展学习链接(Link_Url):
| 立钻哥哥推荐的拓展学习链接(Link_Url) |
++++立钻哥哥Unity 学习空间: http://blog.csdn.net/VRunSoftYanlz/
++++Unity5.x用户手册:https://blog.csdn.net/VRunSoftYanlz/article/details/81712741
++++Unity面试题ABC:https://blog.csdn.net/vrunsoftyanlz/article/details/78630687
++++Unity面试题D:https://blog.csdn.net/VRunSoftYanlz/article/details/78630838
++++Unity面试题E:https://blog.csdn.net/vrunsoftyanlz/article/details/78630913
++++Unity面试题F:https://blog.csdn.net/VRunSoftYanlz/article/details/78630945
++++Cocos2dx面试题:https://blog.csdn.net/VRunSoftYanlz/article/details/78630967
++++禅道[zentao]:https://blog.csdn.net/VRunSoftYanlz/article/details/83964057
++++C#事件:https://blog.csdn.net/vrunsoftyanlz/article/details/78631267
++++C#委托:https://blog.csdn.net/vrunsoftyanlz/article/details/78631183
++++C#集合:https://blog.csdn.net/vrunsoftyanlz/article/details/78631175
++++C#泛型:https://blog.csdn.net/vrunsoftyanlz/article/details/78631141
++++C#接口:https://blog.csdn.net/vrunsoftyanlz/article/details/78631122
++++C#静态类:https://blog.csdn.net/vrunsoftyanlz/article/details/78630979
++++C#中System.String类:https://blog.csdn.net/vrunsoftyanlz/article/details/78630945
++++C#数据类型:https://blog.csdn.net/vrunsoftyanlz/article/details/78630913
++++Unity3D默认的快捷键:https://blog.csdn.net/vrunsoftyanlz/article/details/78630838
++++Unity引擎基础:https://blog.csdn.net/vrunsoftyanlz/article/details/78881685
++++Unity面向组件开发:https://blog.csdn.net/vrunsoftyanlz/article/details/78881752
++++Unity物理系统:https://blog.csdn.net/vrunsoftyanlz/article/details/78881879
++++Unity2D平台开发:https://blog.csdn.net/vrunsoftyanlz/article/details/78882034
++++UGUI基础:https://blog.csdn.net/vrunsoftyanlz/article/details/78884693
++++UGUI进阶:https://blog.csdn.net/vrunsoftyanlz/article/details/78884882
++++UGUI综合:https://blog.csdn.net/vrunsoftyanlz/article/details/78885013
++++Unity动画系统基础:https://blog.csdn.net/vrunsoftyanlz/article/details/78886068
++++Unity动画系统进阶:https://blog.csdn.net/vrunsoftyanlz/article/details/78886198
++++Navigation导航系统:https://blog.csdn.net/vrunsoftyanlz/article/details/78886281
++++Unity特效渲染:https://blog.csdn.net/vrunsoftyanlz/article/details/78886403
++++Unity数据存储:https://blog.csdn.net/vrunsoftyanlz/article/details/79251273
++++Unity中Sqlite数据库:https://blog.csdn.net/vrunsoftyanlz/article/details/79254162
++++WWW类和协程:https://blog.csdn.net/vrunsoftyanlz/article/details/79254559
++++Unity网络:https://blog.csdn.net/vrunsoftyanlz/article/details/79254902
++++PhotonServer简介:https://blog.csdn.net/VRunSoftYanlz/article/details/86652770
++++编写Photon游戏服务器:https://blog.csdn.net/VRunSoftYanlz/article/details/86682935
++++设计模式简单整理:https://blog.csdn.net/vrunsoftyanlz/article/details/79839641
++++专题:设计模式(精华篇):https://blog.csdn.net/VRunSoftYanlz/article/details/81322678
++++U3D小项目参考:https://blog.csdn.net/vrunsoftyanlz/article/details/80141811
++++Unity案例(Vehicle):https://blog.csdn.net/VRunSoftYanlz/article/details/82355876
++++UML类图:https://blog.csdn.net/vrunsoftyanlz/article/details/80289461
++++PowerDesigner简介:https://blog.csdn.net/VRunSoftYanlz/article/details/86500084
++++Unity知识点0001:https://blog.csdn.net/vrunsoftyanlz/article/details/80302012
++++Unity知识点0008:https://blog.csdn.net/VRunSoftYanlz/article/details/81153606
++++U3D_Shader编程(第一篇:快速入门篇):https://blog.csdn.net/vrunsoftyanlz/article/details/80372071
++++U3D_Shader编程(第二篇:基础夯实篇):https://blog.csdn.net/vrunsoftyanlz/article/details/80372628
++++框架知识点:https://blog.csdn.net/VRunSoftYanlz/article/details/80862879
++++游戏框架(UI框架夯实篇):https://blog.csdn.net/vrunsoftyanlz/article/details/80781140
++++游戏框架(初探篇):https://blog.csdn.net/VRunSoftYanlz/article/details/80630325
++++Lua快速入门篇(基础概述):https://blog.csdn.net/VRunSoftYanlz/article/details/81041359
++++Lua快速入门篇(XLua教程):https://blog.csdn.net/VRunSoftYanlz/article/details/81141502
++++Lua快速入门篇(Xlua拓展):https://blog.csdn.net/VRunSoftYanlz/article/details/81173818
++++UnityAPI.Rigidbody刚体:https://blog.csdn.net/VRunSoftYanlz/article/details/81784053
++++HTC_VIVE开发基础:https://blog.csdn.net/VRunSoftYanlz/article/details/81989970
++++Oculus杂谈:https://blog.csdn.net/VRunSoftYanlz/article/details/82469850
++++Oculus安装使用:https://blog.csdn.net/VRunSoftYanlz/article/details/82718982
++++SteamVR简介:https://blog.csdn.net/VRunSoftYanlz/article/details/86484254
++++SteamVR脚本功能分析:https://blog.csdn.net/VRunSoftYanlz/article/details/86531480
++++SteamVR2.0开发指南:https://blog.csdn.net/VRunSoftYanlz/article/details/86618187
++++SteamVR/Extras:https://blog.csdn.net/VRunSoftYanlz/article/details/86584108
++++SteamVR/Input:https://blog.csdn.net/VRunSoftYanlz/article/details/86601950
++++OpenXR简介:https://blog.csdn.net/VRunSoftYanlz/article/details/85726365
++++VRTK杂谈:https://blog.csdn.net/VRunSoftYanlz/article/details/82562993
++++VRTK快速入门(杂谈):https://blog.csdn.net/VRunSoftYanlz/article/details/82955267
++++VRTK官方示例(目录):https://blog.csdn.net/VRunSoftYanlz/article/details/82955410
++++VRTK代码结构(目录):https://blog.csdn.net/VRunSoftYanlz/article/details/82780085
++++VRTK(SceneResources):https://blog.csdn.net/VRunSoftYanlz/article/details/82795400
++++VRTK_ControllerEvents:https://blog.csdn.net/VRunSoftYanlz/article/details/83099512
++++VRTK_InteractTouch:https://blog.csdn.net/VRunSoftYanlz/article/details/83120220
++++UnityAPI.Material材质:https://blog.csdn.net/VRunSoftYanlz/article/details/81814303
++++UnityAPI.Android安卓:https://blog.csdn.net/VRunSoftYanlz/article/details/81843193
++++UnityAPI.AndroidJNI安卓JNI:https://blog.csdn.net/VRunSoftYanlz/article/details/81879345
++++UnityAPI.Transform变换:https://blog.csdn.net/VRunSoftYanlz/article/details/81916293
++++UnityAPI.WheelCollider轮碰撞器:https://blog.csdn.net/VRunSoftYanlz/article/details/82356217
++++UnityAPI.Resources资源:https://blog.csdn.net/VRunSoftYanlz/article/details/83155518
++++JSON数据结构:https://blog.csdn.net/VRunSoftYanlz/article/details/82026644
++++CocosStudio快速入门:https://blog.csdn.net/VRunSoftYanlz/article/details/82356839
++++VR实验:以太网帧的构成:https://blog.csdn.net/VRunSoftYanlz/article/details/82598140
++++FrameVR示例V0913:https://blog.csdn.net/VRunSoftYanlz/article/details/82808498
++++FrameVR示例V1003:https://blog.csdn.net/VRunSoftYanlz/article/details/83066516
++++SwitchMachineV1022:https://blog.csdn.net/VRunSoftYanlz/article/details/83280886
++++PlaySceneManagerV1022:https://blog.csdn.net/VRunSoftYanlz/article/details/83280886
++++Unity企业内训(目录):https://blog.csdn.net/VRunSoftYanlz/article/details/82634668
++++Unity企业内训(第1讲):https://blog.csdn.net/VRunSoftYanlz/article/details/82634733
++++Unity企业内训(第2讲):https://blog.csdn.net/VRunSoftYanlz/article/details/82861180
++++Unity企业内训(第3讲):https://blog.csdn.net/VRunSoftYanlz/article/details/82927699
++++Unity企业内训(第4讲):https://blog.csdn.net/VRunSoftYanlz/article/details/83479776
++++Unity企业内训(第5讲):https://blog.csdn.net/VRunSoftYanlz/article/details/83963811
++++Unity企业内训(第6讲):https://blog.csdn.net/VRunSoftYanlz/article/details/84207696
++++插件<Obi Rope>:https://blog.csdn.net/VRunSoftYanlz/article/details/83963905
++++计算机组成原理(教材篇):https://blog.csdn.net/VRunSoftYanlz/article/details/82719129
++++立钻哥哥Unity 学习空间: http://blog.csdn.net/VRunSoftYanlz/
--_--VRunSoft:lovezuanzuan--_--

最后
以上就是发嗲柠檬最近收集整理的关于编写自己的Photon游戏服务器(Yanlz+Unity+Photon+Server+UNet+KBEngine+Socket+纤程+UDP+立钻哥哥+==)《编写自己的Photon游戏服务器》#第一篇:Photon概述#第一篇:Photon概述#第二篇:Photon客户端脚本编写的全部内容,更多相关编写自己内容请搜索靠谱客的其他文章。


发表评论 取消回复