题目1:
D触发器是一种电路,它存储位并定期更新,位于时钟信号的(通常)正边。
D 触发器在使用时钟始终块时由逻辑合成器创建(请参见始终阻止2).D触发器是最简单的“组合逻辑后跟触发器的斑点”形式,其中组合逻辑部分只是一根线。
创建单个 D 触发器。
模块声明
module top_module (
    input clk,    // Clocks are used in sequential circuits
    input d,
    output reg q );
代码编写如下:
module top_module (
    input clk,    // Clocks are used in sequential circuits
    input d,
    output reg q );//
    always@(posedge clk)
        begin
        q<=d;
        end

endmodule
题目2:
创建 8 位D 触发器。所有DFF都应由clk的上升沿触发。
模块声明
module top_module (
    input clk,
    input [7:0] d,
    output [7:0] q
);
代码编写如下:
module top_module (
    input clk,
    input [7:0] d,
    output [7:0] q
);
    always@(posedge clk)
        begin
            q <= d;
        end
endmodule
题目3:
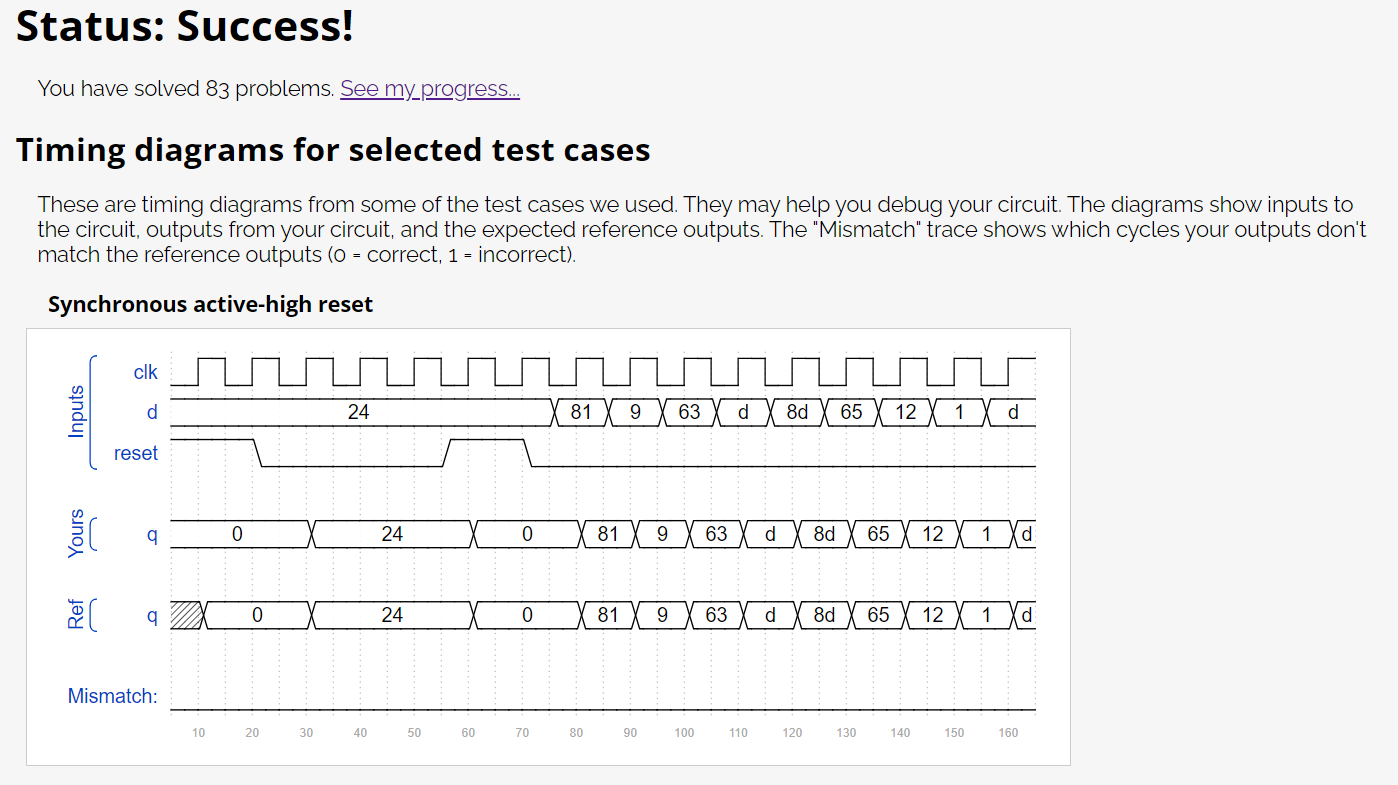
创建具有高电平有效同步复位功能的 8 D 触发器。所有DFF都应由clk的上升沿触发。
模块声明
module top_module (
    input clk,
    input reset,            // Synchronous reset
    input [7:0] d,
    output [7:0] q
);
分析:该触发器为同步清零方式。同步清零:即当复位端(清零输入信号)有效,且时钟(cp)的有效边沿到来时,才能使触发器清零。
代码编写如下:
module top_module (
    input clk,
    input reset,            // Synchronous reset
    input [7:0] d,
    output [7:0] q
);
    always@(posedge clk )
        begin
            if(reset)
                q =0;
            else
            q <= d;
        end

endmodule
仿真结果如下:
题目4:
创建具有高电平有效同步复位功能的 8 D 触发器。触发器必须重置为0x34而不是零。所有DFF都应由clk的负边触发(下降沿触发)。
模块声明
module top_module (
    input clk,
    input reset,
    input [7:0] d,
    output [7:0] q
);
代码编写如下:
module top_module (
    input clk,
    input reset,
    input [7:0] d,
    output [7:0] q
);
    always@(negedge clk)
        begin
            if(reset)
                q = 8'h0x34;
            else
                q <= d;

        end
endmodule
题目5:
创建具有主动高电平异步复位的 8 D 触发器。所有DFF都应由clk的正边触发(上升沿触发)。
模块声明
module top_module (
    input clk,
    input areset,   // active high asynchronous reset
    input [7:0] d,
    output [7:0] q
);
分析:该触发器为异步清零方式。异步清零:当清零输入信号有效,无论时钟(cp)的有效边沿是否到来,触发器都会清零。
代码编写如下:
module top_module (
    input clk,
    input areset,   // active high asynchronous reset
    input [7:0] d,
    output [7:0] q
);
    always@(posedge clk or posedge areset)
        if(areset)
            q <= 0;
    else
        q <= d;

endmodule
题目6:具有字节使能功能的触发器
创建 16 D 触发器。有时,仅修改一组触发器的某些部分很有用。字节使能输入控制是否应在该周期内写入 16 个寄存器的每个字节。byteena[1] 控制上限字节 d[15:8],而 byteena[0] 控制下字节 d[7:0]。
复位是同步、低电平有效复位。
所有DFF都应由clk的正边触发。
模块声明
module top_module (
    input clk,
    input resetn,
    input [1:0] byteena,
    input [15:0] d,
    output [15:0] q
);
代码编写如下:
module top_module (
    input clk,
    input resetn,
    input [1:0] byteena,
    input [15:0] d,
    output [15:0] q
);
    always@(posedge clk )
        begin
        if(!resetn)
            q <= 0;
            else if(byteena[0] | byteena[1])
             begin
                if(byteena[0])
                    q[7:0] <= d[7:0];
               if(byteena[1])
                   q[15:8] <= d[15:8];
                end
        end
endmodule
注意:if -else语句本身就隐含着一种优先级关系。 如果将上述代码换成下面这样,将会出错。
module top_module (
    input clk,
    input resetn,
    input [1:0] byteena,
    input [15:0] d,
    output [15:0] q
);
    always@(posedge clk )
        begin
        if(!resetn)
            q <= 0;
            else
               begin
              if(byteena[0])
                q[7:0] <= d[7:0];
              else if(byteena[1])
                q[15:0] <= d[15:8];
        end
        end
endmodule
出错的仿真结果如下:
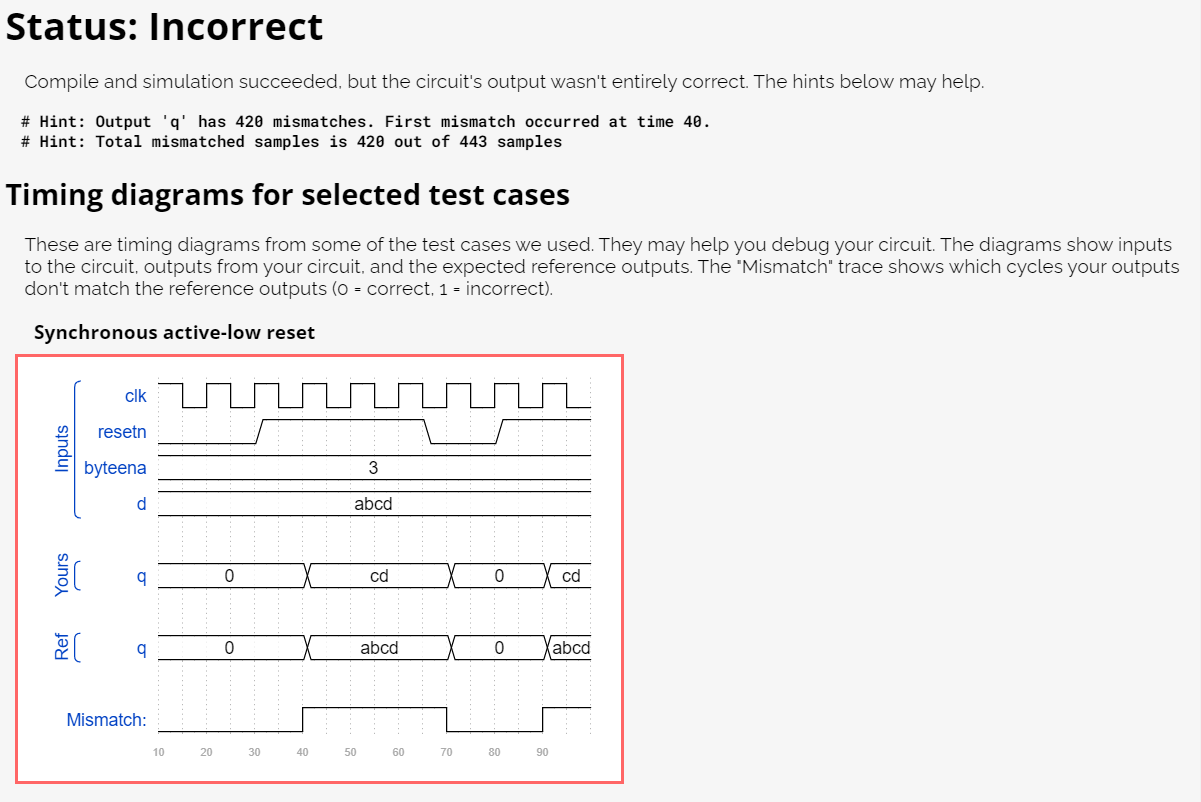
这是因为在else中嵌套的if-else if语句中含有优先级关系:如果判断了 if(byteena[0])为真,则else if(byteena[1])不会被执行,直接跳出该选择语句。而用两个if语句则无优先级关系。
最后
以上就是羞涩棒棒糖最近收集整理的关于HDLBITS笔记23:触发器的基础练习(同步清零、异步清零、复位端、字节使能等)的全部内容,更多相关HDLBITS笔记23:触发器内容请搜索靠谱客的其他文章。


发表评论 取消回复