【翻译自 : Face Recognition using Principal Component Analysis 】
【说明:Jason Brownlee PhD大神的文章个人很喜欢,所以闲暇时间里会做一点翻译和学习实践的工作,这里是相应工作的实践记录,希望能帮到有需要的人!】
机器学习的最新进展使人脸识别不再是一个难题。 但在以前,研究人员进行了各种尝试,开发了各种技能,使计算机能够识别人。 早期取得的成功之一是基于线性代数技术的 eigenface。
在本教程中,我们将看到如何使用一些简单的线性代数技术(例如主成分分析)构建原始人脸识别系统。完成本教程后,您将了解:
eigenface技术的发展
如何使用主成分分析从图像数据集中提取特征图像
如何将任何图像表示为特征图像的加权和
如何从主成分的权重比较图像的相似度
教程概述
本教程分为 3 部分;他们是:
图像和人脸识别
特征脸概述
实施特征脸
图像和人脸识别
在计算机中,图片被表示为一个像素矩阵,每个像素都有一个特定的颜色,用一些数值编码。很自然地会问计算机是否可以读取图片并理解它是什么,如果可以,我们是否可以使用矩阵数学来描述逻辑。为了不那么雄心勃勃,人们试图将这个问题的范围限制在识别人脸上。人脸识别的早期尝试是将矩阵视为高维细节,我们从中推断出低维信息向量,然后尝试在低维中识别人。在过去,这是必要的,因为计算机功能不强,内存量非常有限。然而,通过探索如何将图像压缩到更小的尺寸,我们开发了一种技能来比较两张图像是否描绘了相同的人脸,即使图片不相同。
1987 年,Sirovich 和 Kirby 的一篇论文认为所有人脸图片都是几个“关键图片”的加权和。Sirovich 和 Kirby 将这些关键图片称为“特征图片”,因为它们是人脸图片的协方差矩阵的特征向量。在论文中他们确实提供了矩阵形式的人脸图片数据集的主成分分析算法。并且加权和中使用的权重确实对应于人脸图片到每个特征图片的投影。1991 年,Turk 和 Pentland 的一篇论文创造了“特征脸”一词。他们建立在 Sirovich 和 Kirby 的想法之上,并使用权重和特征图片作为特征来识别人脸。 Turk 和 Pentland 的论文提出了一种计算本征图片的高效内存方法。它还提出了人脸识别系统如何运行的算法,包括如何更新系统以包含新人脸以及如何将其与视频捕获系统相结合。同一篇论文还指出,eigenface的概念可以帮助部分遮挡图片的重建。
eigenface概述
在我们跳入代码之前,让我们概述使用 eigenface 进行人脸识别的步骤,并指出一些简单的线性代数技术如何帮助完成任务。
该部分内容建议阅读原文自行理解,个人理解有限。
实现
现在我们尝试用 numpy 和 scikit-learn 来实现 eigenface 的想法。 我们还将利用 OpenCV 来读取图片文件。 您可能需要使用 pip 命令安装相关包:
pip install opencv-python我们使用的数据集是 ORL 人脸数据库,它已经很老了,但我们可以从这里下载、该文件是一个大约 4MB 的 zip 文件。 它有40个人的照片,每个人有10张照片。 共 400 张图片。 下面我们假设文件下载到本地目录并命名为 attface.zip。我们可以将zip文件解压得到图片,也可以利用Python中的zipfile包直接从zip文件中读取内容:
import cv2
import zipfile
import numpy as np

faces = {}
with zipfile.ZipFile("attface.zip") as facezip:
    for filename in facezip.namelist():
        if not filename.endswith(".pgm"):
            continue # not a face picture
        with facezip.open(filename) as image:
            # If we extracted files from zip, we can use cv2.imread(filename) instead
            faces[filename] = cv2.imdecode(np.frombuffer(image.read(), np.uint8), cv2.IMREAD_GRAYSCALE)
以上就是读取zip中的每个PGM文件。 PGM 是一种灰度图像文件格式。 我们通过 image.read() 将每个 PGM 文件提取为一个字节字符串,并将其转换为一个 numpy 字节数组。 然后我们使用 OpenCV 使用 cv2.imdecode() 将字节字符串解码为像素数组。 OpenCV 会自动检测文件格式。 我们将每张图片保存到 Python 字典faces 中以备后用。在这里,我们可以使用 matplotlib 来查看这些人脸图片:
import matplotlib.pyplot as plt

fig, axes = plt.subplots(4,4,sharex=True,sharey=True,figsize=(8,10))
faceimages = list(faces.values())[-16:] # take last 16 images
for i in range(16):
    axes[i%4][i//4].imshow(faceimages[i], cmap="gray")
plt.show()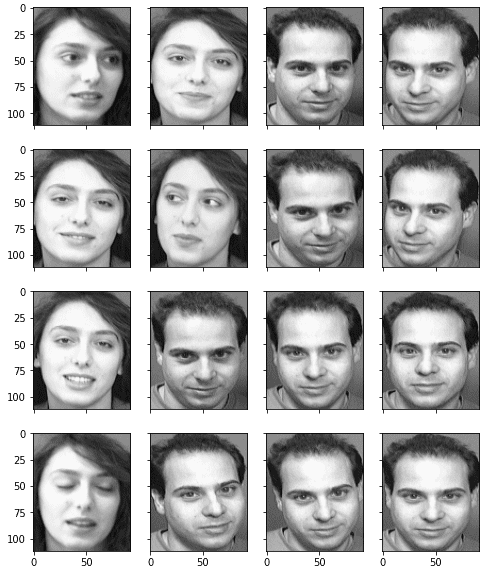
我们还可以查看每张图片的像素大小:
faceshape = list(faces.values())[0].shape
print("Face image shape:", faceshape)
Face image shape: (112, 92)人脸图片通过它们在 Python 字典中的文件名来标识。 我们可以看一下文件名:
print(list(faces.keys())[:5])

['s1/1.pgm', 's1/10.pgm', 's1/2.pgm', 's1/3.pgm', 's1/4.pgm']
因此我们可以将同一个人的面孔放入同一类。 有40个类,共400张图片:
classes = set(filename.split("/")[0] for filename in faces.keys())
print("Number of classes:", len(classes))
print("Number of pictures:", len(faces))


Number of classes: 40
Number of pictures: 400
为了说明使用特征脸进行识别的能力,我们想在生成特征脸之前保留一些图片。 我们保留一个人的所有图片以及另一个人的一张图片作为我们的测试集。 剩下的图片被矢量化并转换成一个二维的 numpy 数组:
# Take classes 1-39 for eigenfaces, keep entire class 40 and
# image 10 of class 39 as out-of-sample test
facematrix = []
facelabel = []
for key,val in faces.items():
    if key.startswith("s40/"):
        continue # this is our test set
    if key == "s39/10.pgm":
        continue # this is our test set
    facematrix.append(val.flatten())
    facelabel.append(key.split("/")[0])

# Create facematrix as (n_samples,n_pixels) matrix
facematrix = np.array(facematrix)
现在我们可以对这个数据集矩阵进行主成分分析。 我们没有一步一步地计算 PCA,而是使用 scikit-learn 中的 PCA 函数,我们可以轻松地检索我们需要的所有结果:
# Apply PCA to extract eigenfaces
from sklearn.decomposition import PCA

pca = PCA().fit(facematrix)
我们可以从解释的方差比中确定每个主成分的显着性:
print(pca.explained_variance_ratio_)


[1.77824822e-01 1.29057925e-01 6.67093882e-02 5.63561346e-02
 5.13040312e-02 3.39156477e-02 2.47893586e-02 2.27967054e-02
 1.95632067e-02 1.82678428e-02 1.45655853e-02 1.38626271e-02
 1.13318896e-02 1.07267786e-02 9.68365599e-03 9.17860717e-03
 8.60995215e-03 8.21053028e-03 7.36580634e-03 7.01112888e-03
 6.69450840e-03 6.40327943e-03 5.98295099e-03 5.49298705e-03
 5.36083980e-03 4.99408106e-03 4.84854321e-03 4.77687371e-03
...
 1.12203331e-04 1.11102187e-04 1.08901471e-04 1.06750318e-04
 1.05732991e-04 1.01913786e-04 9.98164783e-05 9.85530209e-05
 9.51582720e-05 8.95603083e-05 8.71638147e-05 8.44340263e-05
 7.95894118e-05 7.77912922e-05 7.06467912e-05 6.77447444e-05
 2.21225931e-32]
或者我们可以简单地组成一个中等数量的数字,例如 50,并将这些主成分向量视为特征面。 为方便起见,我们从 PCA 结果中提取特征脸并将其存储为一个 numpy 数组。 请注意,特征面以行的形式存储在矩阵中。 如果我们想显示它,我们可以将它转换回 2D。 在下面,我们展示了一些特征脸,看看它们的样子:
# Take the first K principal components as eigenfaces
n_components = 50
eigenfaces = pca.components_[:n_components]

# Show the first 16 eigenfaces
fig, axes = plt.subplots(4,4,sharex=True,sharey=True,figsize=(8,10))
for i in range(16):
    axes[i%4][i//4].imshow(eigenfaces[i].reshape(faceshape), cmap="gray")
plt.show()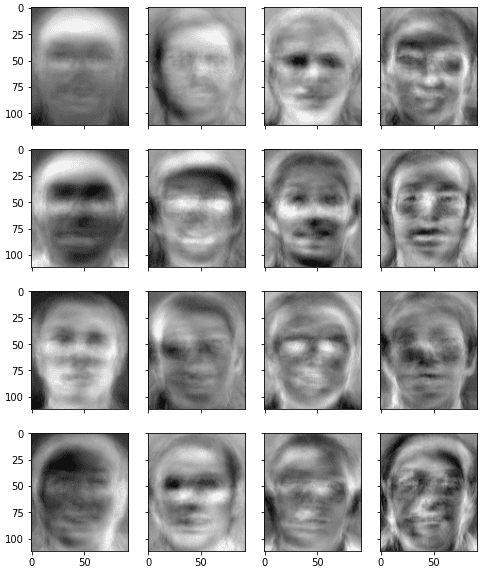
从这张图片中,我们可以看到 eigenfaces 是模糊的人脸,但实际上每个 eigenfaces 都包含一些可以用来构建图片的面部特征。由于我们的目标是构建人脸识别系统,我们首先计算每张输入图片的权重向量:
# Generate weights as a KxN matrix where K is the number of eigenfaces and N the number of samples
weights = eigenfaces @ (facematrix - pca.mean_).T
上面的代码使用矩阵乘法来替换循环。 它大致相当于以下内容:
weights = []
for i in range(facematrix.shape[0]):
    weight = []
    for j in range(n_components):
        w = eigenfaces[j] @ (facematrix[i] - pca.mean_)
        weight.append(w)
    weights.append(weight)
到这里,我们的人脸识别系统就完成了。 我们使用 39 个人的照片来构建我们的特征脸。 我们使用属于这 39 个人之一的测试图片(从训练 PCA 模型的矩阵中取出的那一张)来看看它是否可以成功识别人脸:
# Test on out-of-sample image of existing class
query = faces["s39/10.pgm"].reshape(1,-1)
query_weight = eigenfaces @ (query - pca.mean_).T
euclidean_distance = np.linalg.norm(weights - query_weight, axis=0)
best_match = np.argmin(euclidean_distance)
print("Best match %s with Euclidean distance %f" % (facelabel[best_match], euclidean_distance[best_match]))
# Visualize
fig, axes = plt.subplots(1,2,sharex=True,sharey=True,figsize=(8,6))
axes[0].imshow(query.reshape(faceshape), cmap="gray")
axes[0].set_title("Query")
axes[1].imshow(facematrix[best_match].reshape(faceshape), cmap="gray")
axes[1].set_title("Best match")
plt.show()
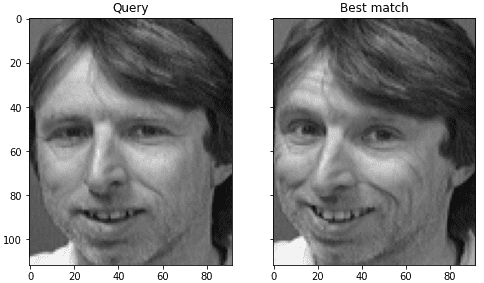
上面,我们首先用从 PCA 结果中检索到的平均向量减去向量化图像。 然后我们计算这个减去均值的向量到每个特征脸的投影,并将其作为这张图片的权重。 之后,我们将所讨论图片的权重向量与每张现有图片的权重向量进行比较,并找到 L2 距离最小的那个作为最佳匹配。 我们可以看到它确实可以成功找到同一个类中最接近的匹配:
Best match s39 with Euclidean distance 1559.997137我们可以通过并排比较最接近的匹配来可视化结果:
我们可以用我们从 PCA 中取出的第 40 个人的照片再试一次。 我们不会永远正确,因为它是我们模型的新人。 但是,我们想看看它有多错误以及距离度量中的值:
# Test on out-of-sample image of new class
query = faces["s40/1.pgm"].reshape(1,-1)
query_weight = eigenfaces @ (query - pca.mean_).T
euclidean_distance = np.linalg.norm(weights - query_weight, axis=0)
best_match = np.argmin(euclidean_distance)
print("Best match %s with Euclidean distance %f" % (facelabel[best_match], euclidean_distance[best_match]))
# Visualize
fig, axes = plt.subplots(1,2,sharex=True,sharey=True,figsize=(8,6))
axes[0].imshow(query.reshape(faceshape), cmap="gray")
axes[0].set_title("Query")
axes[1].imshow(facematrix[best_match].reshape(faceshape), cmap="gray")
axes[1].set_title("Best match")
plt.show()
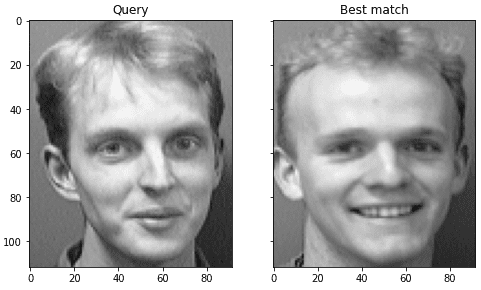
我们可以看到它的最佳匹配具有更大的 L2 距离:
Best match s5 with Euclidean distance 2690.209330但是我们可以看到错误的结果与问题图片有些相似:
在 Turk 和 Petland 的论文中,建议我们为 L2 距离设置一个阈值。 如果最佳匹配的距离小于阈值,我们会认为这张脸被识别为同一个人。 如果距离高于阈值,我们会声称图片是我们从未见过的人,即使可以在数字上找到最佳匹配。 在这种情况下,我们可以考虑通过记住这个新的权重向量,将其作为一个新人包含在我们的模型中。
实际上,我们可以更进一步,使用特征脸生成新的人脸,但结果不太现实。 在下面,我们使用随机权重向量生成一个并与“平均人脸”并排显示
# Visualize the mean face and random face
fig, axes = plt.subplots(1,2,sharex=True,sharey=True,figsize=(8,6))
axes[0].imshow(pca.mean_.reshape(faceshape), cmap="gray")
axes[0].set_title("Mean face")
random_weights = np.random.randn(n_components) * weights.std()
newface = random_weights @ eigenfaces + pca.mean_
axes[1].imshow(newface.reshape(faceshape), cmap="gray")
axes[1].set_title("Random face")
plt.show()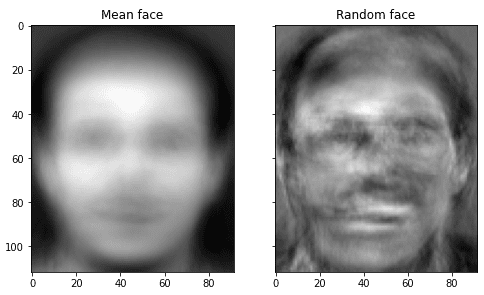
eigenface有多好? 由于模型的简单性,它令人惊讶地超额完成。 但是,Turk 和 Pentland 在各种条件下对其进行了测试。 它发现它的准确度是“平均 96% 的光变化,85% 的方向变化和 64% 的尺寸变化。” 因此,它作为人脸识别系统可能不太实用。 毕竟,作为矩阵的图片,经过放大和缩小后,在主成分域中会扭曲很多。 因此现代的替代方案是使用卷积神经网络,它对各种变换的容忍度更高。
下面是完整的代码:
import zipfile
import cv2
import numpy as np
import matplotlib.pyplot as plt
from sklearn.decomposition import PCA

# Read face image from zip file on the fly
faces = {}
with zipfile.ZipFile("attface.zip") as facezip:
    for filename in facezip.namelist():
        if not filename.endswith(".pgm"):
            continue # not a face picture
        with facezip.open(filename) as image:
            # If we extracted files from zip, we can use cv2.imread(filename) instead
            faces[filename] = cv2.imdecode(np.frombuffer(image.read(), np.uint8), cv2.IMREAD_GRAYSCALE)

# Show sample faces using matplotlib
fig, axes = plt.subplots(4,4,sharex=True,sharey=True,figsize=(8,10))
faceimages = list(faces.values())[-16:] # take last 16 images
for i in range(16):
    axes[i%4][i//4].imshow(faceimages[i], cmap="gray")
print("Showing sample faces")
plt.show()

# Print some details
faceshape = list(faces.values())[0].shape
print("Face image shape:", faceshape)

classes = set(filename.split("/")[0] for filename in faces.keys())
print("Number of classes:", len(classes))
print("Number of images:", len(faces))

# Take classes 1-39 for eigenfaces, keep entire class 40 and
# image 10 of class 39 as out-of-sample test
facematrix = []
facelabel = []
for key,val in faces.items():
    if key.startswith("s40/"):
        continue # this is our test set
    if key == "s39/10.pgm":
        continue # this is our test set
    facematrix.append(val.flatten())
    facelabel.append(key.split("/")[0])

# Create a NxM matrix with N images and M pixels per image
facematrix = np.array(facematrix)

# Apply PCA and take first K principal components as eigenfaces
pca = PCA().fit(facematrix)

n_components = 50
eigenfaces = pca.components_[:n_components]

# Show the first 16 eigenfaces
fig, axes = plt.subplots(4,4,sharex=True,sharey=True,figsize=(8,10))
for i in range(16):
    axes[i%4][i//4].imshow(eigenfaces[i].reshape(faceshape), cmap="gray")
print("Showing the eigenfaces")
plt.show()

# Generate weights as a KxN matrix where K is the number of eigenfaces and N the number of samples
weights = eigenfaces @ (facematrix - pca.mean_).T
print("Shape of the weight matrix:", weights.shape)

# Test on out-of-sample image of existing class
query = faces["s39/10.pgm"].reshape(1,-1)
query_weight = eigenfaces @ (query - pca.mean_).T
euclidean_distance = np.linalg.norm(weights - query_weight, axis=0)
best_match = np.argmin(euclidean_distance)
print("Best match %s with Euclidean distance %f" % (facelabel[best_match], euclidean_distance[best_match]))
# Visualize
fig, axes = plt.subplots(1,2,sharex=True,sharey=True,figsize=(8,6))
axes[0].imshow(query.reshape(faceshape), cmap="gray")
axes[0].set_title("Query")
axes[1].imshow(facematrix[best_match].reshape(faceshape), cmap="gray")
axes[1].set_title("Best match")
plt.show()

# Test on out-of-sample image of new class
query = faces["s40/1.pgm"].reshape(1,-1)
query_weight = eigenfaces @ (query - pca.mean_).T
euclidean_distance = np.linalg.norm(weights - query_weight, axis=0)
best_match = np.argmin(euclidean_distance)
print("Best match %s with Euclidean distance %f" % (facelabel[best_match], euclidean_distance[best_match]))
# Visualize
fig, axes = plt.subplots(1,2,sharex=True,sharey=True,figsize=(8,6))
axes[0].imshow(query.reshape(faceshape), cmap="gray")
axes[0].set_title("Query")
axes[1].imshow(facematrix[best_match].reshape(faceshape), cmap="gray")
axes[1].set_title("Best match")
plt.show()
最后
以上就是从容信封最近收集整理的关于使用主成分分析进行人脸识别教程概述的全部内容,更多相关使用主成分分析进行人脸识别教程概述内容请搜索靠谱客的其他文章。


发表评论 取消回复