目录
二、UVM结构
2.1UVM组件
2.1.1uvm_driver
2.1.2uvm_monitor
2.1.3uvm_sequencer
2.1.4uvm_agent
2.1.5uvm_scoreboard
2.1.6reference model
2.1.7uvm_env
2.1.8uvm_test
2.1.9uvm_component相关宏
2.2UVM验证平台的树形结构
二、UVM结构
2.1UVM组件
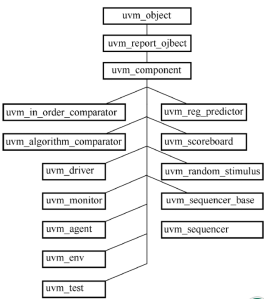
UVM的组件(uvm_component类)继承于UVM的核心基类中一个核心分支,均可构成验证环境,这是因为它们都从uvm_component类继承了phase机制(必须在build_phase中实例化),都会经历各个phase阶段。主要介绍构成环境的常见组件类:uvm_driver、uvm_monitor、uvm_sequencer、uvm_agent、uvm_scoreboard、uvm_env和uvm_test等。

图 5uvm_component类和子类
2.1.1uvm_driver
所有driver派生自uvm_driver。Driver的功能主要就是向sequencer索要sequence_item(transaction),并通过虚拟接口把sequence_item里的信息驱动到DUT的接口上。相当于完成了transaction级别到DUT能够接受的端口级别信息的转变。
drive使用工厂机制注册类通常需要三步:声明,注册,调用new()函数。
class my_driver extends uvm_driver#(my_transaction);     //my_transaction是sequence item类型

   virtual my_if vif; //virtual interface

   `uvm_component_utils(my_driver)    //在factory中注册my_driver
   function new(string name = "my_driver", uvm_component parent = null);
      super.new(name, parent);
   endfunction

   virtual function void build_phase(uvm_phase phase);
      super.build_phase(phase);
      if(!uvm_config_db#(virtual my_if)::get(this, "", "vif", vif))
         `uvm_fatal("my_driver", "virtual interface must be set for vif!!!")
   endfunction

   extern task main_phase(uvm_phase phase);
   extern task drive_one_pkt(my_transaction tr);
endclass
uvm_driver在uvm_component基础上没有扩展新的函数/任务,而只是扩展了一些用来通信的端口seq_item_port和rsp_port。在构建环境组件时,派生uvm_driver和uvm_sequencer的类,可以直接使用这些成员变量。
如果不想使用自带的成员变量,想加入改动,也可以由uvm_component来派生Driver等组件,然后自行定义uvm_seq_item_pull_port #(REQ, RSP)等类型的变量,名字可以不再是seq_item_port等(源码见附录一)。
注:uvm_driver和子类都是参数化类,定义新driver类时,应声明获取的事务参数REQ类型(事务参数)。
2.1.2uvm_monitor
monitor通过虚拟接口收集总线信息,并将数据转换成transation级别的sequence_item,再通过端口将数据发送至其他验证组件。收集的数据可用于简单的功能和时序检查。
所有用户自定义数据监测行为的monitor都继承自uvm_monitor,uvm_monitor继承自uvm_component,从源代码来看并没有增添新的成员和方法,但将monitor类都继承于uvm_monitor有助于实现父类monitor的方法和特性。(源码见附录一)
monitor使用工厂机制注册类通常也需要三步:声明uvm_monitor,向工厂注册并调用new()函数。
class my_monitor extends uvm_monitor;

   virtual my_if vif;

   uvm_analysis_port #(my_transaction)  ap;

   `uvm_component_utils(my_monitor)    在factory中注册my_monitor
   function new(string name = "my_monitor", uvm_component parent = null);
      super.new(name, parent);
   endfunction

   virtual function void build_phase(uvm_phase phase);
      super.build_phase(phase);
      if(!uvm_config_db#(virtual my_if)::get(this, "", "vif", vif))
         `uvm_fatal("my_monitor", "virtual interface must be set for vif!!!")
      ap = new("ap", this);
   endfunction

   extern task main_phase(uvm_phase phase);
   extern task collect_one_pkt(my_transaction tr);
endclass
2.1.3uvm_sequencer
所有的sequencer都要派生自uvm_sequencer。功能是组织管理sequence,当driver要求数据时,他就把sequence生成sequence_item转发给driver。同时若需要的话,uvm_sequencer也可以从uvm_driver那里获取随后的RSP对象来得知数据通信是否正常(源码见附录一)。
sequencer使用工厂机制注册:
class my_sequencer extends uvm_sequencer #(my_transaction);    //my_transaction为sequence_item类型

   function new(string name, uvm_component parent);
      super.new(name, parent);
   endfunction

   `uvm_component_utils(my_sequencer)    //在factory中注册my_sequencer
endclass
一个Sequencer可以挂载多个不同的sequence,sequencer可以通过内置的方法来选择需要发送的sequence,针对不同的测试条件发送不同的transaction。
2.1.4uvm_agent
将driver,monitor,sequencer封装成一个agent模块,方便复用。uvm_agent与uvm_component相比最大的改动在于引入了一个变量is_active,缺省值是UVM_ACTIVE。处在active模式的agent需要例化driver、monitor和sequencer;而如果is_active的值是UVM_PASSIVE,这表示agent是passive模式,只可以例化monitor。
通过is_active变量,agent需要在build_phase()和connect_phase()等函数中通过选择语句来对driver和sequencer进行有条件的例化和连接(源码见附录一)。
class my_agent extends uvm_agent ;
   my_sequencer  sqr;
   my_driver     drv;
   my_monitor    mon;

   uvm_analysis_port #(my_transaction)  ap;

   function new(string name, uvm_component parent);
      super.new(name, parent);
   endfunction

   extern virtual function void build_phase(uvm_phase phase);
   extern virtual function void connect_phase(uvm_phase phase);

   `uvm_component_utils(my_agent)    //在factory中注册my_agent
endclass

function void my_agent::build_phase(uvm_phase phase);
   super.build_phase(phase);
   if (is_active == UVM_ACTIVE) begin    //通过选择语句来对driver和sequencer进行有条件的例化。
      sqr = my_sequencer::type_id::create("sqr", this);
      drv = my_driver::type_id::create("drv", this);
   end
   mon = my_monitor::type_id::create("mon", this);
endfunction

function void my_agent::connect_phase(uvm_phase phase);
   super.connect_phase(phase);
   if (is_active == UVM_ACTIVE) begin    //通过选择语句来对driver和sequencer进行有条件的连接。
      drv.seq_item_port.connect(sqr.seq_item_export);
   end
   ap = mon.ap;
endfunction
2.1.5uvm_scoreboard
一般的scoreboard都要派生自uvm_scoreboard。其功能就是比较reference model和monitor分别发送来的数据,根据比较结果判断DUT是否正确。与uvm_component相比uvm_scoreboard也没有额外的成员变量和方法,但UVM建议用户将检查比较类都继承于uvm_scoreboard,这也便于日后的子类可以自动继承于可能被扩充到uvm_scoreboard中的成员(源码见附录一)。
在scoreboard中通常会声明TLM端口供monitor传输数据。
class my_scoreboard extends uvm_scoreboard;
   my_transaction  expect_queue[$];
   uvm_blocking_get_port #(my_transaction)  exp_port;
   uvm_blocking_get_port #(my_transaction)  act_port;

   `uvm_component_utils(my_scoreboard)    //在factory中注册my_scoreboard

   extern function new(string name, uvm_component parent = null);
   extern virtual function void build_phase(uvm_phase phase);
   extern virtual task main_phase(uvm_phase phase);
endclass
2.1.6reference model
reference model是直接派生自uvm_component。其作用就是模仿DUT,完成与DUT相同的功能,可以直接使用systemverilog的特性,或者可以通过DPI等接口调用其它语言来完成与DUT相同功能,将产生的结果输出到scoreboard进行比较。
2.1.7uvm_env
所有env都要派生自uvm_env,属于uvm_component类,相对于uvm_component类没有做过多扩展。env把验证平台固定不变的component(如agent、reference model、scoreboard和底层env等)封装在一起,并配置各个组件间的通信端口。这样在要运行不同case时,只要在case中实例化此env即可(源码见附录一)。
class my_env extends uvm_env;

   my_agent   i_agt;
   my_agent   o_agt;
   my_model   mdl;
   my_scoreboard scb;

   uvm_tlm_analysis_fifo #(my_transaction) agt_scb_fifo;
   uvm_tlm_analysis_fifo #(my_transaction) agt_mdl_fifo;
   uvm_tlm_analysis_fifo #(my_transaction) mdl_scb_fifo;

   function new(string name = "my_env", uvm_component parent);
      super.new(name, parent);
   endfunction

   virtual function void build_phase(uvm_phase phase);    //在build_phase中实例化组件以及通信管道FIFO
      super.build_phase(phase);
      i_agt = my_agent::type_id::create("i_agt", this);
      o_agt = my_agent::type_id::create("o_agt", this);
      i_agt.is_active = UVM_ACTIVE;
      o_agt.is_active = UVM_PASSIVE;
      mdl = my_model::type_id::create("mdl", this);
      scb = my_scoreboard::type_id::create("scb", this);
      agt_scb_fifo = new("agt_scb_fifo", this);
      agt_mdl_fifo = new("agt_mdl_fifo", this);
      mdl_scb_fifo = new("mdl_scb_fifo", this);

   endfunction

   extern virtual function void connect_phase(uvm_phase phase);

   `uvm_component_utils(my_env)    //在factory注册my_env
endclass
2.1.8uvm_test
所有的测试用例都要派生自uvm_test或派生类,属于uvm_component类,相对于uvm_component类也没有做过多扩展。不同的case之间差异很大,所以从uvm_test派生出来的类各不同。任何一个派生的case都要实例化env,只有这样才能正常传数(源码见附录一)。
class base_test extends uvm_test;

   my_env         env;

   function new(string name = "base_test", uvm_component parent = null);
      super.new(name,parent);
   endfunction

   extern virtual function void build_phase(uvm_phase phase);
   extern virtual function void report_phase(uvm_phase phase);

   `uvm_component_utils(base_test)    //在factory中注册base_test
endclass
2.1.9uvm_component相关宏
1.`uvm_component_utils:把一个直接或间接派生自uvm_component的类注册到factory中。
2.`uvm_component_param_utils:把一个直接或间接派生自uvm_component的参数化的类注册到factory中。
3.`uvm_component_utils_begin:用于同时需要factory和field_automation机制注册的类,与uvm_object_utils_begin相似。最大的意义在于可以自动使用config_db得到某些变量的值。
4.`uvm_component_param_utils_begin:用于参数化class实现某些变量field_automation机制。
5.`uvm_component_utils_end:总是与uvm_component_*_begin成对出现,作为factory注册结束的标志。
2.2UVM验证平台的树形结构
UVM通过uvm_component实现验证平台的树形结构,uvm_component在new()时,需要指定一个类型为uvm_component、名字是parent的变量。
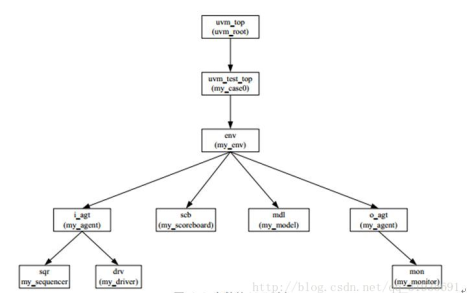
仿真过程中,会先执行build_phase()。该phase用于构建uvm-tree的结构,注:uvm_component组件类必须在build_phase中实例化,build_phase()的主要用途就是实例化组件类,创建和配置测试平台的结构,构建tree,典型的UVM树如下图:

一般来说,对组件实例化时,会向parent参数传递指定的父类(如this指针),若传递null,此component的父类将被设置成uvm_top;
env = my_env::type_id::create("env", this);
env = my_env::type_id::create("env", null);
uvm_top是一个全局变量,它是uvm_root的一个实例(也是唯一的一个实例),而uvm_root本质上是一个uvm_component派生自uvm_component,它是UVM树的根。uvm_test_top的parent是uvm_top,而uvm_top的parent是null。
uvm_root的存在可以保证整个验证平台中只有一棵树,所有结点都是uvm_top的子结点。在导入uvm_pkg文件包(import uvm_pkg::*;)时,会自动创建一个顶层类uvm_root所例化的对象uvm_top。
UVM提供了一系列的接口函数用于访问UVM树中的结点,主要的包括:
- get_parent:用于得到当前实例的parent;
- get_num_children:用于返回当前component所拥有的child的数量;
- get_child:用于得到当前实例child。此函数需要一个string类型的参数name,表示child实例在实例化时指定的名字(因为component只有一个parent,所以get_parent不需要指定参数;而可能有多个child,所以必须指定name参数);
源码:extern function uvm_component get_child (string name);
- get_children:得到当前实例所有的child;
源码:extern function void get_children(ref uvm_component children[$]);
- get_first_child和get_next_child的组合依次得到所有的child。
源码: extern function int get_first_child (ref string name);
extern function int get_next_child (ref string name);
最后
以上就是火星上红酒最近收集整理的关于UVM学习整理——UVM结构(component派生类)二、UVM结构的全部内容,更多相关UVM学习整理——UVM结构(component派生类)二、UVM结构内容请搜索靠谱客的其他文章。


发表评论 取消回复