一般进入APP都有欢迎界面,基本都是水平滚动的,今天和大家分享一个垂直滚动的例子。
先来看看效果把:
1、首先是布局文件:
<com.example.verticallinearlayout.VerticalLinearLayout xmlns:android="http://schemas.android.com/apk/res/android"
 xmlns:tools="http://schemas.android.com/tools"
 android:id="@+id/id_main_ly"
 android:layout_width="match_parent"
 android:layout_height="fill_parent"
 android:orientation="vertical"
 android:background="#fff" >

 <RelativeLayout
 android:layout_width="fill_parent"
 android:layout_height="fill_parent"
 android:background="@drawable/w02" >

 <Button
 android:layout_width="wrap_content"
 android:layout_height="wrap_content"
 android:text="hello" />
 </RelativeLayout>

 <RelativeLayout
 android:layout_width="fill_parent"
 android:layout_height="fill_parent"
 android:background="@drawable/w03" >

 <Button
 android:layout_width="wrap_content"
 android:layout_height="wrap_content"
 android:layout_centerInParent="true"
 android:background="#fff"
 android:text="hello" />
 </RelativeLayout>

 <RelativeLayout
 android:layout_width="fill_parent"
 android:layout_height="fill_parent"
 android:background="@drawable/w04" >

 <Button
 android:layout_width="wrap_content"
 android:layout_height="wrap_content"
 android:layout_centerInParent="true"
 android:text="hello" />
 </RelativeLayout>

 <RelativeLayout
 android:layout_width="fill_parent"
 android:layout_height="fill_parent"
 android:background="@drawable/w05" >

 <Button
 android:layout_width="wrap_content"
 android:layout_height="wrap_content"
 android:layout_centerInParent="true"
 android:text="hello" />
 </RelativeLayout>

</com.example.verticallinearlayout.VerticalLinearLayout>
在自定义的ViewGroup中放入了4个RelativeLayout,每个RelativeLayout都设置了背景图片,背景图片来自微信~
2、主要看自定义的Layout了
package com.example.verticallinearlayout;

import android.content.Context;
import android.util.AttributeSet;
import android.util.DisplayMetrics;
import android.util.Log;
import android.view.MotionEvent;
import android.view.VelocityTracker;
import android.view.View;
import android.view.ViewGroup;
import android.view.WindowManager;
import android.widget.Scroller;

public class VerticalLinearLayout extends ViewGroup
{
 /**
 * 屏幕的高度
 */
 private int mScreenHeight;
 /**
 * 手指按下时的getScrollY
 */
 private int mScrollStart;
 /**
 * 手指抬起时的getScrollY
 */
 private int mScrollEnd;
 /**
 * 记录移动时的Y
 */
 private int mLastY;
 /**
 * 滚动的辅助类
 */
 private Scroller mScroller;
 /**
 * 是否正在滚动
 */
 private boolean isScrolling;
 /**
 * 加速度检测
 */
 private VelocityTracker mVelocityTracker;
 /**
 * 记录当前页
 */
 private int currentPage = 0;

 private OnPageChangeListener mOnPageChangeListener;

 public VerticalLinearLayout(Context context, AttributeSet attrs)
 {
 super(context, attrs);

 /**
 * 获得屏幕的高度
 */
 WindowManager wm = (WindowManager) context.getSystemService(Context.WINDOW_SERVICE);
 DisplayMetrics outMetrics = new DisplayMetrics();
 wm.getDefaultDisplay().getMetrics(outMetrics);
 mScreenHeight = outMetrics.heightPixels;
 // 初始化
 mScroller = new Scroller(context);
 }

 @Override
 protected void onMeasure(int widthMeasureSpec, int heightMeasureSpec)
 {
 super.onMeasure(widthMeasureSpec, heightMeasureSpec);
 int count = getChildCount();
 for (int i = 0; i < count; ++i)
 {
 View childView = getChildAt(i);
 measureChild(childView, widthMeasureSpec,mScreenHeight);
 }
 }

 @Override
 protected void onLayout(boolean changed, int l, int t, int r, int b)
 {
 if (changed)
 {
 int childCount = getChildCount();
 // 设置主布局的高度
 MarginLayoutParams lp = (MarginLayoutParams) getLayoutParams();
 lp.height = mScreenHeight * childCount;
 setLayoutParams(lp);

 for (int i = 0; i < childCount; i++)
 {
 View child = getChildAt(i);
 if (child.getVisibility() != View.GONE)
 {
 child.layout(l, i * mScreenHeight, r, (i + 1) * mScreenHeight);// 调用每个自布局的layout
 }
 }

 }

 }

 @Override
 public boolean onTouchEvent(MotionEvent event)
 {
 // 如果当前正在滚动,调用父类的onTouchEvent
 if (isScrolling)
 return super.onTouchEvent(event);

 int action = event.getAction();
 int y = (int) event.getY();

 obtainVelocity(event);
 switch (action)
 {
 case MotionEvent.ACTION_DOWN:

 mScrollStart = getScrollY();
 mLastY = y;
 break;
 case MotionEvent.ACTION_MOVE:

 if (!mScroller.isFinished())
 {
 mScroller.abortAnimation();
 }

 int dy = mLastY - y;
 // 边界值检查
 int scrollY = getScrollY();
 // 已经到达顶端,下拉多少,就往上滚动多少
 if (dy < 0 && scrollY + dy < 0)
 {
 dy = -scrollY;
 }
 // 已经到达底部,上拉多少,就往下滚动多少
 if (dy > 0 && scrollY + dy > getHeight() - mScreenHeight)
 {
 dy = getHeight() - mScreenHeight - scrollY;
 }

 scrollBy(0, dy);
 mLastY = y;
 break;
 case MotionEvent.ACTION_UP:

 mScrollEnd = getScrollY();

 int dScrollY = mScrollEnd - mScrollStart;

 if (wantScrollToNext())// 往上滑动
 {
 if (shouldScrollToNext())
 {
 mScroller.startScroll(0, getScrollY(), 0, mScreenHeight - dScrollY);

 } else
 {
 mScroller.startScroll(0, getScrollY(), 0, -dScrollY);
 }

 }

 if (wantScrollToPre())// 往下滑动
 {
 if (shouldScrollToPre())
 {
 mScroller.startScroll(0, getScrollY(), 0, -mScreenHeight - dScrollY);

 } else
 {
 mScroller.startScroll(0, getScrollY(), 0, -dScrollY);
 }
 }
 isScrolling = true;
 postInvalidate();
 recycleVelocity();
 break;
 }

 return true;
 }

 /**
 * 根据滚动距离判断是否能够滚动到下一页
 *
 * @return
 */
 private boolean shouldScrollToNext()
 {
 return mScrollEnd - mScrollStart > mScreenHeight / 2 || Math.abs(getVelocity()) > 600;
 }

 /**
 * 根据用户滑动,判断用户的意图是否是滚动到下一页
 *
 * @return
 */
 private boolean wantScrollToNext()
 {
 return mScrollEnd > mScrollStart;
 }

 /**
 * 根据滚动距离判断是否能够滚动到上一页
 *
 * @return
 */
 private boolean shouldScrollToPre()
 {
 return -mScrollEnd + mScrollStart > mScreenHeight / 2 || Math.abs(getVelocity()) > 600;
 }

 /**
 * 根据用户滑动,判断用户的意图是否是滚动到上一页
 *
 * @return
 */
 private boolean wantScrollToPre()
 {
 return mScrollEnd < mScrollStart;
 }

 @Override
 public void computeScroll()
 {
 super.computeScroll();
 if (mScroller.computeScrollOffset())
 {
 scrollTo(0, mScroller.getCurrY());
 postInvalidate();
 } else
 {

 int position = getScrollY() / mScreenHeight;

 Log.e("xxx", position + "," + currentPage);
 if (position != currentPage)
 {
 if (mOnPageChangeListener != null)
 {
 currentPage = position;
 mOnPageChangeListener.onPageChange(currentPage);
 }
 }

 isScrolling = false;
 }

 }

 /**
 * 获取y方向的加速度
 *
 * @return
 */
 private int getVelocity()
 {
 mVelocityTracker.computeCurrentVelocity(1000);
 return (int) mVelocityTracker.getYVelocity();
 }

 /**
 * 释放资源
 */
 private void recycleVelocity()
 {
 if (mVelocityTracker != null)
 {
 mVelocityTracker.recycle();
 mVelocityTracker = null;
 }
 }

 /**
 * 初始化加速度检测器
 *
 * @param event
 */
 private void obtainVelocity(MotionEvent event)
 {
 if (mVelocityTracker == null)
 {
 mVelocityTracker = VelocityTracker.obtain();
 }
 mVelocityTracker.addMovement(event);
 }

 /**
 * 设置回调接口
 *
 * @param onPageChangeListener
 */
 public void setOnPageChangeListener(OnPageChangeListener onPageChangeListener)
 {
 mOnPageChangeListener = onPageChangeListener;
 }

 /**
 * 回调接口
 *
 * @author zhy
 *
 */
 public interface OnPageChangeListener
 {
 void onPageChange(int currentPage);
 }
}
注释还是相当详细的,我简单描述一下,Action_down时获得当前的scrollY,然后Action_move时,根据移动的距离不断scrollby就行了,当前处理了一下边界判断,在Action_up中再次获得scrollY,两个的scrollY进行对比,然后根据移动的距离与方向决定最后的动作。
3、主Activity
package com.example.verticallinearlayout;

import android.app.Activity;
import android.os.Bundle;
import android.widget.Toast;

import com.example.verticallinearlayout.VerticalLinearLayout.OnPageChangeListener;

public class MainActivity extends Activity
{
 private VerticalLinearLayout mMianLayout;

 @Override
 protected void onCreate(Bundle savedInstanceState)
 {
 super.onCreate(savedInstanceState);
 setContentView(R.layout.activity_main);

 mMianLayout = (VerticalLinearLayout) findViewById(R.id.id_main_ly);
 mMianLayout.setOnPageChangeListener(new OnPageChangeListener()
 {
 @Override
 public void onPageChange(int currentPage)
 {
// mMianLayout.getChildAt(currentPage);
 Toast.makeText(MainActivity.this, "第"+(currentPage+1)+"页", Toast.LENGTH_SHORT).show();
 }
 });
 }

}
为了提供可扩展性,还是定义了回调接口,完全可以把这个当成一个垂直的ViewPager使用。
总结下:
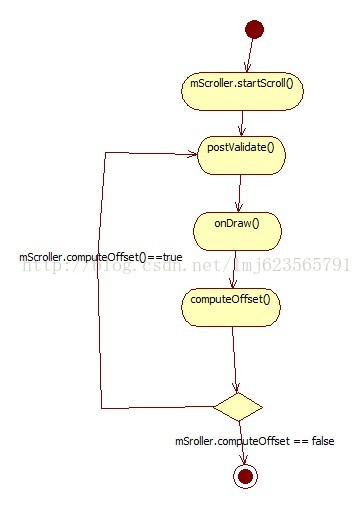
Scroller这个辅助类还是相当好用的,原理我简单说一下:每次滚动时,让Scroller进行滚动,然后调用postInvalidate方法,这个方法会引发调用onDraw方法,onDraw方法中会去调用computeScroll方法,然后我们在computScroll中判断,Scroller的滚动是否结束,没有的话,把当前的View滚动到现在Scroller的位置,然后继续调用postInvalidate,这样一个循环的过程。
画张图方便大家理解,ps:没找到什么好的画图工具,那rose随便画了,莫计较。
源码下载:Android自定义ViewGroup实现竖向引导界面
以上就是本文的全部内容,希望对大家的学习有所帮助,也希望大家多多支持靠谱客。
最后
以上就是甜美芝麻最近收集整理的关于Android自定义ViewGroup实现竖向引导界面的全部内容,更多相关Android自定义ViewGroup实现竖向引导界面内容请搜索靠谱客的其他文章。


发表评论 取消回复