一、效果图展示
如果动图没有动的话,也可以看下面这个静态图
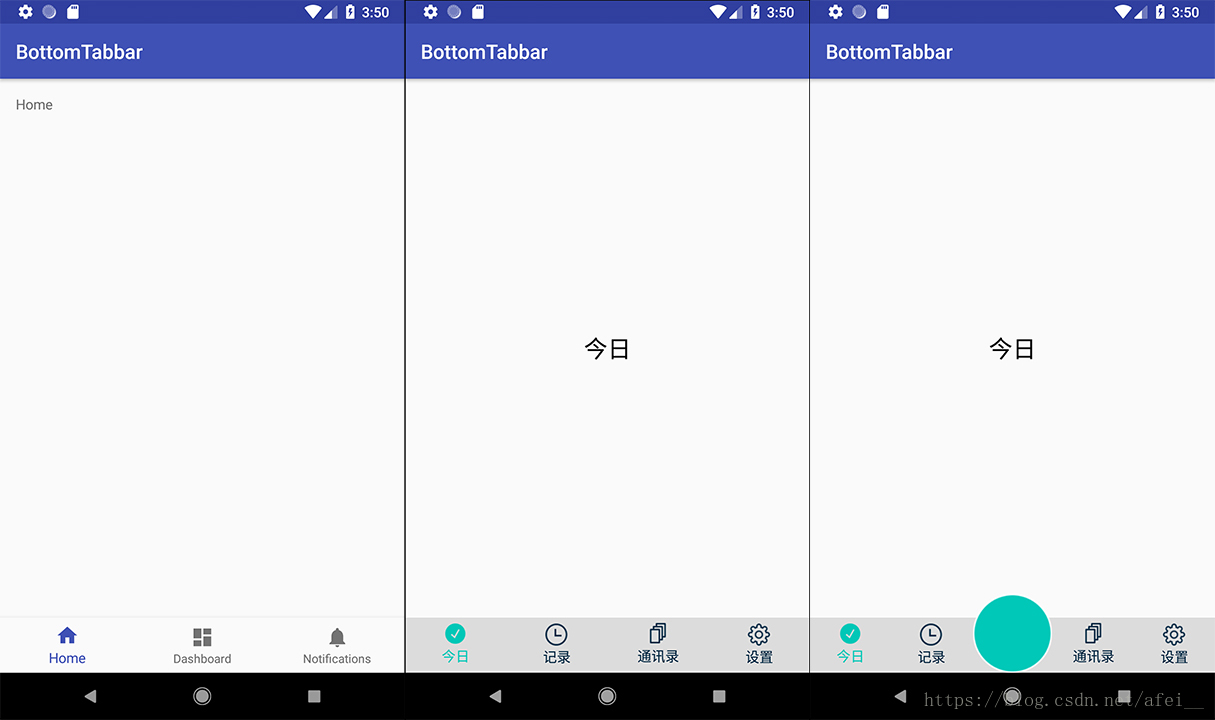
以下挨个分析每个的实现,这里只做简单的效果展示,大家可以基于目前代码做二次开发。
二、BottomNavigationView
这是 Google 给我们提供的一个专门用于底部导航的 View,你只需要在新建 Activity 的时候选择 “Bottom Navigation Activity”,IDE 就会自动使用 BottomNavigationView 帮你生成好相应的代码了。
1. 在 xml 中使用
 <android.support.design.widget.BottomNavigationView
    android:id="@+id/navigation"
    android:layout_width="0dp"
    android:layout_height="wrap_content"
    android:layout_marginEnd="0dp"
    android:layout_marginStart="0dp"
    android:background="?android:attr/windowBackground"
    app:layout_constraintBottom_toBottomOf="parent"
    app:layout_constraintLeft_toLeftOf="parent"
    app:layout_constraintRight_toRightOf="parent"
    app:menu="@menu/navigation" />
这里面唯一要注意的就是 app:menu 属性了,它指定了你的导航栏显示的页面菜单是怎样的。
2. menu 的布局文件
<?xml version="1.0" encoding="utf-8"?>
<menu xmlns:android="http://schemas.android.com/apk/res/android">

  <item
    android:id="@+id/navigation_home"
    android:icon="@drawable/ic_home_black_24dp"
    android:title="@string/title_home" />

  <item
    android:id="@+id/navigation_dashboard"
    android:icon="@drawable/ic_dashboard_black_24dp"
    android:title="@string/title_dashboard" />

  <item
    android:id="@+id/navigation_notifications"
    android:icon="@drawable/ic_notifications_black_24dp"
    android:title="@string/title_notifications" />

</menu>
3. 在 Activity 中调用
 private TextView mTextMessage;

  private BottomNavigationView.OnNavigationItemSelectedListener mOnNavigationItemSelectedListener
      = new BottomNavigationView.OnNavigationItemSelectedListener() {

    @Override
    public boolean onNavigationItemSelected(@NonNull MenuItem item) {
      switch (item.getItemId()) {
        case R.id.navigation_home:
          mTextMessage.setText(R.string.title_home);
          return true;
        case R.id.navigation_dashboard:
          mTextMessage.setText(R.string.title_dashboard);
          return true;
        case R.id.navigation_notifications:
          mTextMessage.setText(R.string.title_notifications);
          return true;
      }
      return false;
    }
  };

  @Override
  protected void onCreate(Bundle savedInstanceState) {
    super.onCreate(savedInstanceState);
    setContentView(R.layout.activity_style1);

    mTextMessage = findViewById(R.id.message);
    BottomNavigationView navigation = findViewById(R.id.navigation);
    navigation.setOnNavigationItemSelectedListener(mOnNavigationItemSelectedListener);
  }
这里的演示 code 都是 IDE 自动生成的,由于 BottomNavigationView 目前我还没有在项目中实际使用过,这里不做过多分析,使用起来不难,以上代码已经足以满足我们的基本使用要求了。
三、RadioGroup + ViewPager
这是一种比较常见了的,下面 4 个 tab 的导航按钮,可以切换不同的页面,这里页面使用了 ViewPager + Fragment 的组合,实现了滑动的页面效果,也可以不使用 ViewPager,这个根据产品的定义来使用即可。
1. 布局文件
<?xml version="1.0" encoding="utf-8"?>
<RelativeLayout xmlns:android="http://schemas.android.com/apk/res/android"
  xmlns:tools="http://schemas.android.com/tools"
  android:layout_width="match_parent"
  android:layout_height="match_parent"
  tools:context=".style2.Style2Activity">

  <android.support.v4.view.ViewPager
    android:id="@+id/fragment_vp"
    android:layout_width="match_parent"
    android:layout_height="match_parent"
    android:layout_above="@+id/tabs_rg" />

  <RadioGroup
    android:id="@+id/tabs_rg"
    android:layout_width="match_parent"
    android:layout_height="56dp"
    android:layout_alignParentBottom="true"
    android:background="#dcdcdc"
    android:orientation="horizontal">

    <RadioButton
      android:id="@+id/today_tab"
      style="@style/Custom.TabRadioButton"
      android:checked="true"
      android:drawableTop="@drawable/tab_sign_selector"
      android:text="今日" />

    <RadioButton
      android:id="@+id/record_tab"
      style="@style/Custom.TabRadioButton"
      android:drawableTop="@drawable/tab_record_selector"
      android:text="记录" />

    <RadioButton
      android:id="@+id/contact_tab"
      style="@style/Custom.TabRadioButton"
      android:drawableTop="@drawable/tab_contact_selector"
      android:text="通讯录" />

    <RadioButton
      android:id="@+id/settings_tab"
      style="@style/Custom.TabRadioButton"
      android:drawableTop="@drawable/tab_setting_selector"
      android:text="设置" />
  </RadioGroup>
</RelativeLayout>
2. Activity 类
public class Style2Activity extends AppCompatActivity {

  private ViewPager mViewPager;
  private RadioGroup mTabRadioGroup;

  private List<Fragment> mFragments;
  private FragmentPagerAdapter mAdapter;

  @Override
  protected void onCreate(Bundle savedInstanceState) {
    super.onCreate(savedInstanceState);
    setContentView(R.layout.activity_style2);
    initView();
  }

  private void initView() {
    // find view
    mViewPager = findViewById(R.id.fragment_vp);
    mTabRadioGroup = findViewById(R.id.tabs_rg);
    // init fragment
    mFragments = new ArrayList<>(4);
    mFragments.add(BlankFragment.newInstance("今日"));
    mFragments.add(BlankFragment.newInstance("记录"));
    mFragments.add(BlankFragment.newInstance("通讯录"));
    mFragments.add(BlankFragment.newInstance("设置"));
    // init view pager
    mAdapter = new MyFragmentPagerAdapter(getSupportFragmentManager(), mFragments);
    mViewPager.setAdapter(mAdapter);
    // register listener
    mViewPager.addOnPageChangeListener(mPageChangeListener);
    mTabRadioGroup.setOnCheckedChangeListener(mOnCheckedChangeListener);
  }

  @Override
  protected void onDestroy() {
    super.onDestroy();
    mViewPager.removeOnPageChangeListener(mPageChangeListener);
  }

  private ViewPager.OnPageChangeListener mPageChangeListener = new ViewPager.OnPageChangeListener() {
    @Override
    public void onPageScrolled(int position, float positionOffset, int positionOffsetPixels) {

    }

    @Override
    public void onPageSelected(int position) {
      RadioButton radioButton = (RadioButton) mTabRadioGroup.getChildAt(position);
      radioButton.setChecked(true);
    }

    @Override
    public void onPageScrollStateChanged(int state) {

    }
  };

  private RadioGroup.OnCheckedChangeListener mOnCheckedChangeListener = new RadioGroup.OnCheckedChangeListener() {
    @Override
    public void onCheckedChanged(RadioGroup group, int checkedId) {
      for (int i = 0; i < group.getChildCount(); i++) {
        if (group.getChildAt(i).getId() == checkedId) {
          mViewPager.setCurrentItem(i);
          return;
        }
      }
    }
  };

  private class MyFragmentPagerAdapter extends FragmentPagerAdapter {

    private List<Fragment> mList;

    public MyFragmentPagerAdapter(FragmentManager fm, List<Fragment> list) {
      super(fm);
      this.mList = list;
    }

    @Override
    public Fragment getItem(int position) {
      return this.mList == null ? null : this.mList.get(position);
    }

    @Override
    public int getCount() {
      return this.mList == null ? 0 : this.mList.size();
    }
  }

}
这里唯一注意点的就是两个监听事件,要实现底部导航按钮和页面的联动。
四、带页面跳转功能的底部导航
很多 APP 的底部导航栏中间有一个很大的按钮,点击后通常是打开一个新的页面,这里我们要实现的就是这种底部导航。
依旧是使用 RadioGroup 来做,只不过中间一个 tab 我们先用一个空的 View 来占位,然后在这个 View 的位置放置一个较大的按钮来覆盖住。
1. 布局文件
<?xml version="1.0" encoding="utf-8"?>
<RelativeLayout xmlns:android="http://schemas.android.com/apk/res/android"
  xmlns:tools="http://schemas.android.com/tools"
  android:layout_width="match_parent"
  android:layout_height="match_parent"
  tools:context=".style3.Style3Activity">

  <FrameLayout
    android:id="@+id/fragment_container"
    android:layout_width="match_parent"
    android:layout_height="match_parent"
    android:layout_above="@+id/tabs_rg" />

  <RadioGroup
    android:id="@+id/tabs_rg"
    android:layout_width="match_parent"
    android:layout_height="56dp"
    android:layout_alignParentBottom="true"
    android:background="#dcdcdc"
    android:orientation="horizontal">

    <RadioButton
      android:id="@+id/today_tab"
      style="@style/Custom.TabRadioButton"
      android:checked="true"
      android:drawableTop="@drawable/tab_sign_selector"
      android:text="今日" />

    <RadioButton
      android:id="@+id/record_tab"
      style="@style/Custom.TabRadioButton"
      android:drawableTop="@drawable/tab_record_selector"
      android:text="记录" />

    <View style="@style/Custom.TabRadioButton" />

    <RadioButton
      android:id="@+id/contact_tab"
      style="@style/Custom.TabRadioButton"
      android:drawableTop="@drawable/tab_contact_selector"
      android:text="通讯录" />

    <RadioButton
      android:id="@+id/settings_tab"
      style="@style/Custom.TabRadioButton"
      android:drawableTop="@drawable/tab_setting_selector"
      android:text="设置" />
  </RadioGroup>

  <ImageView
    android:id="@+id/sign_iv"
    android:layout_width="80dp"
    android:layout_height="80dp"
    android:layout_alignParentBottom="true"
    android:layout_centerHorizontal="true"
    android:background="@android:color/transparent"
    android:src="@mipmap/sign" />
</RelativeLayout>
2. Activity 类
public class Style3Activity extends AppCompatActivity {

  private RadioGroup mTabRadioGroup;
  private SparseArray<Fragment> mFragmentSparseArray;

  @Override
  protected void onCreate(Bundle savedInstanceState) {
    super.onCreate(savedInstanceState);
    setContentView(R.layout.activity_style3);
    initView();
  }

  private void initView() {
    mTabRadioGroup = findViewById(R.id.tabs_rg);
    mFragmentSparseArray = new SparseArray<>();
    mFragmentSparseArray.append(R.id.today_tab, BlankFragment.newInstance("今日"));
    mFragmentSparseArray.append(R.id.record_tab, BlankFragment.newInstance("记录"));
    mFragmentSparseArray.append(R.id.contact_tab, BlankFragment.newInstance("通讯录"));
    mFragmentSparseArray.append(R.id.settings_tab, BlankFragment.newInstance("设置"));
    mTabRadioGroup.setOnCheckedChangeListener(new RadioGroup.OnCheckedChangeListener() {
      @Override
      public void onCheckedChanged(RadioGroup group, int checkedId) {
        // 具体的fragment切换逻辑可以根据应用调整,例如使用show()/hide()
        getSupportFragmentManager().beginTransaction().replace(R.id.fragment_container,
            mFragmentSparseArray.get(checkedId)).commit();
      }
    });
    // 默认显示第一个
    getSupportFragmentManager().beginTransaction().add(R.id.fragment_container,
        mFragmentSparseArray.get(R.id.today_tab)).commit();
    findViewById(R.id.sign_iv).setOnClickListener(new View.OnClickListener() {
      @Override
      public void onClick(View v) {
        startActivity(new Intent(Style3Activity.this, SignActivity.class));
      }
    });
  }

}
注意:
如果这里你也想使用 ViewPager 来展示 Fragment 的话,一定要注意这里的 RadioGroup 中间有一个占位的 View,即两者的监听事件里,实现联动时要考虑多个这个 View 的存在。
代码地址: https://gitee.com/afei_/BottomTabbar
到此这篇关于Android底部导航栏的三种风格实现的文章就介绍到这了,更多相关Android底部导航栏内容请搜索靠谱客以前的文章或继续浏览下面的相关文章希望大家以后多多支持靠谱客!
最后
以上就是拼搏白云最近收集整理的关于Android底部导航栏的三种风格实现的全部内容,更多相关Android底部导航栏内容请搜索靠谱客的其他文章。


发表评论 取消回复