环境:eclipse 、Tomcat8.5、Maven3.6
1.新建maven项目
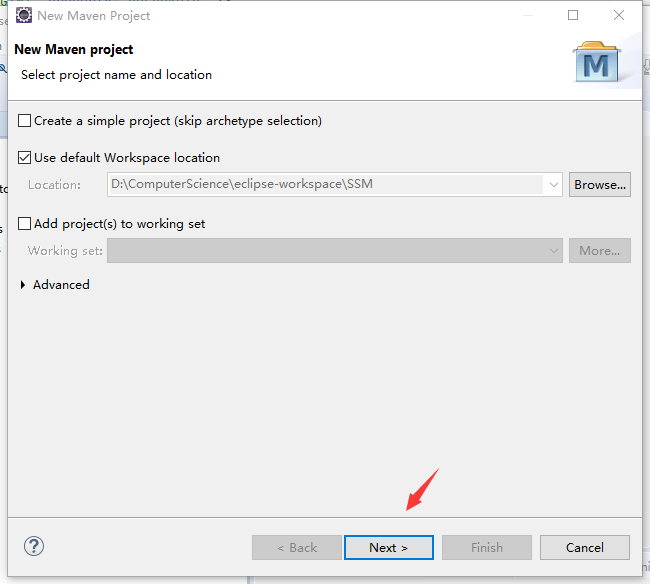
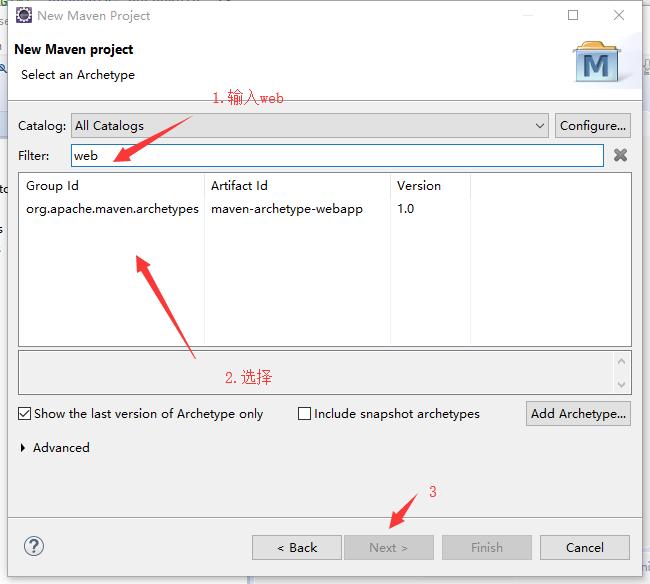
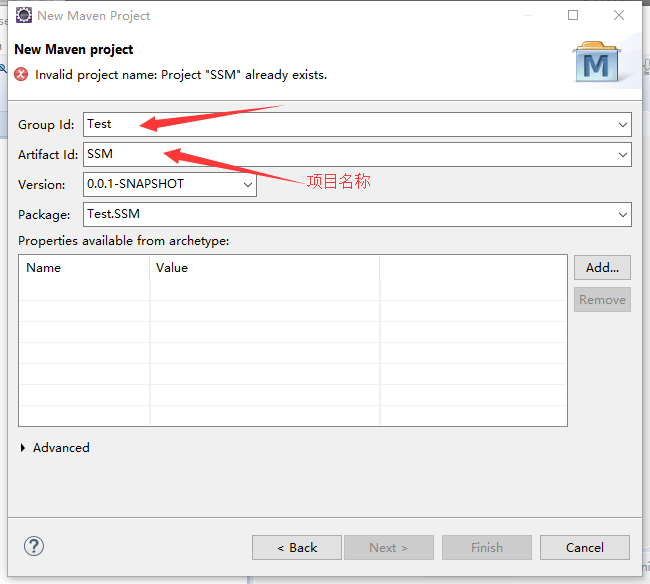
2.项目建立后上面有红叉
解决办法:
右键项目-->build path-- >configure and build-->在libraries那一栏下,选择ADD Libarry-->选择server Runtime-->选择tomcat然后finish-->apply然后关闭
3.pom.xml文件添加依赖
<project xmlns="http://maven.apache.org/POM/4.0.0"
	xmlns:xsi="http://www.w3.org/2001/XMLSchema-instance"
	xsi:schemaLocation="http://maven.apache.org/POM/4.0.0 http://maven.apache.org/maven-v4_0_0.xsd">
	<modelVersion>4.0.0</modelVersion>
	<groupId>wust</groupId>
	<artifactId>SSM</artifactId>
	<packaging>war</packaging>
	<version>0.0.1-SNAPSHOT</version>
	<name>SSM Maven Webapp</name>
	<url>http://maven.apache.org</url>
	<dependencies>
		<dependency>
			<groupId>junit</groupId>
			<artifactId>junit</artifactId>
			<version>3.8.1</version>
			<scope>test</scope>
		</dependency>

		<!-- spring依赖 -->
		<dependency>
			<groupId>org.springframework</groupId>
			<artifactId>spring-context</artifactId>
			<version>5.0.2.RELEASE</version>
		</dependency>
		<dependency>
			<groupId>org.springframework</groupId>
			<artifactId>spring-aop</artifactId>
			<version>5.0.2.RELEASE</version>
		</dependency>
		<dependency>
			<groupId>org.springframework</groupId>
			<artifactId>spring-aspects</artifactId>
			<version>5.0.2.RELEASE</version>
		</dependency>

		<!-- spring数据库事务处理 tomcat8.5居然不支持5.0.2.RELEASE事务 -->
		<dependency>
			<groupId>org.springframework</groupId>
			<artifactId>spring-tx</artifactId>
			<version>4.3.9.RELEASE</version>
		</dependency>
		<!-- Spring对JDBC数据访问 同样tomcat8.5居然不支持5.0.2.RELEASE -->
		<dependency>
			<groupId>org.springframework</groupId>
			<artifactId>spring-jdbc</artifactId>
			<version>4.3.9.RELEASE</version>
		</dependency>

		<!-- springmvc依赖 -->
		<dependency>
			<groupId>org.springframework</groupId>
			<artifactId>spring-webmvc</artifactId>
			<version>5.0.2.RELEASE</version>
		</dependency>
		<dependency>
			<groupId>jstl</groupId>
			<artifactId>jstl</artifactId>
			<version>1.2</version>
		</dependency>

		<!-- json依赖 -->
		<dependency>
			<groupId>com.fasterxml.jackson.core</groupId>
			<artifactId>jackson-core</artifactId>
			<version>2.9.3</version>
		</dependency>
		<dependency>
			<groupId>com.fasterxml.jackson.core</groupId>
			<artifactId>jackson-databind</artifactId>
			<version>2.9.3</version>
		</dependency>

		<!-- mybatis依赖 -->
		<dependency>
			<groupId>org.mybatis</groupId>
			<artifactId>mybatis</artifactId>
			<version>3.4.5</version>
		</dependency>
		<!-- mybatis-spring依赖 -->
		<dependency>
			<groupId>org.mybatis</groupId>
			<artifactId>mybatis-spring</artifactId>
			<version>1.3.1</version>
		</dependency>

		<!-- mysql驱动依赖 -->
		<dependency>
			<groupId>mysql</groupId>
			<artifactId>mysql-connector-java</artifactId>
			<version>5.1.45</version>
		</dependency>
		<!-- JDBC连接池依赖 -->
		<dependency>
			<groupId>com.mchange</groupId>
			<artifactId>c3p0</artifactId>
			<version>0.9.5.2</version>
		</dependency>

	</dependencies>
	<build>
		<finalName>SSM</finalName>
	</build>
</project>
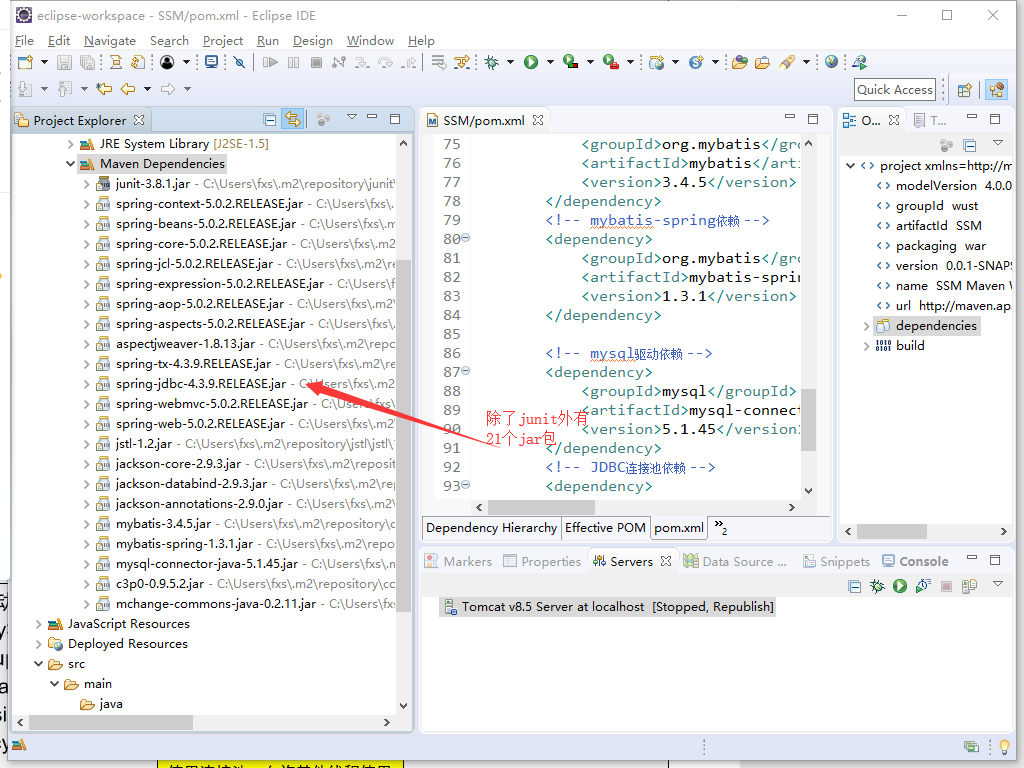
4.SSM配置:4个配置文件
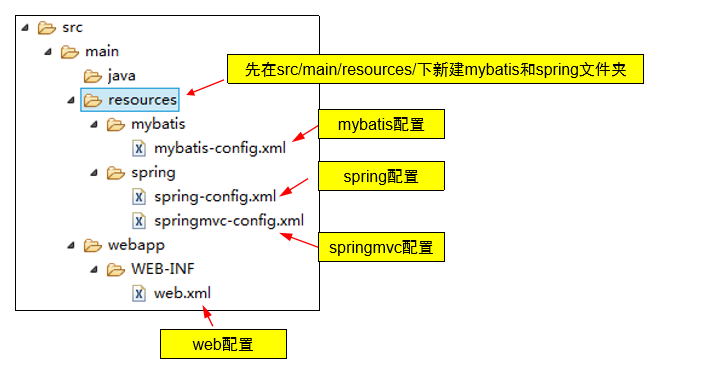
web.xml配置
<?xml version="1.0" encoding="UTF-8"?>
<web-app xmlns:xsi="http://www.w3.org/2001/XMLSchema-instance"
	xmlns="http://xmlns.jcp.org/xml/ns/javaee"
	xsi:schemaLocation="http://xmlns.jcp.org/xml/ns/javaee http://xmlns.jcp.org/xml/ns/javaee/web-app_3_1.xsd"
	version="3.1">
<!-- 监听器:
        创建Spring框架的IOC容器.
        将IOC容器对象存放到application域.
        ApplicationContext ioc = WebApplicationContextUtils.getWebApplicationContext(application);


        ServletContextListener监听器接口:
            监听ServletContext创建和销毁.
                如果监听到ServletContext创建(服务器启动),就会创建IOC容器(XmlWebApplicationContext).
                如果监听到ServletContext销毁(服务器停止,或卸载项目),就会销毁IOC容器.
     -->
    <listener>
        <listener-class>org.springframework.web.context.ContextLoaderListener</listener-class>
    </listener>

    <!-- 加载spring容器 -->
    <context-param>
        <param-name>contextConfigLocation</param-name>
        <param-value>classpath:spring/spring-config.xml</param-value>
    </context-param>
    <!-- 加载spring mvc -->
    <servlet>
        <servlet-name>SpringMVC</servlet-name>
        <servlet-class>org.springframework.web.servlet.DispatcherServlet</servlet-class>
        <init-param>
            <param-name>contextConfigLocation</param-name>
            <param-value>classpath:spring/springmvc-config.xml</param-value>
        </init-param>
        <load-on-startup>1</load-on-startup>
    </servlet>


    <servlet-mapping>
        <servlet-name>SpringMVC</servlet-name>

        <!-- URL : http://localhost:8080/contextPath/order/save.action -->

        <!-- 精确匹配
        <url-pattern>/user/save</url-pattern>
         -->
        <!-- 路径匹配 -->
        <!--
        <url-pattern>/user/*</url-pattern>
        <url-pattern>/*</url-pattern>
         -->

        <!-- 扩展匹配 -->
        <url-pattern>*.htm</url-pattern>
        <url-pattern>*.do</url-pattern>

        <!-- 默认匹配
        <url-pattern>/</url-pattern>
        -->
    </servlet-mapping>


    <!-- 会话超时时间 /分-->
    <session-config>
        <session-timeout>60</session-timeout>
    </session-config>

    <welcome-file-list>
        <welcome-file>index.jsp</welcome-file>
    </welcome-file-list>
</web-app>
spring-config.xml配置
<?xml version="1.0" encoding="UTF-8"?>
<beans xmlns="http://www.springframework.org/schema/beans"
	xmlns:xsi="http://www.w3.org/2001/XMLSchema-instance"
	xmlns:p="http://www.springframework.org/schema/p"
	xmlns:context="http://www.springframework.org/schema/context"
	xmlns:mvc="http://www.springframework.org/schema/mvc"
	xmlns:jdbc="http://www.springframework.org/schema/jdbc"
	xmlns:jee="http://www.springframework.org/schema/jee"
	xmlns:aop="http://www.springframework.org/schema/aop"
	xmlns:tx="http://www.springframework.org/schema/tx"
	xsi:schemaLocation="http://www.springframework.org/schema/beans
	http://www.springframework.org/schema/beans/spring-beans.xsd
	http://www.springframework.org/schema/context
	http://www.springframework.org/schema/context/spring-context.xsd
	http://www.springframework.org/schema/mvc
	http://www.springframework.org/schema/mvc/spring-mvc.xsd
	http://www.springframework.org/schema/tx
	http://www.springframework.org/schema/tx/spring-tx.xsd
	http://www.springframework.org/schema/aop
	http://www.springframework.org/schema/aop/spring-aop.xsd">
	<!-- 配置数据源(spring接管了mybatis的配置) -->  <!-- c3p0连接池 -->
	<bean id="dataSource"
		class="com.mchange.v2.c3p0.ComboPooledDataSource">  <!-- jdbc:mysql://localhost:3306/testdb -->  <!-- 本地数据库可以省略localhost:3306 -->
		<property name="jdbcUrl" value="jdbc:mysql:///testdb"></property>
		<property name="driverClass" value="com.mysql.jdbc.Driver"></property>
		<property name="user" value="root"></property>
		<property name="password" value="123456"></property>
		<!-- 当连接池中的连接耗尽的时候c3p0一次同时获取的连接数,Default: 3 -->
		<property name="acquireIncrement" value="3"></property> <!-- 初始化时获取连接数,取值应在minPoolSize与maxPoolSize之间。Default: 3 -->
		<property name="initialPoolSize" value="10"></property>
		<property name="minPoolSize" value="2"></property>
		<property name="maxPoolSize" value="10"></property>
	</bean>
	<!-- sqlSessionFactory配置 (回忆一下mybatis编程,现在由spring注入) -->
	<bean id="sqlSessionFactory"
		class="org.mybatis.spring.SqlSessionFactoryBean">  <!-- 注入数据库连接池 -->
		<property name="dataSource" ref="dataSource" /> <!-- 加载mybatis-config配置 -->
		<property name="configLocation"
			value="classpath:mybatis/mybatis-config.xml">
		</property>
	    <property name="mapperLocations">
	        <list>
	            <!--<value>classpath*:mybatis/mapper-*.xml</value>  -->
	             <value>classpath*:mapper/*Mapper.xml</value>
	        </list>
	    </property>
	</bean>
	<!-- 配置mybatis mapper批量扫描 --> <!-- 从basePackage指定的mapper包中扫描mapper类,自动生成bean -->
	<bean class="org.mybatis.spring.mapper.MapperScannerConfigurer">  <!-- 注入sqlSessionFactory -->
		<property name="sqlSessionFactoryBeanName"
			value="sqlSessionFactory" />
		<property name="basePackage" value="dao" />
	</bean>
	<!-- 事务配置(spring接管mybatis事务操作,如事务的提交、回滚、关闭等) -->
	<bean id="transactionManager"
		class="org.springframework.jdbc.datasource.DataSourceTransactionManager">
		<property name="dataSource" ref="dataSource" />
	</bean>  <!-- 使用annotation注解方式配置事务 -->
	<tx:annotation-driven
		transaction-manager="transactionManager" />
	<!-- 自动扫描配置 --> <!-- 在base-package包中扫描@Service、@Component注解的类, 并把这些类自动注册为bean 备注:@Controller放到spring
		mvc扫描 -->
	<context:component-scan base-package="service" />
	<context:component-scan base-package="entity" />
</beans>
springmvc-config.xml配置
<?xml version="1.0" encoding="UTF-8"?>
<beans xmlns="http://www.springframework.org/schema/beans"
	xmlns:xsi="http://www.w3.org/2001/XMLSchema-instance"
	xmlns:p="http://www.springframework.org/schema/p"
	xmlns:context="http://www.springframework.org/schema/context"
	xmlns:mvc="http://www.springframework.org/schema/mvc"
	xsi:schemaLocation="http://www.springframework.org/schema/beans
	http://www.springframework.org/schema/beans/spring-beans.xsd
	http://www.springframework.org/schema/context
	http://www.springframework.org/schema/context/spring-context.xsd
	http://www.springframework.org/schema/mvc
	http://www.springframework.org/schema/mvc/spring-mvc.xsd">
	<!-- 启用注解映射+json转换器 -->
	<mvc:annotation-driven>
		<mvc:message-converters>
			<bean
				class="org.springframework.http.converter.StringHttpMessageConverter" />
			<bean
				class="org.springframework.http.converter.json.MappingJackson2HttpMessageConverter" />
		</mvc:message-converters>
	</mvc:annotation-driven>
	<!-- 自动扫描 --> <!-- spring mvc自动扫描base-pack下或子包下的@Controller注解的类,自动注册为bean 注:@Service、@Component一般放到spring配置文件中去扫描 -->
	<context:component-scan
		base-package="controller" />
	<!-- 视图解析路径配置 依赖jstl包 -->
	<bean
		class="org.springframework.web.servlet.view.InternalResourceViewResolver">
		<property name="viewClass"
			value="org.springframework.web.servlet.view.JstlView" />
		<property name="contentType" value="text/html" />
		<property name="prefix" value="/WEB-INF/views/" />
		<!-- <property name="prefix" value="/" /> -->
		<property name="suffix" value=".jsp" />
	</bean>
	<!-- 配置静态资源(JS、CSS、图片等)的访问路径 --> <!--对location文件夹下内容的访问将不再被DispatcherServlet拦截 -->
	<mvc:resources mapping="/gif/**" location="/gif/" />
	<mvc:resources mapping="/jquery/**" location="/jquery/" />
</beans>
mybatis-config.xml配置
<?xml version="1.0" encoding="UTF-8"?> <!DOCTYPE configuration PUBLIC "-//mybatis.org//DTD Config 3.0//EN" "http://mybatis.org/dtd/mybatis-3-config.dtd">
<configuration>
	<!-- 原先的配置基本都被spring接管 -->
	<!-- 别名配置 把entity包中简单类起个别名(如User类的别名就是user) -->
	<typeAliases>
		<package name="entity" />
	</typeAliases>
</configuration>
5.将项目添加到tomcat运行没报错就是成功了
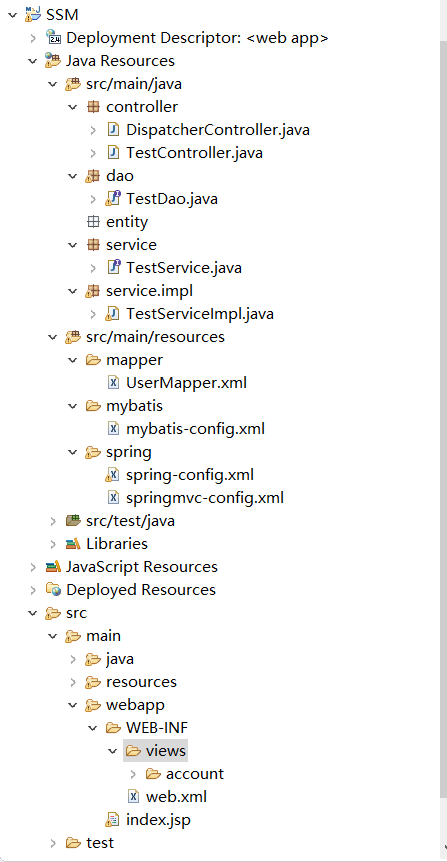
SSM例子
先看一下文件的目录
新建jsp文件
index.jsp实现跳转功能
<%@ page language="java" contentType="text/html; charset=UTF-8"
    pageEncoding="UTF-8"%>
<!DOCTYPE html>
<html>
<head>
<meta charset="UTF-8">
<title>Insert title here</title>
</head>
<body>
<a href="${pageContext.request.contextPath}/index.htm" }>index</a><br>
<a href="${pageContext.request.contextPath}/test.htm" }>test</a>
</body>
</html>
TestController控制层
package controller;

import org.springframework.beans.factory.annotation.Autowired;
import org.springframework.stereotype.Controller;
import org.springframework.web.bind.annotation.RequestMapping;

import service.TestService;

@Controller
public class TestController {
	@Autowired
	private TestService testservice;

	@RequestMapping("/test")
	public String testfun() {
		System.out.println("测试控制器TestController");
		testservice.insert();
		System.out.println("测试控制器TestController结束");
		return "account/index";//跳转到/WEB-INF/views/account下的index.jsp
	}
}
TestService和TestServiceImpl 业务层
package service;

public interface TestService {
	public void insert();
}
package service.impl;

import java.util.HashMap;
import java.util.Map;

import org.springframework.beans.factory.annotation.Autowired;
import org.springframework.stereotype.Service;

import dao.TestDao;
import service.TestService;

@Service
public class TestServiceImpl implements TestService {

	@Autowired
	private TestDao testdao;

	@Override
	public void insert() {
		// TODO Auto-generated method stub
		System.out.println("insert()方法");
		Map map=new HashMap();
		map.put("id", "1");
		map.put("username", "fan");
		map.put("password", "123");
		testdao.insertDao(map);
	}

}
DAO层
package dao;

import java.util.Map;

public interface TestDao {
	public void insertDao(Map map);
}
UserMapper.xml
<?xml version="1.0" encoding="UTF-8" ?>
<!DOCTYPE mapper
  PUBLIC "-//mybatis.org//DTD Mapper 3.0//EN"
  "http://mybatis.org/dtd/mybatis-3-mapper.dtd">

<mapper namespace="dao.TestDao">
    <insert id="insertDao">
        insert into user (
            id,username,password
        ) values (
            #{id},#{username},#{password}
        )
    </insert>
</mapper>
然后运行,可以在事先创建的简单数据库表里看见插入了我们在service层写进去的字段
最后
以上就是舒心歌曲最近收集整理的关于eclipse搭建SSM框架的全部内容,更多相关eclipse搭建SSM框架内容请搜索靠谱客的其他文章。
本图文内容来源于网友提供,作为学习参考使用,或来自网络收集整理,版权属于原作者所有。


发表评论 取消回复