| 主机名称 | ip地址 | 服务 |
|---|---|---|
| server | 192.168.102.11 | nginx |
| client | 192.168.102.12 | mysql |
| lishuai | 192.168.102.13 | tomcat |
nginx安装与配置
192.168.102.11
//创建nginx用户
[root@server ~]# groupadd -r -g 1000 nginx
[root@server ~]# useradd -M -s /sbin/nologin -g 1000 -u 1000 nginx
[root@server ~]# id nginx
uid=1000(nginx) gid=1000(nginx) groups=1000(nginx)
//安装nginx依赖包
[root@server ~]# yum -y install pcre-devel openssl openssl-devel gd-devel gcc gcc-c++
 [root@server ~]# yum -y groupinstall 'Development Tools'
//建立nginx日志存放目录
[root@server ~]# mkdir -p /var/log/nginx
[root@server ~]# chown -R nginx.nginx /var/log/nginx/
[root@server ~]# ll /var/log/nginx/ -d
drwxr-xr-x. 2 nginx nginx 6 Oct 23 10:37 /var/log/nginx/
下载并安装nginx
[root@server ~]# wget http://nginx.org/download/nginx-1.14.0.tar.gz
[root@server ~]# tar -xf nginx-1.14.0
[root@server ~]# cd nginx-1.14.0/
[root@server nginx-1.14.0]# ./configure
--prefix=/usr/local/nginx
--user=nginx
--group=nginx
--with-debug
--with-http_ssl_module
--with-http_realip_module
--with-http_image_filter_module
--with-http_gunzip_module
--with-http_gzip_static_module
--with-http_stub_status_module
--http-log-path=/var/log/nginx/access.log
--error-log-path=/var/log/nginx/error.log
[root@server nginx-1.14.0]# make && make install
//将路径写入环境变量
[root@server ~]# echo 'export PATH=/usr/local/nginx/sbin:$PATH' > /etc/profile.d/nginx.sh
[root@server ~]# . /etc/profile.d/nginx.sh
//安装后检查配置是否有错
[root@server nginx-1.14.0]# nginx -t
nginx: the configuration file /usr/local/nginx/conf/nginx.conf syntax is ok
nginx: configuration file /usr/local/nginx/conf/nginx.conf test is successful
//启动nginx
[root@server nginx-1.14.0]# nginx
[root@server ~]# ss -antl
State      Recv-Q Send-Q Local Address:Port               Peer Address:Port
LISTEN     0      128          *:22                       *:*
LISTEN     0      100    127.0.0.1:25                       *:*
LISTEN     0      128         :::80                      :::*
LISTEN     0      128         :::22                      :::*
LISTEN     0      100        ::1:25                      :::*
安装mysql
192.168.102.12
//安装依赖包
[root@client ~]# yum -y install ncurses-devel openssl-devel openssl cmake mariadb-devel gcc gcc-c++ epel-release

//创建mysql用户和组
[root@client ~]# groupadd -r -g 306 mysql
[root@client ~]# useradd -r -M -s /sbin/nologin -g 306 -u 306 mysql
[root@client ~]# id mysql
uid=306(mysql) gid=306(mysql) groups=306(mysql)
//下载
[root@client ~]# wget https://downloads.mysql.com/archives/get/file/mysql-5.7.22-linux-glibc2.12-x86_64.tar.gz
//解压二进制包,并创建连接修改属主和属组
[root@client ~]# tar -xf mysql-5.7.23-linux-glibc2.12-x86_64.tar.gz -C /usr/local/
[root@client ~]# cd /usr/local/
[root@client local]# ln -s mysql-5.7.23-linux-glibc2.12-x86_64/ mysql
[root@client local]# chown -R mysql.mysql mysql
//添加环境变量
[root@client local]# echo 'export PATH=/usr/local/mysql/bin:$PATH' > /etc/profile.d/mysql.sh
[root@client local]# . /etc/profile.d/mysql.sh
//创建存放数据的目录并修改属主
[root@client local]# mkdir /opt/data
[root@client local]# chown -R mysql.mysql /opt/data
//初始化数据库
[root@client ~]# mysqld --initialize --user=mysql --datadir=/opt/data
//保存密码
echo '密码' > pass      //密码是最后一个字符串(一般12个字符)
//安装后配置
[root@client ~]# ln -s /usr/local/mysql/include/ /usr/local/include/mysql
[root@client ~]# echo '/usr/local/mysql/lib' > /etc/ld.so.conf.d/mysql.con
//生成配置文件
[root@client ~]# cat > /etc/my.cnf << EOF
[mysqld]
datadir=/opt/data
basedir = /usr/local/mysql
socket = /tmp/mysql.sock
port = 3306
pid-file = /opt/data/mysql.pid
user = mysql
skip-name-resolve
EOF

//配置服务启动脚本
[root@client ~]# cp -a /usr/local/mysql/support-files/mysql.server /etc/init.d/mysqld
[root@client ~]# vim /etc/init.d/mysqld
basedir=/usr/local/mysql
datadir=/opt/data


//启动mysql
[root@client ~]# service mysqld start
Starting MySQL.Logging to '/opt/data/client.err'.
 SUCCESS!

//修改密码
[root@lishuai ~]# mysql -uroot -p
Enter password:
mysql> set password=password('ls123!');
Query OK, 0 rows affected, 1 warning (0.00 sec)
安装tomcat
192.168.102.13
//安装jave
[root@lishuai ~]# yum -y install java-1.8.0-openjdk java-1.8.0-openjdk-devel
[root@lishuai ~]# java -version        //查询Java版本
openjdk version "1.8.0_191"
OpenJDK Runtime Environment (build 1.8.0_191-b12)
OpenJDK 64-Bit Server VM (build 25.191-b12, mixed mode)

//安装tomcat
[root@lishuai ~]# cd /usr/src/
[root@lishuai src]# wget https://archive.apache.org/dist/tomcat/tomcat-9/v9.0.8/bin/apache-tomcat-9.0.8.tar.gz
[root@lishuai src]# tar -xf apache-tomcat-9.0.8.tar.gz -C /usr/local/[root@lishuai src]# cd /usr/local
[root@lishuai local]# ln -s apache-tomcat-9.0.8/ tomcat

//写一个Java页面
[root@lishuai ~]# vim index.jsp
<html>
<head>
        <title>test page</title>
</head>
<body>
        <%
          out.println("hello world");
        %>
</body>
</html>

//将原有的覆盖掉
[root@lishuai ~]# cp index.jsp /usr/local/tomcat/webapps/ROOT/
cp: overwrite ‘/usr/local/tomcat/webapps/ROOT/index.jsp’? y

//启动tomcat
[root@lishuai ~]# /usr/local/tomcat/bin/catalina.sh start
Using CATALINA_BASE:   /usr/local/tomcat
Using CATALINA_HOME:   /usr/local/tomcat
Using CATALINA_TMPDIR: /usr/local/tomcat/temp
Using JRE_HOME:        /usr
Using CLASSPATH:       /usr/local/tomcat/bin/bootstrap.jar:/usr/local/tomcat/bin/tomcat-juli.jar
Tomcat started.
[root@lishuai ~]# ss -antl
State       Recv-Q Send-Q Local Address:Port               Peer Address:Port
LISTEN      0      128     *:22                  *:*
LISTEN      0      100    127.0.0.1:25                  *:*
LISTEN      0      100    :::8080               :::*
LISTEN      0      128    :::22                 :::*
LISTEN      0      100       ::1:25                 :::*
LISTEN      0      1        ::ffff:127.0.0.1:8005               :::*
LISTEN      0      100    :::8009               :::*

//解压第二个tomcat
[root@lishuai local]# cd /usr/src/
[root@lishuai src]# ls
apache-tomcat-9.0.8.tar.gz  debug  kernels
[root@lishuai src]# tar xf apache-tomcat-9.0.8.tar.gz -C /root/
[root@lishuai src]# cd
[root@lishuai ~]# ln -s apache-tomcat-9.0.8/ tomcat2
[root@lishuai ~]# cd tomcat2/conf/
[root@lishuai conf]# vim server.xml
···
<Server port="8015" shutdown="SHUTDOWN">     这个地方改为8015端口
  <Listener className="org.apache.catalina.startup.VersionLoggerListener" />
···
    <Connector port="8050" potocol="HTTP/1.1"    避免服务冲突,改为8050端口
               connectionTimeout="20000"
               redirectPort="8443" />
···
    <Connector port="8019" protocol="AJP/1.3" redirectPort="8443" />   改为8019端口

//启动第二个tomcat
[root@lishuai ~]# /root/tomcat2/bin/catalina.sh start
Using CATALINA_BASE:   /root/tomcat2
Using CATALINA_HOME:   /root/tomcat2
Using CATALINA_TMPDIR: /root/tomcat2/temp
Using JRE_HOME:        /usr
Using CLASSPATH:       /root/tomcat2/bin/bootstrap.jar:/root/tomcat2/bin/tomcat-juli.jar
Tomcat started.
[root@lishuai ~]# ss -antl
State       Recv-Q Send-Q Local Address:Port               Peer Address:Port
LISTEN      0      128     *:22                  *:*
LISTEN      0      100    127.0.0.1:25                  *:*
LISTEN      0      1        ::ffff:127.0.0.1:8015               :::*
LISTEN      0      100    :::8080               :::*
LISTEN      0      100    :::8050               :::*
LISTEN      0      100    :::8019               :::*
LISTEN      0      128    :::22                 :::*
LISTEN      0      100       ::1:25                 :::*
LISTEN      0      1        ::ffff:127.0.0.1:8005               :::*
LISTEN      0      100    :::8009               :::*
在nginx服务器上对nginx进行配置
\在 nginx 上配置反向代理 和 负载均衡实现动静分离
[root@server ~]# vim /usr/local/nginx/conf/nginx.conf

    #gzip  on;
    upstream tomcat {
	server 192.168.102.13:8080;
	server 192.168.102.13:8050;
    }

    server {
        listen       80;
        server_name  localhost;

        #charset koi8-r;

        #access_log  logs/host.access.log  main;

        location ~* .(jsp|do)$ {
	    proxy_pass http://tomcat;
        }
	location / {
            root   html;
	    proxy_pass http://tomcat;
            index  index.html index.htm;
        }

//检查nginx、重启nginx
[root@server ~]# nginx -t
nginx: the configuration file /usr/local/nginx/conf/nginx.conf syntax is ok
nginx: configuration file /usr/local/nginx/conf/nginx.conf test is successful
[root@server ~]# nginx -s reload
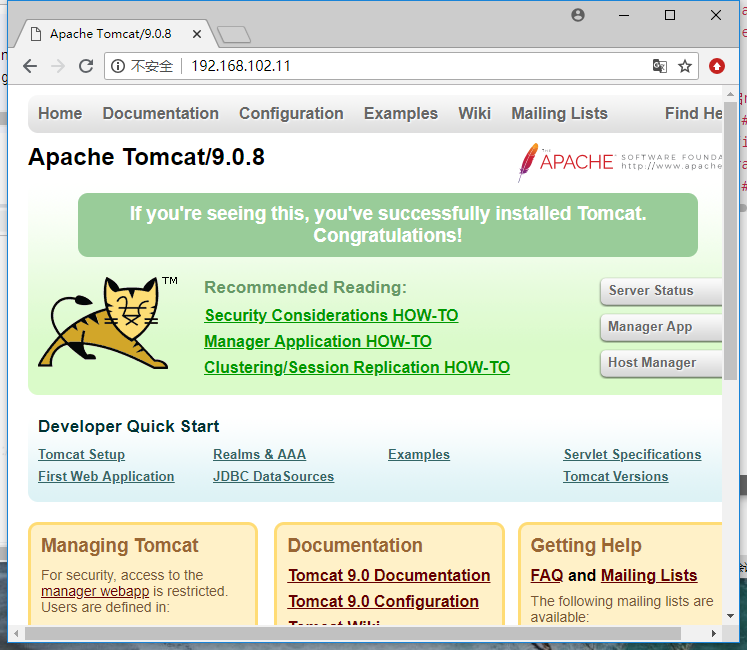
在游览器上访问192.168.102.11(出现以下图片则成功)

最后
以上就是尊敬康乃馨最近收集整理的关于lnmt部署的全部内容,更多相关lnmt部署内容请搜索靠谱客的其他文章。
本图文内容来源于网友提供,作为学习参考使用,或来自网络收集整理,版权属于原作者所有。


发表评论 取消回复