Linux(Centos6.5)下安装Vertica9.2.1数据库教程
一、 安装Vertica
1. 安装依赖或环境
[root@localhost ~]# yum install gdb –y
[root@localhost ~]# yum install mcelog –y
[root@localhost ~]# yum install sysstat –y
[root@localhost ~]# yum install ntp –y
[root@localhost ~]# yum install dialog –y(建议此时安装,或者后面步骤中安装)
2. 修改SELINUX
将SELINUX=enforcing改为 SELINUX=disabled
[root@localhost ~]# vi /etc/selinux/config
修改保存后执行(不知道有没有用,也不知道什么作用):
[root@localhost ~]# setenforce 0
重启生效
[root@localhost ~]# reboot
3. 直接安装报错
rpm -ivh vertica-9.2.1-7.x86_64.RHEL6.rpm
[root@localhost ~]# rpm -ivh vertica-9.2.1-7.x86_64.RHEL6.rpm
error: Failed dependencies:
	dialog is needed by vertica-9.2.1-7.x86_64
[root@localhost ~]#
4. 安装vertica所需软件dialog
yum install –y dialog
[root@localhost ~]# yum install -y dialog
Loaded plugins: fastestmirror, refresh-packagekit, security
Loading mirror speeds from cached hostfile
 * base: mirrors.163.com
 * extras: mirrors.163.com
 * updates: mirrors.163.com
Setting up Install Process
Resolving Dependencies
--> Running transaction check
---> Package dialog.x86_64 0:1.1-10.20080819.el6 will be installed
--> Finished Dependency Resolution

Dependencies Resolved

======================================================================================================================
 Package                  Arch                     Version                               Repository              Size
======================================================================================================================
Installing:
 dialog                   x86_64                   1.1-10.20080819.el6                   base                   196 k

Transaction Summary
======================================================================================================================
Install       1 Package(s)

Total download size: 196 k
Installed size: 512 k
Downloading Packages:
dialog-1.1-10.20080819.el6.x86_64.rpm                                                          | 196 kB     00:00
warning: rpmts_HdrFromFdno: Header V3 RSA/SHA1 Signature, key ID c105b9de: NOKEY
Retrieving key from file:///etc/pki/rpm-gpg/RPM-GPG-KEY-CentOS-6
Importing GPG key 0xC105B9DE:
 Userid : CentOS-6 Key (CentOS 6 Official Signing Key) <centos-6-key@centos.org>
 Package: centos-release-6-5.el6.centos.11.1.x86_64 (@anaconda-CentOS-201311272149.x86_64/6.5)
 From   : /etc/pki/rpm-gpg/RPM-GPG-KEY-CentOS-6
Running rpm_check_debug
Running Transaction Test
Transaction Test Succeeded
Running Transaction
Warning: RPMDB altered outside of yum.
** Found 5 pre-existing rpmdb problem(s), 'yum check' output follows:
1:libreoffice-core-4.0.4.2-9.el6.x86_64 has missing requires of libjawt.so()(64bit)
1:libreoffice-core-4.0.4.2-9.el6.x86_64 has missing requires of libjawt.so(SUNWprivate_1.1)(64bit)
1:libreoffice-ure-4.0.4.2-9.el6.x86_64 has missing requires of jre >= ('0', '1.5.0', None)
2:postfix-2.6.6-2.2.el6_1.x86_64 has missing requires of libmysqlclient.so.16()(64bit)
2:postfix-2.6.6-2.2.el6_1.x86_64 has missing requires of libmysqlclient.so.16(libmysqlclient_16)(64bit)
  Installing : dialog-1.1-10.20080819.el6.x86_64                                                                  1/1
  Verifying  : dialog-1.1-10.20080819.el6.x86_64                                                                  1/1

Installed:
  dialog.x86_64 0:1.1-10.20080819.el6

Complete!
[root@localhost ~]#
5. 再次安装
rpm -ivh vertica-9.2.1-7.x86_64.RHEL6.rpm
[root@localhost ~]# rpm -ivh vertica-9.2.1-7.x86_64.RHEL6.rpm
Preparing...                ########################################### [100%]
   1:vertica                ########################################### [100%]

Vertica Analytic Database V9.2.1-7 successfully installed on host localhost.localdomain

To complete your NEW installation and configure the cluster, run:
 /opt/vertica/sbin/install_vertica

To complete your Vertica UPGRADE, run:
 /opt/vertica/sbin/update_vertica

----------------------------------------------------------------------------------
Important
----------------------------------------------------------------------------------
Before upgrading Vertica, you must backup your database.  After you restart your
database after upgrading, you cannot revert to a previous Vertica software version.
----------------------------------------------------------------------------------

View the latest Vertica documentation at https://www.vertica.com/documentation/vertica/

[root@localhost ~]#
二、 创建Vertica节点
注: 个人机创建节点时切记配置静态IP,教程详见《Linux(Centos6.5)配置静态IP教程—小虎》。
1. 创建节点报错
执行命令:
/opt/vertica/sbin/install_vertica --host 192.168.116.128 --rpm
/root/vertica-9.2.1-7.x86_64.RHEL6.rpm --failure-threshold FAIL
–dba-user vdbadmin
其中,vdbadmin为管理员账户。
运行如下:
[root@localhost ~]# /opt/vertica/sbin/install_vertica --host 192.168.116.128 --rpm /root/vertica-9.2.1-7.x86_64.RHEL6.rpm --failure-threshold FAIL --dba-user vdbadmin
Vertica Analytic Database 9.2.1-7 Installation Tool


>> Validating options...


Mapping hostnames in --hosts (-s) to addresses...

>> Starting installation tasks.
>> Getting system information for cluster (this may take a while)...

Default shell on nodes:
192.168.116.128 /bin/bash

>> Validating software versions (rpm or deb)...


>> Beginning new cluster creation...

successfully backed up admintools.conf on 192.168.116.128

>> Creating or validating DB Admin user/group...

Successful on hosts (1): 192.168.116.128
    Provided DB Admin account details: user = vdbadmin, group = verticadba, home = /home/vdbadmin
    Creating group... Group already exists
    Validating group... Okay
    Creating user... User already exists
    Validating user... Okay


>> Validating node and cluster prerequisites...

Prerequisites not fully met during local (OS) configuration for
verify-192.168.116.128.xml:
    HINT (S0305): https://www.vertica.com/docs/9.2.x/HTML/index.htm#cshid=S0305
        TZ is unset for vdbadmin. Consider updating .profile or .bashrc
    WARN (N0010): https://www.vertica.com/docs/9.2.x/HTML/index.htm#cshid=N0010
        Linux iptables (firewall) has some non-trivial rules in tables: filter
    WARN (S0112): https://www.vertica.com/docs/9.2.x/HTML/index.htm#cshid=S0112
        vm.swappiness is higher than recommended: your 60 > 1
    FAIL (S0020): https://www.vertica.com/docs/9.2.x/HTML/index.htm#cshid=S0020
        Readahead size of  (/dev/mapper/VolGroup-lv_root) is too low for typical
        systems: 256 < 2048
    FAIL (S0030): https://www.vertica.com/docs/9.2.x/HTML/index.htm#cshid=S0030
        ntp daemon process is not running: ['ntpd', 'ntp', 'chronyd']
    FAIL (S0310): https://www.vertica.com/docs/9.2.x/HTML/index.htm#cshid=S0310
        Transparent hugepages is set to 'always'. Must be 'never' or 'madvise'.

System prerequisites failed.  Threshold = FAIL
	Hint: Fix above failures or use --failure-threshold

Installation FAILED with errors.

****
AdminTools and your existing Vertica databases may be unavailable.
Investigate the above warnings/errors and re-run installation.
****
[root@localhost ~]#
2. 常见错误解决方法
错误描述1:
FAIL (S0020): https://www.vertica.com/docs/9.2.x/HTML/index.htm#cshid=S0020
        Readahead size of  (/dev/mapper/VolGroup-lv_root) is too low for typical
        systems: 256 < 2048
【解决】:要求2048—8192之间,建议4096。
[root@localhost ~]# /sbin/blockdev --setra 4096
/dev/mapper/VolGroup-lv_root
错误描述2:
   FAIL (S0030): https://www.vertica.com/docs/9.2.x/HTML/index.htm#cshid=S0030
        ntp daemon process is not running: ['ntpd', 'ntp', 'chronyd']
【解决】:启动ntpd
[root@localhost ~]# /sbin/service ntpd restart
错误描述3:
   FAIL (S0310): https://www.vertica.com/docs/9.2.x/HTML/index.htm#cshid=S0310
        Transparent hugepages is set to 'always'. Must be 'never' or 'madvise'.
【解决】:
[root@localhost ~]# echo never > /sys/kernel/mm/redhat_transparent_hugepage/enabled
3. 创建节点并指定数据库管理员(没有会自动创建)
执行命令:
/opt/vertica/sbin/install_vertica --host 192.168.116.128 --rpm /root/vertica-9.2.1-7.x86_64.RHEL6.rpm --failure-threshold FAIL --dba-user vdbadmin
其中,vdbadmin为管理员账户。
[root@localhost ~]# /opt/vertica/sbin/install_vertica --host 192.168.116.128 --rpm /root/vertica-9.2.1-7.x86_64.RHEL6.rpm --failure-threshold FAIL --dba-user vdbadmin
Vertica Analytic Database 9.2.1-7 Installation Tool


>> Validating options...


Mapping hostnames in --hosts (-s) to addresses...

>> Starting installation tasks.
>> Getting system information for cluster (this may take a while)...

Default shell on nodes:
192.168.116.128 /bin/bash

>> Validating software versions (rpm or deb)...


>> Beginning new cluster creation...

successfully backed up admintools.conf on 192.168.116.128

>> Creating or validating DB Admin user/group...

Successful on hosts (1): 192.168.116.128
    Provided DB Admin account details: user = vdbadmin, group = verticadba, home = /home/vdbadmin
    Creating group... Group already exists
    Validating group... Okay
    Creating user... User already exists
    Validating user... Okay


>> Validating node and cluster prerequisites...

Prerequisites not fully met during local (OS) configuration for
verify-192.168.116.128.xml:
    HINT (S0305): https://www.vertica.com/docs/9.2.x/HTML/index.htm#cshid=S0305
        TZ is unset for vdbadmin. Consider updating .profile or .bashrc
    WARN (N0010): https://www.vertica.com/docs/9.2.x/HTML/index.htm#cshid=N0010
        Linux iptables (firewall) has some non-trivial rules in tables: filter
    WARN (S0112): https://www.vertica.com/docs/9.2.x/HTML/index.htm#cshid=S0112
        vm.swappiness is higher than recommended: your 60 > 1

System prerequisites passed.  Threshold = FAIL


>> Establishing DB Admin SSH connectivity...

Installing/Repairing SSH keys for vdbadmin


>> Setting up each node and modifying cluster...

Creating Vertica Data Directory...

Updating agent...
Creating node node0001 definition for host 192.168.116.128
... Done

>> Sending new cluster configuration to all nodes...

Starting agent...

>> Completing installation...

Running upgrade logic
No spread upgrade required: /opt/vertica/config/vspread.conf not found on any node
Installation complete.

Please evaluate your hardware using Vertica's validation tools:
    https://www.vertica.com/docs/9.2.x/HTML/index.htm#cshid=VALSCRIPT

To create a database:
  1. Logout and login as vdbadmin. (see note below)
  2. Run /opt/vertica/bin/adminTools as vdbadmin
  3. Select Create Database from the Configuration Menu

  Note: Installation may have made configuration changes to vdbadmin
  that do not take effect until the next session (logout and login).

To add or remove hosts, select Cluster Management from the Advanced Menu.
[root@localhost ~]#
安装成功
三、 创建Vertica数据库
1. 修改vdbadmin密码
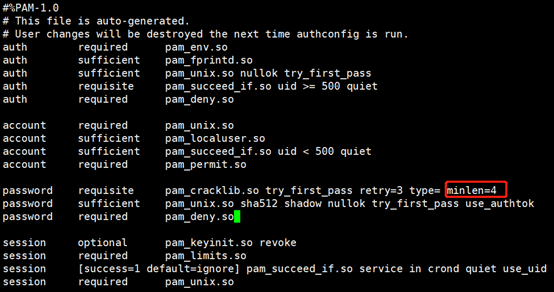
1)设置系统密码最小长度(非必须)
[root@localhost ~]# vi /etc/pam.d/system-auth
2)修改密码(多输入几遍)
passwd vdbadmin

注:这里我将密码设置为123456。
3)增大vdbadmin用户的权限
[root@localhost ~]# vi /etc/sudoers

只读文件需强制退出保存::wq!
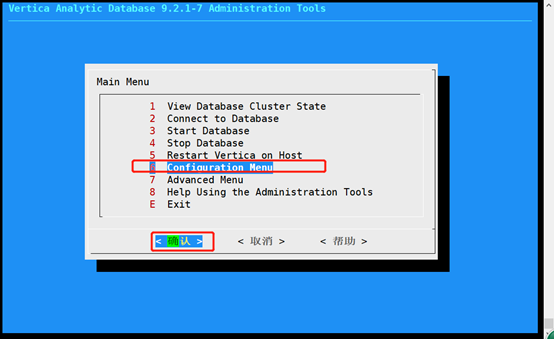
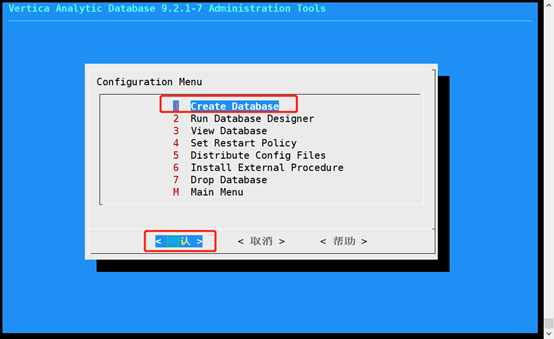
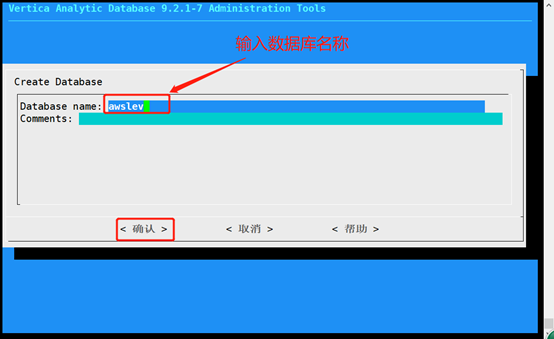
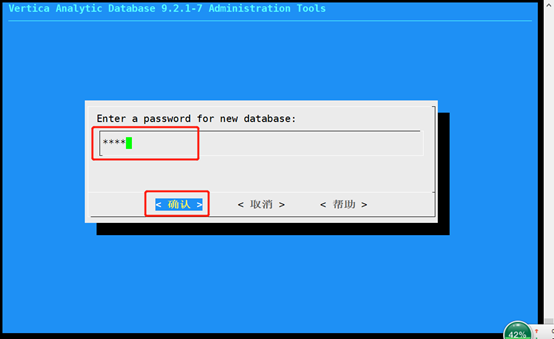
2. 启动vertica管理工具(图形化界面)
需切换到数据库管理员用户下(不支持root用户)
[root@localhost ~]# su vdbadmin
[vdbadmin@localhost root]$ /opt/vertica/bin/admintools
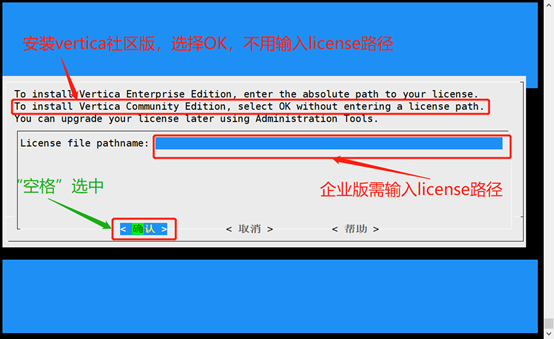
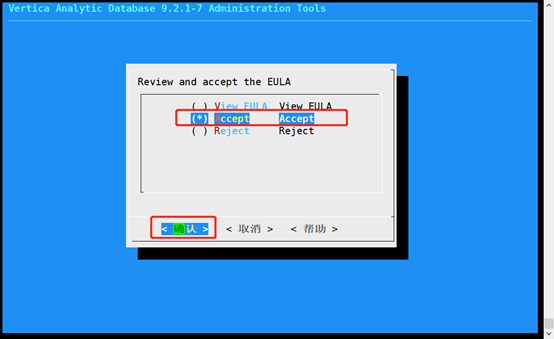
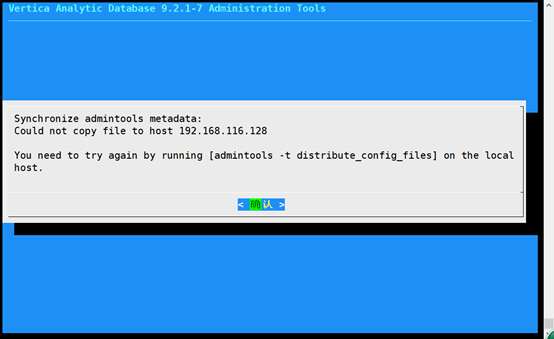
注:TAB键切换,方向键选择,空格键或Enter键为选中。也可以直接用鼠标双击选择。
我们安装如下社区版,直接选择“<确认>”按钮。
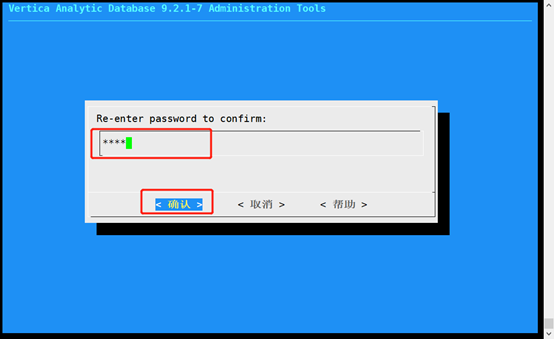
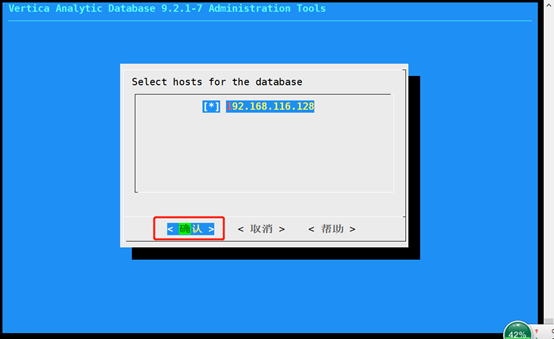
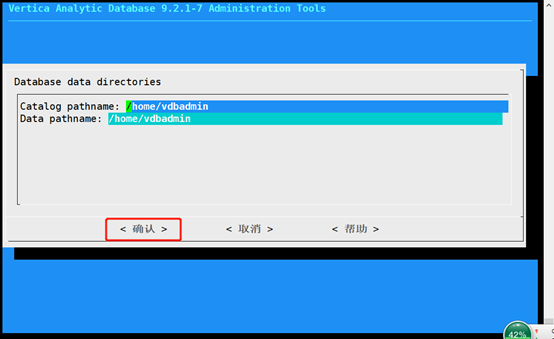
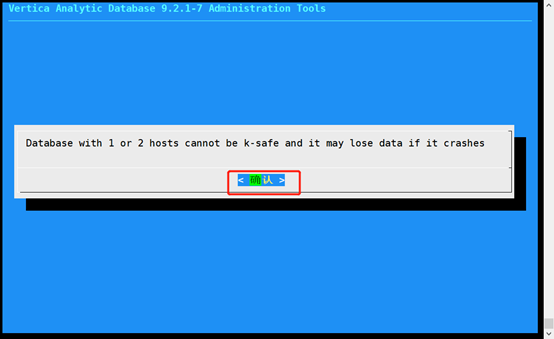
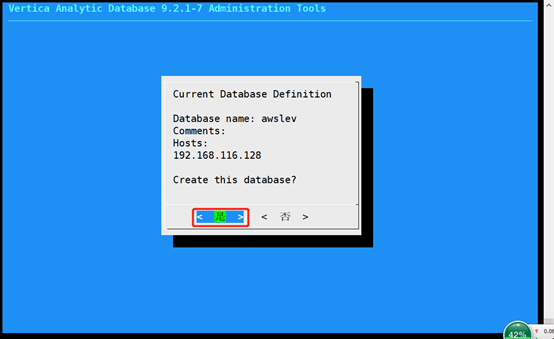
输出如下日志:
*** Creating database: awslev ***
	Creating database awslev
	Starting bootstrap node v_awslev_node0001 (192.168.116.128)
	Starting nodes:
		v_awslev_node0001 (192.168.116.128)
	Starting Vertica on all nodes. Please wait, databases with a large catalog may take a while to initialize.
	Node Status: v_awslev_node0001: (DOWN)
	Node Status: v_awslev_node0001: (DOWN)
	Node Status: v_awslev_node0001: (DOWN)
	Node Status: v_awslev_node0001: (DOWN)
	Node Status: v_awslev_node0001: (UP)
Automatically installing extension packages
Package: AWS
	Success: package AWS successfully installed
Package: MachineLearning
	Success: package MachineLearning successfully installed
Package: ParquetExport
	Success: package ParquetExport successfully installed
Package: txtindex
	Success: package txtindex successfully installed
Package: flextable
	Success: package flextable successfully installed
Package: place
	Success: package place successfully installed
Package: logsearch
	Success: package logsearch successfully installed
Package: VFunctions
	Success: package VFunctions successfully installed
Package: kafka
	Success: package kafka successfully installed
Package: approximate
	Success: package approximate successfully installed
Package: voltagesecure
	Success: package voltagesecure successfully installed
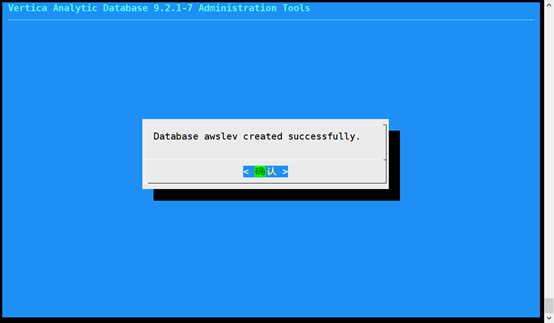
注: 本人设置数据库密码为:1234
四、 启动Vertica数据库
1. 手动启动
需切换到vertica数据库管理员用户下(不支持root用户)
[root@localhost ~]# su vdbadmin
打开图形界面:
[vdbadmin@localhost root]$ /opt/vertica/bin/admintools
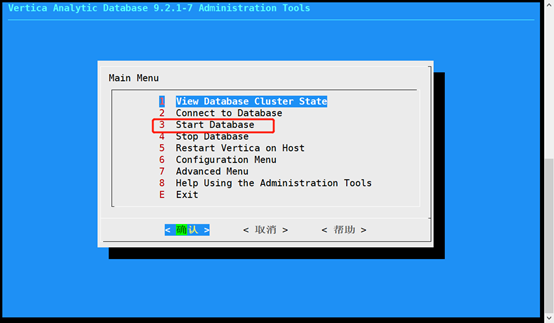
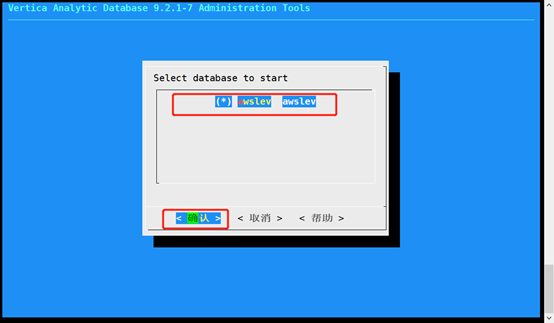
页面输出如下:
*** Starting database: awslev ***
	Starting nodes:
		v_awslev_node0001 (192.168.116.128)
	Starting Vertica on all nodes. Please wait, databases with a large catalog may take a while to initialize.
	Node Status: v_awslev_node0001: (DOWN)
	Node Status: v_awslev_node0001: (DOWN)
	Node Status: v_awslev_node0001: (DOWN)
	Node Status: v_awslev_node0001: (DOWN)
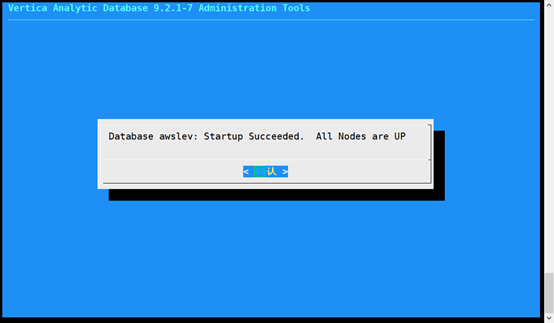
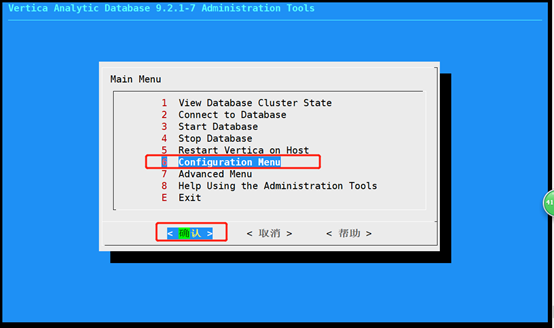
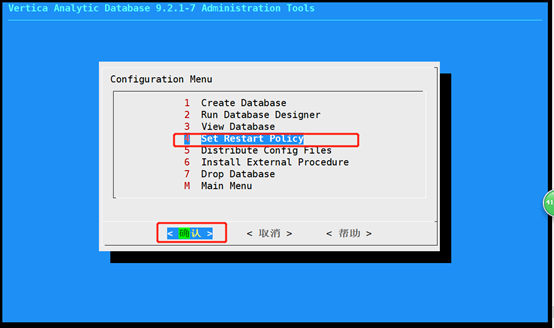
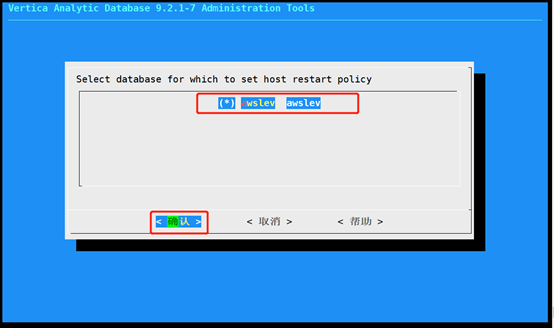
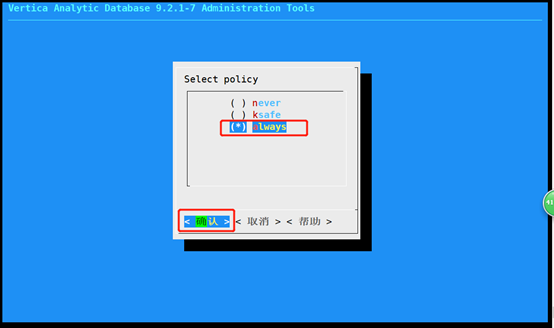
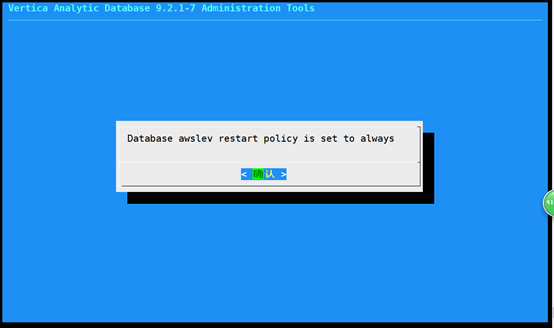
2. 设置开机启动
由于每次开启服务器时,都需要重新手动启动Vertica数据库,故此设置开机启动。
友情提示: 由于Vertica是吃内存和cpu的数据库,故设置为开机启动,在个人机器上Linux启动时会很慢。
需切换到vertica数据库管理员用户下(不支持root用户)
[root@localhost ~]# su vdbadmin
打开图形界面:
[vdbadmin@localhost root]$ /opt/vertica/bin/admintools
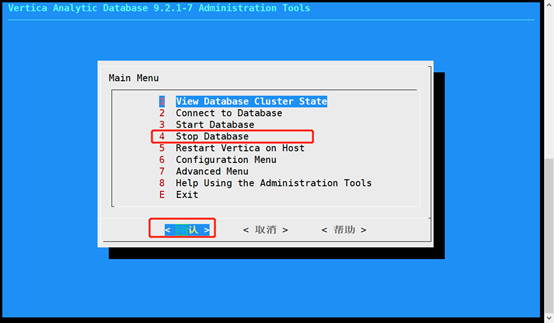
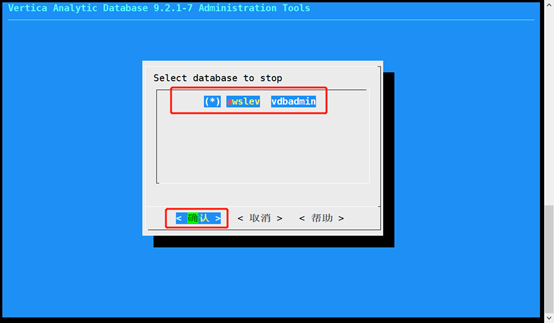
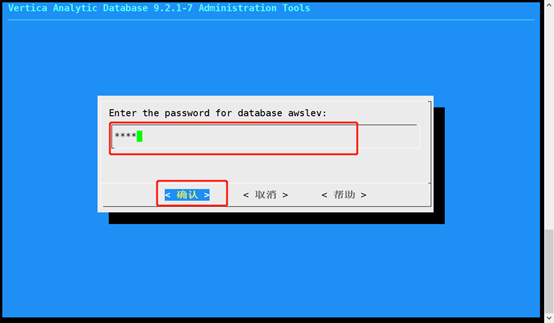
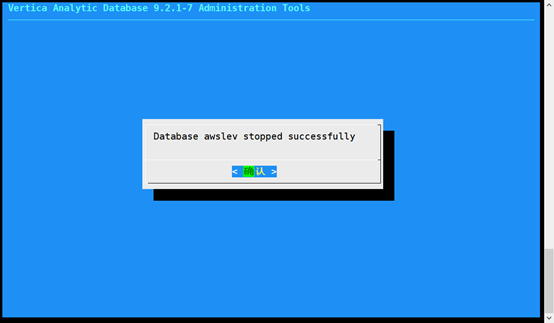
五、 关闭Vertica数据库
打开vertica图形管理工具:
[vdbadmin@localhost root]$ /opt/vertica/bin/admintools
六、 连接Vertica数据库
在图形界面启动Vertica数据库后,退出图形界面(但不要退出本窗口session):
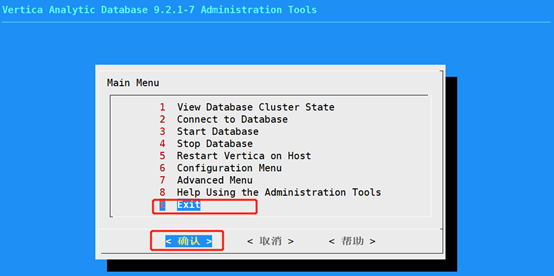
直接在窗口下方输入脚本连接vertica(其中-U为大写):
[vdbadmin@localhost root]$ vsql -h192.168.116.128 -U vdbadmin

注: 也可以在图形界面中直接连接Vertica(这里教程略)。
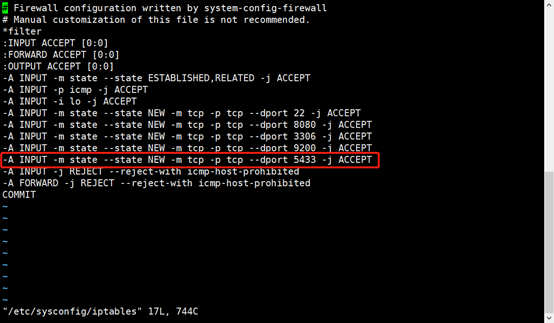
七、 开放5433端口
1. 配置防火墙端口
[root@localhost ~]# vi /etc/sysconfig/iptables
2. 重新加载配置文件
[root@localhost ~]# service iptables restart

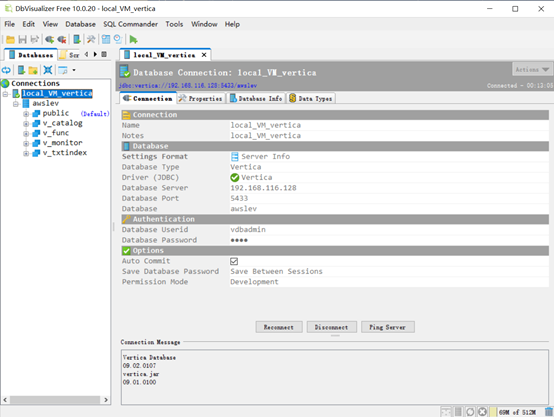
八、 DbVisualizer连接工具(图形界面)
1. 连接Vertical数据库
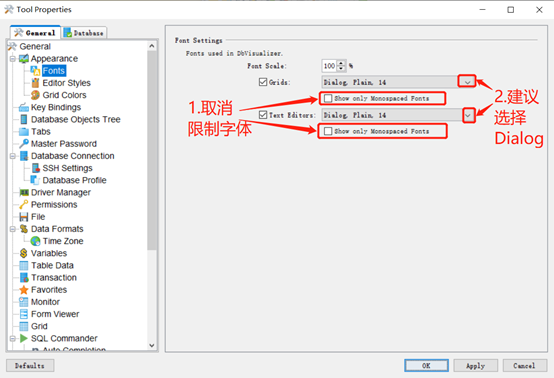
2. 设置界面字体和文本字体
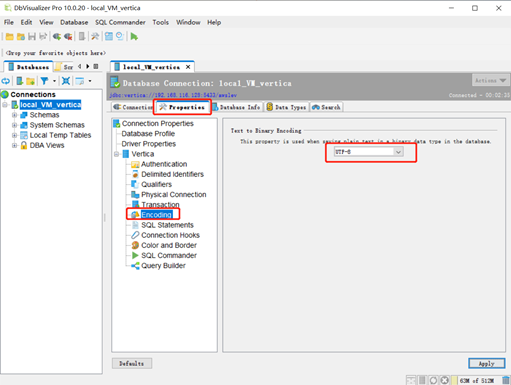
九、 DbVisualizer设置数据库编码
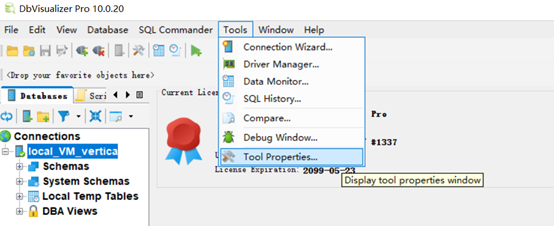
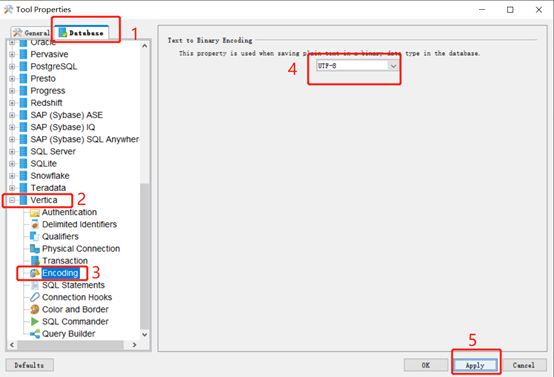
1. 设置Vertica数据库编码
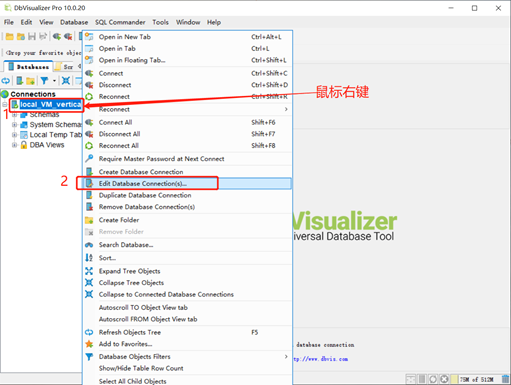
2. 设置会话编码
如果1中已经设置编码,此步骤可省略。
十、 附:常见配置命令
1. 配置yum源URL
建议将未注释的URL的https改为http。
vi /etc/yum.repos.d/epel.repo
2. 配置yum缓存路径
vi /etc/yum.conf
3. 查看磁盘空间使用情况
df -h
4. 修改主机IP
vi /etc/hosts
最后
以上就是壮观墨镜最近收集整理的关于Linux(Centos6.5)下安装Vertica9.2.1数据库教程的全部内容,更多相关Linux(Centos6内容请搜索靠谱客的其他文章。


发表评论 取消回复