文章目录
- 一、AddTryCatchPlugin插件介绍
- 1.1 功能
- 1.2 用法
- 1.3 运行效果
- 1.3.1 运行效果讲解
- 1.3.2 实际运行效果分析
- 1.3.2.1 源代码
- 1.3.2.2 原始字节码
- 1.3.2.3 使用AddTryCatchPlugin插件处理后的字节码
- 二、AddTryCatchPlugin插件原理介绍
- 2.1 基于ByteX来编写AddTryCatchPlugin插件
- 2.2.1 插件配置
- 2.2.1.1 属性文件:`srcmainresourcesMETA-INFgradle-pluginsbytex.add_try_catch.properties`
- 2.2.1.2 AddTryCatchExtension
- 2.2.3 TryCatchClassVisitor
- 2.2.4 AddTryCatchAdviceAdapter实现原理
- 2.2.4.1 设置Android Studio的ASM Bytecode Viewer插件
- 2.2.4.2 写一个不带try catch的方法,并查看对应的ASM代码
- 2.2.4.3 在该方法里加上try catch,并查看对应的ASM代码
- 2.2.4.4 对比两次的ASMifier代码的差异
- 2.2.4.5 需要生成try catch字节码的ASM
- 2.2.5 AddTryCatchAdviceAdapter具体的代码
- 三、发布和使用
- 3.1 发布
- 3.2 使用
- 四、总结
- 五、参考链接
文章【我的ASM学习进阶之旅】 如何基于ByteX快速上手,开发你自己的ASM插件?
中介绍了如何基于ByteX快速上手,现在写一个基于ByteX开发的练手的ASM插件AddTryCatchPlugin,并使用该插件来给指定的类的指定的方法,添加上tryCatch捕获异常然后丢给指定的处理类来处理。
一、AddTryCatchPlugin插件介绍
1.1 功能
给指定的类的指定的方法,添加上tryCatch捕获异常,并丢给指定的处理类来处理
1.2 用法
在项目的根目录下的 build.gradle 文件中添加该插件的对应配置
// 添加try catch代码的插件
classpath "com.xtc.asm.plugin:add-try-catch-plugin:1.0.0-oyp-4-dev"
在对应的module的build.gradle 文件中添加该插件的对应配置
//应用插件
apply plugin: 'bytex'

apply plugin: 'bytex.add_try_catch'

//配置插件的配置项
add_try_catch {
    enable true
    enableInDebug true
    // 要hook的类和方法
    hookPoint = [
            "com.oyp.asm.crash.TestCrash1": [
                    "crashMethod1",
                    "crashMethod2"
            ],
            "com.oyp.asm.crash.TestCrash2": [
                    "crashMethod1",
                    "crashMethod2"
            ],

            "com.oyp.asm.MainActivity":[
                    "testTryCatch"
            ]
    ]
    // 异常处理类 以及处理方法
    exceptionHandler = ["com.oyp.asm.crash.ExceptionUtils": "uploadCatchedException"]
}
1.3 运行效果
1.3.1 运行效果讲解
处理之前 , 原来的代码:
package com.oyp.asm.crash;

public class TestCrash1 {
    public TestCrash1() {
    }

    public static void crashMethod1() {
        int a = 1 / 0;
    }

    public static void crashMethod2() {
        int a = 1 / 0;
    }
}
transform处理之后,自动添加上TryCatch语句:
package com.oyp.asm.crash;

public class TestCrash1 {
    public TestCrash1() {
    }

    public static void crashMethod1() {
        try {
            int var0 = 1 / 0;
        } catch (Exception var2) {
            ExceptionUtils.uploadCatchedException(var2);
        }

    }

    public static void crashMethod2() {
        try {
            int var0 = 1 / 0;
        } catch (Exception var2) {
            ExceptionUtils.uploadCatchedException(var2);
        }

    }
}
1.3.2 实际运行效果分析
1.3.2.1 源代码
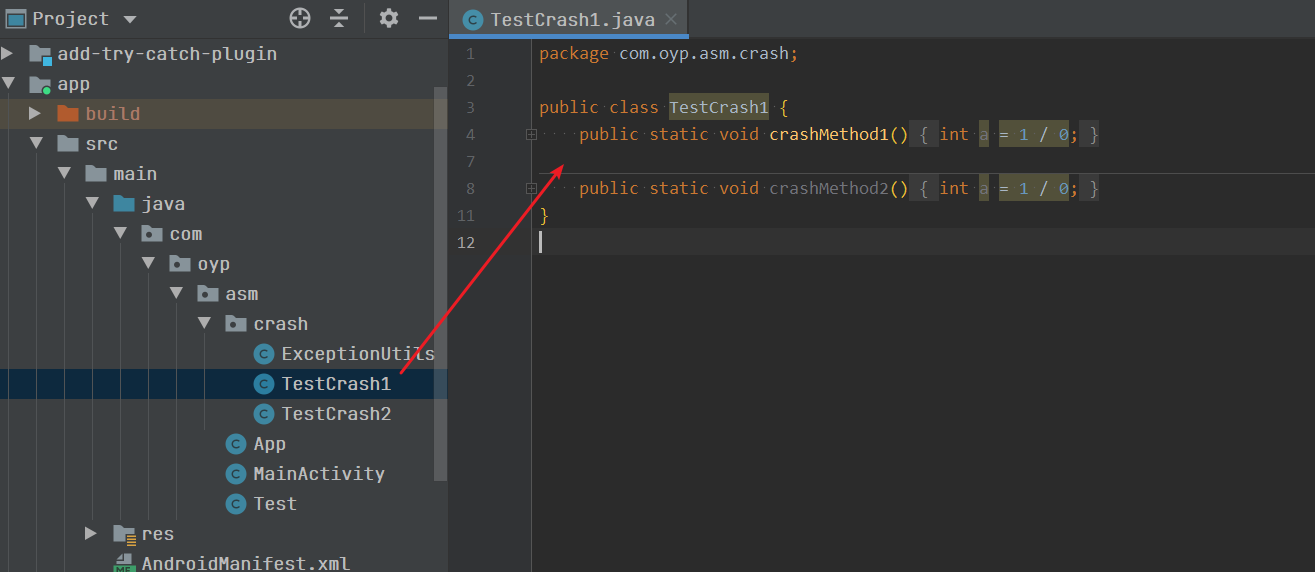
srcmainjavacomoypasmcrashTestCrash1.java 源代码如下
package com.oyp.asm.crash;

public class TestCrash1 {
    public static void crashMethod1() {
        int a = 1 / 0;
    }

    public static void crashMethod2() {
        int a = 1 / 0;
    }
}
1.3.2.2 原始字节码
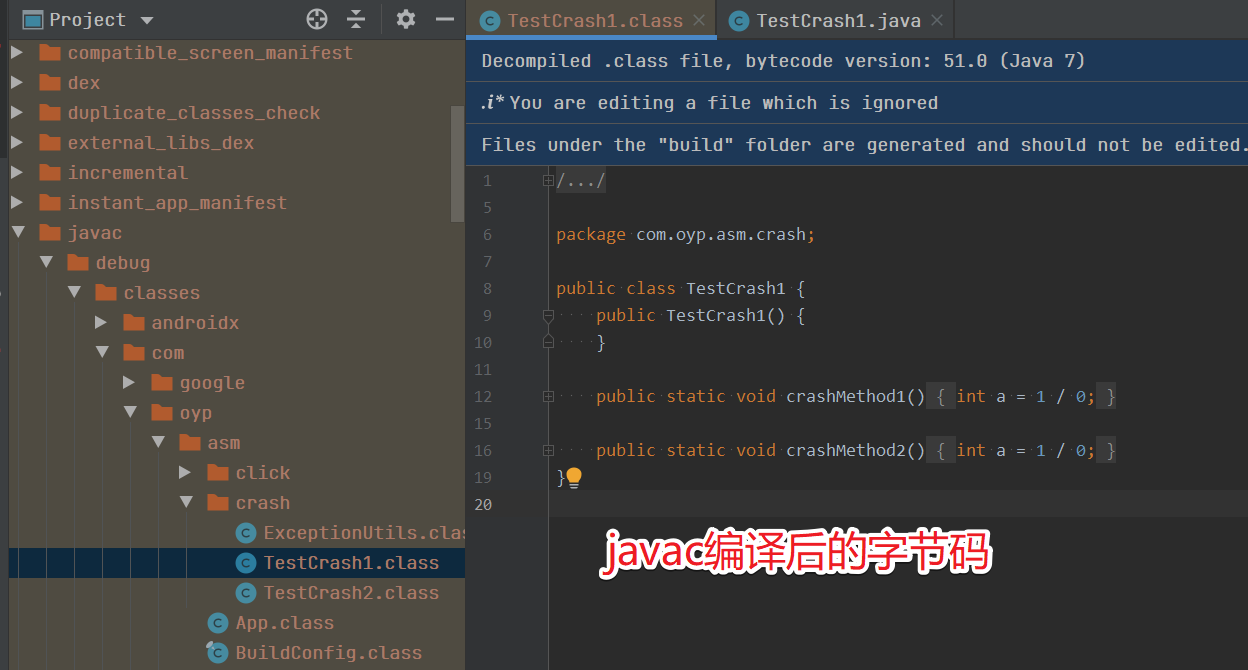
编译之后的原始字节码如下所示:
路径为:buildintermediatesjavacdebugclassescomoypasmcrashTestCrash1.class
- javac 编译后的字节码
//
// Source code recreated from a .class file by IntelliJ IDEA
// (powered by Fernflower decompiler)
//

package com.oyp.asm.crash;

public class TestCrash1 {
    public TestCrash1() {
    }

    public static void crashMethod1() {
        int a = 1 / 0;
    }

    public static void crashMethod2() {
        int a = 1 / 0;
    }
}
1.3.2.3 使用AddTryCatchPlugin插件处理后的字节码
使用AddTryCatchPlugin插件处理后的字节码如下所示:
路径为:buildintermediatestransformsByteXdebug45comoypasmcrashTestCrash1.class
//
// Source code recreated from a .class file by IntelliJ IDEA
// (powered by Fernflower decompiler)
//

package com.oyp.asm.crash;

public class TestCrash1 {
    public TestCrash1() {
    }

    public static void crashMethod1() {
        try {
            int var0 = 1 / 0;
        } catch (Exception var2) {
            ExceptionUtils.uploadCatchedException(var2);
        }

    }

    public static void crashMethod2() {
        try {
            int var0 = 1 / 0;
        } catch (Exception var2) {
            ExceptionUtils.uploadCatchedException(var2);
        }

    }
}
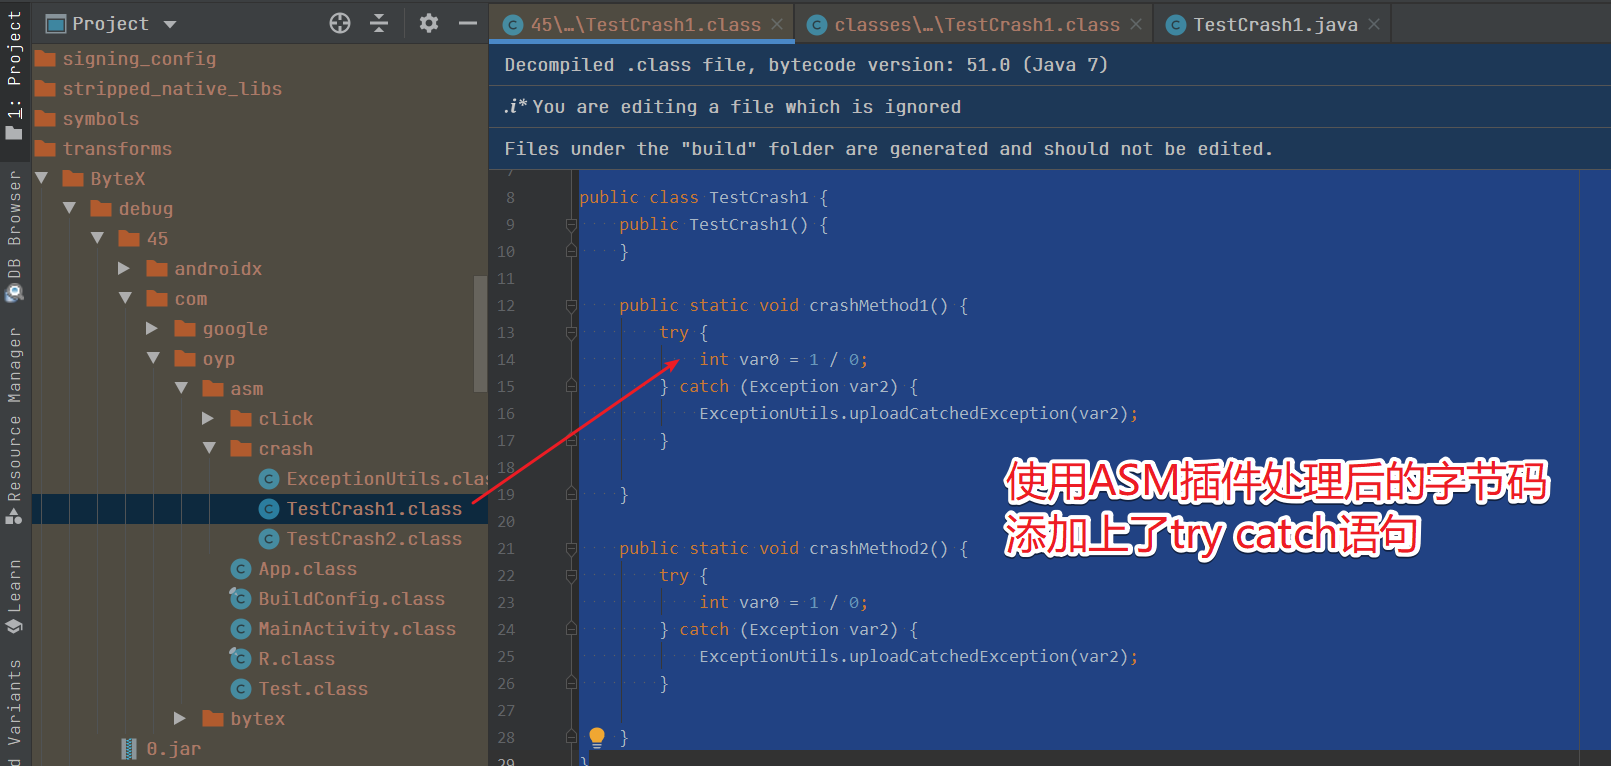
我们可以看到使用我们编写好的ASM插件AddTryCatchPlugin处理过后的字节码,自动添加上了try catch 语句。
二、AddTryCatchPlugin插件原理介绍
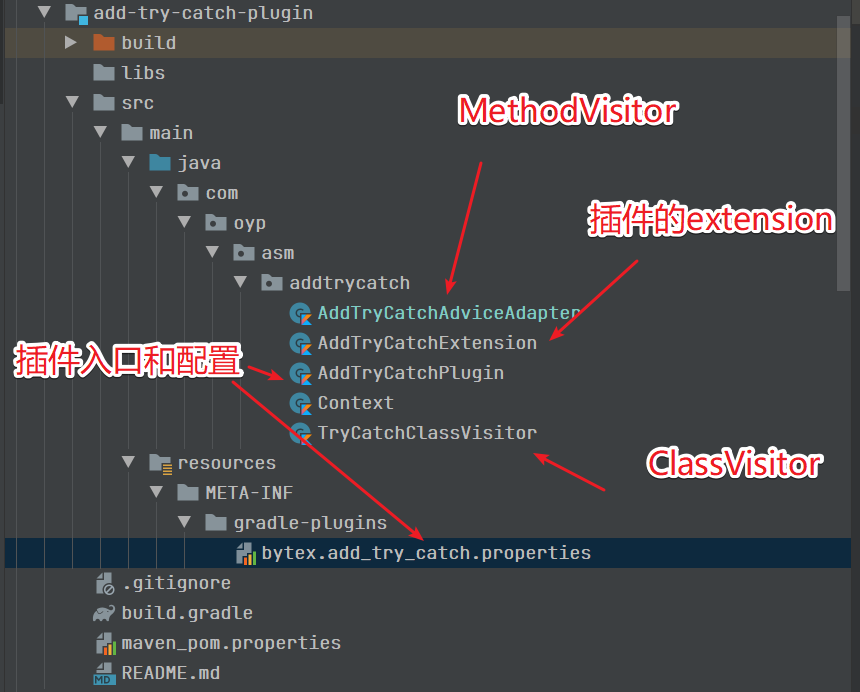
2.1 基于ByteX来编写AddTryCatchPlugin插件
2.2.1 插件配置
2.2.1.1 属性文件:srcmainresourcesMETA-INFgradle-pluginsbytex.add_try_catch.properties
- 确定插件实现类
首先 该文件定义插件的具体实现类为com.oyp.asm.addtrycatch.AddTryCatchPlugin
implementation-class=com.oyp.asm.addtrycatch.AddTryCatchPlugin
- 确定插件名称
并且该文件名称为bytex.add_try_catch.properties,所以插件的名称是bytex.add_try_catch
2.2.1.2 AddTryCatchExtension
package com.oyp.asm.addtrycatch

import com.ss.android.ugc.bytex.common.BaseExtension

open class AddTryCatchExtension : BaseExtension() {
    var hookPoint: Map<String, List<String>>? = null

    var exceptionHandler: Map<String, String>? = null

    override fun getName(): String {
        return "add_try_catch"
    }
}
上面代码AddTryCatchExtension 继承自BaseExtension,
- 自定义属性
- 自定义一个extension属性为
hookPoint,表示定义 要hook的类和方法 - 自定义一个extension属性为
exceptionHandler,表示定义 异常的处理类以及异常的处理方法。
- 自定义一个extension属性为
- 定义extension名称
上面表示 extension名称为"add_try_catch"
所以在build.gradle中的配置如下所示:
//应用插件
apply plugin: 'bytex'
apply plugin: 'bytex.add_try_catch'

//配置插件的配置项
add_try_catch {
    enable true
    enableInDebug true
    // 要hook的类和方法
    hookPoint = [
            "com.oyp.asm.crash.TestCrash1": [
                    "crashMethod1",
                    "crashMethod2"
            ],
            "com.oyp.asm.crash.TestCrash2": [
                    "crashMethod1",
                    "crashMethod2"
            ],

            "com.oyp.asm.MainActivity":[
                    "testTryCatch"
            ]
    ]
    // 异常处理类 以及处理方法
    exceptionHandler = ["com.oyp.asm.crash.ExceptionUtils": "uploadCatchedException"]
}
其中hookPoint和exceptionHandler来自于AddTryCatchExtension
enable 和 enableInDebug 是来自于AddTryCatchExtension 继承的BaseExtension。
2.2.2 AddTryCatchPlugin具体实现类
package com.oyp.asm.addtrycatch

import com.android.build.gradle.AppExtension
import com.ss.android.ugc.bytex.common.CommonPlugin
import com.ss.android.ugc.bytex.common.visitor.ClassVisitorChain
import org.gradle.api.Project
import javax.annotation.Nonnull

class AddTryCatchPlugin : CommonPlugin<AddTryCatchExtension, Context>() {
    override fun getContext(
        project: Project,
        android: AppExtension,
        extension: AddTryCatchExtension
    ): Context {
        return Context(project, android, extension)
    }

    //relativePath = xxx.class
    override fun transform(
        @Nonnull relativePath: String,
        @Nonnull chain: ClassVisitorChain
    ): Boolean {
        println("transform relativePath = " + relativePath )
        // 判断了类名是否在配置文件里存在,存在的话就处理

        // 注意  transform relativePath = com/oyp/asm/crash/TestCrash1.class
        // 配置的是  com.oyp.asm.crash.TestCrash1
        // 得去掉 .class  然后将  /  转换成  .   才能匹配上

        if (extension.hookPoint!!.containsKey(
                relativePath.replace(".class", "")
                    .replace("/","."))){
            println("transform relativePath = " + relativePath + " connect TryCatchClassVisitor")
            chain.connect(TryCatchClassVisitor(extension))
        }
        return super.transform(relativePath, chain)
    }
}
上面的插件,会进行下面的处理
- 将relativePath的值类似于:
com/oyp/asm/crash/TestCrash1.class的格式,转换成类似于:com.oyp.asm.crash.TestCrash1的格式,便于做逻辑判断。 - 判断当前遍历的转后格式之后的
relativePath是否等于extension中配置的hookPoint中的key ,如果等于的话,则通过TryCatchClassVisitor来处理。
extension中配置的hookPoint 是一个数组,每个数组的值是一个key-value的形式。
其中
- key为要hook的类
- value为要hook的方法
如下所示:
// 要hook的类和方法
    hookPoint = [
            "com.oyp.asm.crash.TestCrash1": [
                    "crashMethod1",
                    "crashMethod2"
            ],
            "com.oyp.asm.crash.TestCrash2": [
                    "crashMethod1",
                    "crashMethod2"
            ],

            "com.oyp.asm.MainActivity":[
                    "testTryCatch"
            ]
    ]
2.2.3 TryCatchClassVisitor
接下来我们看看TryCatchClassVisitor的源代码,如下所示:
package com.oyp.asm.addtrycatch

import com.ss.android.ugc.bytex.common.visitor.BaseClassVisitor
import org.objectweb.asm.MethodVisitor
import org.objectweb.asm.Opcodes

class TryCatchClassVisitor(private val mExtension: AddTryCatchExtension) : BaseClassVisitor() {
    private var mClassName: String? = null
    private var mMethodNames: List<String>? = null

    override fun visit(
        version: Int,
        access: Int,
        name: String?,
        signature: String?,
        superName: String?,
        interfaces: Array<out String>?
    ) {
        // 获取类名
        mClassName = name?.replace("/", ".")
        mMethodNames = mExtension.hookPoint?.get(mClassName)
        System.out.println("add try catch ,mClassName :" + mClassName + " mMethodNames :" + mMethodNames)
        super.visit(version, access, name, signature, superName, interfaces)
    }

    override fun visitMethod(
        access: Int,
        name: String,
        desc: String,
        signature: String?,
        exceptions: Array<String>?
    ): MethodVisitor {
        var mv = super.visitMethod(access, name, desc, signature, exceptions)
        //判断当前方法是要加try catch的方法就使用AddTryCatchMethodVisitor来处理
        if (mMethodNames!!.contains(name)) {
            System.out.println("use AddTryCatchMethodVisitor to add try catch");
            mv = AddTryCatchAdviceAdapter(mExtension, Opcodes.ASM5, mv, access, name, desc)
        }
        return mv
    }
}
TryCatchClassVisitor做了如下所示的操作:
- 在
visit()方法中使用mClassName来记录当前访问到的class的类名 - 在
visit()方法中使用mMethodNames去获取当前的class类名在extension中配置了要hook的method方法列表。 - 在
visitMethod()方法中,去匹配当前访问的method名是否在mMethodNames集合中,如果处于extension配置的hookPoint配置的mMethodNames中的话,则说明当前类的当前这个方法需要被处理。 - 如果上一步判断表示要处理的话,则使用
AddTryCatchAdviceAdapter来处理具体的方法。
2.2.4 AddTryCatchAdviceAdapter实现原理
我们来看一看AddTryCatchAdviceAdapter类,AddTryCatchAdviceAdapter才是我们这个插件的核心业务逻辑所在,在这里我们会给具体要hook的class的具体method加上trycatch代码块。
具体如何实现这个AddTryCatchAdviceAdapter,我们分解成如下几个步骤:
2.2.4.1 设置Android Studio的ASM Bytecode Viewer插件
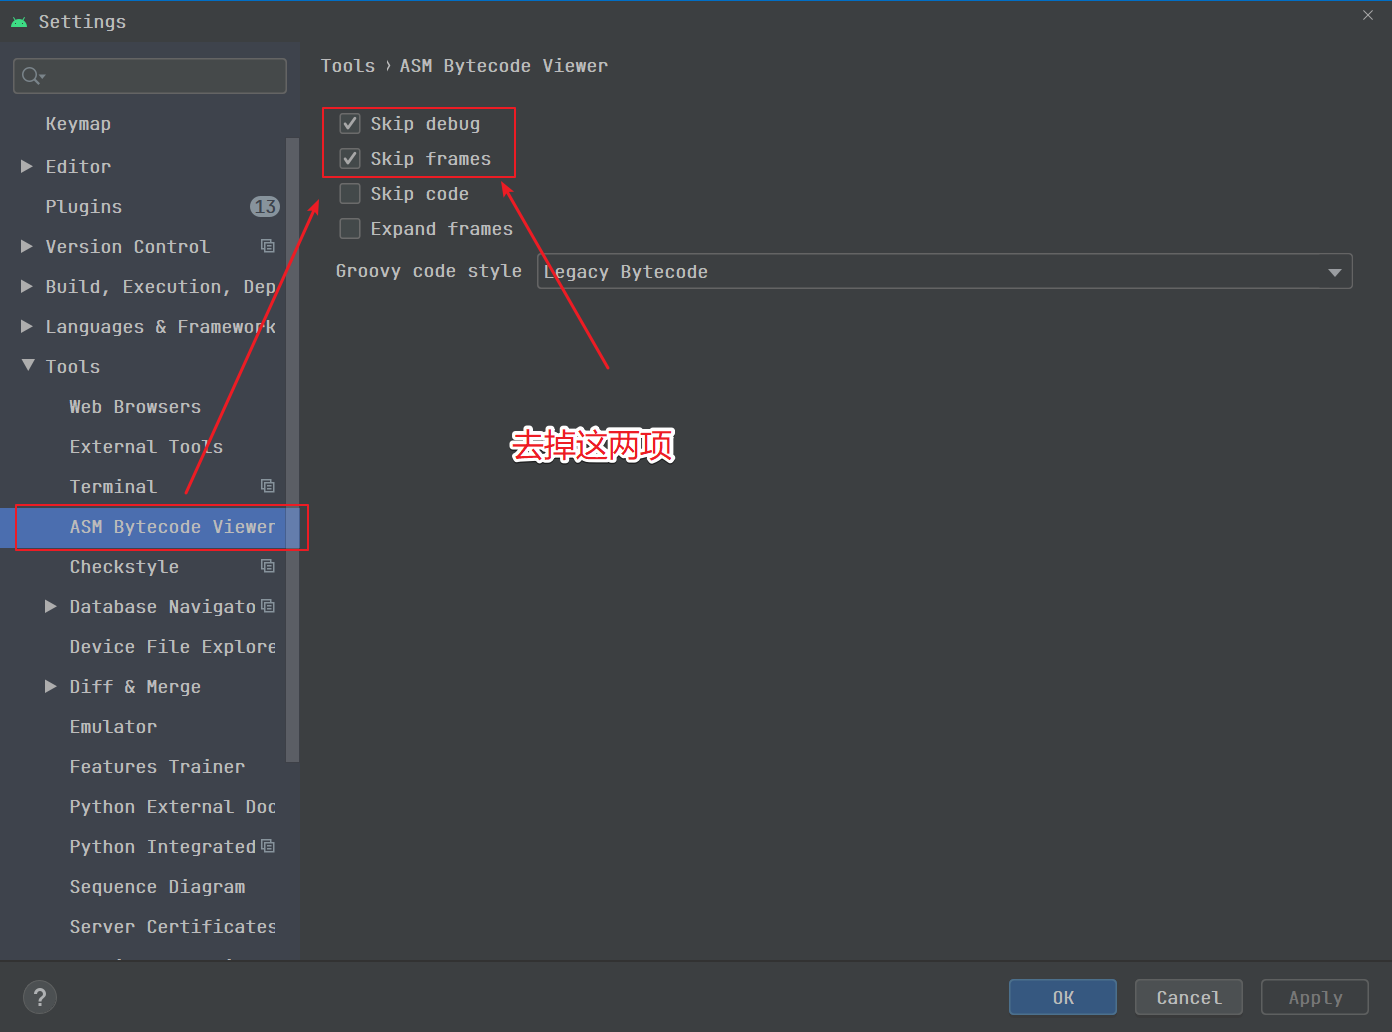
我们使用Android Studio的ASM Bytecode Viewer插件来查看字节码,先在设置里找到ASM Bytecode Viewer的设置项,然后把Skip debug和Skip frames两项勾选上,这样可以减少部分不必要的ASM代码。
2.2.4.2 写一个不带try catch的方法,并查看对应的ASM代码
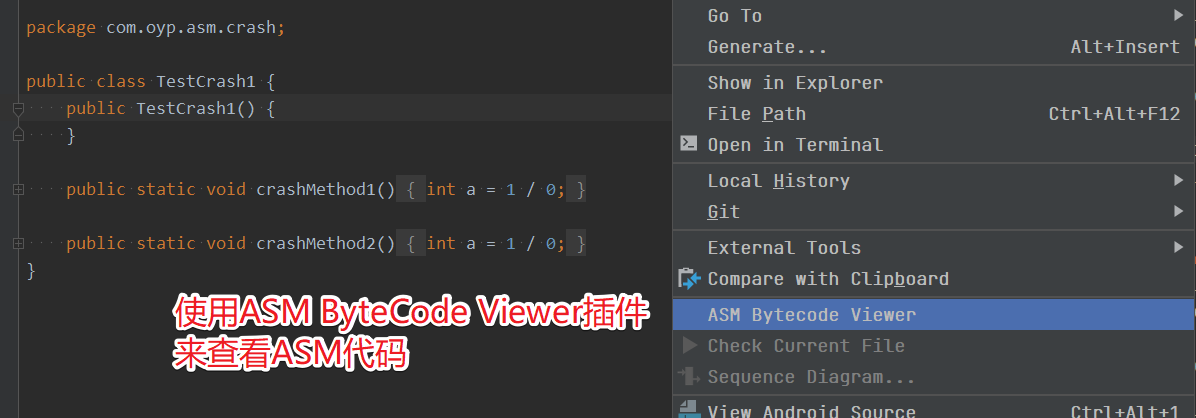
我们先写一个不带try catch的方法,然后在类上点击右键,在弹出菜单里点击Show Bytecode outline开始生成对应的字节码,再点击弹出框上的ASMified按钮,即可显示生成我们当前类所需的ASM代码。
比如下面的代码,不带try catch代码块
package com.oyp.asm.crash;

public class TestCrash1 {
    public TestCrash1() {
    }

    public static void crashMethod1() {
        int a = 1 / 0;
    }

    public static void crashMethod2() {
        int a = 1 / 0;
    }
}
在代码中,右键,然后选择【ASM Bytecode Viwer】
对应的ASMifier代码,如下所示:
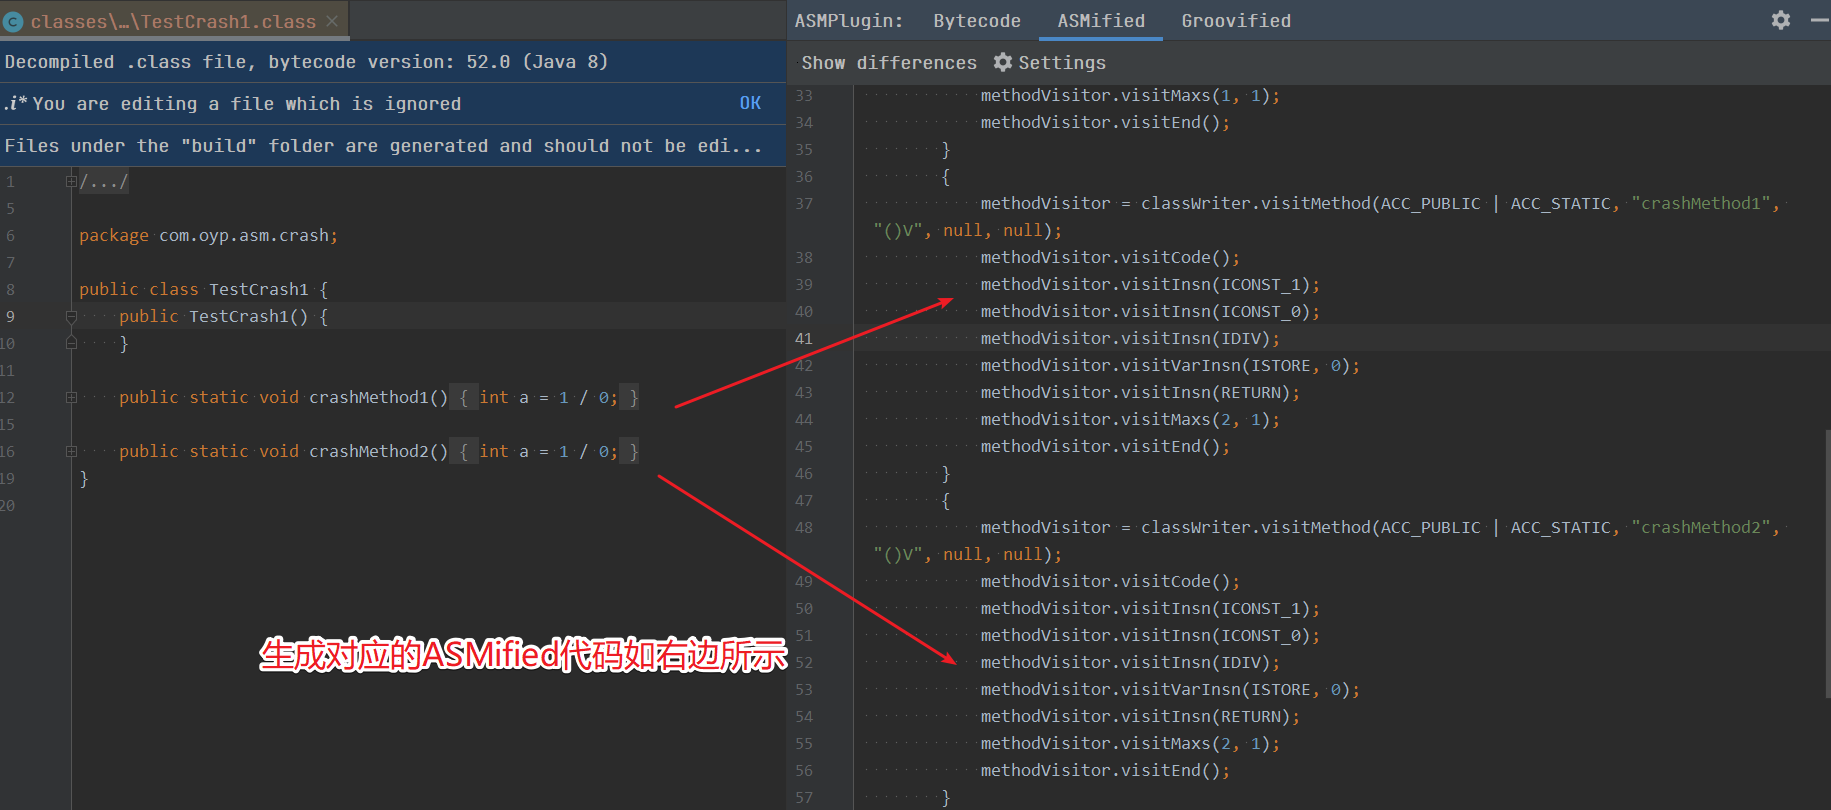
package asm.com.oyp.asm.crash;

import org.objectweb.asm.AnnotationVisitor;
import org.objectweb.asm.Attribute;
import org.objectweb.asm.ClassReader;
import org.objectweb.asm.ClassWriter;
import org.objectweb.asm.ConstantDynamic;
import org.objectweb.asm.FieldVisitor;
import org.objectweb.asm.Handle;
import org.objectweb.asm.Label;
import org.objectweb.asm.MethodVisitor;
import org.objectweb.asm.Opcodes;
import org.objectweb.asm.Type;
import org.objectweb.asm.TypePath;

public class TestCrash1Dump implements Opcodes {

    public static byte[] dump() throws Exception {

        ClassWriter classWriter = new ClassWriter(0);
        FieldVisitor fieldVisitor;
        MethodVisitor methodVisitor;
        AnnotationVisitor annotationVisitor0;

        classWriter.visit(V1_8, ACC_PUBLIC | ACC_SUPER, "com/oyp/asm/crash/TestCrash1", null, "java/lang/Object", null);

        {
            methodVisitor = classWriter.visitMethod(ACC_PUBLIC, "<init>", "()V", null, null);
            methodVisitor.visitCode();
            methodVisitor.visitVarInsn(ALOAD, 0);
            methodVisitor.visitMethodInsn(INVOKESPECIAL, "java/lang/Object", "<init>", "()V", false);
            methodVisitor.visitInsn(RETURN);
            methodVisitor.visitMaxs(1, 1);
            methodVisitor.visitEnd();
        }
        {
            methodVisitor = classWriter.visitMethod(ACC_PUBLIC | ACC_STATIC, "crashMethod1", "()V", null, null);
            methodVisitor.visitCode();
            methodVisitor.visitInsn(ICONST_1);
            methodVisitor.visitInsn(ICONST_0);
            methodVisitor.visitInsn(IDIV);
            methodVisitor.visitVarInsn(ISTORE, 0);
            methodVisitor.visitInsn(RETURN);
            methodVisitor.visitMaxs(2, 1);
            methodVisitor.visitEnd();
        }
        {
            methodVisitor = classWriter.visitMethod(ACC_PUBLIC | ACC_STATIC, "crashMethod2", "()V", null, null);
            methodVisitor.visitCode();
            methodVisitor.visitInsn(ICONST_1);
            methodVisitor.visitInsn(ICONST_0);
            methodVisitor.visitInsn(IDIV);
            methodVisitor.visitVarInsn(ISTORE, 0);
            methodVisitor.visitInsn(RETURN);
            methodVisitor.visitMaxs(2, 1);
            methodVisitor.visitEnd();
        }
        classWriter.visitEnd();

        return classWriter.toByteArray();
    }
}
2.2.4.3 在该方法里加上try catch,并查看对应的ASM代码
然后我们在该方法里加上try catch,再次重复第二步生成ASM代码
加上try catch块的源代码
package com.oyp.asm.crash;

public class TestCrash1 {
    public TestCrash1() {
    }

    public static void crashMethod1() {
        try {
            int var0 = 1 / 0;
        } catch (Exception var2) {
            ExceptionUtils.uploadCatchedException(var2);
        }

    }

    public static void crashMethod2() {
        try {
            int var0 = 1 / 0;
        } catch (Exception var2) {
            ExceptionUtils.uploadCatchedException(var2);
        }

    }
}
加上try catch块的源代码对应的ASMifier代码如下所示:
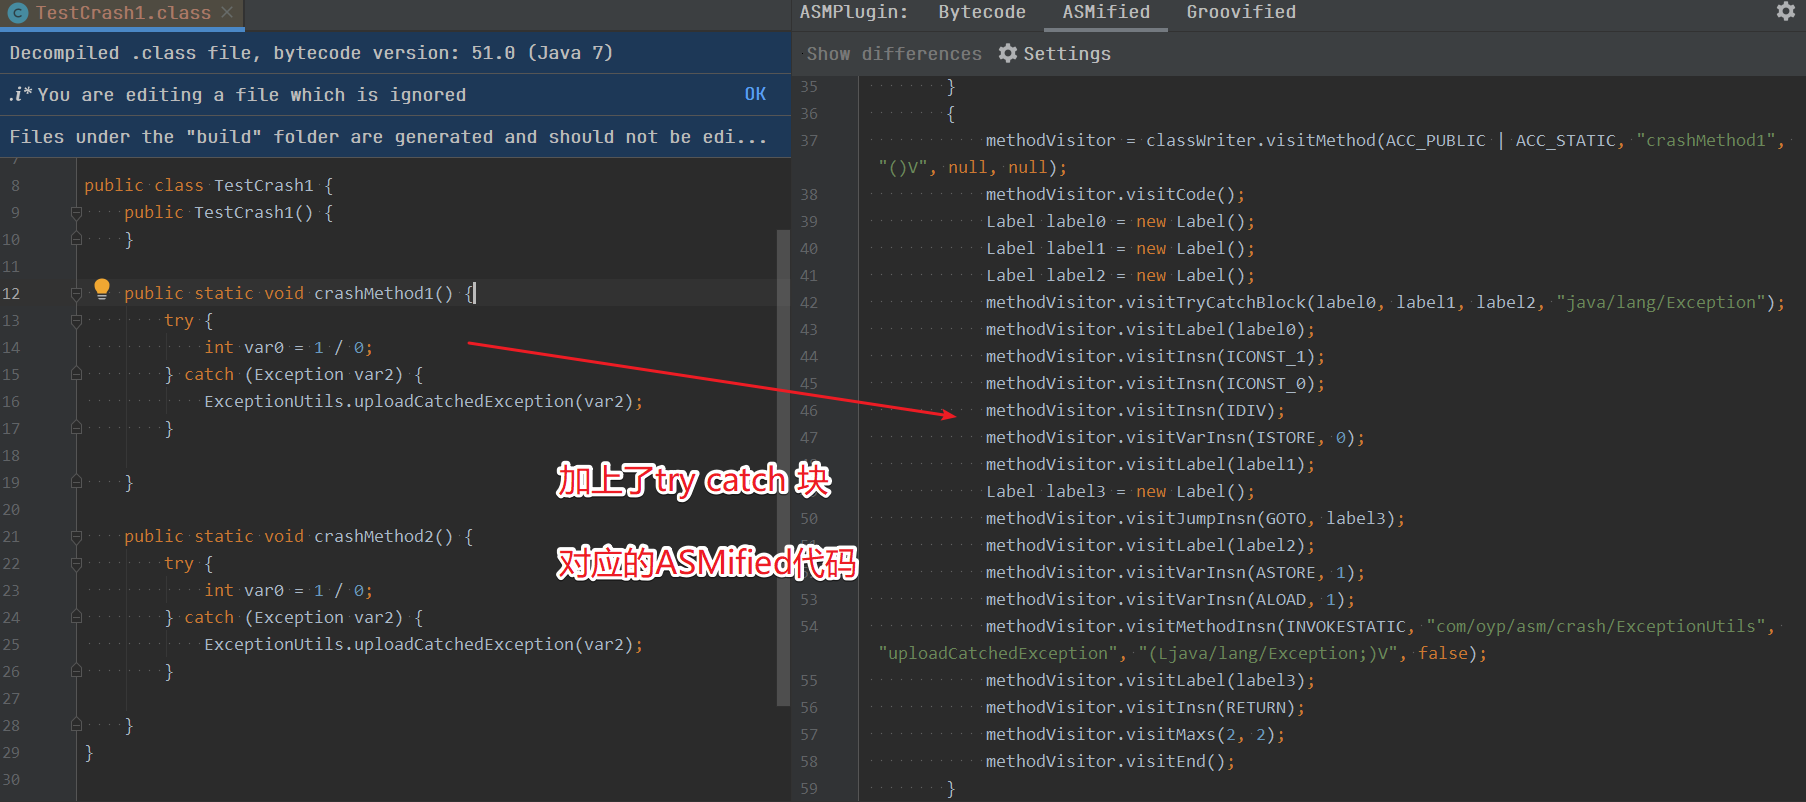
package asm.com.oyp.asm.crash;

import org.objectweb.asm.AnnotationVisitor;
import org.objectweb.asm.Attribute;
import org.objectweb.asm.ClassReader;
import org.objectweb.asm.ClassWriter;
import org.objectweb.asm.ConstantDynamic;
import org.objectweb.asm.FieldVisitor;
import org.objectweb.asm.Handle;
import org.objectweb.asm.Label;
import org.objectweb.asm.MethodVisitor;
import org.objectweb.asm.Opcodes;
import org.objectweb.asm.Type;
import org.objectweb.asm.TypePath;

public class TestCrash1Dump implements Opcodes {

    public static byte[] dump() throws Exception {

        ClassWriter classWriter = new ClassWriter(0);
        FieldVisitor fieldVisitor;
        MethodVisitor methodVisitor;
        AnnotationVisitor annotationVisitor0;

        classWriter.visit(V1_7, ACC_PUBLIC | ACC_SUPER, "com/oyp/asm/crash/TestCrash1", null, "java/lang/Object", null);

        {
            methodVisitor = classWriter.visitMethod(ACC_PUBLIC, "<init>", "()V", null, null);
            methodVisitor.visitCode();
            methodVisitor.visitVarInsn(ALOAD, 0);
            methodVisitor.visitMethodInsn(INVOKESPECIAL, "java/lang/Object", "<init>", "()V", false);
            methodVisitor.visitInsn(RETURN);
            methodVisitor.visitMaxs(1, 1);
            methodVisitor.visitEnd();
        }
        {
            methodVisitor = classWriter.visitMethod(ACC_PUBLIC | ACC_STATIC, "crashMethod1", "()V", null, null);
            methodVisitor.visitCode();
            Label label0 = new Label();
            Label label1 = new Label();
            Label label2 = new Label();
            methodVisitor.visitTryCatchBlock(label0, label1, label2, "java/lang/Exception");
            methodVisitor.visitLabel(label0);
            methodVisitor.visitInsn(ICONST_1);
            methodVisitor.visitInsn(ICONST_0);
            methodVisitor.visitInsn(IDIV);
            methodVisitor.visitVarInsn(ISTORE, 0);
            methodVisitor.visitLabel(label1);
            Label label3 = new Label();
            methodVisitor.visitJumpInsn(GOTO, label3);
            methodVisitor.visitLabel(label2);
            methodVisitor.visitVarInsn(ASTORE, 1);
            methodVisitor.visitVarInsn(ALOAD, 1);
            methodVisitor.visitMethodInsn(INVOKESTATIC, "com/oyp/asm/crash/ExceptionUtils", "uploadCatchedException", "(Ljava/lang/Exception;)V", false);
            methodVisitor.visitLabel(label3);
            methodVisitor.visitInsn(RETURN);
            methodVisitor.visitMaxs(2, 2);
            methodVisitor.visitEnd();
        }
        {
            methodVisitor = classWriter.visitMethod(ACC_PUBLIC | ACC_STATIC, "crashMethod2", "()V", null, null);
            methodVisitor.visitCode();
            Label label0 = new Label();
            Label label1 = new Label();
            Label label2 = new Label();
            methodVisitor.visitTryCatchBlock(label0, label1, label2, "java/lang/Exception");
            methodVisitor.visitLabel(label0);
            methodVisitor.visitInsn(ICONST_1);
            methodVisitor.visitInsn(ICONST_0);
            methodVisitor.visitInsn(IDIV);
            methodVisitor.visitVarInsn(ISTORE, 0);
            methodVisitor.visitLabel(label1);
            Label label3 = new Label();
            methodVisitor.visitJumpInsn(GOTO, label3);
            methodVisitor.visitLabel(label2);
            methodVisitor.visitVarInsn(ASTORE, 1);
            methodVisitor.visitVarInsn(ALOAD, 1);
            methodVisitor.visitMethodInsn(INVOKESTATIC, "com/oyp/asm/crash/ExceptionUtils", "uploadCatchedException", "(Ljava/lang/Exception;)V", false);
            methodVisitor.visitLabel(label3);
            methodVisitor.visitInsn(RETURN);
            methodVisitor.visitMaxs(2, 2);
            methodVisitor.visitEnd();
        }
        {
            methodVisitor = classWriter.visitMethod(ACC_STATIC, "<clinit>", "()V", null, null);
            methodVisitor.visitCode();
            methodVisitor.visitInsn(RETURN);
            methodVisitor.visitMaxs(0, 0);
            methodVisitor.visitEnd();
        }
        classWriter.visitEnd();

        return classWriter.toByteArray();
    }
}
2.2.4.4 对比两次的ASMifier代码的差异
然后比较这次生成的ASM代码和上次生成的ASM的区别。分析这个区别,即可找到添加try catch的部分代码是什么。
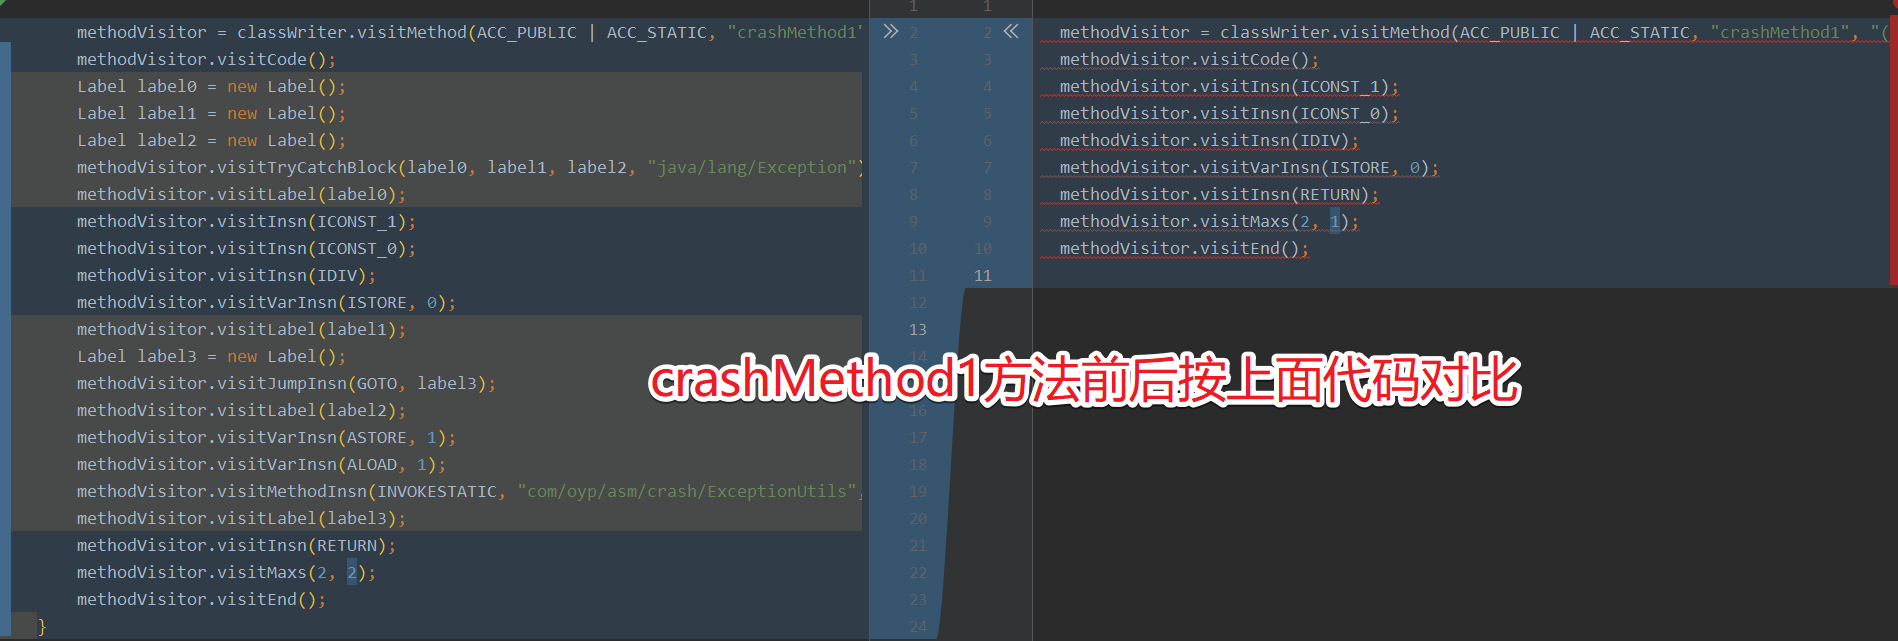
- 未加try catch 的
crashMethod1方法的ASM代码
 {
            methodVisitor = classWriter.visitMethod(ACC_PUBLIC | ACC_STATIC, "crashMethod1", "()V", null, null);
            methodVisitor.visitCode();
            methodVisitor.visitInsn(ICONST_1);
            methodVisitor.visitInsn(ICONST_0);
            methodVisitor.visitInsn(IDIV);
            methodVisitor.visitVarInsn(ISTORE, 0);
            methodVisitor.visitInsn(RETURN);
            methodVisitor.visitMaxs(2, 1);
            methodVisitor.visitEnd();
        }
- 加了try catch 的
crashMethod1方法的ASM代码
{
            methodVisitor = classWriter.visitMethod(ACC_PUBLIC | ACC_STATIC, "crashMethod1", "()V", null, null);
            methodVisitor.visitCode();
            Label label0 = new Label();
            Label label1 = new Label();
            Label label2 = new Label();
            methodVisitor.visitTryCatchBlock(label0, label1, label2, "java/lang/Exception");
            methodVisitor.visitLabel(label0);
            methodVisitor.visitInsn(ICONST_1);
            methodVisitor.visitInsn(ICONST_0);
            methodVisitor.visitInsn(IDIV);
            methodVisitor.visitVarInsn(ISTORE, 0);
            methodVisitor.visitLabel(label1);
            Label label3 = new Label();
            methodVisitor.visitJumpInsn(GOTO, label3);
            methodVisitor.visitLabel(label2);
            methodVisitor.visitVarInsn(ASTORE, 1);
            methodVisitor.visitVarInsn(ALOAD, 1);
            methodVisitor.visitMethodInsn(INVOKESTATIC, "com/oyp/asm/crash/ExceptionUtils", "uploadCatchedException", "(Ljava/lang/Exception;)V", false);
            methodVisitor.visitLabel(label3);
            methodVisitor.visitInsn(RETURN);
            methodVisitor.visitMaxs(2, 2);
            methodVisitor.visitEnd();
        }
2.2.4.5 需要生成try catch字节码的ASM
我通过上述方式找到了需要生成try catch字节码的ASM代码如下:
// 这段代码是以前的
methodVisitor = classWriter.visitMethod(ACC_PUBLIC | ACC_STATIC, "crashMethod1", "()V", null, null);
methodVisitor.visitCode();
----------------------------

// 这段代码是要添加的
Label label0 = new Label();
Label label1 = new Label();
Label label2 = new Label();
methodVisitor.visitTryCatchBlock(label0, label1, label2, "java/lang/Exception");
methodVisitor.visitLabel(label0);

----------------------------
// 这段代码是以前的
methodVisitor.visitInsn(ICONST_1);
methodVisitor.visitInsn(ICONST_0);
methodVisitor.visitInsn(IDIV);
methodVisitor.visitVarInsn(ISTORE, 0);

----------------------------

// 这段代码是要添加的
methodVisitor.visitLabel(label1);
Label label3 = new Label();
methodVisitor.visitJumpInsn(GOTO, label3);
methodVisitor.visitLabel(label2);
methodVisitor.visitVarInsn(ASTORE, 1);
methodVisitor.visitVarInsn(ALOAD, 1);
methodVisitor.visitMethodInsn(INVOKESTATIC, "com/oyp/asm/crash/ExceptionUtils", "uploadCatchedException", "(Ljava/lang/Exception;)V", false);
methodVisitor.visitLabel(label3);

----------------------------

// 这段代码是以前的
methodVisitor.visitInsn(RETURN);
methodVisitor.visitMaxs(2, 2);
methodVisitor.visitEnd();
所以真正要实现try crash 代码,需要添加的代码如下所示:
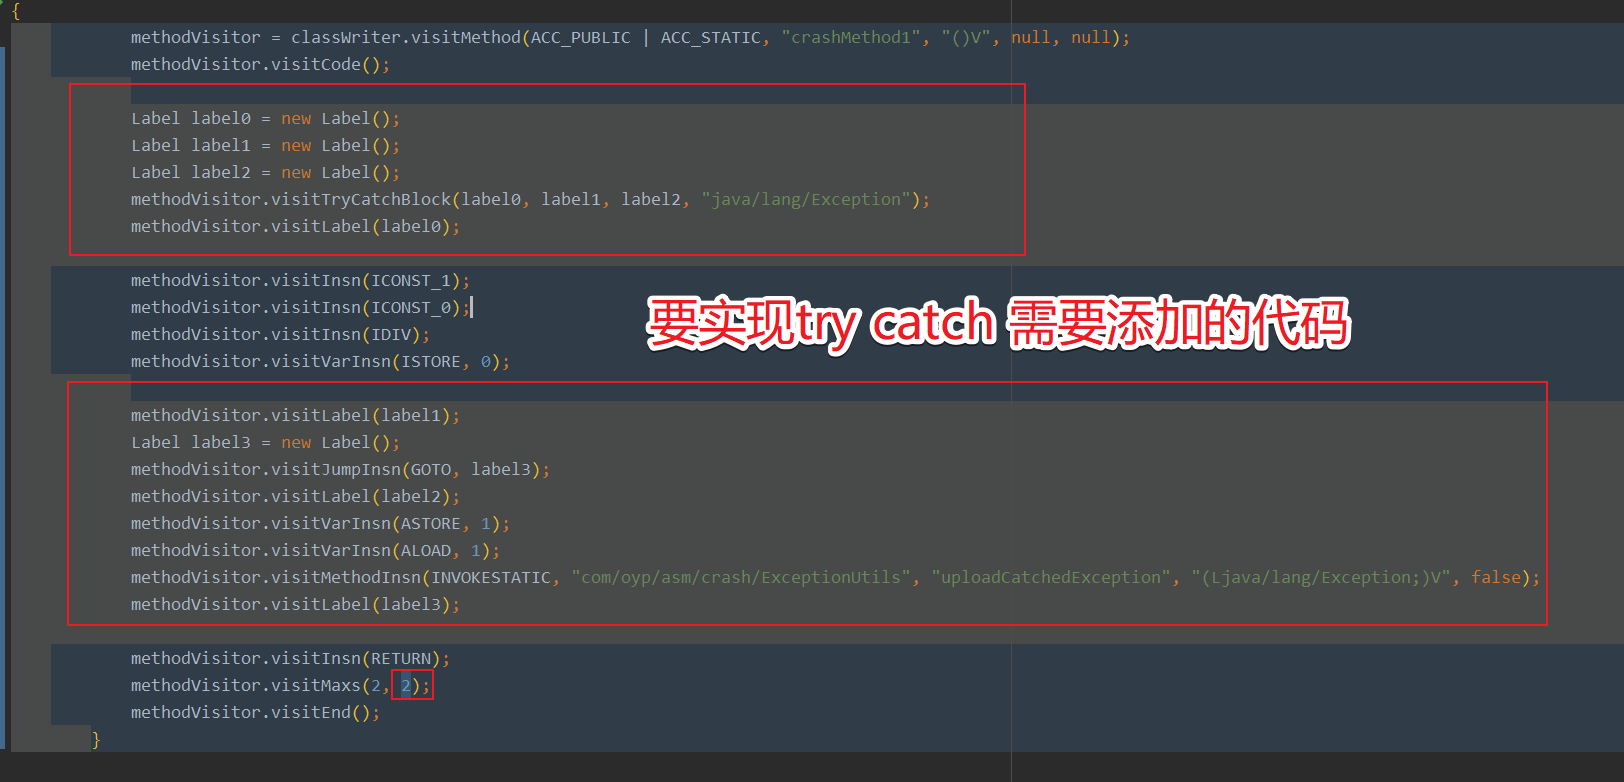
// 这段代码是要添加的
Label label0 = new Label();
Label label1 = new Label();
Label label2 = new Label();
methodVisitor.visitTryCatchBlock(label0, label1, label2, "java/lang/Exception");
methodVisitor.visitLabel(label0);

----------------------------

以前的代码 。。。。。。

----------------------------

// 这段代码是要添加的
methodVisitor.visitLabel(label1);
Label label3 = new Label();
methodVisitor.visitJumpInsn(GOTO, label3);
methodVisitor.visitLabel(label2);
methodVisitor.visitVarInsn(ASTORE, 1);
methodVisitor.visitVarInsn(ALOAD, 1);
methodVisitor.visitMethodInsn(INVOKESTATIC, "com/oyp/asm/crash/ExceptionUtils", "uploadCatchedException", "(Ljava/lang/Exception;)V", false);
methodVisitor.visitLabel(label3);
2.2.5 AddTryCatchAdviceAdapter具体的代码
AddTryCatchAdviceAdapter具体的源代码,如下所示:
package com.oyp.asm.addtrycatch

import org.objectweb.asm.Label
import org.objectweb.asm.MethodVisitor
import org.objectweb.asm.commons.AdviceAdapter
import java.util.function.Consumer

//AdviceAdapter继承于MethodVisitor,是一个对MethodVisitor方便的封装,提供了onMethodEnter和onMethodExit两个方法,分别表示扫描器进入方法和离开方法的时机。
class AddTryCatchAdviceAdapter(
    extension: AddTryCatchExtension,
    api: Int,
    mv: MethodVisitor?,
    access: Int,
    name: String?,
    desc: String?
) : AdviceAdapter(api, mv, access, name, desc) {
    var l1: Label? = null
    var l2: Label? = null
    private var exceptionHandleClass: String? = null
    private var exceptionHandleMethod: String? = null

    init {
        val exceptionHandler = extension.exceptionHandler
        if (exceptionHandler != null && !exceptionHandler.isEmpty()) {
            exceptionHandler.entries.forEach(Consumer { entry: Map.Entry<String, String> ->
                exceptionHandleClass = entry.key.replace(".", "/")
                exceptionHandleMethod = entry.value
            })
        }
    }

    // 进入方法
    override fun onMethodEnter() {
        super.onMethodEnter()
        val l0 = Label()
        l1 = Label()
        l2 = Label()
        mv.visitTryCatchBlock(l0, l1, l2, "java/lang/Exception")
        mv.visitLabel(l0)
    }

    // 离开方法
    override fun onMethodExit(i: Int) {
        super.onMethodExit(i)
        mv.visitLabel(l1)
        val l3 = Label()
        mv.visitJumpInsn(GOTO, l3)
        mv.visitLabel(l2)
        mv.visitVarInsn(ASTORE, 1)
        if (exceptionHandleClass != null && exceptionHandleMethod != null) {
            mv.visitVarInsn(ALOAD, 1)
            mv.visitMethodInsn(
                INVOKESTATIC, exceptionHandleClass,
                exceptionHandleMethod, "(Ljava/lang/Exception;)V", false
            )
        }
        mv.visitLabel(l3)
    }
}
AdviceAdapter继承于MethodVisitor,是一个对MethodVisitor方便的封装,提供了onMethodEnter和onMethodExit两个方法,分别表示扫描器进入方法和离开方法的时机。
我们自定义的AddTryCatchAdviceAdapter继承AdviceAdapter,并重写onMethodEnter和onMethodExit两个方法来在该方法的第一行和最后一行插入我们需要的字节码。把我们前面用ASMifier插件得到的asm代码放到这里即可。
上述代码除了加入了try catch,还加入了触发异常后,catch代码块内对异常的处理部分。
mv.visitMethodInsn(INVOKESTATIC, exceptionHandleClass,exceptionHandleMethod, "(Ljava/lang/Exception;)V", false);
表示执行一个静态方法,方法的类名是exceptionHandleClass,
方法名是exceptionHandleMethod,参数类型是java.lang.Exception。
比如
methodVisitor.visitMethodInsn(INVOKESTATIC, "com/oyp/asm/crash/ExceptionUtils",
"uploadCatchedException", "(Ljava/lang/Exception;)V", false);
表示我们将对异常的处理部分,丢给com.oyp.asm.crash.ExceptionUtils类的uploadCatchedException方法来处理,参数类型是java.lang.Exception。
三、发布和使用
然后我们将上面写好的插件发布到自己的私有Maven仓库即可。
3.1 发布
我们配置的Maven上传的相关属性为:
POM_NAME=android
POM_DESCRIPTION=xtc asm plugin lib
POM_GROUP=com.xtc.asm.plugin
POM_ARTIFACT_ID=add-try-catch-plugin
POM_PACKAGING=jar

#relsease version
POM_VERSION_RELEASE=1.0.0
#dev version
POM_VERSION_DEV=1.0.0-oyp-4-dev

#mode DEV RELEASE
POM_VERSION_TYPE=DEV
3.2 使用
使用的话,参考 章节 1.2 写的用法中
在项目的根目录下的 build.gradle 文件中添加该插件的对应配置
// 添加try catch代码的插件
classpath "com.xtc.asm.plugin:add-try-catch-plugin:1.0.0-oyp-4-dev"
四、总结
这样我们就写好了一个基于ByteX开发的练手的ASM插件AddTryCatchPlugin,并使用该插件来给指定的类的指定的方法,添加上tryCatch捕获异常然后丢给指定的处理类来处理。
五、参考链接
- 一步步实现AddTryCatch插件 —— Gradle Transform和ASM实践
- ASM字节码编程 | 用字节码增强技术给所有方法加上TryCatch捕获异常并输出
- 【我的ASM学习进阶之旅】 介绍一个基于ByteX开发的练手的ASM插件ClickDebouncePlugin,并使用该插件来检测android应用中是否对view在指定时间内重复点击
- 【我的ASM学习进阶之旅】 介绍基于ByteX开发的练手的ASM插件EncryptString并使用该插件对应用程序中的字符串值进行加密
最后
以上就是喜悦保温杯最近收集整理的关于【我的ASM学习进阶之旅】 写一个基于ByteX开发的练手的ASM插件AddTryCatchPlugin,并使用该插件来给指定的类的指定的方法,添加上tryCatch捕获异常然后丢给指定的处理类来处理一、AddTryCatchPlugin插件介绍二、AddTryCatchPlugin插件原理介绍三、发布和使用四、总结五、参考链接的全部内容,更多相关【我的ASM学习进阶之旅】内容请搜索靠谱客的其他文章。


发表评论 取消回复