实验拓扑
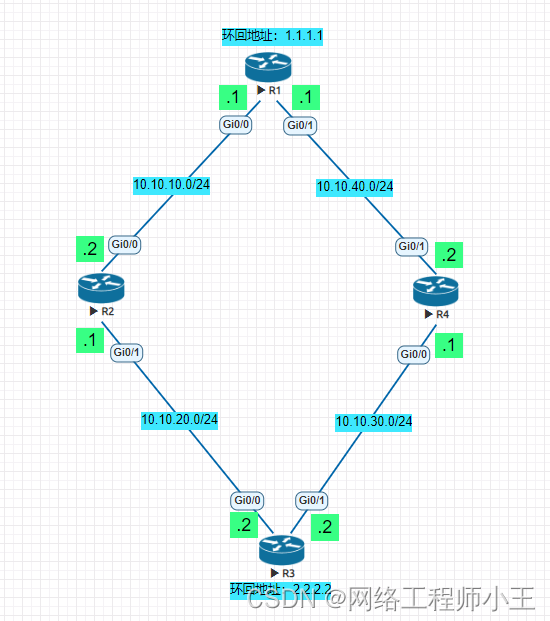
一、配置IP地址
R1
Router#configure terminal
Router(config)#hostname R1
R1(config)#interface g0/0
R1(config-if)#ip address 10.10.10.1 255.255.255.0
R1(config-if)#no shutdown
R1(config-if)#exit
R1(config)#interface g0/1
R1(config-if)#ip address 10.10.40.1 255.255.255.0
R1(config-if)#no shutdown
R1(config-if)#exit
R1(config)#interface loopback 1
R1(config-if)#ip address 1.1.1.1 255.255.255.0
R1(config-if)#no shutdown
R2
Router#configure terminal
Router(config)#hostname R2
R2(config)#interface g0/0
R2(config-if)#ip address 10.10.10.2 255.255.255.0
R2(config-if)#no shutdown
R2(config-if)#exit
R2(config)#interface g0/1
R2(config-if)#ip address 10.10.20.1 255.255.255.0
R2(config-if)#no shutdown
R3
Router#configure terminal
Router(config)#hostname R3
R3(config)#interface g0/0
R3(config-if)#ip address 10.10.20.2 255.255.255.0
R3(config-if)#no shutdown
R3(config-if)#exit
R3(config)#interface g0/1
R3(config-if)#ip address 10.10.30.2 255.255.255.0
R3(config-if)#no shutdown
R3(config-if)#exit
R3(config)#interface loopback 1
R3(config-if)#ip address 2.2.2.2 255.255.255.0
R3(config-if)#no shutdown
R4
Router#configure terminal
Router(config)#hostname R4
R4(config)#interface g0/0
R4(config-if)#ip address 10.10.30.1 255.255.255.0
R4(config-if)#no shutdown
R4(config-if)#exit
R4(config)#interface g0/1
R4(config-if)#ip address 10.10.40.2 255.255.255.0
R4(config-if)#no shutdown
二、接口上配置BFD
(所有接口参数都要一样)
R1
R1(config)#interface range g0/0 - 1
R1(config-if)#bfd interval 50 min_rx 50 multiplier 3  在接口上使能bfd,修改BFD控制报文的最小发送时间间隔和最小接收时间间隔为50毫秒,检测超时倍数为3
R2
R2(config)#interface range g0/0 - 1
R2(config-if)#bfd interval 50 min_rx 50 multiplier 3
R3
R3(config)#interface range g0/0 - 1
R3(config-if)#bfd interval 50 min_rx 50 multiplier 3
R4
R4(config)#interface range g0/0 - 1
R4(config-if)#bfd interval 50 min_rx 50 multiplier 3
三、配置OSPF
R1
R1(config)#router ospf 10		创建一个进程为10的ospf
R1(config-router)#router-id 1.1.1.1		配置Router ID 1.1.1.1
R1(config-router)#network 10.10.10.0 0.0.0.255 area 0	宣告网络
R1(config-router)#network 10.10.40.0 0.0.0.255 area 0	宣告网络
R1(config-router)#network 1.1.1.0 0.0.0.255 area 0		宣告网络
R1(config-router)#bfd all-interfaces	在与 OSPF 路由进程关联的所有接口上全局启用 BFD
R2
R2(config)#router ospf 10		创建一个进程为10的ospf
R2(config-router)#router-id 2.2.2.2		配置Router ID 2.2.2.2
R2(config-router)#network 10.10.10.0 0.0.0.255 area 0		宣告网络
R2(config-router)#network 10.10.20.0 255.255.255.0 area 0	宣告网络
R2(config-router)#bfd all-interfaces	在与 OSPF 路由进程关联的所有接口上全局启用 BFD
R3
R3(config)#router ospf 10		创建一个进程为10的ospf
R3(config-router)#router-id 3.3.3.3		配置Router ID 3.3.3.3
R3(config-router)#network 10.10.20.0 0.0.0.255 area 0	宣告网络
R3(config-router)#network 10.10.30.0 0.0.0.255 area 0	宣告网络
R3(config-router)#network 2.2.2.0 0.0.0.255 area 0		宣告网络
R3(config-router)#bfd all-interfaces	在与 OSPF 路由进程关联的所有接口上全局启用 BFD
R4
R4(config)#router ospf 10		创建一个进程为10的ospf
R4(config-router)#router-id 4.4.4.4		配置Router ID 4.4.4.4
R4(config-router)#network 10.10.30.0 0.0.0.255 area 0		宣告网络
R4(config-router)#network 10.10.40.0 0.0.0.255 area 0		宣告网络
R4(config-router)#bfd all-interfaces	在与 OSPF 路由进程关联的所有接口上全局启用 BFD
验证
show bfd neighbors查看bfd邻居,状态都为up

show ip ospf neighbor 查看ospf邻居,都为full

关闭R2的G0/1接口查看R3的邻居关系

在关闭R2的G0/1接口后,瞬间R2从R3的邻居表中删除(14:50:20在一秒的时间内完成了操作)

默认情况下OSPF在40秒内没有接收到邻居的hello信息才会宣告解除邻居关系,在日常网络的使用过程中40秒的时间是非常长的。
在使用BFD与OSPF联动过后会大大减小OSPF的收敛时间!
最后
以上就是过时黑猫最近收集整理的关于思科OSPF与BFD联动实验实验拓扑一、配置IP地址二、接口上配置BFD三、配置OSPF验证的全部内容,更多相关思科OSPF与BFD联动实验实验拓扑一、配置IP地址二、接口上配置BFD三、配置OSPF验证内容请搜索靠谱客的其他文章。
本图文内容来源于网友提供,作为学习参考使用,或来自网络收集整理,版权属于原作者所有。


![[openwrt][wifi] 隐藏2.4G 5G的ssid](https://www.shuijiaxian.com/files_image/reation/bcimg26.png)


发表评论 取消回复