dlib人脸68个特征点检测 Win10_VS2019编译过程和实验结果
- 编译
- cmake-gui编译
- 解决无法解析的外部符号
- 68个关键点代码测试
- 68个关键点代码测试
使用Cmake_gui编译
本文参考https://zhuanlan.zhihu.com/p/157785108
编译
dlib官方链接下载:http://dlib.net/files/dlib-19.21.tar.bz2
cmake-gui
Visual studio 2019
cmake-gui编译
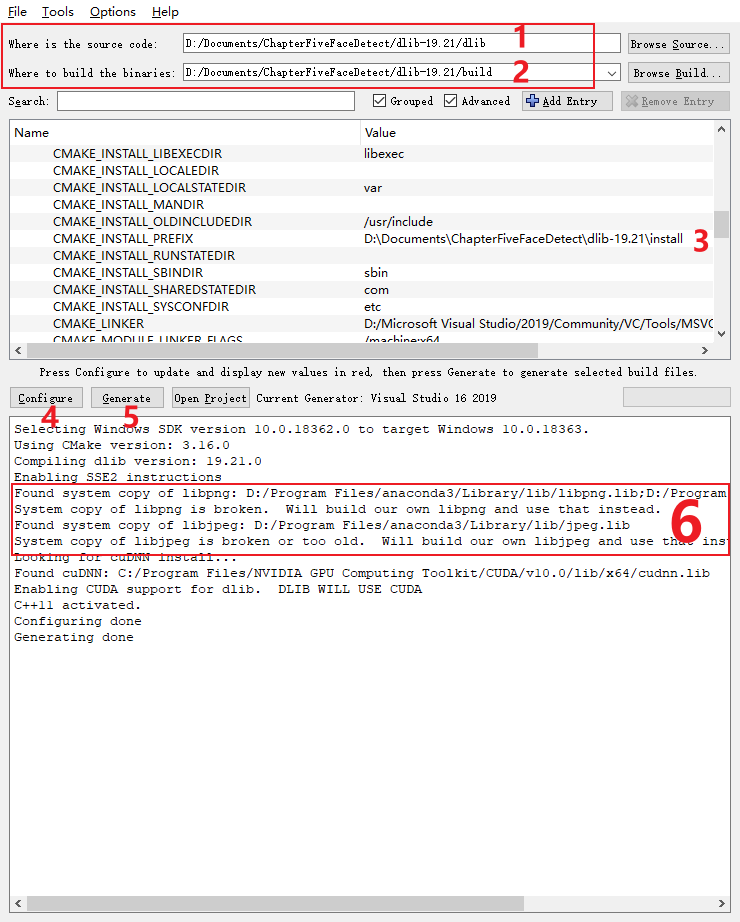
1.解压下载后的dlib-19.21(版本号),在cmake-gui中设置source code->初始
2.新建build文件并设置build binaries->中间件。
3.设置install 目录->最终生成版本,即为在vs中设置的包含目录、库目录、链接库等。
4.依次点击configure
5.Generate
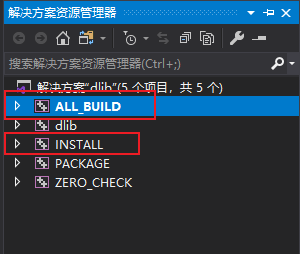
6.OpenProject,然后依次在ALL_BUILD、INSTALL处右键生成
特别注意:如果你的设备中安装Anaconda 或者其他的开发环境的话,
如果电脑中装有 Anaconda 或者其他的开发环境的话,在上图中可能会有一些跳过libjpeg.lib、libpng.lib、zlib.lib类似的命令(例如:图中第6点,只需要将对应目录的对应PNGJPEG文件后缀进行更改或者另存后删除),成功后会显示图中第6点的will build our own lib…。文件。
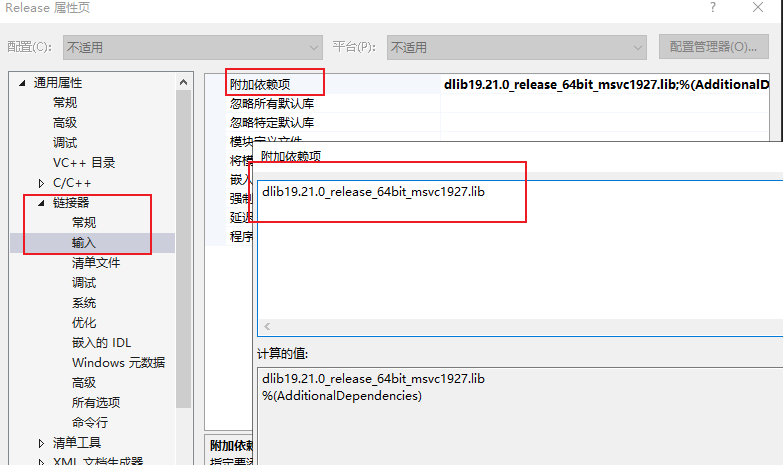
解决无法解析的外部符号
**解决错误:**若C++出现这种无法解析的外部符号大概率是由于上述问题产生:
本文生成的链接库依赖项:dlib19.21.0_release_64bit_msvc1927.lib
下述错误参考别处,大同小异。
1>dlib.lib(png_loader.obj) : error LNK2001: 无法解析的外部符号 png_set_sig_bytes
1>dlib.lib(png_loader.obj) : error LNK2001: 无法解析的外部符号 png_sig_cmp
1>dlib.lib(png_loader.obj) : error LNK2001: 无法解析的外部符号 png_create_read_struct
1>dlib.lib(png_loader.obj) : error LNK2001: 无法解析的外部符号 png_set_longjmp_fn
1>dlib.lib(png_loader.obj) : error LNK2001: 无法解析的外部符号 png_create_info_struct
1>dlib.lib(png_loader.obj) : error LNK2001: 无法解析的外部符号 png_set_palette_to_rgb
1>dlib.lib(png_loader.obj) : error LNK2001: 无法解析的外部符号 png_destroy_read_struct
1>dlib.lib(png_loader.obj) : error LNK2001: 无法解析的外部符号 png_init_io
1>dlib.lib(png_loader.obj) : error LNK2001: 无法解析的外部符号 png_get_rows
1>dlib.lib(png_loader.obj) : error LNK2001: 无法解析的外部符号 png_get_image_width
1>dlib.lib(png_loader.obj) : error LNK2001: 无法解析的外部符号 png_get_image_height
1>dlib.lib(png_loader.obj) : error LNK2001: 无法解析的外部符号 png_get_bit_depth
1>dlib.lib(png_loader.obj) : error LNK2001: 无法解析的外部符号 png_get_color_type
1>dlib.lib(png_loader.obj) : error LNK2001: 无法解析的外部符号 png_read_png
1>dlib.lib(png_loader.obj) : error LNK2001: 无法解析的外部符号 png_get_header_ver
1>dlib.lib(jpeg_loader.obj) : error LNK2001: 无法解析的外部符号 jpeg_std_error
1>dlib.lib(jpeg_loader.obj) : error LNK2001: 无法解析的外部符号 jpeg_CreateDecompress
1>dlib.lib(jpeg_loader.obj) : error LNK2001: 无法解析的外部符号 jpeg_destroy_decompress
1>dlib.lib(jpeg_loader.obj) : error LNK2001: 无法解析的外部符号 jpeg_stdio_src
1>dlib.lib(jpeg_loader.obj) : error LNK2001: 无法解析的外部符号 jpeg_read_header
1>dlib.lib(jpeg_loader.obj) : error LNK2001: 无法解析的外部符号 jpeg_start_decompress
1>dlib.lib(jpeg_loader.obj) : error LNK2001: 无法解析的外部符号 jpeg_read_scanlines
1>dlib.lib(jpeg_loader.obj) : error LNK2001: 无法解析的外部符号 jpeg_finish_decompress
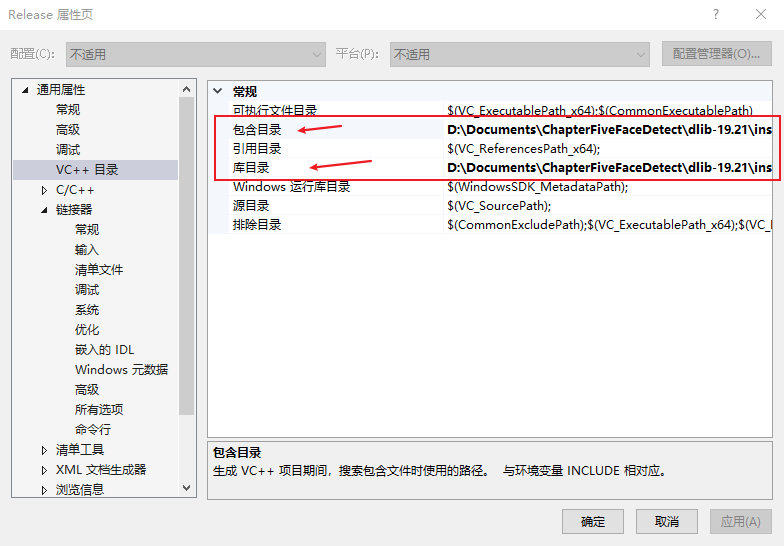
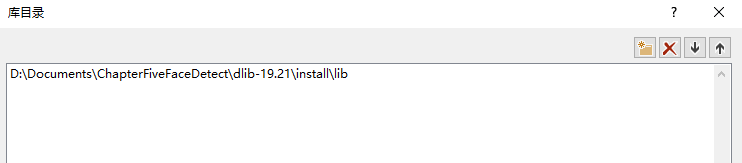
利用VS新项目,然后设置包含目录、库目录,该地址为cmake-gui中设置的 cmake_Install_prefix地址。

68个关键点代码测试
代码测试:
将图片地址和 .dat文件地址写在了源代码中
#include <dlib/image_processing/frontal_face_detector.h>
#include <dlib/image_processing/render_face_detections.h>
#include <dlib/image_processing.h>
#include <dlib/gui_widgets.h>
#include <dlib/image_io.h>
#include <iostream>
using namespace dlib;
using namespace std;
int main(int argc, char** argv)
{
try
{
// This example takes in a shape model file and then a list of images to
// process. We will take these filenames in as command line arguments.
// Dlib comes with example images in the examples/faces folder so give
// those as arguments to this program.
// 这个例子需要一个形状模型文件和一系列的图片.
// if (argc == 1)
// {
// cout << "Call this program like this:" << endl;
// cout << "./face_landmark_detection_ex shape_predictor_68_face_landmarks.dat faces/*.jpg" << endl;
// cout << "nYou can get the shape_predictor_68_face_landmarks.dat file from:n";
// cout << "http://dlib.net/files/shape_predictor_68_face_landmarks.dat.bz2" << endl;//从这个地址下载模型标记点数据
// return 0;
// }
// We need a face detector. We will use this to get bounding boxes for
// each face in an image.
//****需要一个人脸检测器,获得一个边界框
frontal_face_detector detector = get_frontal_face_detector();
// And we also need a shape_predictor. This is the tool that will predict face
// landmark positions given an image and face bounding box. Here we are just
// loading the model from the shape_predictor_68_face_landmarks.dat file you gave
// as a command line argument.
//****也需要一个形状预测器,这是一个工具用来预测给定的图片和脸边界框的标记点的位置。
//****这里我们仅仅从shape_predictor_68_face_landmarks.dat文件加载模型
shape_predictor sp;//定义个shape_predictor类的实例
deserialize("D:\Documents\ChapterFiveFaceDetect\Test_dlib_example\shape_predictor_68_face_landmarks.dat") >> sp;
image_window win, win_faces;
// Loop over all the images provided on the command line.
// ****循环所有图片
// for (int i = 2; i < argc; ++i)
{
// cout << "processing image " << argv[i] << endl;
array2d<rgb_pixel> img;//注意变量类型 rgb_pixel 三通道彩色图像
load_image(img, "D:\Documents\ChapterFiveFaceDetect\Test_dlib_example\1.png");
// Make the image larger so we can detect small faces.
pyramid_up(img);
// Now tell the face detector to give us a list of bounding boxes
// around all the faces in the image.
std::vector<rectangle> dets = detector(img);//检测人脸,获得边界框
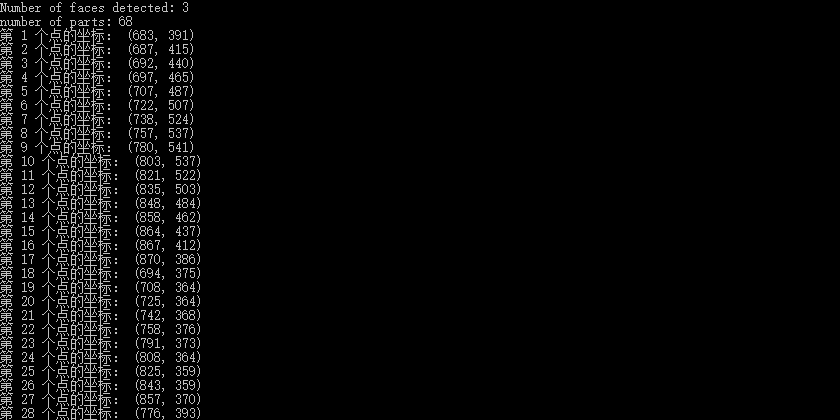
cout << "Number of faces detected: " << dets.size() << endl;//检测到人脸的数量
// Now we will go ask the shape_predictor to tell us the pose of
// each face we detected.
//****调用shape_predictor类函数,返回每张人脸的姿势
std::vector<full_object_detection> shapes;//注意形状变量的类型,full_object_detection
for (unsigned long j = 0; j < dets.size(); ++j)
{
full_object_detection shape = sp(img, dets[j]);//预测姿势,注意输入是两个,一个是图片,另一个是从该图片检测到的边界框
cout << "number of parts: " << shape.num_parts() << endl;
//cout << "pixel position of first part: " << shape.part(0) << endl;//获得第一个点的坐标,注意第一个点是从0开始的
//cout << "pixel position of second part: " << shape.part(1) << endl;//获得第二个点的坐标
//打印出全部68个点
for (int i = 0; i < 68; i++)
{
cout << "第 " << i + 1 << " 个点的坐标: " << shape.part(i) << endl;
}
// You get the idea, you can get all the face part locations if
// you want them. Here we just store them in shapes so we can
// put them on the screen.
shapes.push_back(shape);
}
// Now let's view our face poses on the screen.
//**** 显示结果
win.clear_overlay();
win.set_image(img);
win.add_overlay(render_face_detections(shapes));
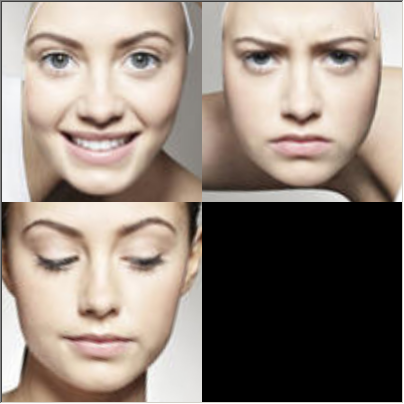
// We can also extract copies of each face that are cropped, rotated upright,
// and scaled to a standard size as shown here:
//****我们也能提取每张剪裁后的人脸的副本,旋转和缩放到一个标准尺寸
dlib::array<array2d<rgb_pixel> > face_chips;
extract_image_chips(img, get_face_chip_details(shapes), face_chips);
win_faces.set_image(tile_images(face_chips));
cout << "Hit enter to process the next image..." << endl;
cin.get();
}
}
catch (exception& e)
{
cout << "nexception thrown!" << endl;
cout << e.what() << endl;
}
}
68个关键点代码测试
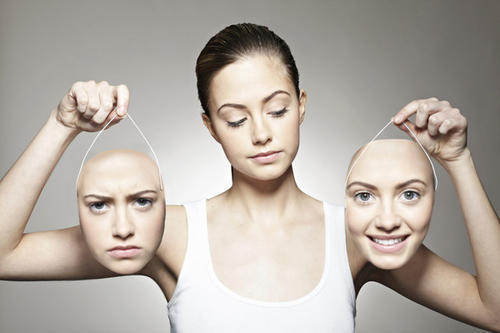
##原图
##处理结果

新增:
Release编译会出现USER_ERROR__inconsistent_build_configuration__see_dlib_faq_2这个错误。原因可看官网的FAQ的解决方法,直接在dlibconfig.h中注释 // #define DLIB_NOT_CONFIGURED [4]
参考内容:
[1]: https://zhuanlan.zhihu.com/p/157785108
[2]: https://blog.csdn.net/liukang325/article/details/55213197
[3]: http://dlib.net/
[4]:https://blog.csdn.net/u014426939/article/details/81451389?utm_source=blogxgwz4
最后
以上就是包容铃铛最近收集整理的关于dlib人脸68个特征点检测 Win10_VS2019编译过程和实验结果编译68个关键点代码测试68个关键点代码测试的全部内容,更多相关dlib人脸68个特征点检测内容请搜索靠谱客的其他文章。


发表评论 取消回复