为开发一个测试程序,特搭建一个简单的ssm框架,因为网上看到很多都是比较老旧的教程,很多包都不能用了,eclipes搭建并且其中还附带了很多的其他东西,所以特此记录一下idea中搭建ssm框架过程。
其实就是因为这不是疫情原因,家里好多亲戚家得孩子提前放学了,但是有好几个又面临找工作得境地,真的是亲戚多了费劲啊,一波波得,浪浪不绝啊,而且大学学的怎么样,我想,不需要我说太多什么东西,哎,所以,没办法,只能给他们补课了,所以现在需要搭建这样一套简单的web框架,正好也回顾梳理一下自己的知识,巩固一下基础,看看年后有没有机会跳一下啊,哈哈哈哈,一不小心透露内心最真实的想法
另:平常开发的项目中其实用的不是mybatis,而是mybatisplus,一款为简化开发而生的基于mybatis的三方,只能说,用起来贼爽,省去了很多的sql语句。
以下为一步步操作,详细可循,完全学习了白居易写诗的风格,堪称傻瓜教程。
目录结构已建好的童鞋,可以直接跳过前几步去看相应配置文件,点击穿越,今天得内容以基础内容搭建为基础,适合新手观看
git源码地址,不断更新源代码内容,有需要的朋友可以自行下载gitee.com/biwangsheng/java.git
一、搭建背景及准备条件
不是必须的,保证项目运行只要有这些东西就行,可以不一样
idea,maven3.6.0,jdk1.8,tomcat8,mysql5.7
二、搭建开始——新建项目
1. file -> new -> project

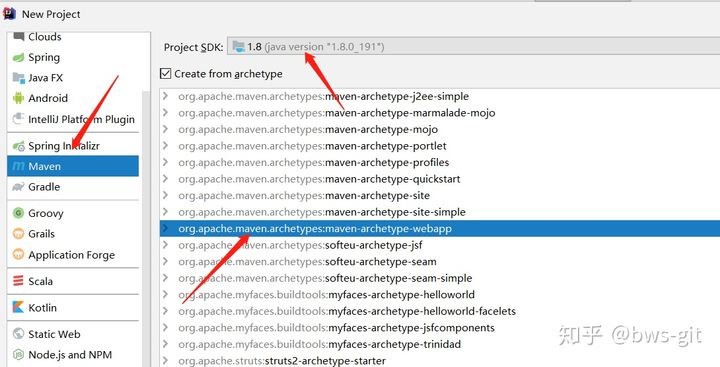
2. 新建maven项目,如图勾选 create from archetype,并选择 maven-archetype-webapp,next
3. 选择maven配置,选择你自己的maven,next
同样得,这里可以设置文件下载位置,尽量不要下载到C盘,占用空间

4. 确定项目名,finish
完成项目结构目录的创建,这里需要耐心地等待一会儿,可以做点别的事情。
完成后结构目录就会弹出(包含src等目录),如果一直卡住不动,可以点击右下方的import changes。
三、完善项目结构
1. 新建java目录 src/main/java
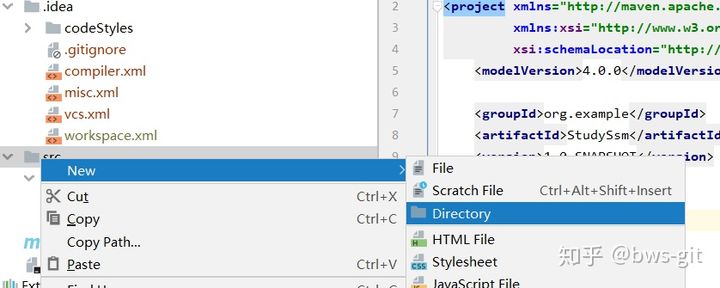
在这里,idea就很友善,直接项目名上右键选择创建新得Directory,可以针对一些必须的文件,直接创建,有四个选项,可以直接创建
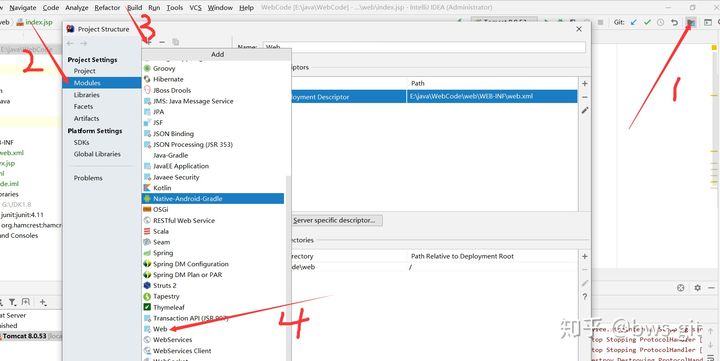
2、 接下来,创建web模块(我一直是这么理解得,虽然咱也不知道对错,或者说设置为web项目),当完成这一步之后,会自动生成web文件夹
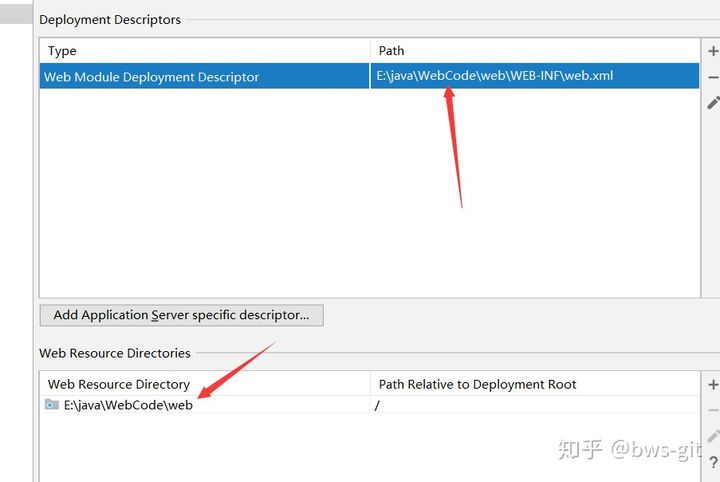
这两个选项是设置你的web模块路径,我得就是默认得,如果你的路径需要更改得话,这里要改动,不然无法访问
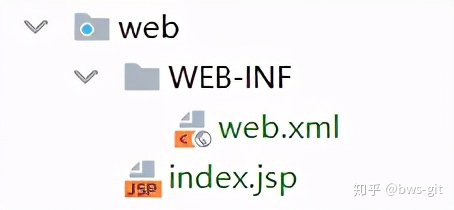
这是目录,我们在其中创建index.jsp文件,方便后面用来测试
<%--
  Created by IntelliJ IDEA.
  User: Administrator
  Date: 2020/12/19
  Time: 22:19
  To change this template use File | Settings | File Templates.
--%>
<%@ page contentType="text/html;charset=UTF-8" language="java" %>
<html>
<head>
    <title>Title</title>
</head>
<body>
<p>欢迎光临</p>
<h2>Hello World!</h2>
</body>
</html>
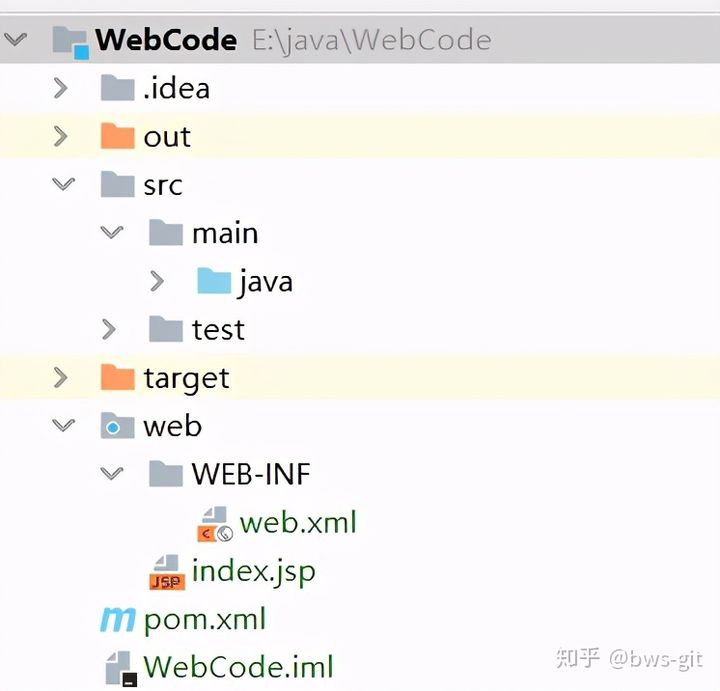
3. 现在基本目录结构已建成,让我们对比一下看是不是一样的
4、 添加项目打包方式
1、file -> Project Structure -> Artifacts
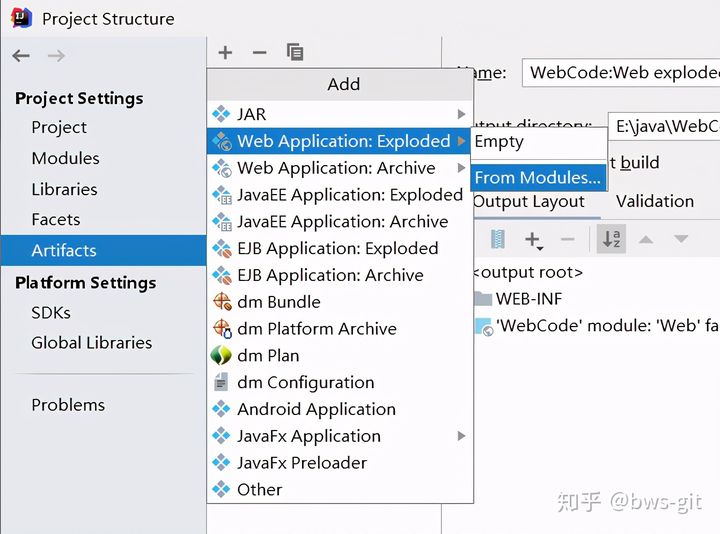
因为之前已经将项目添加到Modules模块中,所以这里可以直接显示,直接ok即可

最终想要得到的结果如下图:
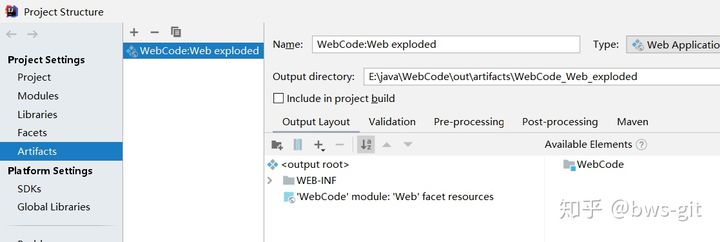
到这里,基本就设计完成了
四、初步配置启动tomcat服务
添加tomcat,进行相关配置 点击面板右上角
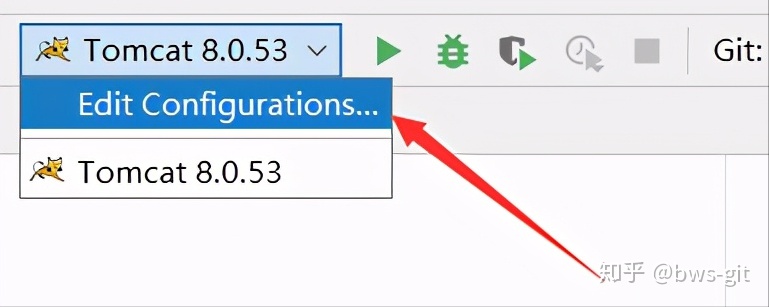
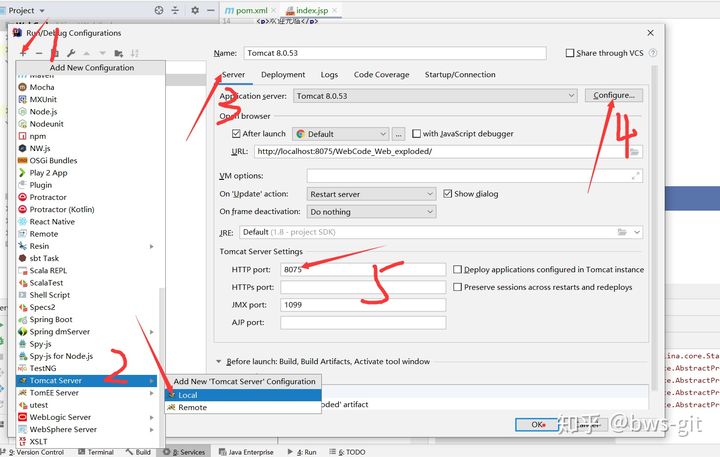
添加配置tomcat
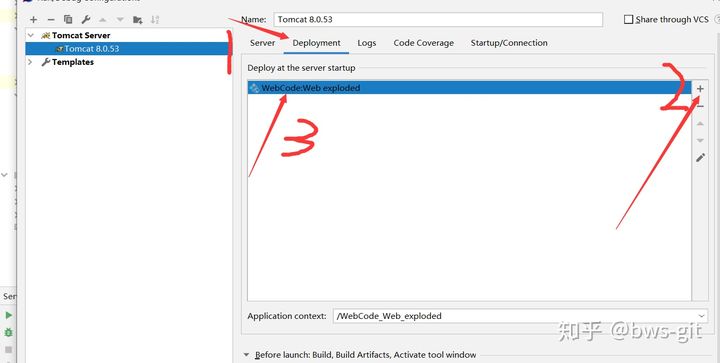
添加刚才生成的包
运行tomcat 右上角面板选择debug模式运行(也可以普通模式)

运行成功,页面显示默认生成的index.jsp的内容 http://localhost:8075/
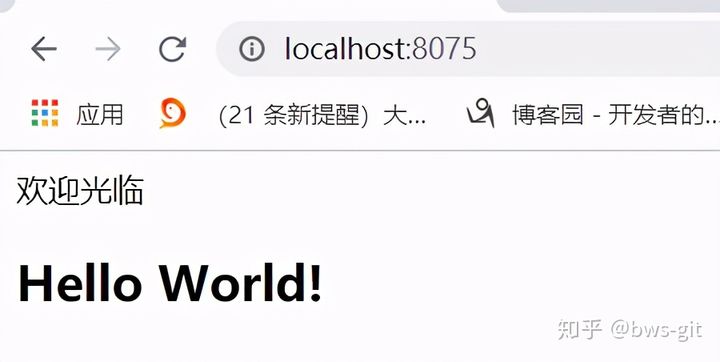
到这里,通过idea搭建一个完整得web项目开发环境就可以了。
后面我所有web相关得内容都会在这个项目的基础上进行更新和修改,就像我前面说的,这些东西本就是基础,而现在很多时候也需要源码、基础等知识考察你的基本功扎实不扎实,那这个时候,放弃一些花里胡哨得东西,反而会更加有效果一些
这是我随便写了一个测试的框架结构,相应得源码太多了,这里就先不对外发了,后面我会上传到我的仓库,有需要得朋友可以自己先试验一下
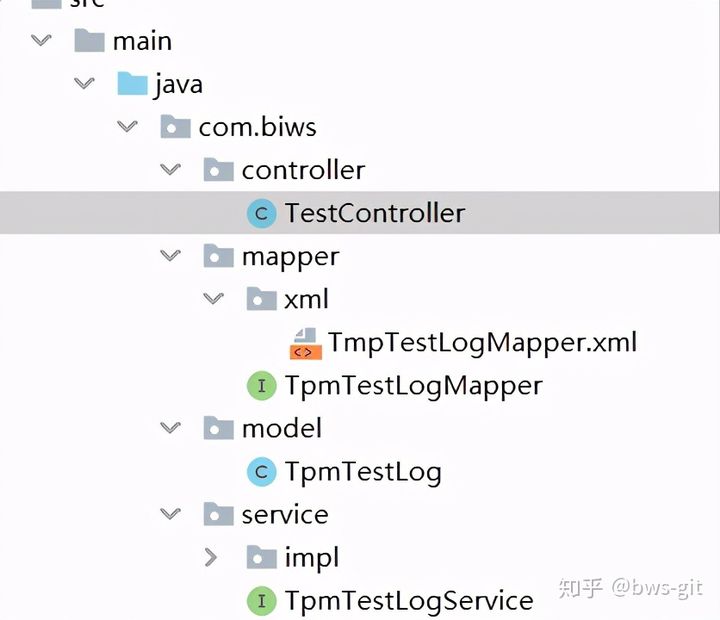
我的pom文件先给大家
<?xml version="1.0" encoding="UTF-8"?>
<project xmlns="http://maven.apache.org/POM/4.0.0" xmlns:xsi="http://www.w3.org/2001/XMLSchema-instance"
xsi:schemaLocation="http://maven.apache.org/POM/4.0.0 http://maven.apache.org/xsd/maven-4.0.0.xsd">
<modelVersion>4.0.0</modelVersion>
<groupId>org.example</groupId>
<artifactId>WebCode</artifactId>
<version>1.0-SNAPSHOT</version>
<packaging>war</packaging>
<name>WebCode</name>
<!-- FIXME change it to the project's website -->
<url>http://www.example.com</url>
<properties>
<org.springframework.version>4.3.7.RELEASE</org.springframework.version>
<mybatis.version>3.5.0</mybatis.version>
</properties>
<dependencies>
<!-- Spring最新的包 -->
<dependency>
<groupId>org.springframework</groupId>
<artifactId>spring-webmvc</artifactId>
<version>${org.springframework.version}</version>
</dependency>
<!--Spriing jdbc-->
<dependency>
<groupId>org.springframework</groupId>
<artifactId>spring-jdbc</artifactId>
<version>${org.springframework.version}</version>
</dependency>
<dependency>
<groupId>org.aspectj</groupId>
<artifactId>aspectjweaver</artifactId>
<version>1.7.4</version>
</dependency>
<!-- mysql连接 -->
<dependency>
<groupId>mysql</groupId>
<artifactId>mysql-connector-java</artifactId>
<version>5.1.26</version>
</dependency>
<!--数据库连接池druid-->
<dependency>
<groupId>com.alibaba</groupId>
<artifactId>druid</artifactId>
<version>1.0.11</version>
</dependency>
<!-- mybatis依赖 -->
<dependency>
<groupId>org.mybatis</groupId>
<artifactId>mybatis</artifactId>
<version>3.4.2</version>
</dependency>
<dependency>
<groupId>org.mybatis</groupId>
<artifactId>mybatis-spring</artifactId>
<version>1.3.1</version>
</dependency>
<!-- 事务的配置标签 -->
<dependency>
<groupId>org.springframework</groupId>
<artifactId>spring-tx</artifactId>
<version>4.3.7.RELEASE</version>
</dependency>
<!-- json -->
<dependency>
<groupId>com.fasterxml.jackson.core</groupId>
<artifactId>jackson-databind</artifactId>
<version>2.5.0</version>
</dependency>
<!-- lombok插件通过@data注解 实现省略写getset方法 -->
<dependency>
<groupId>org.projectlombok</groupId>
<artifactId>lombok</artifactId>
<version>1.18.0</version>
</dependency>
<!-- json 包 fastjson -->
<dependency>
<groupId>com.alibaba</groupId>
<artifactId>fastjson</artifactId>
<version>1.1.39</version>
</dependency>
<!--单元测试-->
<dependency>
<groupId>junit</groupId>
<artifactId>junit</artifactId>
<version>4.12</version>
</dependency>
<!-- log日志 -->
<dependency>
<groupId>log4j</groupId>
<artifactId>log4j</artifactId>
<version>1.2.14</version>
</dependency>
<dependency>
<groupId>commons-logging</groupId>
<artifactId>commons-logging</artifactId>
<version>1.2</version>
</dependency>
<dependency>
<groupId>org.slf4j</groupId>
<artifactId>slf4j-api</artifactId>
<version>1.6.1</version>
</dependency>
<dependency>
<groupId>org.slf4j</groupId>
<artifactId>slf4j-log4j12</artifactId>
<version>1.6.1</version>
</dependency>
<!--文件上传下载 commons-->
<!--<dependency>
<groupId>commons-fileupload</groupId>
<artifactId>commons-fileupload</artifactId>
<version>1.2.1</version>
</dependency>
<dependency>
<groupId>commons-io</groupId>
<artifactId>commons-io</artifactId>
<version>2.2</version>
</dependency>-->
</dependencies>
<build>
<resources>
<resource>
<directory>src/main/java</directory>
<excludes>
<exclude>**/*.java</exclude>
</excludes>
</resource>
<resource>
<directory>src/main/resources</directory>
<filtering>true</filtering>
</resource>
<resource>
<directory>src/main/java</directory>
<includes>
<include>**/*.xml</include>
</includes>
</resource>
</resources>
<plugins>
<!--编译代码插件-->
<plugin>
<groupId>org.apache.maven.plugins</groupId>
<artifactId>maven-compiler-plugin</artifactId>
<configuration>
<!-- 设置JDK版本 -->
<source>1.8</source>
<target>1.8</target>
<encoding>UTF-8</encoding>
<fork>false</fork>
</configuration>
</plugin>
</plugins>
</build>
</project>如果觉得文件下载慢得话,可以去改一下下载源,我是改成了阿里得,相当不错
找到你的maven安装路径

  <mirrors>
    <!-- mirror
     | Specifies a repository mirror site to use instead of a given repository. The repository that
     | this mirror serves has an ID that matches the mirrorOf element of this mirror. IDs are used
     | for inheritance and direct lookup purposes, and must be unique across the set of mirrors.
     |
    <mirror>
      <id>mirrorId</id>
      <mirrorOf>repositoryId</mirrorOf>
      <name>Human Readable Name for this Mirror.</name>
      <url>http://maven.aliyun.com/nexus/content/groups/public/</url>
    </mirror>
     -->
  </mirrors>
最后
以上就是健忘芝麻最近收集整理的关于从最基础的SSM框架开始,梳理自己的Java基础的全部内容,更多相关从最基础内容请搜索靠谱客的其他文章。


发表评论 取消回复