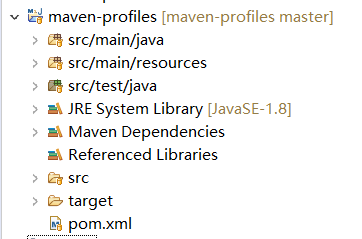
1.首先创建maven工程(略),项目结构如下

2.pom文件配置
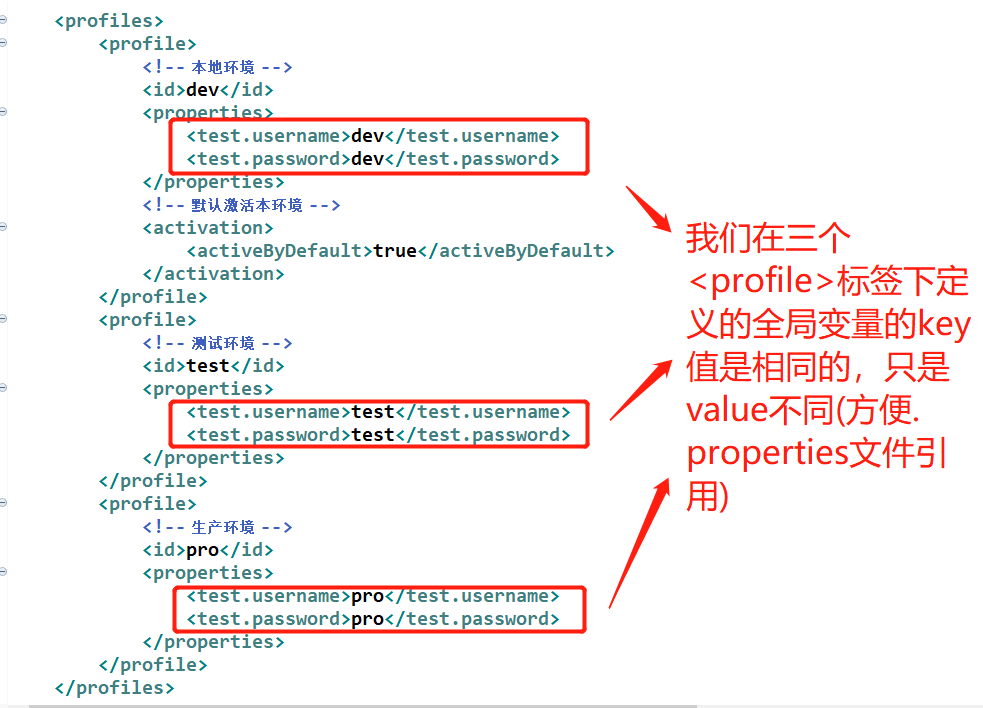
2.1 添加<profiles标签>,在<profiles>分别定义各个<profile>用来配置开发,测试以及生产的全局变量,代码如下:
<project xmlns="http://maven.apache.org/POM/4.0.0" xmlns:xsi="http://www.w3.org/2001/XMLSchema-instance" xsi:schemaLocation="http://maven.apache.org/POM/4.0.0 http://maven.apache.org/xsd/maven-4.0.0.xsd">
  <modelVersion>4.0.0</modelVersion>
  <groupId>tca</groupId>
  <artifactId>maven</artifactId>
  <version>0.0.1-SNAPSHOT</version>

    <properties>
		<junit.version>4.12</junit.version>
		<slf4j.version>1.7.7</slf4j.version>
		<spring.version>4.3.8.RELEASE</spring.version>
    </properties>

	<!-- 整个项目都需要依赖的jar包 -->
	<dependencies>
		<!-- 单元测试 -->
		<dependency>
			<groupId>junit</groupId>
			<artifactId>junit</artifactId>
			<version>${junit.version}</version>
		</dependency>

		<!-- 日志 -->
		<dependency>
			<groupId>org.slf4j</groupId>
			<artifactId>slf4j-log4j12</artifactId>
			<version>${slf4j.version}</version>
		</dependency>

		<!-- Spring -->
		<dependency>
			<groupId>org.springframework</groupId>
			<artifactId>spring-context-support</artifactId>
			<version>${spring.version}</version>
		</dependency>
		<dependency>
			<groupId>org.springframework</groupId>
			<artifactId>spring-oxm</artifactId>
			<version>${spring.version}</version>
		</dependency>
		<dependency>
			<groupId>org.springframework</groupId>
			<artifactId>spring-jdbc</artifactId>
			<version>${spring.version}</version>
		</dependency>
		<dependency>
			<groupId>org.springframework</groupId>
			<artifactId>spring-test</artifactId>
			<version>${spring.version}</version>
		</dependency>
  	</dependencies>

  	<profiles>
        <profile>
            <!-- 本地环境 -->
            <id>dev</id>
            <properties>
                <test.username>dev</test.username>
                <test.password>dev</test.password>
            </properties>
            <!-- 默认激活本环境 -->
            <activation>
                <activeByDefault>true</activeByDefault>
            </activation>
        </profile>
        <profile>
            <!-- 测试环境 -->
            <id>test</id>
            <properties>
                <test.username>test</test.username>
                <test.password>test</test.password>
            </properties>
        </profile>
        <profile>
            <!-- 生产环境 -->
            <id>pro</id>
            <properties>
                <test.username>pro</test.username>
                <test.password>pro</test.password>
            </properties>
        </profile>
    </profiles>

    <build>
		<!-- 所有子项目都需要 -->
		<plugins>
			<!-- JDK版本 -->
			<plugin>
				<groupId>org.apache.maven.plugins</groupId>
				<artifactId>maven-compiler-plugin</artifactId>
				<version>3.0</version>
				<configuration>
					<source>1.8</source>
					<target>1.8</target>
				</configuration>
			</plugin>
			<!-- maven插件 -->
			<plugin>
				<groupId>org.apache.maven.plugins</groupId>
				<artifactId>maven-surefire-plugin</artifactId>
				<configuration>
					<testFailureIgnore>true</testFailureIgnore>
					<!-- 跳过单元测试 -->
					<skip>true</skip>
				</configuration>
			</plugin>
		</plugins>

		<resources>
           <resource>
                <directory>${project.basedir}/src/main/resources</directory>
                <filtering>true</filtering>
            </resource>
        </resources>
	</build>
</project>
注:
1.为保证项目完整性,所以将整个pom文件粘贴上来
2.<profiles>标签是定义在<project>下的子标签,我们在<profiles>里分别定义三个<profile>标签,分别代表三个环境,开发,测试和线上,在<profile>标签下我们通常添加下列几个子标签:
<id>标签表示当前环境的唯一标识符,之后使用maven打包时具体选择哪个<profile>环境需要用到该参数
<properties>标签用于定义该环境下的全局变量(<key>value</key>格式)
<activation>标签用于定义默认打包环境,配置如下(表示打包时默认选择当前<profile>):
 <activation>
        <activeByDefault>true</activeByDefault>
 </activation>
2.2 <resources>标签用于指定上述<profile>中定义的全局变量可被哪些资源引用,配置如下:
<resources>
       <resource>
           <directory>${project.basedir}/src/main/resources</directory>
           <filtering>true</filtering>
       </resource>
</resources>
如上图所示,表示可以被src/main/resources类路径下的资源引用。因为正常我们在.properties配置文件中引用。${project.basedir}表示项目根目录,即pom文件所在的目录
3.实际应用
一般,我们在各个<profile>中定义的全局变量的<key>值是相同的,只是value不同,如代码:

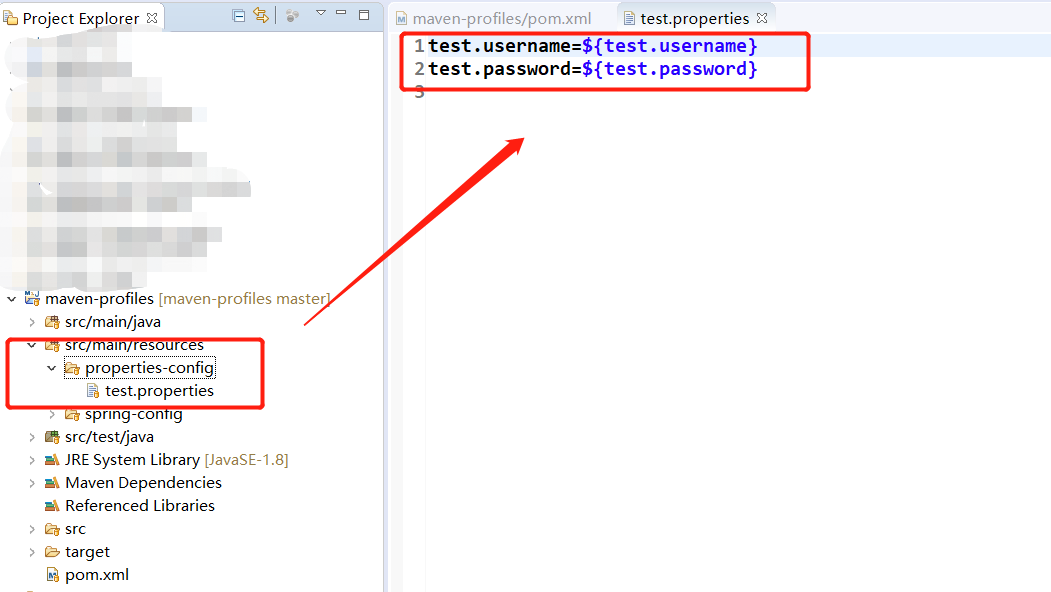
我们在properties文件中进行引用, 使用${}符号,${}内的值就是上述全局变量的key,这样我们在打包时就会根据所选的<profile>模板来引用不同的值:

4.打包
切换到项目根目录下,即pom文件所在的目录,使用命令:
<!-- profile-id代表上述定义profile时下的<id>标签的值 -->
mvn clean package -P profile-id
如,打包为生产环境,只需要 mvn clean package -P pro
5.验证
切换到项目根目录下,使用mvn clean package -P pro命令打包,用解压器打开打包之后的jar包(jar包位于项目根目录下的target目录下),观察test.properties文件,如下:

验证成功!
最后
以上就是隐形花瓣最近收集整理的关于maven的profile构建不同环境打包的全部内容,更多相关maven内容请搜索靠谱客的其他文章。


发表评论 取消回复