前言:
随着应用用户数量的增加,相应的并发请求的数量也会跟着不断增加,慢慢地,单个数据库已经没有办法满足我们频繁的数据库操作请求了。
在某些场景下,我们可能会需要配置多个数据源,使用多个数据源(例如实现数据库的读写分离)来缓解系统的压力等,同样的,Springboot官方提供了相应的实现来帮助开发者们配置多数据源,一般分为两种方式(目前我所了解到的),分包和AOP。
而在Springboot +Mybatis实现多数据源配置中,我们实现了静态多数据源的配置,但是这种方式怎么说呢,在实际的使用中不够灵活,为了解决这个问题,我们可以使用上文提到的第二种方法,即使用AOP面向切面编程的方式配合我们的自定义注解来实现在不同数据源之间动态切换的目的。
1. 数据库准备:
数据库准备仍然和之前的例子相同,具体建表sql语句则不再详细说明,表格如下:
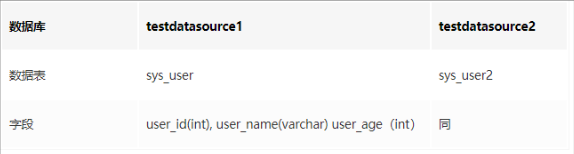
并分别插入两条记录,为了方便对比,其中testdatasource1为芳年25岁的张三, testdatasource2为芳年30岁的李四。
2. 环境准备:
首先新建一个Springboot项目,我这里版本是2.1.7.RELEASE,并在pom文件中引入相关依赖,和上次相比,这次主要额外新增了aop相关的依赖,如下:
<dependency>
            <groupId>mysql</groupId>
            <artifactId>mysql-connector-java</artifactId>
        </dependency>

        <dependency>
            <groupId>org.springframework.boot</groupId>
            <artifactId>spring-boot-starter-jdbc</artifactId>
        </dependency>


        <dependency>
            <groupId>org.springframework</groupId>
            <artifactId>spring-aop</artifactId>
            <version>5.1.5.RELEASE</version>
        </dependency>
        <dependency>
            <groupId>junit</groupId>
            <artifactId>junit</artifactId>
        </dependency>
        <dependency>
            <groupId>org.aspectj</groupId>
            <artifactId>aspectjweaver</artifactId>
            <version>1.9.2</version>
        </dependency>
3.代码部分
首先呢,在我们Springboot的配置文件中配置我们的datasourse,和以往不一样的是,因为我们有两个数据源,所以要指定相关数据库的名称,其中主数据源为primary,次数据源为secondary如下:
#配置主数据库
spring.datasource.primary.jdbc-url=jdbc:mysql://localhost:3306/testdatasource1?useUnicode=true&characterEncoding=UTF-8&serverTimezone=UTC&useSSL=false
spring.datasource.primary.username=root
spring.datasource.primary.password=root
spring.datasource.primary.driver-class-name=com.mysql.cj.jdbc.Driver

##配置次数据库
spring.datasource.secondary.jdbc-url=jdbc:mysql://localhost:3306/testdatasource2?useUnicode=true&characterEncoding=UTF-8&serverTimezone=UTC&useSSL=false
spring.datasource.secondary.username=root
spring.datasource.secondary.password=root
spring.datasource.secondary.driver-class-name=com.mysql.cj.jdbc.Driver


spring.http.encoding.charset=UTF-8
spring.http.encoding.enabled=true
spring.http.encoding.force=true
需要我们注意的是,Springboot2.0 在配置数据库连接的时候需要使用jdbc-url,如果只使用url的话会报jdbcUrl is required with driverClassName.错误。
新建一个配置文件,DynamicDataSourceConfig 用来配置我们相关的bean,代码如下
@Configuration
@MapperScan(basePackages = "com.mzd.multipledatasources.mapper", sqlSessionFactoryRef = "SqlSessionFactory") //basePackages 我们接口文件的地址
public class DynamicDataSourceConfig {

    // 将这个对象放入Spring容器中
    @Bean(name = "PrimaryDataSource")
    // 表示这个数据源是默认数据源
    @Primary
    // 读取application.properties中的配置参数映射成为一个对象
    // prefix表示参数的前缀
    @ConfigurationProperties(prefix = "spring.datasource.primary")
    public DataSource getDateSource1() {
        return DataSourceBuilder.create().build();
    }


    @Bean(name = "SecondaryDataSource")
    @ConfigurationProperties(prefix = "spring.datasource.secondary")
    public DataSource getDateSource2() {
        return DataSourceBuilder.create().build();
    }


    @Bean(name = "dynamicDataSource")
    public DynamicDataSource DataSource(@Qualifier("PrimaryDataSource") DataSource primaryDataSource,
                                        @Qualifier("SecondaryDataSource") DataSource secondaryDataSource) {

        //这个地方是比较核心的targetDataSource 集合是我们数据库和名字之间的映射
        Map<Object, Object> targetDataSource = new HashMap<>();
        targetDataSource.put(DataSourceType.DataBaseType.Primary, primaryDataSource);
        targetDataSource.put(DataSourceType.DataBaseType.Secondary, secondaryDataSource);
        DynamicDataSource dataSource = new DynamicDataSource();
        dataSource.setTargetDataSources(targetDataSource);
        dataSource.setDefaultTargetDataSource(primaryDataSource);//设置默认对象
        return dataSource;
    }


    @Bean(name = "SqlSessionFactory")
    public SqlSessionFactory SqlSessionFactory(@Qualifier("dynamicDataSource") DataSource dynamicDataSource)
            throws Exception {
        SqlSessionFactoryBean bean = new SqlSessionFactoryBean();
        bean.setDataSource(dynamicDataSource);
        bean.setMapperLocations(
                new PathMatchingResourcePatternResolver().getResources("classpath*:mapping/*/*.xml"));//设置我们的xml文件路径
        return bean.getObject();
    }
}
而在这所有的配置中,最核心的地方就是DynamicDataSource这个类了,DynamicDataSource是我们自定义的动态切换数据源的类,该类继承了AbstractRoutingDataSource 类并重写了它的determineCurrentLookupKey()方法。
AbstractRoutingDataSource 类内部维护了一个名为targetDataSources的Map,并提供的setter方法用于设置数据源关键字与数据源的关系,实现类被要求实现其determineCurrentLookupKey()方法,由此方法的返回值决定具体从哪个数据源中获取连接。同时AbstractRoutingDataSource类提供了程序运行时动态切换数据源的方法,在dao类或方法上标注需要访问数据源的关键字,路由到指定数据源,获取连接。
DynamicDataSource代码如下:
public class DynamicDataSource extends AbstractRoutingDataSource {

    @Override
    protected Object determineCurrentLookupKey() {
        DataSourceType.DataBaseType dataBaseType = DataSourceType.getDataBaseType();
        return dataBaseType;
    }

}
DataSourceType类的代码如下:
public class DataSourceType {

    //内部枚举类,用于选择特定的数据类型
    public enum DataBaseType {
        Primary, Secondary
    }

    // 使用ThreadLocal保证线程安全
    private static final ThreadLocal<DataBaseType> TYPE = new ThreadLocal<DataBaseType>();

    // 往当前线程里设置数据源类型
    public static void setDataBaseType(DataBaseType dataBaseType) {
        if (dataBaseType == null) {
            throw new NullPointerException();
        }
        TYPE.set(dataBaseType);
    }

    // 获取数据源类型
    public static DataBaseType getDataBaseType() {
        DataBaseType dataBaseType = TYPE.get() == null ? DataBaseType.Primary : TYPE.get();
        return dataBaseType;
    }

    // 清空数据类型
    public static void clearDataBaseType() {
        TYPE.remove();
    }

}
接下来编写我们相关的Mapper和xml文件,代码如下:
@Component
@Mapper
public interface PrimaryUserMapper {

    List<User> findAll();
}


@Component
@Mapper
public interface SecondaryUserMapper {

    List<User> findAll();
}
<?xml version="1.0" encoding="UTF-8" ?>
<!DOCTYPE mapper
        PUBLIC "-//mybatis.org//DTD Mapper 3.0//EN"
        "http://mybatis.org/dtd/mybatis-3-mapper.dtd">
<mapper namespace="com.jdkcb.mybatisstuday.mapper.one.PrimaryUserMapper">

    <select id="findAll" resultType="com.jdkcb.mybatisstuday.pojo.User">
                select * from sys_user;
    </select>

</mapper>


<?xml version="1.0" encoding="UTF-8" ?>
<!DOCTYPE mapper
        PUBLIC "-//mybatis.org//DTD Mapper 3.0//EN"
        "http://mybatis.org/dtd/mybatis-3-mapper.dtd">
<mapper namespace="com.jdkcb.mybatisstuday.mapper.two.SecondaryUserMapper">

    <select id="findAll" resultType="com.jdkcb.mybatisstuday.pojo.User">
                select * from sys_user2;
    </select>


</mapper>
相关接口文件编写好之后,就可以编写我们的aop代码了:
@Aspect
@Component
public class DataSourceAop {
    //在primary方法前执行
    @Before("execution(* com.jdkcb.mybatisstuday.controller.UserController.primary(..))")
    public void setDataSource2test01() {
        System.err.println("Primary业务");
        DataSourceType.setDataBaseType(DataSourceType.DataBaseType.Primary);
    }

    //在secondary方法前执行
    @Before("execution(* com.jdkcb.mybatisstuday.controller.UserController.secondary(..))")
    public void setDataSource2test02() {
        System.err.println("Secondary业务");
        DataSourceType.setDataBaseType(DataSourceType.DataBaseType.Secondary);
    }
}
编写我们的测试 UserController, 代码如下:
@RestController
public class UserController {

    @Autowired
    private PrimaryUserMapper primaryUserMapper;
    @Autowired
    private SecondaryUserMapper secondaryUserMapper;


    @RequestMapping("primary")
    public Object primary(){
        List<User> list = primaryUserMapper.findAll();
        return list;
    }
    @RequestMapping("secondary")
    public Object secondary(){
        List<User> list = secondaryUserMapper.findAll();
        return list;
    }

}
4. 测试:
启动项目,在浏览器中分别输入http://127.0.0.1:8080/primary 和http://127.0.0.1:8080/primary ,结果如下:
[{"user_id":1,"user_name":"张三","user_age":25}]

[{"user_id":1,"user_name":"李四","user_age":30}]
5.等等
等等,啧啧啧,我看你这不行啊,还不够灵活,几个菜啊,喝成这样,这就算灵活了?
那肯定不能的,aop也有aop的好处,比如两个包下的代码分别用两个不同的数据源,就可以直接用aop表达式就可以完成了,但是,如果想本例中方法级别的拦截,就显得优点不太灵活了,这个适合就需要我们的注解上场了。
6.配合注解实现
首先自定义我们的注解 @DataSource
/**
 * 切换数据注解 可以用于类或者方法级别 方法级别优先级 > 类级别
 */
@Target({ElementType.METHOD, ElementType.TYPE, ElementType.PARAMETER})
@Retention(RetentionPolicy.RUNTIME)
@Documented
public @interface DataSource {
    String value() default "primary"; //该值即key值,默认使用默认数据库
}
通过使用aop拦截,获取注解的属性value的值。如果value的值并没有在我们DataBaseType里面,则使用我们默认的数据源,如果有的话,则切换为相应的数据源。
@Aspect
@Component
public class DynamicDataSourceAspect {
    private static final Logger logger = LoggerFactory.getLogger(DynamicDataSourceAspect.class);

    @Before("@annotation(dataSource)")//拦截我们的注解
    public void changeDataSource(JoinPoint point, DataSource dataSource) throws Throwable {
        String value = dataSource.value();
        if (value.equals("primary")){
            DataSourceType.setDataBaseType(DataSourceType.DataBaseType.Primary);
        }else if (value.equals("secondary")){
            DataSourceType.setDataBaseType(DataSourceType.DataBaseType.Secondary);
        }else {
            DataSourceType.setDataBaseType(DataSourceType.DataBaseType.Primary);//默认使用主数据库
        }

    }

    @After("@annotation(dataSource)") //清除数据源的配置
    public void restoreDataSource(JoinPoint point, DataSource dataSource) {
        DataSourceType.clearDataBaseType();


    }
}
7 .测试:
修改我们的mapper,添加我们的自定义的@DataSouse注解,并注解掉我们DataSourceAop类里面的内容。如下:
@Component
@Mapper
public interface PrimaryUserMapper {

    @DataSource
    List<User> findAll();
}

@Component
@Mapper
public interface SecondaryUserMapper {

    @DataSource("secondary")//指定数据源为:secondary
    List<User> findAll();
}
启动项目,在浏览器中分别输入http://127.0.0.1:8080/primary 和http://127.0.0.1:8080/primary ,结果如下:
[{"user_id":1,"user_name":"张三","user_age":25}]

[{"user_id":1,"user_name":"李四","user_age":30}]
到此,就算真正的大功告成啦。
源码
https://github.com/hanshuaikang/HanShu-Note
1. SpringBoot内容聚合
2. 面试题内容聚合
3. 设计模式内容聚合
4. Mybatis内容聚合
5. 多线程内容聚合
最后,推荐一个专注于Java学习的公众号,Java知音。分享java基础、原理性知识、JavaWeb实战、spring全家桶、设计模式及面试资料、开源项目,助力开发者成长!

最后
以上就是高挑小蘑菇最近收集整理的关于SpringBoot + Mybatis配合AOP和注解实现动态数据源切换配置的全部内容,更多相关SpringBoot内容请搜索靠谱客的其他文章。


发表评论 取消回复