init进程是Android用户空间的第一个进程,进程号为1,是Android系统启动流程中一个关键步骤,作为第一个进程,被赋予了许多极其重要的工作职责,比如创建Zygote(孵化器)和属性服务等。init进程是由多个源文件共同组成的,这些文件位于源码目录system/core/init中。
总的来说主要做了以下三件事:
1.创建和挂载启动所需的文件目录。
2.初始化和启动属性服务。
3.解析init.rc配置文件并启动Zygote进程。
一、kernel启动init进程
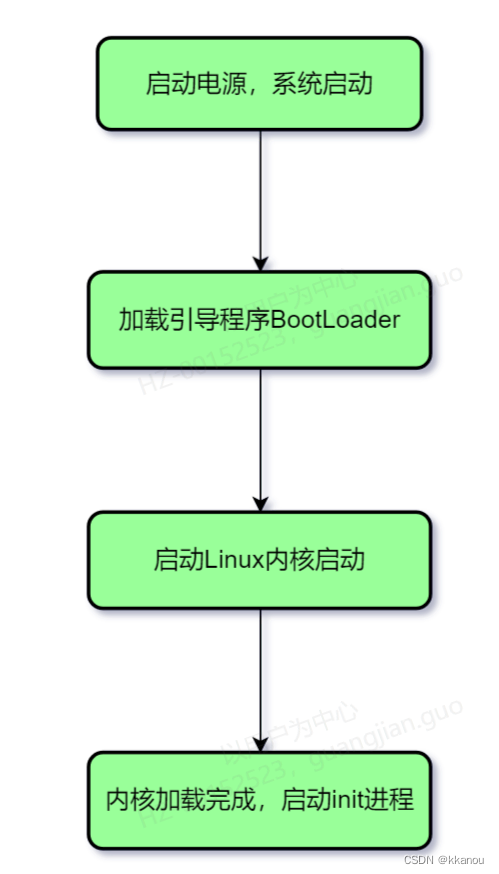
bootloader完成初始化工作后,会载入 /boot 目录下面的 kernel,此时控制权转交给操作系统。操作系统将要完成的存储管理、设备管理、文件管理、进程管理、加载驱动等任务的初始化工作,以便进入用户态。
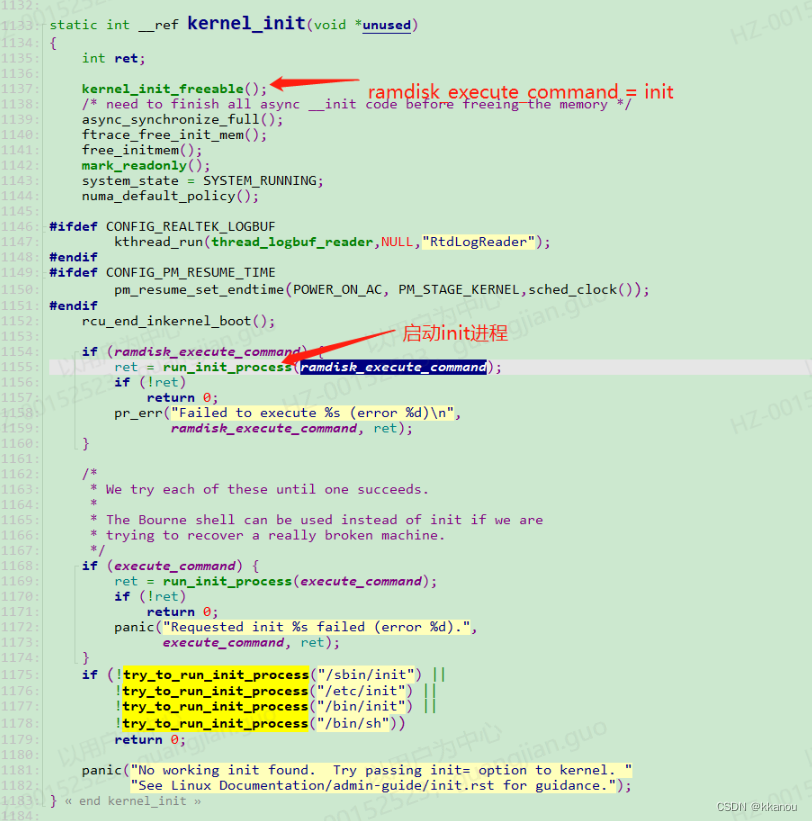
内核启动完成后,将会寻找init文件(init文件位于Android11/linux/linux-4.14/init/main.c),启动init进程,也就是android的第一个进程。
Android11/linux/linux-4.14/init/main.c中的kernel_init方法。可以看到,在kernel_init,会调用kernel_init_freeable,将全局变量ramdisk_execute_command设为"/init",所以会启动/init。

在机器根目录用:ls -l 查看得:
lrwxr-x— 1 root shell 16 2008-12-31 20:00 init -> /system/bin/init
init是链接到/system/bin/init的, 所以说kernel最终启动的就是/system/bin/init
二、init入口
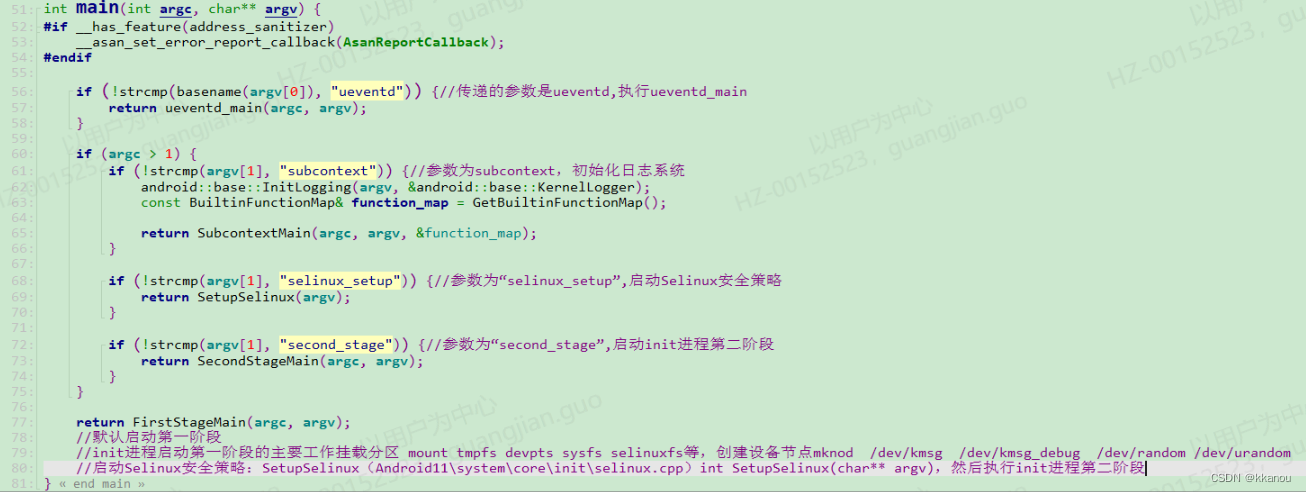
源码路径位于Android11/system/core/init,入口函数是main.cpp。

int main(int argc, char** argv) 第一个参数argc表示参数个数,第二个参数是参数列表,也就是具体的参数。
main函数有四个参数入口:
一是参数中有ueventd,进入ueventd_main
二是参数中有subcontext,进入InitLogging 和SubcontextMain
三是参数中有selinux_setup,进入SetupSelinux
四是参数中有second_stage,进入SecondStageMain
第一步、启动时并没有带任何参数,所在最先执行的就是FirstStageMain(argc, argv);
经过一系列操作,主要是创建目录、挂载分区等,最后进入第二次运行init,可以看到这次是带了selinux_setup参数。
第二步:进入SetupSelinux(argv),这个函数实现在system/core/init/selinux.cpp中,只看主要代码段
主要就是启动SElinux。
第三步、SecondStageMain(argc, argv);函数实现是在system/core/init/init.cpp中
初始化property系统,解析init.rc,然后添加一些任务。
PS:
最开始的ueventd_main(argc, argv);的启动,在init.rc中:

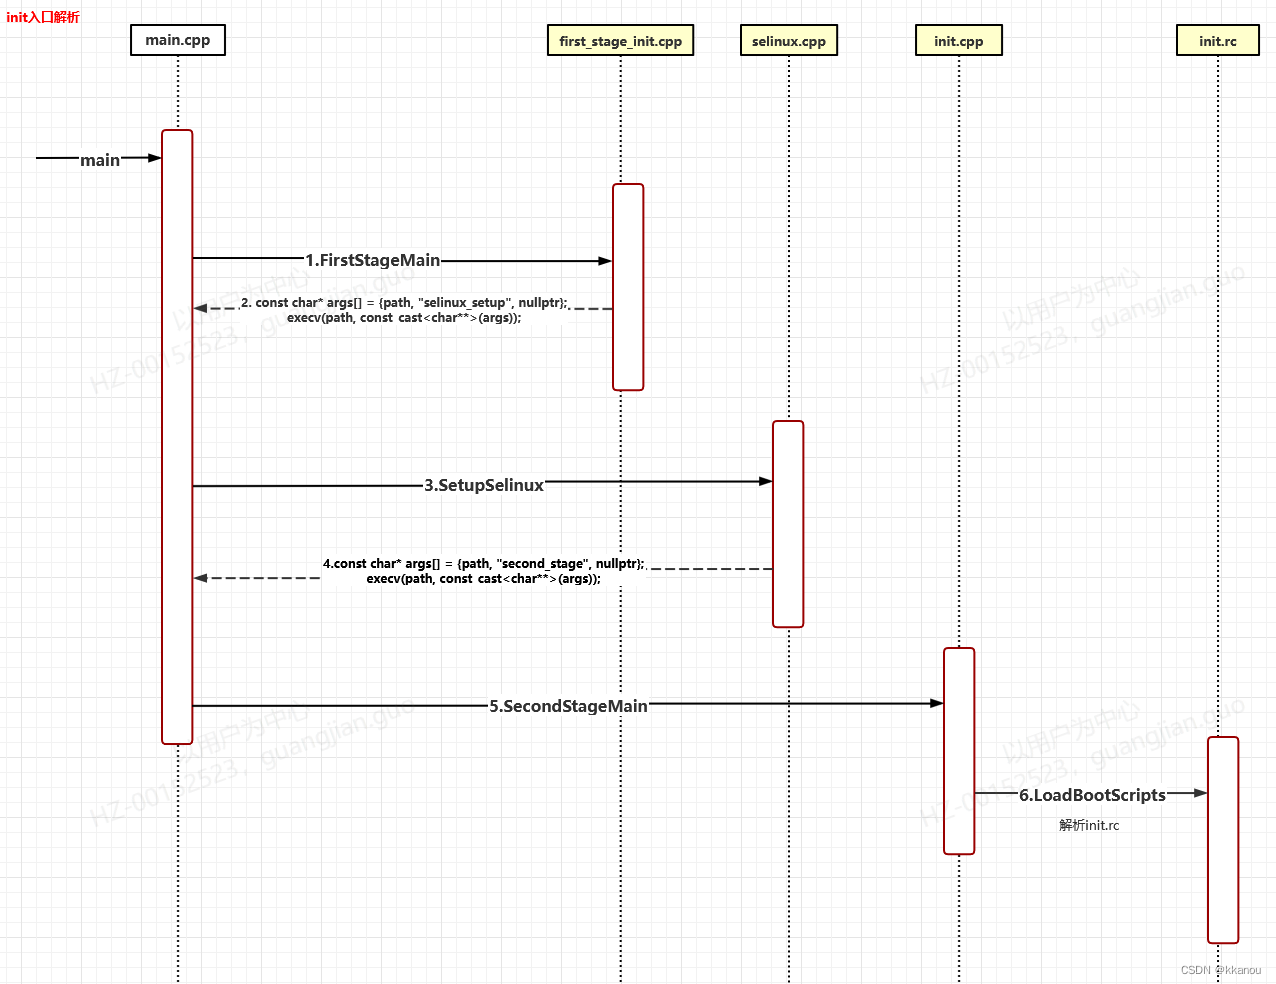
三、init调用时序图:
注:以下源文件均在Android11/system/core/init下。
在系统启动过程中会多次调用 execv(),如:FirstStageMain每次调用该方法时会重新执行 main() 方法。该方法如下:
int execv(const char* name, char* const* argv) { return execve(name,
argv, environ); }
execv() 会停止执行当前的进程,并且以 progname 应用进程替换被停止执行的进程,进程 ID 不会改变。 init.cpp
进程的入口函数 main

四、SecondStageMain做了啥
int SecondStageMain(int argc, char** argv) {
if (REBOOT_BOOTLOADER_ON_PANIC) {
InstallRebootSignalHandlers();
}

boot_clock::time_point start_time = boot_clock::now();

trigger_shutdown = [](const std::string& command) { shutdown_state.TriggerShutdown(command); };

SetStdioToDevNull(argv);
InitKernelLogging(argv);// 初始化 kernel Log
LOG(INFO) << "init second stage started!";

// Init should not crash because of a dependence on any other process, therefore we ignore
// SIGPIPE and handle EPIPE at the call site directly. Note that setting a signal to SIG_IGN
// is inherited across exec, but custom signal handlers are not. Since we do not want to
// ignore SIGPIPE for child processes, we set a no-op function for the signal handler instead.
{
struct sigaction action = {.sa_flags = SA_RESTART};
action.sa_handler = [](int) {};
sigaction(SIGPIPE, &action, nullptr);
}

// Set init and its forked children's oom_adj.
if (auto result =
WriteFile("/proc/1/oom_score_adj", StringPrintf("%d", DEFAULT_OOM_SCORE_ADJUST));
!result.ok()) {
LOG(ERROR) << "Unable to write " << DEFAULT_OOM_SCORE_ADJUST
<< " to /proc/1/oom_score_adj: " << result.error();
}

// Set up a session keyring that all processes will have access to. It
// will hold things like FBE encryption keys. No process should override
// its session keyring.
keyctl_get_keyring_ID(KEY_SPEC_SESSION_KEYRING, 1);

// Indicate that booting is in progress to background fw loaders, etc.
close(open("/dev/.booting", O_WRONLY | O_CREAT | O_CLOEXEC, 0000));

// See if need to load debug props to allow adb root, when the device is unlocked.
const char* force_debuggable_env = getenv("INIT_FORCE_DEBUGGABLE");
bool load_debug_prop = false;
if (force_debuggable_env && AvbHandle::IsDeviceUnlocked()) {
load_debug_prop = "true"s == force_debuggable_env;
}

// 清除掉之前存储到系统属性中的环境变量
unsetenv("INIT_FORCE_DEBUGGABLE");

// Umount the debug ramdisk so property service doesn't read .prop files from there, when it
// is not meant to.
if (!load_debug_prop) {
UmountDebugRamdisk();
}

// 调用 property_init() 初始化属性域,然后设置各种属性

PropertyInit();

// Umount the debug ramdisk after property service has read the .prop files when it means to.
if (load_debug_prop) {
UmountDebugRamdisk();
}
// #ifndef VENDOR_EDIT
// shaochun.wan@android, 2020/11/09 add the skd mode
process_kernel_cmdline();//TCL客制化  SKD模式
// #endif / VENDOR_EDIT */

// Mount extra filesystems required during second stage init
MountExtraFilesystems();

// Now set up SELinux for second stage.

//init 进程 第一阶段 主要 加载 selinux 相关的策略,而 第二阶段 调用 SelabelInitialize() 是为了 注册一些处理器
SelinuxSetupKernelLogging();
SelabelInitialize();
SelinuxRestoreContext();

Epoll epoll;
if (auto result = epoll.Open(); !result.ok()) {
PLOG(FATAL) << result.error();
}

//主要是创建 handler 处理子进程终止信号,注册一个 signal 到 epoll 进行监听

//init 是一个守护进程,为了防止 init 的子进程成为僵尸进程,需要 init 在子进程结束时获取子进程的结束码,通过结束码将程序表中的子进程移除,防止成为僵尸进程的子进程占用程序表的空间(程序表的空间达到上限时,系统就不能再启动新的进程了,会引起严重的系统问题)


InstallSignalFdHandler(&epoll);
InstallInitNotifier(&epoll);


// 设置其他系统属性并开启系统属性服务
StartPropertyService(&property_fd);

// Make the time that init stages started available for bootstat to log.
RecordStageBoottimes(start_time);

// Set libavb version for Framework-only OTA match in Treble build.
if (const char* avb_version = getenv("INIT_AVB_VERSION"); avb_version != nullptr) {
SetProperty("ro.boot.avb_version", avb_version);
}
unsetenv("INIT_AVB_VERSION");

fs_mgr_vendor_overlay_mount_all();
export_oem_lock_status();
MountHandler mount_handler(&epoll);
SetUsbController();

const BuiltinFunctionMap& function_map = GetBuiltinFunctionMap();
Action::set_function_map(&function_map);

if (!SetupMountNamespaces()) {
PLOG(FATAL) << "SetupMountNamespaces failed";
}


//init 进程的 准备工作 执行完毕, 接下来就要开始 解析 init.rc 文件 的工作

InitializeSubcontext();

//am和sm是存放action和service的数据结构

ActionManager& am = ActionManager::GetInstance();
ServiceList& sm = ServiceList::GetInstance();

LoadBootScripts(am, sm);//解析init.rc

// Turning this on and letting the INFO logging be discarded adds 0.2s to
// Nexus 9 boot time, so it's disabled by default.
if (false) DumpState();

// Make the GSI status available before scripts start running.
auto is_running = android::gsi::IsGsiRunning() ? "1" : "0";
SetProperty(gsi::kGsiBootedProp, is_running);
auto is_installed = android::gsi::IsGsiInstalled() ? "1" : "0";
SetProperty(gsi::kGsiInstalledProp, is_installed);

am.QueueBuiltinAction(SetupCgroupsAction, "SetupCgroups");
am.QueueBuiltinAction(SetKptrRestrictAction, "SetKptrRestrict");
am.QueueBuiltinAction(TestPerfEventSelinuxAction, "TestPerfEventSelinux");

// 执行rc文件中触发器为 on early-init 的语句
am.QueueEventTrigger("early-init");

// Queue an action that waits for coldboot done so we know ueventd has set up all of /dev...
am.QueueBuiltinAction(wait_for_coldboot_done_action, "wait_for_coldboot_done");
// ... so that we can start queuing up actions that require stuff from /dev.
am.QueueBuiltinAction(MixHwrngIntoLinuxRngAction, "MixHwrngIntoLinuxRng");
am.QueueBuiltinAction(SetMmapRndBitsAction, "SetMmapRndBits");
Keychords keychords;
am.QueueBuiltinAction(
[&epoll, &keychords](const BuiltinArguments& args) -> Result<void> {
for (const auto& svc : ServiceList::GetInstance()) {
keychords.Register(svc->keycodes());
}
keychords.Start(&epoll, HandleKeychord);
return {};
},
"KeychordInit");

// Trigger all the boot actions to get us started.

// 执行rc文件中触发器为 on init 的语句
am.QueueEventTrigger("init");

// Repeat mix_hwrng_into_linux_rng in case /dev/hw_random or /dev/random
// wasn't ready immediately after wait_for_coldboot_done
am.QueueBuiltinAction(MixHwrngIntoLinuxRngAction, "MixHwrngIntoLinuxRng");

// Don't mount filesystems or start core system services in charger mode.
std::string bootmode = GetProperty("ro.bootmode", "");
if (bootmode == "charger") {
am.QueueEventTrigger("charger");
} else {
am.QueueEventTrigger("late-init"); // 执行rc文件中触发器为 on lata-init 的语句
}

// Run all property triggers based on current state of the properties.
am.QueueBuiltinAction(queue_property_triggers_action, "queue_property_triggers");

while (true) {
// By default, sleep until something happens.
auto epoll_timeout = std::optional<std::chrono::milliseconds>{};

auto shutdown_command = shutdown_state.CheckShutdown();
if (shutdown_command) {
HandlePowerctlMessage(*shutdown_command);
}

if (!(prop_waiter_state.MightBeWaiting() || Service::is_exec_service_running())) {
am.ExecuteOneCommand();//依次执行每个 action 中携带 command 对应的执行函数
}
if (!IsShuttingDown()) {
auto next_process_action_time = HandleProcessActions();

// If there's a process that needs restarting, wake up in time for that.

//重新启动死掉的进程
if (next_process_action_time) {
epoll_timeout = std::chrono::ceil<std::chrono::milliseconds>(
*next_process_action_time - boot_clock::now());
if (*epoll_timeout < 0ms) epoll_timeout = 0ms;
}
}

if (!(prop_waiter_state.MightBeWaiting() || Service::is_exec_service_running())) {
// If there's more work to do, wake up again immediately.
if (am.HasMoreCommands()) epoll_timeout = 0ms;
}

auto pending_functions = epoll.Wait(epoll_timeout);
if (!pending_functions.ok()) {
LOG(ERROR) << pending_functions.error();
} else if (!pending_functions->empty()) {
// We always reap children before responding to the other pending functions. This is to
// prevent a race where other daemons see that a service has exited and ask init to
// start it again via ctl.start before init has reaped it.
ReapAnyOutstandingChildren();
for (const auto& function : *pending_functions) {
(*function)();
}
}
if (!IsShuttingDown()) {
HandleControlMessages();
SetUsbController();
}
}

return 0;
}
五、init各阶段总结:
init进程第一阶段做的主要工作是挂载分区,创建设备节点和一些关键目录,初始化日志输出系统,启用SELinux安全策略。
init进程第二阶段主要工作是初始化属性系统,解析SELinux的匹配规则,处理子进程终止信号,启动系统属性服务,可以说每一项都很关键,如果说第一阶段是为属性系统,SELinux做准备,那么第二阶段就是真正去把这些功能落实。
init进行第三阶段主要是解析init.rc 来启动其他进程,进入无限循环,进行子进程实时监控。
最后
以上就是愤怒蜡烛最近收集整理的关于Android R开机流程跟踪-----启动init进程的全部内容,更多相关Android内容请搜索靠谱客的其他文章。


发表评论 取消回复