Android 绘图学习
android绘图之Paint(1)
android绘图之Canvas基础(2)
Android绘图之Path(3)
Android绘图之drawText绘制文本相关(4)
Android绘图之Canvas概念理解(5)
Android绘图之Canvas变换(6)
Android绘图之Canvas状态保存和恢复(7)
Android绘图之PathEffect (8)
Android绘图之LinearGradient线性渐变(9)
Android绘图之SweepGradient(10)
Android绘图之RadialGradient 放射渐变(11)
Android绘制之BitmapShader(12)
Android绘图之ComposeShader,PorterDuff.mode及Xfermode(13)
Android绘图之drawText,getTextBounds,measureText,FontMetrics,基线(14)
Android绘图之贝塞尔曲线简介(15)
Android绘图之PathMeasure(16)
Android 动态修改渐变 GradientDrawable
绘制文字相关:
Paint 相关设置,
Canvas相关设置。
1 Paint绘制文字相关:
相关函数说明:
mPaint.setStrokeWidth(10);//设置画笔宽度
mPaint.setColor(Color.BLUE);//设置画笔颜色
mPaint.setStyle(Paint.Style.STROKE);//设置画笔样式

mPaint.setTextSize();//字体大小
mPaint.setTextAlign();//对齐方式
mPaint.setShadowLayer();//阴影
mPaint.setUnderlineText();//是否显示下划线
mPaint.setFakeBoldText();//true 表示粗体,false表示正常
mPaint.setTextSkewX();//float,设置文本在水平方向上的倾斜,负数表示右斜,正数表示左斜
mPaint.setTextScaleX();//设置比例因子,默认为1,当大于1的时候表示横向拉伸,
// 当小于1的时候表示横向压缩。该方法往往用于一些特效字体的显示场合。
mPaint.setStrikeThruText();//设置文本删除线
mPaint.setLetterSpacing();//设置行间距,默认是0.
mPaint.setTypeface();//设置文本字体样式

**暂不讲解**
mPaint.setLinearText();//设置是否打开线性文本标识
mPaint.setHinting();//设置画笔的隐藏模式
mPaint.setFontFeatureSettings();//设置字体的样式,这个样式和CSS样式很类似
mPaint.setStrokeMiter(float miter );//设置笔画的倾斜度
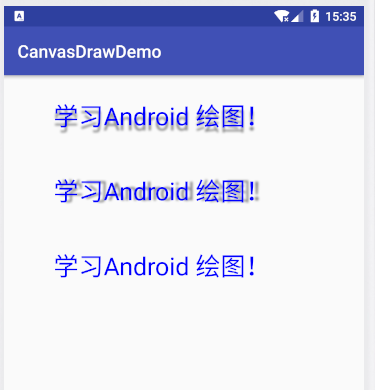
1.1 setStrokeWidth,setColor
画笔越宽字体越宽,画笔颜色决定了文字颜色。
实例代码:
mPaint1 = new Paint(Paint.ANTI_ALIAS_FLAG);
mPaint1.setStrokeWidth(7);//设置画笔宽度
mPaint1.setColor(Color.BLUE);//设置画笔颜色
mPaint1.setStyle(Paint.Style.STROKE);//设置画笔样式
mPaint1.setTextSize(100);

mPaint2 = new Paint(Paint.ANTI_ALIAS_FLAG);
mPaint2.setStrokeWidth(3);//设置画笔宽度
mPaint2.setColor(Color.BLUE);//设置画笔颜色
mPaint2.setStyle(Paint.Style.STROKE);//设置画笔样式
mPaint2.setTextSize(100);
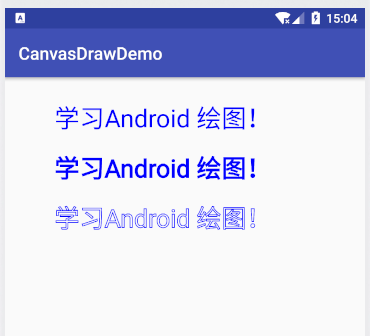
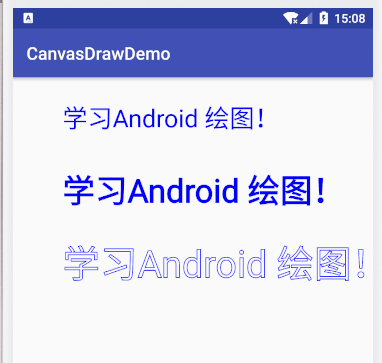
1.2 setStyle 设置画笔样式
设置画笔样式:分别设置Paint Style 为FILL,FILL_AND_STROKE,STROKE的字体效果
mPaint1 = new Paint(Paint.ANTI_ALIAS_FLAG);
mPaint1.setStrokeWidth(3);//设置画笔宽度
mPaint1.setColor(Color.BLUE);//设置画笔颜色
mPaint1.setStyle(Paint.Style.FILL);//设置画笔样式
mPaint1.setTextSize(100);

mPaint2 = new Paint(Paint.ANTI_ALIAS_FLAG);
mPaint2.setStrokeWidth(3);//设置画笔宽度
mPaint2.setColor(Color.BLUE);//设置画笔颜色
mPaint2.setStyle(Paint.Style.FILL_AND_STROKE);//设置画笔样式
mPaint2.setTextSize(100);

mPaint3 = new Paint(Paint.ANTI_ALIAS_FLAG);
mPaint3.setStrokeWidth(3);//设置画笔宽度
mPaint3.setColor(Color.BLUE);//设置画笔颜色
mPaint3.setStyle(Paint.Style.STROKE);//设置画笔样式
mPaint3.setTextSize(100);
STROKE会有镂空的效果,其他两种由于画笔宽度的不同也会导致绘制的问题粗细有很大差异。
1.3 setTextSize 设置字体大小
设置不同的字体大小,单位为px,如果使用dp记得转换。
mPaint1 = new Paint(Paint.ANTI_ALIAS_FLAG);
mPaint1.setStrokeWidth(3);//设置画笔宽度
mPaint1.setColor(Color.BLUE);//设置画笔颜色
mPaint1.setStyle(Paint.Style.FILL);//设置画笔样式
mPaint1.setTextSize(100);

mPaint2 = new Paint(Paint.ANTI_ALIAS_FLAG);
mPaint2.setStrokeWidth(3);//设置画笔宽度
mPaint2.setColor(Color.BLUE);//设置画笔颜色
mPaint2.setStyle(Paint.Style.FILL_AND_STROKE);//设置画笔样式
mPaint2.setTextSize(130);

mPaint3 = new Paint(Paint.ANTI_ALIAS_FLAG);
mPaint3.setStrokeWidth(3);//设置画笔宽度
mPaint3.setColor(Color.BLUE);//设置画笔颜色
mPaint3.setStyle(Paint.Style.STROKE);//设置画笔样式
mPaint3.setTextSize(150);
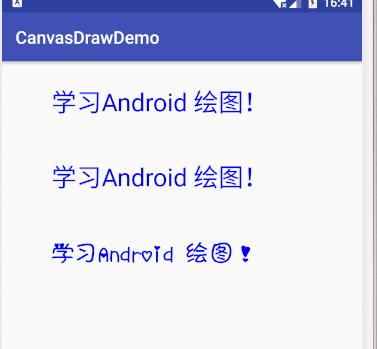
1.4 setTextAlign
设置文字对齐方式,取值:align.CENTER、align.LEFT或align.RIGHT三种
mPaint1 = new Paint(Paint.ANTI_ALIAS_FLAG);
mPaint1.setStrokeWidth(3);//设置画笔宽度
mPaint1.setColor(Color.BLUE);//设置画笔颜色
mPaint1.setStyle(Paint.Style.FILL);//设置画笔样式
mPaint1.setTextSize(100);
mPaint1.setTextAlign(Paint.Align.LEFT);
mPaint2 = new Paint(Paint.ANTI_ALIAS_FLAG);
mPaint2.setStrokeWidth(3);//设置画笔宽度
mPaint2.setColor(Color.BLUE);//设置画笔颜色
mPaint2.setStyle(Paint.Style.FILL_AND_STROKE);//设置画笔样式
mPaint2.setTextSize(100);
mPaint2.setTextAlign(Paint.Align.CENTER);
mPaint3 = new Paint(Paint.ANTI_ALIAS_FLAG);
mPaint3.setStrokeWidth(3);//设置画笔宽度
mPaint3.setColor(Color.BLUE);//设置画笔颜色
mPaint3.setStyle(Paint.Style.STROKE);//设置画笔样式
mPaint3.setTextSize(100);
mPaint3.setTextAlign(Paint.Align.RIGHT);
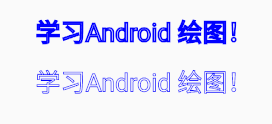
canvas.drawText("学习Android 绘图!",200,200, mPaint1);
canvas.drawText("学习Android 绘图!",200,500, mPaint2);
canvas.drawText("学习Android 绘图!",200,800, mPaint3);
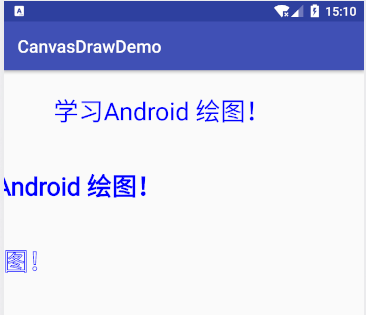
根据绘制文字的结果,可以知道所谓对齐方式是以开始绘制点为相对的。
1.6 setShadowLayer 设置阴影
public void setShadowLayer(float radius, float dx, float dy, int shadowColor) ;
/**
 * 清除阴影
 */
public void clearShadowLayer() {
    setShadowLayer(0, 0, 0, 0);
}
//判断是否有阴影
public boolean hasShadowLayer() ;
setShadowLayer(float radius, float dx, float dy, int shadowColor)
参数说明:
radius:模糊半径,越大越模糊。
dx:阴影离开文字的x横向距离。
dy:阴影离开文字的Y横向距离。
shadowColor:阴影颜色。
阴影的方向可以通过dx,dy值得正负决定。
-
如果阴影的颜色是不透明的,它的透明度将是paint的透明度,否则将是阴影颜色的透明度
-
radius为0时,shadowLayer会被清除,dx,dy可以控制显示的位置方向,可以在文字的上下左右等方向。
-
dx,dy为0是和文字重叠,dx>0 在文字右侧,dx<0在文字左侧,dy>0在文字下侧,dy<0在文字上面。
mPaint1 = new Paint(Paint.ANTI_ALIAS_FLAG);
mPaint1.setStrokeWidth(3);//设置画笔宽度
mPaint1.setColor(Color.BLUE);//设置画笔颜色
mPaint1.setStyle(Paint.Style.FILL);//设置画笔样式
mPaint1.setTextSize(100);
mPaint1.setShadowLayer(10,20,20,Color.GRAY);

mPaint2 = new Paint(Paint.ANTI_ALIAS_FLAG);
mPaint2.setStrokeWidth(3);//设置画笔宽度
mPaint2.setColor(Color.BLUE);//设置画笔颜色
mPaint2.setStyle(Paint.Style.FILL);//设置画笔样式
mPaint2.setTextSize(100);
mPaint2.setShadowLayer(10,-20,20,Color.GRAY);

mPaint3 = new Paint(Paint.ANTI_ALIAS_FLAG);
mPaint3.setStrokeWidth(3);//设置画笔宽度
mPaint3.setColor(Color.BLUE);//设置画笔颜色
mPaint3.setStyle(Paint.Style.FILL);//设置画笔样式
mPaint3.setTextSize(100);
mPaint3.setShadowLayer(10,-20,-20,Color.GRAY);

mPaint1 = new Paint(Paint.ANTI_ALIAS_FLAG);
mPaint1.setStrokeWidth(3);//设置画笔宽度
mPaint1.setColor(Color.BLUE);//设置画笔颜色
mPaint1.setStyle(Paint.Style.FILL);//设置画笔样式
mPaint1.setTextSize(100);
mPaint1.setShadowLayer(10,0,20,Color.GRAY);

mPaint2 = new Paint(Paint.ANTI_ALIAS_FLAG);
mPaint2.setStrokeWidth(3);//设置画笔宽度
mPaint2.setColor(Color.BLUE);//设置画笔颜色
mPaint2.setStyle(Paint.Style.FILL);//设置画笔样式
mPaint2.setTextSize(100);
mPaint2.setShadowLayer(10,20,0,Color.GRAY);

mPaint3 = new Paint(Paint.ANTI_ALIAS_FLAG);
mPaint3.setStrokeWidth(3);//设置画笔宽度
mPaint3.setColor(Color.BLUE);//设置画笔颜色
mPaint3.setStyle(Paint.Style.FILL);//设置画笔样式
mPaint3.setTextSize(100);
mPaint3.setShadowLayer(0,-20,-20,Color.GRAY);
1.7 下划线,粗体,删除线
mPaint1 = new Paint(Paint.ANTI_ALIAS_FLAG);
mPaint1.setStrokeWidth(3);//设置画笔宽度
mPaint1.setColor(Color.BLUE);//设置画笔颜色
mPaint1.setStyle(Paint.Style.FILL);//设置画笔样式
mPaint1.setTextSize(100);
mPaint1.setUnderlineText(true);//下划线

mPaint2 = new Paint(Paint.ANTI_ALIAS_FLAG);
mPaint2.setStrokeWidth(3);//设置画笔宽度
mPaint2.setColor(Color.BLUE);//设置画笔颜色
mPaint2.setStyle(Paint.Style.FILL);//设置画笔样式
mPaint2.setTextSize(100);
mPaint2.setFakeBoldText(true);//粗体

mPaint3 = new Paint(Paint.ANTI_ALIAS_FLAG);
mPaint3.setStrokeWidth(3);//设置画笔宽度
mPaint3.setColor(Color.BLUE);//设置画笔颜色
mPaint3.setStyle(Paint.Style.FILL);//设置画笔样式
mPaint3.setTextSize(100);
mPaint3.setStrikeThruText(true);//删除线
1.8 setTextSkewX();
参数类型float,设置文本在水平方向上的倾斜,负数表示右斜,正数表示左斜,默认为0,一般斜体设置为-0.25
mPaint1 = new Paint(Paint.ANTI_ALIAS_FLAG);
 mPaint1.setStrokeWidth(3);//设置画笔宽度
 mPaint1.setColor(Color.BLUE);//设置画笔颜色
 mPaint1.setStyle(Paint.Style.FILL);//设置画笔样式
 mPaint1.setTextSize(100);
 mPaint1.setTextSkewX(1);//斜体

 mPaint2 = new Paint(Paint.ANTI_ALIAS_FLAG);
 mPaint2.setStrokeWidth(3);//设置画笔宽度
 mPaint2.setColor(Color.BLUE);//设置画笔颜色
 mPaint2.setStyle(Paint.Style.FILL);//设置画笔样式
 mPaint2.setTextSize(100);
 mPaint2.setTextSkewX(-1);//斜体

mPaint3 = new Paint(Paint.ANTI_ALIAS_FLAG);
 mPaint3.setStrokeWidth(3);//设置画笔宽度
 mPaint3.setColor(Color.BLUE);//设置画笔颜色
 mPaint3.setStyle(Paint.Style.FILL);//设置画笔样式
 mPaint3.setTextSize(100);
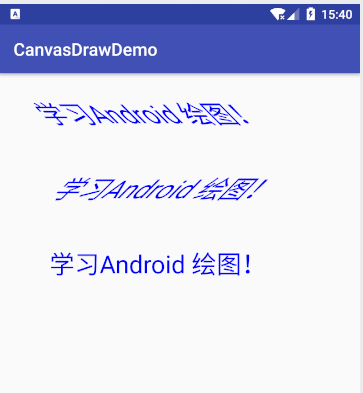
默认为0,通常的斜体字为-0.25,向右倾斜。
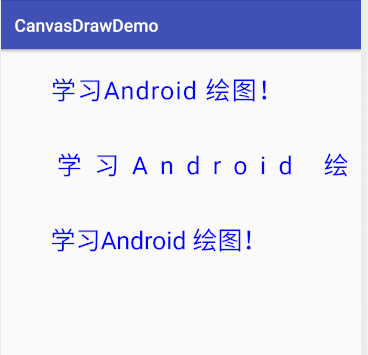
1.9 setTextScaleX();
//设置比例因子,默认为1,当大于1的时候表示横向拉伸,小于1时横向压缩。
mPaint1 = new Paint(Paint.ANTI_ALIAS_FLAG);
 mPaint1.setStrokeWidth(3);//设置画笔宽度
 mPaint1.setColor(Color.BLUE);//设置画笔颜色
 mPaint1.setStyle(Paint.Style.FILL);//设置画笔样式
 mPaint1.setTextSize(100);
 mPaint1.setTextScaleX(2);

 mPaint2 = new Paint(Paint.ANTI_ALIAS_FLAG);
 mPaint2.setStrokeWidth(3);//设置画笔宽度
 mPaint2.setColor(Color.BLUE);//设置画笔颜色
 mPaint2.setStyle(Paint.Style.FILL);//设置画笔样式
 mPaint2.setTextSize(100);
 mPaint2.setTextScaleX(0.5f);

mPaint3 = new Paint(Paint.ANTI_ALIAS_FLAG);
 mPaint3.setStrokeWidth(3);//设置画笔宽度
 mPaint3.setColor(Color.BLUE);//设置画笔颜色
 mPaint3.setStyle(Paint.Style.FILL);//设置画笔样式
 mPaint3.setTextSize(100);

1.10 setLetterSpacing 字间距设置默认0,需要最低api21支持.
mPaint1 = new Paint(Paint.ANTI_ALIAS_FLAG);
mPaint1.setStrokeWidth(3);//设置画笔宽度
mPaint1.setColor(Color.BLUE);//设置画笔颜色
mPaint1.setStyle(Paint.Style.FILL);//设置画笔样式
mPaint1.setTextSize(100);
mPaint1.setLetterSpacing(0.05f);

mPaint2 = new Paint(Paint.ANTI_ALIAS_FLAG);
mPaint2.setStrokeWidth(3);//设置画笔宽度
mPaint2.setColor(Color.BLUE);//设置画笔颜色
mPaint2.setStyle(Paint.Style.FILL);//设置画笔样式
mPaint2.setTextSize(100);
mPaint2.setLetterSpacing(0.5f);

mPaint3 = new Paint(Paint.ANTI_ALIAS_FLAG);
mPaint3.setStrokeWidth(3);//设置画笔宽度
mPaint3.setColor(Color.BLUE);//设置画笔颜色
mPaint3.setStyle(Paint.Style.FILL);//设置画笔样式
mPaint3.setTextSize(100);
1.11setTypeface 设置文本字体样式
可以设置系统中已有字体样式,也可以从文件中读取字体。
如何创建TypeFace:
根据系统存在的字体生成Typeface
//根据提供的字体名字和style创建typeFace,如果从名字获取的字体信息为null,将使用default字体。
//style包含四种样式:NORMAL,BOLD,ITALIC,BOLD_ITALIC
public static Typeface create(String familyName, @Style int style) ;

//从已存在的TypeFace生成新的typeface
public static Typeface create(Typeface family, @Style int style) ;

public static @NonNull Typeface create(@Nullable Typeface family,
        @IntRange(from = 1, to = 1000) int weight, boolean italic);

//默认字体样式
public static Typeface defaultFromStyle(@Style int style) {
    return sDefaults[style];
}
Style:
Typeface.NORMAL //正常体
Typeface.BOLD //粗体
Typeface.ITALIC //斜体
Typeface.BOLD_ITALIC //粗斜体
读取字体文件,生成TypeFace
//从Asset文件中读取字体文件,创建TypeFace
public static Typeface createFromAsset(AssetManager mgr, String path);
//从file文件中读取文件创建typeface
public static Typeface createFromFile(@Nullable File file) ;
利用TypeFace换系统支持的其他字体:
代码示例:
Typeface typeface1 =  Typeface.create("黑体",Typeface.NORMAL);
Typeface typeface2 =  Typeface.create("宋体",Typeface.NORMAL);
Typeface typeface3 =  Typeface.createFromAsset(getContext().getAssets(),"bijiben.TTF");
mPaint1.setTypeface(typeface1);
mPaint2.setTypeface(typeface2);
mPaint3.setTypeface(typeface3);
2 Canvas相关
2.1 简单函数
public void drawText(@NonNull char[] text, int index,
int count, float x, float y, @NonNull Paint paint) ;

public void drawText(@NonNull String text, float x, float y,
 @NonNull Paint paint) ;

public void drawText(@NonNull String text, int start,
int end, float x, float y, @NonNull Paint paint) ;
public void drawText(@NonNull CharSequence text, int start, int end, float x, float y, @NonNull Paint paint);
上面四个函数时最简单的绘制text函数。
drawText(@NonNull char[] text, int index, int count, float x, float y, @NonNull Paint paint)
drawText(@NonNull String text, float x, float y,@NonNull Paint paint)
index,count: 表示text数组中从index开始,共count个数的文字绘制。
x,y: 表示在(x,y)的坐标绘制text,这里的x,y不是绘制文本左上角的坐标。
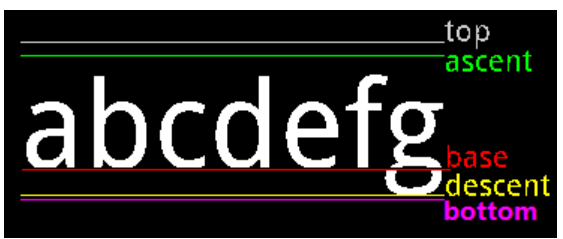
**注意:**这里的(x,y)坐标不是绘制文本时左上角的坐标,
详情请看drawText详述
 /**
     * Draw the text, with origin at (x,y), using the specified paint. The origin is interpreted
     * based on the Align setting in the paint.
     *
     * @param text The text to be drawn
     * @param x The x-coordinate of the origin of the text being drawn
     * @param y The y-coordinate of the baseline of the text being drawn
     * @param paint The paint used for the text (e.g. color, size, style)
     */
    public void drawText(@NonNull char[] text, int index, int count, float x, float y,
            @NonNull Paint paint);
看上面(x,y)坐标的解释,x是开始绘制的x轴坐标的原点,重点来了,y是文本的baseline(基准线)的开始坐标,看下图,后面会有文章专门讲解。
2.2drawTextOnPath
public void drawTextOnPath(@NonNull char[] text, int index, int count, @NonNull Path path,
        float hOffset, float vOffset, @NonNull Paint paint) {
    super.drawTextOnPath(text, index, count, path, hOffset, vOffset, paint);
}

public void drawTextOnPath(@NonNull String text, @NonNull Path path, float hOffset,
        float vOffset, @NonNull Paint paint) {
    super.drawTextOnPath(text, path, hOffset, vOffset, paint);
}
沿着路径绘制文字,参数解析:
float hOffset : 与路径起始点的水平偏移距离
float vOffset : 与路径中心的垂直偏移量
mPaint1 = new Paint(Paint.ANTI_ALIAS_FLAG);
mPaint1.setStrokeWidth(70);//设置画笔宽度
mPaint1.setColor(Color.BLUE);//设置画笔颜色
mPaint1.setStyle(Paint.Style.STROKE);//设置画笔样式
mPaint1.setTextSize(100);

mPaint3 = new Paint(Paint.ANTI_ALIAS_FLAG);
mPaint3.setStrokeWidth(3);//设置画笔宽度
mPaint3.setColor(Color.BLUE);//设置画笔颜色
mPaint3.setStyle(Paint.Style.STROKE);//设置画笔样式
mPaint3.setTextSize(100);

path1 = new Path();
path1.addCircle(400,400,300, Path.Direction.CW);

path2= new Path();
path2.addCircle(400,1200,300, Path.Direction.CCW);

canvas.drawCircle(400,400,300,mPaint3);
canvas.drawCircle(400,1200,300,mPaint3);
canvas.drawPoint(400,400,mPaint1);
canvas.drawPoint(400,1200,mPaint1);
canvas.drawTextOnPath("学习Android 绘图!",path1,0,0, mPaint3);
canvas.drawTextOnPath("学习Android 绘图!",path2,50,50, mPaint3);
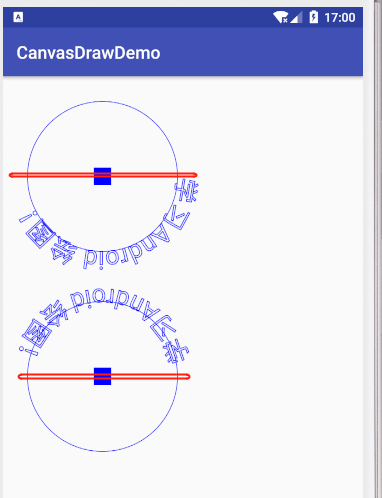
首先可以看到一个文字顺时针,一个逆时针绘制,设置了偏移(0,0)的从0度开始绘制,沿着圆形外边缘绘制。
设置了(50,50)偏移的,开始绘制点离0度有一定距离,文字整体向园内偏。
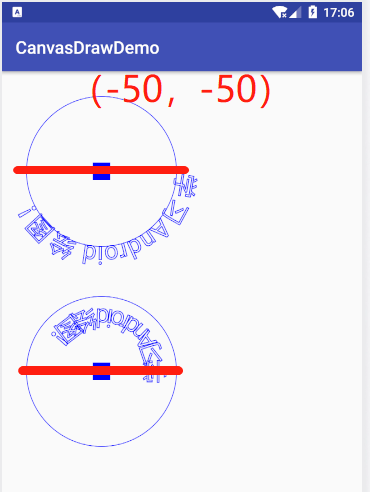
注意:
hOffset The distance along the path to add to the text’s starting position
vOffset The distance above(-) or below(+) the path to position the text
float hOffset : 与路径起始点的水平偏移距离,正沿绘制方向,负沿绘制反方向
float vOffset : 与路径中心的垂直偏移量,正向外,负向内。
canvas.drawTextOnPath("学习Android 绘图!",path2,-50,-50, mPaint3);
2.3 drawTextRun
public void drawTextRun(@NonNull char[] text, int index, int count, int contextIndex,
        int contextCount, float x, float y, boolean isRtl, @NonNull Paint paint) {
    super.drawTextRun(text, index, count, contextIndex, contextCount, x, y, isRtl, paint);
}

public void drawTextRun(@NonNull CharSequence text, int start, int end, int contextStart,
        int contextEnd, float x, float y, boolean isRtl, @NonNull Paint paint) {
    super.drawTextRun(text, start, end, contextStart, contextEnd, x, y, isRtl, paint);
}
drawTextRun 由于api等级较高,没有看具体用法,所以就不在这里讲了。
更多文字相关请看Android绘图之drawText,getTextBounds,measureText,FontMetrics,基线(14)
最后
以上就是如意铃铛最近收集整理的关于Android绘图之drawText绘制文本相关(4)Android 绘图学习1 Paint绘制文字相关:2 Canvas相关的全部内容,更多相关Android绘图之drawText绘制文本相关(4)Android内容请搜索靠谱客的其他文章。


发表评论 取消回复