文章目录
- 目标
- 设计思路
- 项目结构
- 一、实现
- 1、定义属性
- 2、定义属性集合包装类
- 3、类引用(bean类型)
- 4、Bean定义补全
- 5、Bean 属性填充
- 二、测试
- 1、准备
- 2、测试案例
- 3、测试结果
目标
这一章节目的是接着前面的实例化策略实现后,进行属性填充,才算是真正的实例化结束
今天这里暂时不考虑循环依赖,后续会加上
设计思路

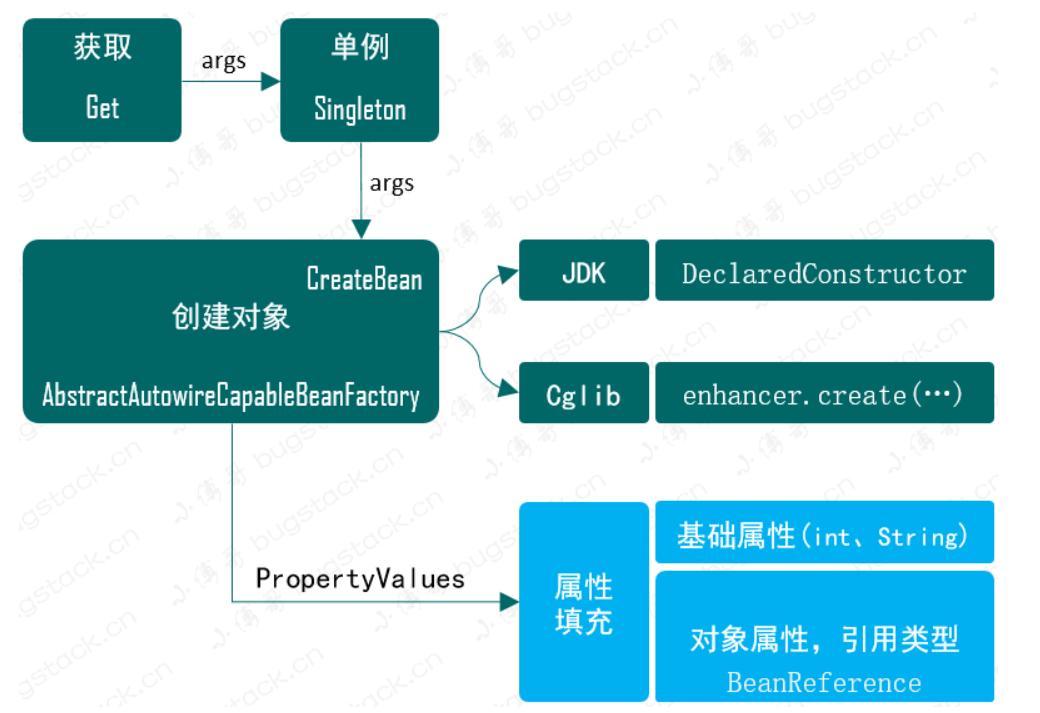
主要做了几件事情
1、属性填充是在创建实例化后,在AbstractAutowireCapableBeanFactory 的createBean方法中添加applyPropertyValues 操作。
2、由于我们需要在创建Bean时候填充属性操作,那么就需要在 bean 定义 BeanDefinition 类中,添加 PropertyValues 信息。
3、填充属性还包括的bean的对象类型,所以需要添加一个BeanReference(区分于普通属性类型,如果是bean对象则递归进行创建和填充)
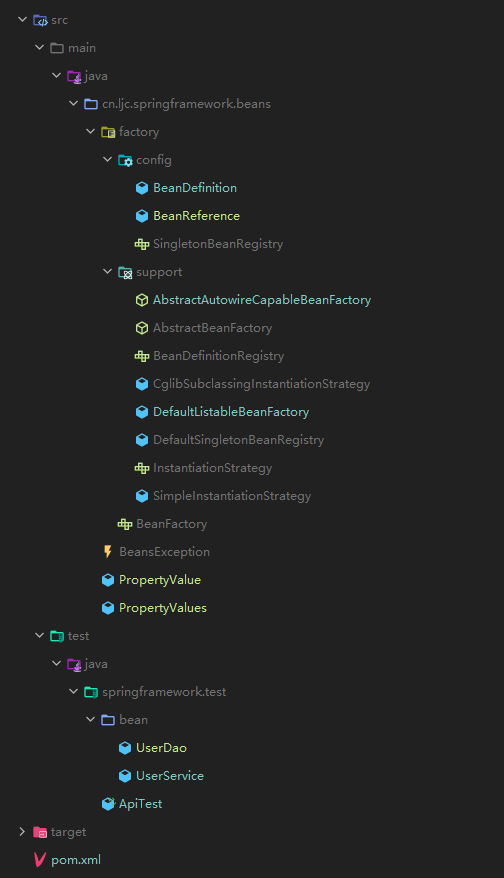
项目结构

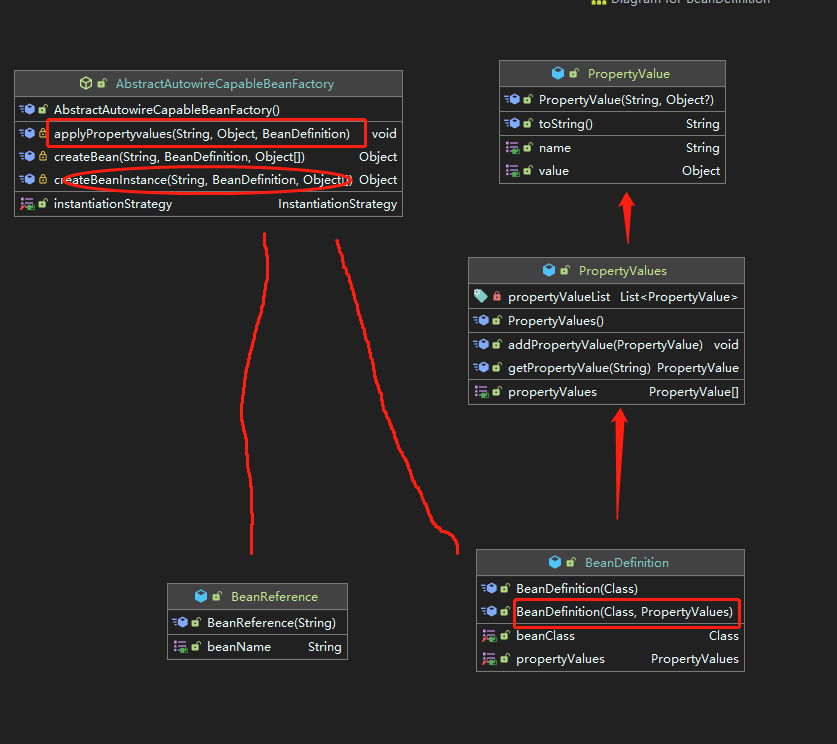
核心关系图

新增加3个类,BeanReference(类引用)、PropertyValue(属性值)、PropertyValues(属性集合),分别用于类和其他类型属性填充操作。
另外改动的类主要是 AbstractAutowireCapableBeanFactory,在 createBean 中补全属性填充部分
一、实现
1、定义属性
/**
 * 属性
 */
public class PropertyValue {

    private final String name;

    private final Object value;


    public PropertyValue(String name, @Nullable Object value) {
        this.name = name;
        this.value = value;
    }

    public String getName() {
        return name;
    }

    public Object getValue() {
        return value;
    }

    @Override
    public String toString() {
        return "PropertyValue{" +
                "name='" + name + ''' +
                ", value=" + value +
                '}';
    }
}
属性的包装类
2、定义属性集合包装类
/**
 * 属性集合
 */
public class PropertyValues {

    private final List<PropertyValue> propertyValueList = new ArrayList<>();

    public void addPropertyValue(PropertyValue pv){
        this.propertyValueList.add(pv);
    }

    public PropertyValue[] getPropertyValues(){
        return this.propertyValueList.toArray(new PropertyValue[0]);
    }

    public PropertyValue getPropertyValue(String propertyName){
        for (PropertyValue propertyValue : propertyValueList) {
            if(propertyValue.getName().equals(propertyName)){
                return propertyValue;
            }
        }
        return null;
    }

}
维护每个类下的属性集合
3、类引用(bean类型)
/**
 * 类引用
 */
public class BeanReference {

    private String beanName;

    public String getBeanName() {
        return beanName;
    }

    public BeanReference(String beanName) {
        this.beanName = beanName;
    }
}
在属性填充时,循环处理时,用于区分是一个bean类型还是一个普通类型,是bean类型则需要递归去创建和获取bean,普通属性则直接赋值
4、Bean定义补全
/**
 * @desc Bean定义
 * @Author: ljc
 * @Date: 2022/11/28 10:35
 */
public class BeanDefinition {

    private Class beanClass;

    private PropertyValues propertyValues;

    public BeanDefinition(Class beanClass) {
        this.beanClass = beanClass;
        this.propertyValues = new PropertyValues();
    }

    public BeanDefinition(Class beanClass,PropertyValues propertyValues) {
        this.beanClass = beanClass;
        this.propertyValues = propertyValues != null ? propertyValues : new PropertyValues();
    }


    public Class getBeanClass() {
        return beanClass;
    }

    public void setBeanClass(Class beanClass) {
        this.beanClass = beanClass;
    }

    public PropertyValues getPropertyValues() {
        return propertyValues;
    }

    public void setPropertyValues(PropertyValues propertyValues) {
        this.propertyValues = propertyValues;
    }
}
新增了1个构造函数,方便初始化bean定义时,直接填充属性
5、Bean 属性填充
/**
 * @desc 实例化Bean类
 * @Author: ljc
 * @Date: 2022/12/7 13:06
 */
public abstract class  AbstractAutowireCapableBeanFactory extends AbstractBeanFactory{

    private InstantiationStrategy instantiationStrategy = new CglibSubclassingInstantiationStrategy();

    /**
     * 创建bean
     * @param beanName
     * @param beanDefinition
     * @param args
     * @return
     * @throws BeansException
     */
    @Override
    protected Object createBean(String beanName, BeanDefinition beanDefinition, Object[] args) throws BeansException {
        Object bean = null;
        try {
            bean = createBeanInstance(beanName,beanDefinition,args);
            // 属性填充
            applyPropertyvalues(beanName,bean,beanDefinition);
        } catch (Exception e) {
            throw new BeansException("Instantiation of bean failed", e);
        }
        addSingleton(beanName,bean);
        return bean;
    }


    /**
     * 创建实例
     * @param beanName
     * @param beanDefinition
     * @param args
     * @return
     */
    protected Object createBeanInstance(String beanName, BeanDefinition  beanDefinition, Object[] args) {
        Constructor constructorToUse  = null;
        Class beanClass = beanDefinition.getBeanClass();
        Constructor[] declaredConstructors = beanClass.getDeclaredConstructors();
        for (Constructor ctor : declaredConstructors) {
            if (args != null && ctor.getParameterTypes().length == args.length) {
                constructorToUse  = ctor;
                break;
            }
        }
        return getInstantiationStrategy().instantiate(beanDefinition,beanName,constructorToUse,args);
    }


    /**
     * 属性填充
     * @param beanName
     * @param bean
     * @param beanDefinition
     */
    protected void applyPropertyvalues(String beanName, Object bean,BeanDefinition beanDefinition) {
        try {
            PropertyValues propertyValues = beanDefinition.getPropertyValues();
            for (PropertyValue propertyValue : propertyValues.getPropertyValues()) {
                String name = propertyValue.getName();
                Object value = propertyValue.getValue();

                if (value instanceof BeanReference) {
                    // 获取 依赖的对象实例化
                    BeanReference beanReference = (BeanReference) value;
                    value = getBean(beanReference.getBeanName());
                }
                BeanUtil.setFieldValue(bean, name, value);
            }
        } catch (BeansException e) {
            throw new BeansException("Error setting property values:" + beanName);
        }
    }

    /**
     * 获取实例化策略
     * @return
     */
    public InstantiationStrategy getInstantiationStrategy() {
        return instantiationStrategy;
    }

    // 定义实例化策略
    public void setInstantiationStrategy(InstantiationStrategy instantiationStrategy) {
        this.instantiationStrategy = instantiationStrategy;
    }
}
这个类的内容稍微有点长,主要包括三个方法:createBean、createBeanInstance、applyPropertyValues,这里我们主要关注 createBean 的方法中调用的 applyPropertyValues 方法。
1、在 applyPropertyValues 中,通过获取 beanDefinition.getPropertyValues() 循环进行属性填充操作,如果遇到的是 BeanReference,那么就需要递归获取 Bean 实例,调用 getBean 方法。
2、当把依赖的 Bean 对象创建完成后,会递归回现在属性填充中。这里需要注意我们并没有去处理循环依赖的问题,这部分内容较大,后续补充。
3、BeanUtil.setFieldValue(bean, name, value) 是 hutool-all 工具类中的方法,你也可以自己实现
二、测试
1、准备
public class UserDao {

    private static Map<String, String> hashMap = new HashMap<>();

    static {
        hashMap.put("10001", "ljc");
        hashMap.put("10002", "yaya");
        hashMap.put("10003", "zz");
    }

    public String queryUserName(String uId) {
        return hashMap.get(uId);
    }
}
public class UserService {

    private String uId;

    private UserDao userDao;


    public void queryUserInfo(){
        System.out.println("查询用户信息:" + userDao.queryUserName(uId));
    }


    public String getuId() {
        return uId;
    }

    public void setuId(String uId) {
        this.uId = uId;
    }

    public UserDao getUserDao() {
        return userDao;
    }

    public void setUserDao(UserDao userDao) {
        this.userDao = userDao;
    }
}
2、测试案例
public class ApiTest {

    @Test
    public void test_BeanFactory() {
        // 1、初始化 BeanFactory
        DefaultListableBeanFactory beanFactory = new DefaultListableBeanFactory();
        // 2、userDao 注册bean定义
        beanFactory.registerBeanDefinition("userDao",new BeanDefinition(UserDao.class));
        // 3、userService设置属性
        PropertyValues propertyValues = new PropertyValues();
        propertyValues.addPropertyValue(new PropertyValue("uId","10002"));
        propertyValues.addPropertyValue(new PropertyValue("userDao",new BeanReference("userDao")));
        // 4 、userService注入bean
        BeanDefinition beanDefinition = new BeanDefinition(UserService.class,propertyValues);
        beanFactory.registerBeanDefinition("userService", beanDefinition);
        // 5、获取 bean
        UserService userService = (UserService) beanFactory.getBean("userService");
        userService.queryUserInfo();
    }


}
1、与直接获取 Bean 对象不同,这次我们还需要先把 userDao 注入到 Bean 容器中。
beanFactory.registerBeanDefinition("userDao", new BeanDefinition(UserDao.class));
2、接下来就是属性填充的操作了,一种是普通属性 new PropertyValue(“uId”, “10001”),另外一种是对象属性 new PropertyValue(“userDao”,new BeanReference(“userDao”))
3、接下来的操作就简单了,只不过是正常获取 userService 对象,调用方法即可。
3、测试结果
查询用户信息:yaya

Process finished with exit code 0
最后
以上就是笑点低红牛最近收集整理的关于手写Spring4(Spring属性填充)目标设计思路项目结构一、实现二、测试的全部内容,更多相关手写Spring4(Spring属性填充)目标设计思路项目结构一、实现二、测试内容请搜索靠谱客的其他文章。


发表评论 取消回复