目录
- 使用docker搭建elk
- filebeat安装与配置
- docker容器设置
- 参考文章
- 首发地址
使用docker搭建elk
1、使用docker-compose文件构建elk。文件如下:
version: '3'
services:
  elk:
    image: sebp/elk:640
    ports:
      - "5601:5601"
      - "9200:9200"
      - "5044:5044"
    environment:
      - ES_JAVA_OPTS=-Xms512m -Xmx512m
    volumes:
      - ~dockerdata/elk:/var/lib/elasticsearch
2、执行docker-compose up -d 启动elk。可以使用docker logs 命令查看elk启动日志。启动成功后打开浏览器访问 http://127.0.0.1:5601
filebeat安装与配置
关于filebeat本文也不做过多介绍。只讲解安装与配置。
1、filebeat的docker-composep
version: '3'
services:
  filebeat:
    image: prima/filebeat:6
    #restart: always
    volumes:
      - ./config/filebeat.yml:/filebeat.yml
      - ~/dockerdata/filebeat:/data
      - /var/lib/docker/containers:/var/lib/docker/containers
挂载说明
- filebeat.yml配置需要在本地有对应文件,稍后会说到
- filebeat抓取日志进度数据,挂载到本地,防止filebeat容器重启,所有日志重新抓取
- 因为要收集docker容器的日志,所以要挂在到docker日志存储目录,使它有读取权限
2、filebeat配置文件设置
- 在docker-compose.yml同级目录新建config文件夹
- 在config文件下新建filebeat.yml文件,文件内容如下:
filebeat.prospectors:
- type: log
  enabled: true
  paths:
    - /var/lib/docker/containers/*/*.log #需要读取日志的目录#
  json.keys_under_root: true # 因为docker使用的log driver是json-file,因此采集到的日志格式是json格式,设置为true之后,filebeat会将日志进行json_decode处理
  json.add_error_key: true #如果启用此设置,则在出现JSON解组错误或配置中定义了message_key但无法使用的情况下,Filebeat将添加“error.message”和“error.type:json”键。
  json.message_key: log #一个可选的配置设置,用于指定应用行筛选和多行设置的JSON密钥。 如果指定,键必须位于JSON对象的顶层,且与键关联的值必须是字符串,否则不会发生过滤或多行聚合。
  tail_files: true
  # 将error日志合并到一行
  multiline.pattern: '^([0-9]{4}|[0-9]{2})-[0-9]{2}'
  multiline.negate: true
  multiline.match: after
  multiline.timeout: 10s
#  registry_file: /opt/filebeat/registry
#-------------------------- Elasticsearch output ------------------------------
# 直接输出到elasticsearch,这里的hosts是elk地址,端口号是elasticsearch端口#
output.elasticsearch:
  hosts: ["10.9.70.62:9200"]

#==================== Elasticsearch template setting ==========================

setup.template.name: "filebeat.template.json"
setup.template.fields: "filebeat.template.json"
setup.template.overwrite: true
setup.template.enabled: false

# 过滤掉一些不必要字段#
processors:
- drop_fields:
fields: ["input_type", "offset", "stream", "beat"]- 在config文件下新建filebeat.template.json文件,文件内容如下:
{
  "mappings": {
    "_default_": {
      "_all": {
        "norms": false
      },
      "_meta": {
        "version": "5.1.2"
      },
      "dynamic_templates": [
        {
          "strings_as_keyword": {
            "mapping": {
              "ignore_above": 1024,
              "type": "keyword"
            },
            "match_mapping_type": "string"
          }
        }
      ],
      "properties": {
        "@timestamp": {
          "type": "date"
        },
        "beat": {
          "properties": {
            "hostname": {
              "ignore_above": 1024,
              "type": "keyword"
            },
            "name": {
              "ignore_above": 1024,
              "type": "keyword"
            },
            "version": {
              "ignore_above": 1024,
              "type": "keyword"
            }
          }
        },
        "input_type": {
          "ignore_above": 1024,
          "type": "keyword"
        },
        "message": {
          "norms": false,
          "type": "text"
        },
        "meta": {
          "properties": {
            "cloud": {
              "properties": {
                "availability_zone": {
                  "ignore_above": 1024,
                  "type": "keyword"
                },
                "instance_id": {
                  "ignore_above": 1024,
                  "type": "keyword"
                },
                "machine_type": {
                  "ignore_above": 1024,
                  "type": "keyword"
                },
                "project_id": {
                  "ignore_above": 1024,
                  "type": "keyword"
                },
                "provider": {
                  "ignore_above": 1024,
                  "type": "keyword"
                },
                "region": {
                  "ignore_above": 1024,
                  "type": "keyword"
                }
              }
            }
          }
        },
        "offset": {
          "type": "long"
        },
        "source": {
          "ignore_above": 1024,
          "type": "keyword"
        },
        "tags": {
          "ignore_above": 1024,
          "type": "keyword"
        },
        "type": {
          "ignore_above": 1024,
          "type": "keyword"
        }
      }
    }
  },
  "order": 0,
  "settings": {
    "index.refresh_interval": "5s"
  },
  "template": "filebeat-*"
}
- 执行docker-compose up -d 启动filebeat。
在需要抓取docker日志的所有主机上按照以上步骤安装运行filebeat即可。到这一步其实就已经可以在elk里面建立索引查抓取到的日志。但是如果docker容器很多的话,没有办法区分日志具体是来自哪个容器,所以为了能够在elk里区分日志来源,需要在具体的docker容器上做一些配置,接着看下面的内容
docker容器设置
可以给具体的docker容器增加labels,并且设置logging。参考以下docker-compose.yml
version: '3'
services:
  db:
    image: mysql:5.7
    # 设置labels
    labels:
      service: db
    # logging设置增加labels.service
    logging:
      options:
        labels: "service"
    ports:
      - "3306:3306"
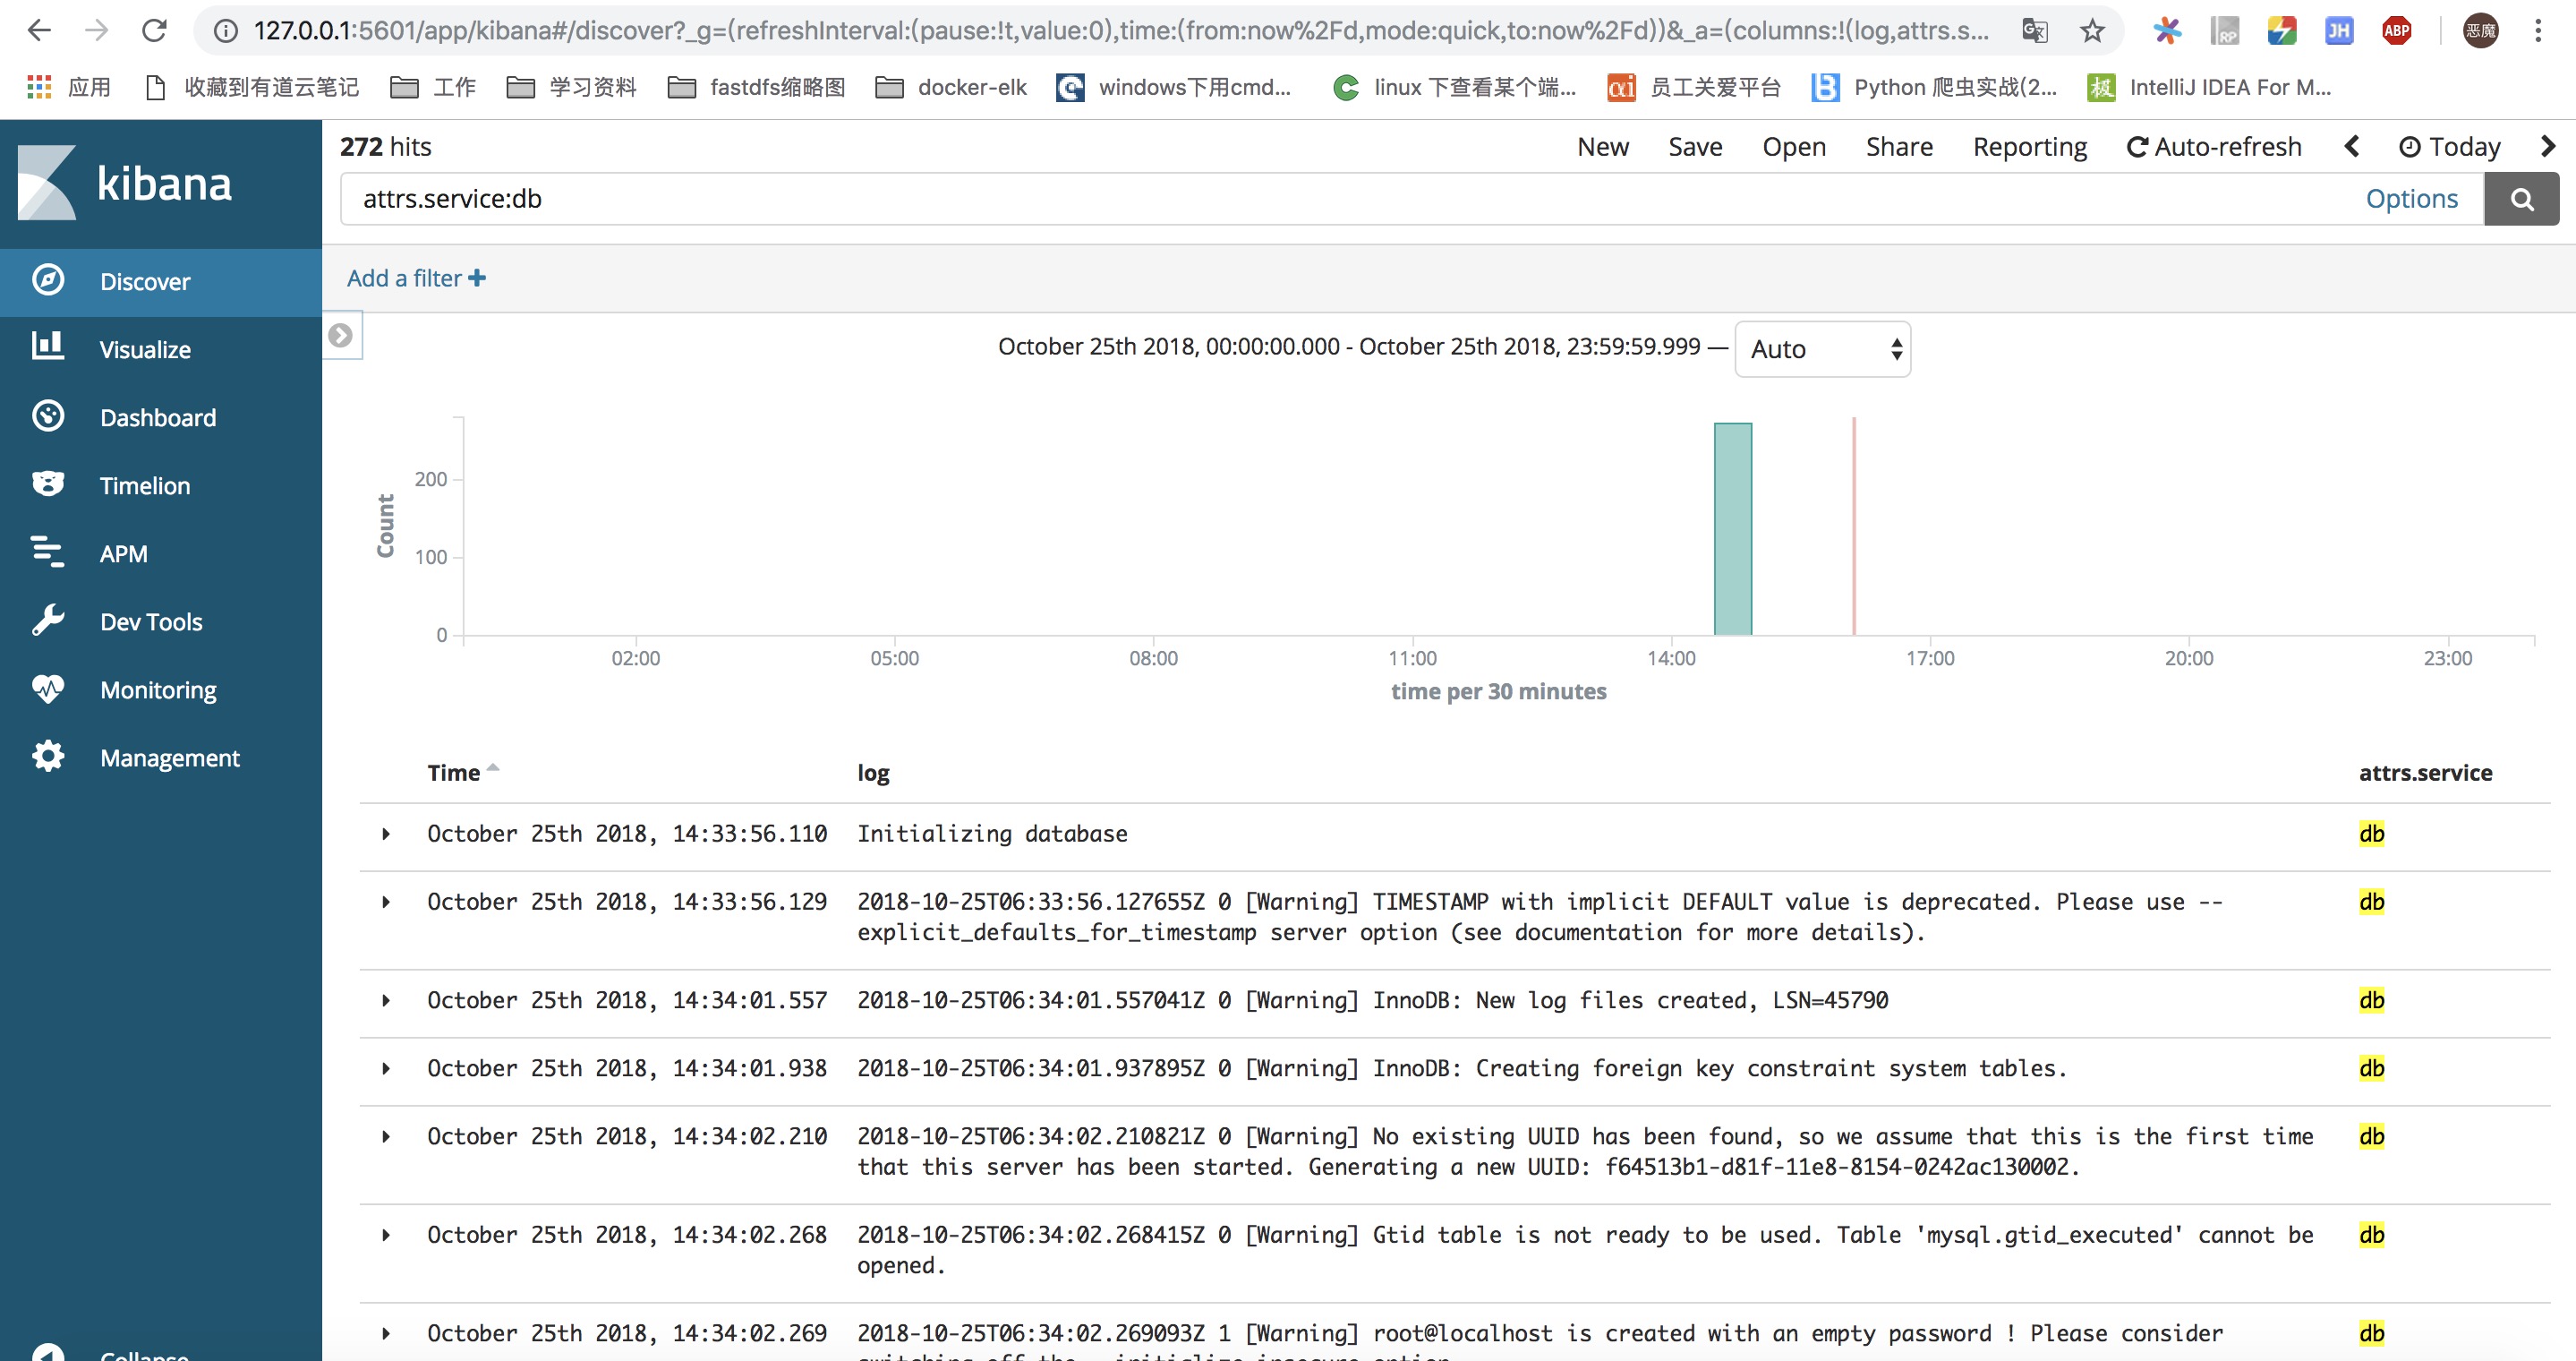
重新启动应用,然后访问http://127.0.0.1:5601 重新添加索引。查看日志,可以增加过滤条件 attrs.service:db,此时查看到的日志就全部来自db容器。结果如下图所示:
参考文章
采集docker-container日志
Beats详解(四)
首发地址
http://www.devzxd.top/2018/10/25/elk-filebeat-dockerlogs.html
转载于:https://www.cnblogs.com/devzxd/p/9982130.html
最后
以上就是笨笨山水最近收集整理的关于elk-filebeat收集docker容器日志使用docker搭建elkfilebeat安装与配置docker容器设置参考文章首发地址的全部内容,更多相关elk-filebeat收集docker容器日志使用docker搭建elkfilebeat安装与配置docker容器设置参考文章首发地址内容请搜索靠谱客的其他文章。


发表评论 取消回复