本系列文章将为大家总结如何快速使用ListView以及做到高效的ListView,本篇博文介绍ListView的基本使用
ListView&Adapter
ListView是Android中用来显示一个列表的数据的控件,几乎大部分的应用都会用到,它以列表的形式展示具体内容,并且能够根据数据的长度自适应显示,ListView继承至AdapterView,它的展示是要通过一个adapter来完成,adapter里面装载数据,ListView再通过adapter的数据来进行每一个Item的展示。如下图:
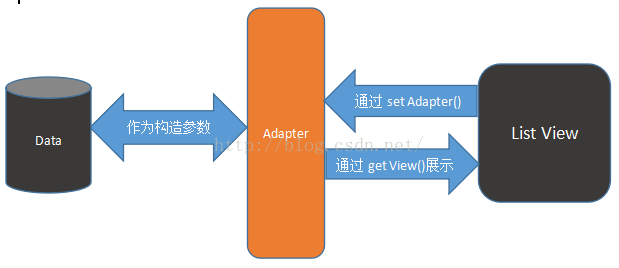
Adapter在ListView的使用中起着至关重要的作用。它是ListView展示与后台数据之间的桥梁。因此,ListView的基本使用包括以下几步:
1.创建或获得数据,包括图片或者文字内容
2.构建一个adapter,将数据作为adapter的构造参数传进去
3.创建一个ListView,通过setAdapter(adapter)将构造好的adapter设置给ListView
ArrayAdapter的使用
下面以ArrayAdapter作为适配器为例
activity_main.xml:
<?xml version="1.0" encoding="utf-8"?>
<LinearLayout xmlns:android="http://schemas.android.com/apk/res/android"
    android:layout_width="match_parent"
    android:layout_height="match_parent"
    android:orientation="vertical" >

    <ListView
        android:id="@+id/mylistview"
        android:layout_width="fill_parent"
        android:layout_height="fill_parent">
    </ListView>

</LinearLayout>
1.创建或获得数据
private List<String> getData(){

        List<String> data = new ArrayList<String>();
	data.add("第一项数据");
        data.add("第二项数据");
        data.add("第三项数据");
        data.add("第四项数据");

        return data;
}
定义这样一个方法用来获取数据,即要显示在listview上的内容
2.构建一个adapter,将数据作为adapter的构造参数传进去
ArrayAdapter<String> adapter = new ArrayAdapter<String>(getContext(), android.R.layout.simple_list_item_1,getData());三个参数分别代表:
getContext()【传入当前listview所在的上下文对象】
android.R.layout.simple_list_item_1 【每一个列表项的布局,这里的demo使用Android系统自带的布局】
getData() 【传入一个List<String>对象,这里使用第一步获取到数据在进行填充】
3.创建一个ListView,通过setAdapter(adapter)将构造好的adapter设置给ListView
ListView mylistview = (ListView)this.findViewById(R.id.mylistview);
mylistview.setAdapter(adapter);
运行结果:
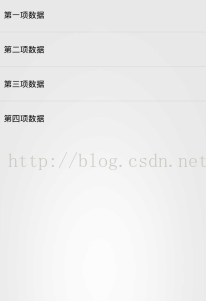
可以看到一个最简单的列表,每个列表项只有一条文本数据,但你会发现,我们只能将数据展示,无法更改文字的大小或颜色等,接下来我们再将其改造一下,通过自定义布局来构造adapter:
首先创建一个布局文件list_item.xml:
<?xml version="1.0" encoding="utf-8"?>
<LinearLayout xmlns:android="http://schemas.android.com/apk/res/android"
    android:layout_width="match_parent"
    android:layout_height="match_parent"
    android:orientation="vertical" >

    <TextView
        android:id="@+id/list_item_text"
        android:layout_width="wrap_content"
        android:layout_height="wrap_content"
        android:paddingTop="20dp"
        android:paddingBottom="20dp"
        android:paddingLeft="10dp"
        android:textColor="#32A082"/>

</LinearLayout>
修改一下adapter的构造函数:
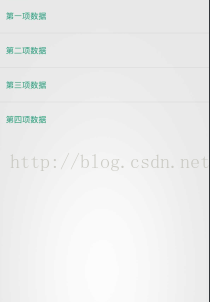
ArrayAdapter<String> adapter = new ArrayAdapter<String>(getActivity().getApplicationContext(), R.layout.list_item, R.id.list_item_text,getData());这里多添加了一个参数,这个参数是布局文件中textView所对应的id
运行结果:
SimpleAdapter的使用
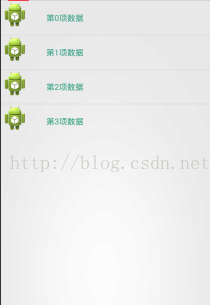
使用ArrayAdapter虽然简单,但是它还是不能够满足我们的需求,大部分情况下,列表的内容不仅仅是文字,而是有图片、图标、多选框等各种控件的搭配,这种情况下就要用到另外一种常见的Adapter——SimpleAdapter.先在布局文件中添加一个ImageView:
<?xml version="1.0" encoding="utf-8"?>
<LinearLayout xmlns:android="http://schemas.android.com/apk/res/android"
    android:layout_width="match_parent"
    android:layout_height="match_parent"
    android:orientation="horizontal" >

    <ImageView
        android:id="@+id/list_item_image"
        android:layout_width="wrap_content"
        android:layout_height="wrap_content"
        android:layout_marginRight="15dp"/>

    <TextView
        android:id="@+id/list_item_text"
        android:layout_width="wrap_content"
        android:layout_height="wrap_content"
        android:paddingTop="20dp"
        android:paddingBottom="20dp"
        android:paddingLeft="10dp"
        android:textColor="#32A082"/>

</LinearLayout>
由于SimpleAdapter的构造函数的参数是要求传入一个List<? extends Map<String, ?>>类型的数据集,所以getData方法也要修改一下:
public List<Map<String, Object>> getData(){
	List<Map<String, Object>> data = new ArrayList<Map<String,Object>>();
	for(int i=0; i<4; i++){
		Map<String, Object> map = new HashMap<String, Object>();
		map.put("image", R.drawable.ic_launcher);
		map.put("text", "第"+i+"项数据");
		data.add(map);
	}
        return data;
}
其中,每一个map代表着列表中每一行的数据,这里由于每一行只有一张图片和一个文本,所以只需要往map中put进两个键值
键是作为数据的标识,值是作为数据的内容。这里循环了4次添加了4行数据
数据构造完毕,接下来就是要构造SimpleAdapter并setAdapter:
adapter = new SimpleAdapter(getContext(), getData(), R.layout.list_item,
				new String[]{"image","text"},
				new int[]{R.id.list_item_image,R.id.list_item_text});
mylistview.setAdapter(adapter);
可以看到,SimpleAdapter的构造函数中有5个参数,它们分别代表:
getContext() 【传入当前listview所在的上下文对象】
R.layout.list_item 【每一个列表项的自定义布局】
getData() 【传入一个List<? extends Map<String, ?>>对象,这里使用上一步获取到数据在进行填充】
new String[]{"image","text"}【这里是一个字符串数组,注意元素要一一对应数据集中map对应的那些键】
new int[]{R.id.list_item_image,R.id.list_item_text}【这里一一对应每一行中每一个控件的资源ID】
运行结果:
ListView子控件的点击事件
在上面例子的基础上,再往布局文件中添加一个button:
<?xml version="1.0" encoding="utf-8"?>
<LinearLayout xmlns:android="http://schemas.android.com/apk/res/android"
    android:layout_width="match_parent"
    android:layout_height="match_parent"
    android:orientation="horizontal" >

    <ImageView
        android:id="@+id/list_item_image"
        android:layout_width="wrap_content"
        android:layout_height="wrap_content"
        android:layout_marginRight="15dp"/>

    <TextView
        android:id="@+id/list_item_text"
        android:layout_width="wrap_content"
        android:layout_height="wrap_content"
        android:paddingTop="20dp"
        android:paddingBottom="20dp"
        android:paddingLeft="10dp"
        android:textColor="#32A082"/>
    <Button
        android:id="@+id/list_item_btn"
        android:layout_width="wrap_content"
        android:layout_height="wrap_content"
        android:text="按钮"
        android:layout_marginLeft="15dp"/>

</LinearLayout>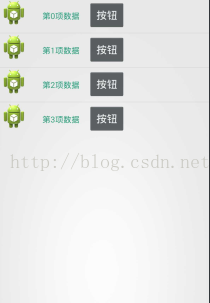
运行之后,每一个列表项都多加了一个按钮,但我们如何监听每一个按钮各自的onClick事件呢?直接在Activity中操作显然不可能,无法区别每一个button,所以adapter同样为我们提供了一个getView()方法,可以在这个方法中实现每一行的子控件的监听事件。
首先,先建一个自定义Adapter类继承于SimpleAdapter(其它比如BaseAdapter等也可以,都有getView方法),重写其getCount()、getItem()、getItemtId()、getView()等方法,代码如下:
public class ListViewAdapter extends SimpleAdapter{

	private Context context;

	private List<Map<String,Object>> data;

	public ListViewAdapter(Context context,
			List<Map<String, Object>> data, int resource, String[] from,
			int[] to) {
		super(context, data, resource, from, to);
		// TODO Auto-generated constructor stub
		this.context = context;
		this.data = data;
	}
	//返回数据的大小,即listview的行数
	@Override
	public int getCount() {
		// TODO Auto-generated method stub
		return data.size();
	}
	//根据下标获得某一行的数据
	@Override
	public Object getItem(int position) {
		// TODO Auto-generated method stub
		return data.get(position);
	}
	//获得指定的Item的下标
	@Override
	public long getItemId(int position) {
		// TODO Auto-generated method stub
		return position;
	}


	@Override
	public View getView(final int position, View convertView, ViewGroup parent) {
		// TODO Auto-generated method stub

		View v = super.getView(position, convertView, parent);
		Button btn = (Button)v.findViewById(R.id.list_item_btn);
		btn.setOnClickListener(new OnClickListener() {

			@Override
			public void onClick(View arg0) {
				// TODO Auto-generated method stub

				Toast.makeText(context, "点击了第"+position+"项", 1000).show();
			}
		});
		return v;
	}

}
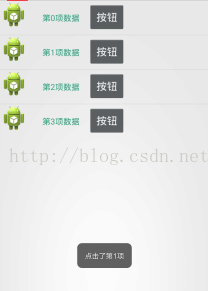
代码分析:重点在于getView这个方法,它相当于重绘ListView每一行的元素,通过调用父类的getView()方法,获得每一行的View的句柄,然后就可以根据这个句柄通过findViewById()来获得list_item布局文件中的各个控件了,这里为每一行的按钮设置点击事件,并显示当前点击的是哪一行(position代表的正是当前行的下标)
当然,还需要使用我们定义好的adapter类:
adapter = new ListViewAdapter(getActivity().getApplicationContext(), getData(), R.layout.list_item,
				new String[]{"image","text"},
				new int[]{R.id.list_item_image,R.id.list_item_text});
		mylistview.setAdapter(adapter);
运行结果:
ListView焦点抢夺问题
运行以上demo时,你会发现点击按钮虽然有反应了,但是ListView的每一行的点击事件却失效了,这是由于Android规定了:一旦自定义listitem里面含有子控件例如按钮、下拉框等等的话默认是子控件获得焦点,因此此时点击listitem时是无效的,所以应该在listItem的最底层那个父布局上面加上:android:descendantFocusability="blocksDescendants"【表示会覆盖子类控件而直接获得焦点】

再次运行,就会发现子控件的点击事件有效果,每个ListItem的点击事件也有效果。
至此,我们就可以通过自定义形形色色的布局文件来构造我们的listView了,并且可以实现各自的监听事件,这就是关于ListView的基本使用方式了,我在以后的博文中整合有关ListView的优化,希望对大家有所帮助。
最后
以上就是哭泣斑马最近收集整理的关于Android ListView基础篇本系列文章将为大家总结如何快速使用ListView以及做到高效的ListView,本篇博文介绍ListView的基本使用 ListView&AdapterArrayAdapter的使用SimpleAdapter的使用ListView子控件的点击事件ListView焦点抢夺问题的全部内容,更多相关Android内容请搜索靠谱客的其他文章。


发表评论 取消回复