算法思想
- 训练阶段: 分类器只保存下所有的成对训练数据
- 预测阶段: 分类器计算测试图片和所有训练数据的距离,选择K个最相近的图片,通过投票预测该图片的分类
- 交叉验证: 通过交叉验证选择最佳的K
加载数据集
# Load the raw CIFAR-10 data.
cifar10_dir = 'cs231n/datasets/cifar-10-batches-py'

# Cleaning up variables to prevent loading data multiple times (which may cause memory issue)
try:
   del X_train, y_train
   del X_test, y_test
   print('Clear previously loaded data.')
except:
   pass

X_train, y_train, X_test, y_test = load_CIFAR10(cifar10_dir)

# As a sanity check, we print out the size of the training and test data.
print('Training data shape: ', X_train.shape)
print('Training labels shape: ', y_train.shape)
print('Test data shape: ', X_test.shape)
print('Test labels shape: ', y_test.shape)
输出:
Training data shape: (50000, 32, 32, 3)
Training labels shape: (50000,)
Test data shape: (10000, 32, 32, 3)
Test labels shape: (10000,)
训练数据是5万张32*32的图片
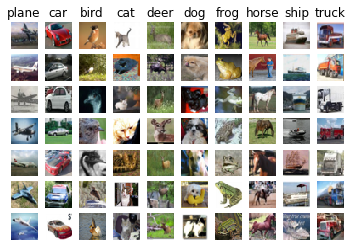
数据可视化
# Visualize some examples from the dataset.
# We show a few examples of training images from each class.
classes = ['plane', 'car', 'bird', 'cat', 'deer', 'dog', 'frog', 'horse', 'ship', 'truck']
num_classes = len(classes)
samples_per_class = 7
for y, cls in enumerate(classes):
    idxs = np.flatnonzero(y_train == y) # 类别为Y的下标
    idxs = np.random.choice(idxs, samples_per_class, replace=False) # 从中选择samples_per_class个
    for i, idx in enumerate(idxs):
        plt_idx = i * num_classes + y + 1
        plt.subplot(samples_per_class, num_classes, plt_idx)
        plt.imshow(X_train[idx].astype('uint8'))
        plt.axis('off')
        if i == 0:
            plt.title(cls)
plt.show()
输出:
Subsample - 抽样
从训练数据中抽取5000张用于训练
从测试数据中抽取500张用于测试
将每个图片张成一维向量 32323 -> 3072
# Subsample the data for more efficient code execution in this exercise
num_training = 5000
mask = list(range(num_training))
X_train = X_train[mask]
y_train = y_train[mask]

num_test = 500
mask = list(range(num_test))
X_test = X_test[mask]
y_test = y_test[mask]

# Reshape the image data into rows
X_train = np.reshape(X_train, (X_train.shape[0], -1))
X_test = np.reshape(X_test, (X_test.shape[0], -1))
print(X_train.shape, X_test.shape)
输出:
(5000, 3072) (500, 3072)
计算距离
计算每个测试向量和每个训练数据的L2距离
最终得到的矩阵是(500, 5000)
1. 二重循环版本:
def compute_distances_two_loops(self, X):
	num_test = X.shape[0]
    num_train = self.X_train.shape[0]
    dists = np.zeros((num_test, num_train))
    for i in range(num_test):
    	for j in range(num_train):
        	dists[i][j] = np.sqrt(np.sum(np.square(self.X_train[j, :] - X[i, :])))
    return dists
2. 一重循环版本:
def compute_distances_one_loop(self, X):
	num_test = X.shape[0]
    num_train = self.X_train.shape[0]
    dists = np.zeros((num_test, num_train))

    for i in range(num_test):
		dists[i, :] = np.sqrt(np.sum(np.square(self.X_train - X[i, :]), axis = 1))

    return dists
在这里self.X_train是(5000, 3072), X[i, :]是(3072, )
根据Python中广播机制的原理,会将后者扩展为(5000, 3072),然后每一行都做相应的减法。
然后每行做平方和,得到一个(5000, )的向量,填充到对应的dists[i, :]中
3. 无循环,向量化版本:
   def compute_distances_no_loops(self, X):
        num_test = X.shape[0]
        num_train = self.X_train.shape[0]
        dists = np.zeros((num_test, num_train))

        dists = np.multiply(np.dot(X, self.X_train.T), -2)
        sq1 = np.sum(np.square(X),axis=1,keepdims = True)
        sq2 = np.sum(np.square(self.X_train),axis=1)
        dists = np.add(dists,sq1)
        dists = np.add(dists,sq2)
        dists = np.sqrt(dists)

        return dists
将计算L2距离的公式拆分为3个矩阵的相加,其中两个是各自特征的平方和,一个是两个矩阵的点乘结果,详细的证明过程见附录。
dists矩阵可视化
每一行代表测试图片与训练图片间的距离
plt.imshow(dists, interpolation='none')
plt.show()
输出:

Cross-validation
通过交叉验证选取合适的参数K,采用5折交叉,每次用4组做训练集,1组做验证集。
num_folds = 5
k_choices = [1, 3, 5, 8, 10, 12, 15, 20, 50, 100]

X_train_folds = []
y_train_folds = []

X_train_folds = np.array_split(X_train, num_folds) # 在这里分成了5份
y_train_folds = np.array_split(y_train, num_folds)

k_to_accuracies = {}

classifier = KNearestNeighbor()

for k in k_choices:
    accuracies = []
    for fold in range(num_folds):
        temp_X = X_train_folds[:]
        temp_Y = y_train_folds[:]
        X_val_fold = temp_X.pop(fold)  # 取验证集
        Y_val_fold = temp_Y.pop(fold)
        temp_X = np.array([y for x in temp_X for y in x]) # 将训练集展开为1维
        temp_Y = np.array([y for x in temp_Y for y in x])

        classifier.train(temp_X, temp_Y)
        y_val_pred = classifier.predict(X_val_fold, k = k)
        num_correct = np.sum(y_val_pred == Y_val_fold)
        accuracies.append(num_correct / Y_val_fold.shape[0])
    k_to_accuracies[k] = accuracies


# *****END OF YOUR CODE (DO NOT DELETE/MODIFY THIS LINE)*****

# Print out the computed accuracies
for k in sorted(k_to_accuracies):
    for accuracy in k_to_accuracies[k]:
        print('k = %d, accuracy = %f' % (k, accuracy))
Inline Question 1
-
What in the data is the cause behind the distinctly bright rows?
训练数据中,没有和测试数据相近的。
-
What causes the columns?
测试数据中,没有和训练数据相近的。
Inline Question 2
下面的数据预处理做法中,会对L1距离产生影响的
- Subtracting the mean ????
- Subtracting the per pixel mean u i j u_{ij} uij
- Subtracting the mean ???? and dividing by the standard deviation σ sigma σ
- Subtracting the pixel-wise mean u i j u_{ij} uij and dividing by the pixel-wise standard deviation σ i j sigma_{ij} σij
- Rotating the coordinate axes of the data.
在1、2中,对数据进行减平均值,相当于把数据平移到了原点附近,不改变L1距离。
在3、4中,对数据进行平移之后,再进行压缩,会在L1距离中乘一个系数,改变了L1距离,但是不改变数据点之间的相对大小。
5中对坐标轴进行旋转会改变L1距离,但是不改变L2距离。
Inline Question 3
下面哪些说法是正确的
- The decision boundary of the k-NN classifier is linear.
决策边界不是线性的 - The training error of a 1-NN will always be lower than that of 5-NN.
KNN算法没有训练的过程,所以不存在训练误差 - The test error of a 1-NN will always be lower than that of a 5-NN.
测试误差不一定K越大越好,例如过拟合 - The time needed to classify a test example with the k-NN classifier grows with the size of the training set.
K的增大,每次需要看的数据越多,所以时间一定是多的
附录-L2距离向量化证明
L2距离向量化证明
最后
以上就是帅气自行车最近收集整理的关于[cs231n] Assignment1-KNN的全部内容,更多相关[cs231n]内容请搜索靠谱客的其他文章。


![[cs231n] Assignment1-KNN](https://www.shuijiaxian.com/files_image/reation/bcimg13.png)


发表评论 取消回复