一、springboot+mybatis整合redis cluster整合流程图

二、springboot+mybatis整合redis cluster具体实现
2.1 创建springboot+mybatis项目,引入jar
<!--springboot整合redis jar  开始-->
<dependency>
    <groupId>org.springframework.boot</groupId>
    <artifactId>spring-boot-starter-data-redis</artifactId>
</dependency>
<dependency>
    <groupId>redis.clients</groupId>
    <artifactId>jedis</artifactId>
</dependency>
<!--springboot整合redis jar  结束-->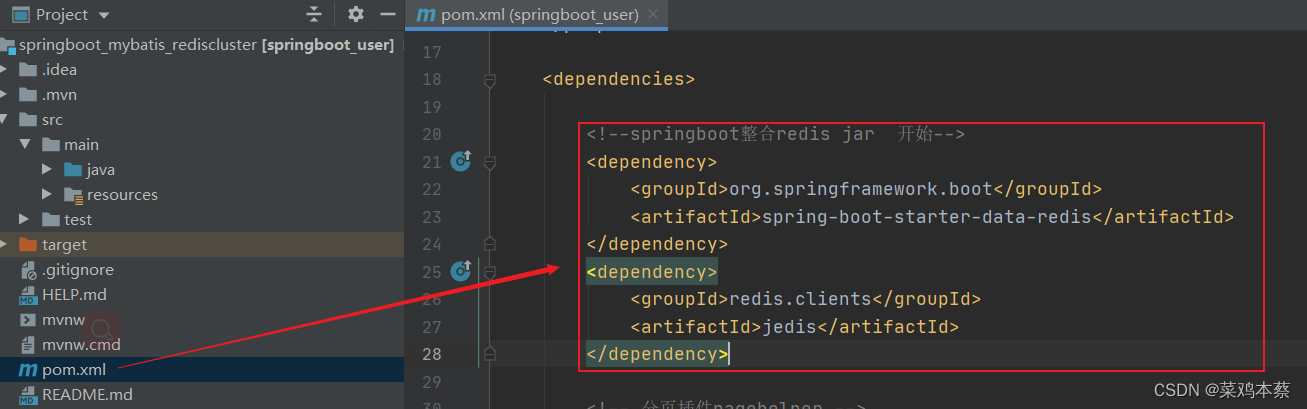
2.2 配置连接redis数据源
在resources文件夹下 添加一个配置 project.properties配置文件
# redis 数据源配置   springboot+mybatis+redis cluster

# 最大能够保持空闲状态的连接数
redis.maxIdle=2000

#最大连接数
redis.maxTotal=20000

#最大的等待是时长  毫秒
redis.maxWaitMillis=20000

# 当调用borrow object方法时,是否进行有效性检查
redis.testOnBorrow=false

# 集群节点配置    对应redis服务器创建的集群模式中的IP和端口
redis.nodes=192.168.140.41:8001,192.168.140.41:8002,192.168.140.42:8003,192.168.140.43:8004,192.168.140.43:8005,192.168.140.43:8006
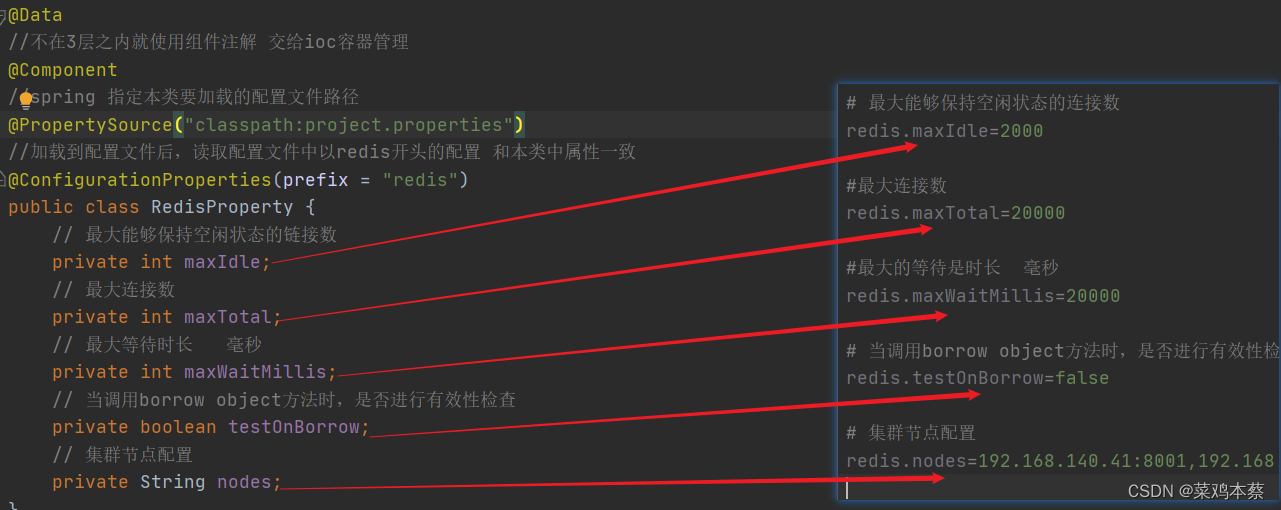
2.3 springboot加载自定义配置文件
创建一个property文件夹存放自定义配置文件
配置文件
package com.aaa.springboot.property;
import lombok.Data;
import org.springframework.boot.context.properties.ConfigurationProperties;
import org.springframework.context.annotation.PropertySource;
import org.springframework.stereotype.Component;

/**
 * @author :caicai
 * @date :Created in 2022/8/12 13:30
 * @description: redis配置属性类(springboot加载自定义配置文件)
 * @modified By:
 * @version:
 */
@Data
//不在3层之内就使用组件注解 交给ioc容器管理
@Component
//spring 指定本类要加载的配置文件路径
@PropertySource("classpath:project.properties")
//加载到配置文件后,读取配置文件中以redis开头的配置 和本类中属性一致
@ConfigurationProperties(prefix = "redis")
public class RedisProperty {
    // 最大能够保持空闲状态的链接数
    private int maxIdle;
    // 最大连接数
    private int maxTotal;
    // 最大等待时长   毫秒
    private int maxWaitMillis;
    // 当调用borrow object方法时,是否进行有效性检查
    private boolean testOnBorrow;
    // 集群节点配置
    private String nodes;
}
2.4 配置rediscluster-config 使用配置连接配置数据源
使用spring-boot-starter-data-redis中提供的JedisConnectionFactory 连接redis集群
package com.aaa.springboot.config;
import com.aaa.springboot.property.RedisProperty;
import com.aaa.springboot.util.MyCustomCache;
import org.springframework.context.annotation.Bean;
import org.springframework.context.annotation.Configuration;
import org.springframework.data.redis.connection.RedisClusterConfiguration;
import org.springframework.data.redis.connection.RedisNode;
import org.springframework.data.redis.connection.jedis.JedisConnectionFactory;
import redis.clients.jedis.JedisPoolConfig;

import javax.annotation.Resource;

@Configuration  // 相当于 redis-cluster-config.xml   <bean></bean>
public class RedisClusterConfig {
    // 依赖注入
    @Resource
    private RedisProperty redisProperty;


    /**
     *  配置JedisConnectionFactory redis连接工厂
     * @return
     */
    @Bean   //<bean id=jedisConnectionFactory class =org.springframework.data.redis.connection.jedis.JedisConnectionFactory>
    public JedisConnectionFactory jedisConnectionFactory(){
        // 实例化对象  使用redis 集群 + redis连接池
        // RedisClusterConfiguration clusterConfig, JedisPoolConfig poolConfig
        JedisConnectionFactory jedisConnectionFactory = new JedisConnectionFactory(clusterConfig(),poolConfig());

        // 返回对象
        return jedisConnectionFactory;
    }


    /**
     * 初始化 RedisClusterConfiguration   redis 集群配置
     * @return
     */
    @Bean
    public RedisClusterConfiguration clusterConfig() {
        // 实例化
        RedisClusterConfiguration redisClusterConfiguration = new RedisClusterConfiguration();

        // 192.168.140.41:8001,192.168.140.41:8002,192.168.140.42:8003,192.168.140.43:8004,192.168.140.43:8005,192.168.140.43:8006
        String nodes = redisProperty.getNodes();
        // nodesArray=["192.168.140.41:8001","192.168.140.41:8002","192.168.140.42:8003",....]
        String[] nodesArray = nodes.split(",");

        // 对节点集合进行遍历
        for (String node : nodesArray) {
            // node: 第一次:"192.168.140.41:8001"  第二次  "192.168.140.41:8002"
            // 在次分割  获取ip 和 端口
            String[] nodeip = node.split(":");
            // 实例化节点
            RedisNode redisNode = new RedisNode(nodeip[0], Integer.valueOf(nodeip[1]));
            // 添加节点到集群配置类中
            redisClusterConfiguration.addClusterNode(redisNode);
        }
        return redisClusterConfiguration;
    }


    /**
     *  初始化JedisPoolConfig  redis连接池配置
     * @return
     */
    @Bean
    public JedisPoolConfig poolConfig() {
        // 实例化连接池配置
        JedisPoolConfig jedisPoolConfig = new JedisPoolConfig();

        jedisPoolConfig.setMaxIdle(redisProperty.getMaxIdle());
        jedisPoolConfig.setMaxTotal(redisProperty.getMaxTotal());
        jedisPoolConfig.setTestOnBorrow(redisProperty.isTestOnBorrow());
        jedisPoolConfig.setMaxWaitMillis(redisProperty.getMaxWaitMillis());
        return jedisPoolConfig;
    }


    /**
     *   特殊的bean配置  在springboot启动时也会被执行
     *   没有返回值,目的是调用静态注入方法,把当前配置完成的jedisConnectionFactory
     *   赋值给MyCustomCache中的属性
     */
    @Bean
    public void setJCF(){
        // 调用MyCustomCache 静态方法,把jedisConnectionFactory注入进去
        MyCustomCache.setJedisConnectionFactory(jedisConnectionFactory());
    }

}
2.5 编写mybatis自定义缓存类
通过mybatis调用redis集群缓存。 实际使用的mybatis二级缓存,调用第三方缓存。
https://mybatis.net.cn/sqlmap-xml.html#cache
MyBatis 内置了一个强大的事务性(一旦进行CUD,缓存就会被清空)查询(只有查询有缓存)缓存机制,它可以非常方便地配置和定制。默认情况下,只启用了本地的会话缓存(只开启了一级缓存,无论想不想用,都是开启),它仅仅对一个会话中的数据进行缓存(一级缓存是基于SqlSession)。 要启用全局的二级缓存,只需要在你的 SQL 映射文件中添加一行(二级缓存需要自己开启,二级缓存是语句XxxMapper.xml) <cache>
<?xml version="1.0" encoding="UTF-8"?>
<!DOCTYPE mapper
        PUBLIC "-//mybatis.org//DTD Mapper 3.0//EN" "http://mybatis.org/dtd/mybatis-3-mapper.dtd">
<mapper namespace="com.aaa.springboot.dao.DeptDao">
    <!--    开启二级缓存-->
    <cache type="com.aaa.springboot.util.MyCustomCache"></cache>

    <select id="queryInfo" resultType="com.aaa.springboot.entity.DeptEntity">
        select * from tb_dept
        <where>
            <if test="dname!=null and dname!=''">
                and dname like concat("%",#{dname},"%")
            </if>
            <if test="loc!=null and loc!=''">
                and loc like concat("%",#{loc},"%")
            </if>
        </where>
    </select>


    <insert id="addInfo">
        insert into tb_dept(dname,loc) values (#{dname},#{loc})
    </insert>


    <update id="updateInfo">
        update tb_dept set dname=#{dname},loc=#{loc} where dept_no = #{deptNo}
    </update>


    <delete id="delInfo">
        delete from tb_dept where dept_no = #{deptNo}
    </delete>
</mapper>
mybatis 二级缓存详解:
1、所有 select 语句的结果将会被缓存 除非自己配置去掉缓存useCache="false"
2、所有 insert、update 和 delete 语句会刷新缓存。(增删改是改变数据库数据,改变之后一定要重新缓存)除非自己配置不刷新 flushCache="false"
3、缓存会使用最近最少使用算法(LRU, Least Recently Used)算法来清除不需要的缓存。(当1025个热点数据准备缓存时,先把缓存最近最少使用的踢出去)
默认策略可以通过 eviction="FIFO" 改为先进先出
4、缓存不会定时进行刷新(也就是说,没有刷新间隔)。如果想定时刷新(定时把所有缓存内容清空)配置flushInterval=""
5、缓存会保存列表或对象(无论查询方法返回哪种)的 1024 个引用(一共有多少个被缓存)。
6、缓存会被视为读/写缓存 (readOnly="false"),这意味着获取到的对象并不是共享的,可以安全地被调用者修改,而不干扰其他调用者或线程所做的潜在修改。
如果配置的是readOnly="false" 每次请求获取缓存数据时,缓存会把当前缓存的数据复制一份返回给调用或者线程,修改复制品,对原来缓存没有任何影响,
速度慢,但是安全性好。。。。 浪费内存
如果配置的是readOnly="true" 每一个请求获取缓存数据时,都是同一份数据,如果有请求改了,其他人拿到的也会被修改,速度快,因为没有复制品
但是安全性不好。。。 节省内存
编写缓存类
package com.aaa.springboot.util;

import org.apache.ibatis.cache.Cache;
import org.springframework.data.redis.connection.RedisConnection;
import org.springframework.data.redis.connection.jedis.JedisConnectionFactory;
import org.springframework.data.redis.serializer.JdkSerializationRedisSerializer;

import java.util.concurrent.locks.ReadWriteLock;
import java.util.concurrent.locks.ReentrantReadWriteLock;

/**
 * @author :caicai
 * @date :Created in 2022/8/12 14:18
 * @description:自定义的缓存类 用于调用第三方缓存(我们在这调用的是redis cluster 缓存)
 *              必须要实现 Cache接口
 * @version:
 */
public class MyCustomCache implements Cache {
    // 定义缓存对象的唯一识别  mybatis官网要求必须提供一个接收String参数作为id的构造器
    private String id;

    // 使用在springboot 启动时,加载配置文件
    // 实例化 jedisConnectionFactory 对象,来进行数据存入和获取及删除相关操作
    private static JedisConnectionFactory jedisConnectionFactory;

    // 实例话读写锁对象  多个请求同时对缓存中某一个操作时的策略
    private ReadWriteLock readWriteLock = new ReentrantReadWriteLock();

    // 无法使用正常注入,使用该对象 所以使用一个静态方法注入 给当前jedisConnectionFactory对象来赋值
    public static void setJedisConnectionFactory(JedisConnectionFactory jedisConnectionFactory){
        MyCustomCache.jedisConnectionFactory=jedisConnectionFactory;
    }


    /**
     * 提供一个接收有String参数 作为id的构造器(官网要求)
     * @return
     */
    public MyCustomCache(String id) {
        if (null == id){
            throw new RuntimeException("id不能为空,必须传递!!");
        }
        this.id = id;
    }


    /**
     *  获取缓存对象id
     * @return
     */
    @Override
    public String getId() {
        return this.id;
    }

    /**
     * 向redis集群中写入缓存对象
     * @param key
     * @param value
     */
    @Override
    public void putObject(Object key, Object value) {
        // 通过实例化连接redis集群的工厂类  获取一个redis连接  静态属性在非静态方法中可以直接使用  静态属性在类加载时就被放入到所有内存共享区域-方法区  所有对象都是共享
        RedisConnection connection = jedisConnectionFactory.getConnection();

        // 因为存储时存储的时字节数组类型  所以key 和 value 都要经过序列化
        // 使用springboot整合redis提供的序列化方式
        JdkSerializationRedisSerializer jdkSerializationRedisSerializer = new JdkSerializationRedisSerializer();

        // 使用该类,序列化 key 和 value  a=1 变为:aserialize =  1serialize
        byte[] serializeKey = jdkSerializationRedisSerializer.serialize(key);
        byte[] serializeValue = jdkSerializationRedisSerializer.serialize(value);

        // 通过RedisConnection 可以执行redis所有命令
        // 在此使用spring类型操作,向集群中存入数据  存入的key 和value都是序列化过的字节数组
        connection.set(serializeKey,serializeValue);

        // 这里面不要手动关闭连接,因为配置的有连接池,连接的使用和关闭由连接池来完成
        // connection.close();

    }

    /**
     *  通过 key 获取缓存对象
     * @param key
     * @return
     */
    @Override
    public Object getObject(Object key) {
        // 通过实例化连接 redis 集群的工厂类 获取一个redis 连接静态属性在非静态方法中可以直接使用  静态属性在类加载时就被放入到所有内存共享区域-方法区  所有对象都是共享
        RedisConnection connection = jedisConnectionFactory.getConnection();

        // 因为存储时存储的是自己数组类型  所以key 和 value 都要经过序列化
        // 使用springboot整合redis提供的序列化方式
        JdkSerializationRedisSerializer jdkSerializationRedisSerializer = new JdkSerializationRedisSerializer();

        // 序列化变字节数组   serializekey = a
        byte[] serializeKey = jdkSerializationRedisSerializer.serialize(key);

        //通过序列化的key获取到序列化后的值
        byte[] serializeValue = connection.get(serializeKey);

        // 反序列化后并返回   1serialize --> 1
        return jdkSerializationRedisSerializer.deserialize(serializeValue);
    }


    /**
     *  根据 key 删除缓存对象
     * @param key
     * @return
     */
    @Override
    public Object removeObject(Object key) {
        // 通过实例化连接 redis 集群的工厂类  获取一个redis 连接
        RedisConnection connection = jedisConnectionFactory.getConnection();


        // 使用springboot整合redis提供的序列化方式
        JdkSerializationRedisSerializer jdkSerializationRedisSerializer = new JdkSerializationRedisSerializer();

        // 序列 key 变为字节数组
        byte[] serializeKey = jdkSerializationRedisSerializer.serialize(key);

        // 删除时也要使用序列化后的key  这种写法当在大量缓存进行删除时,效率会低    每次都会执行删除
        // connection.del(serializeKey);

        // 设置该 key 失效  0为立马失效  立马失效,就获取不到,等同于删除    底层redis使用惰性删除  定期批量清理失效的key 批量操作,而不是一个一个操纵,提高效率
        return connection.expireAt(serializeKey,0);
    }


    /**
     *   清空所有缓存书库
     */
    @Override
    public void clear() {
        // 通过实例化连接redis集群的工厂类,获取一个redis连接   静态属性在非静态方法中可以直接使用  静态属性在类加载时就被放入到所有内存共享区域-方法区  所有对象都是共享
        RedisConnection connection = jedisConnectionFactory.getConnection();

        // flushDb redis 每个实例对象默认分为16库  清空当前库
        // connection.flushDb();

        // flushAll 清空所有库
        connection.flushAll();
    }

    /**
     *  获取当前缓存中对象数量
     * @return
     */
    @Override
    public int getSize() {
        // 通过实例化连接redis集群的工厂类,获取一个redis连接
        RedisConnection connection = jedisConnectionFactory.getConnection();

        // 使用 dbSize
        Long aLong = connection.dbSize();

        // 转为 int 类型,并返回
        return Integer.valueOf(aLong.toString());
    }

    /**
     *  缓存读写锁  (缓存读写策略)
     * @return
     */
    @Override
    public ReadWriteLock getReadWriteLock() {
        return readWriteLock;
    }
}
2.6 整合测试
1、注意所有的实体类必须序列化 (只要使用了mybatis二级缓存,就需要这么做)

2、 启动redis集群,使用客户端命令测试是否正常
使用脚本启动集群:
./shelldir/redis-start-stop.sh
使用客户端命令测试:
/usr/redis/bin/redis-cli -c -h 192.168.140.43 -p 8005
192.168.140.43:8005> cluster info 发现正常

3、启动sbm项目,使用swagger做查询 测试
http://localhost:16666/swagger-ui/index.html#/
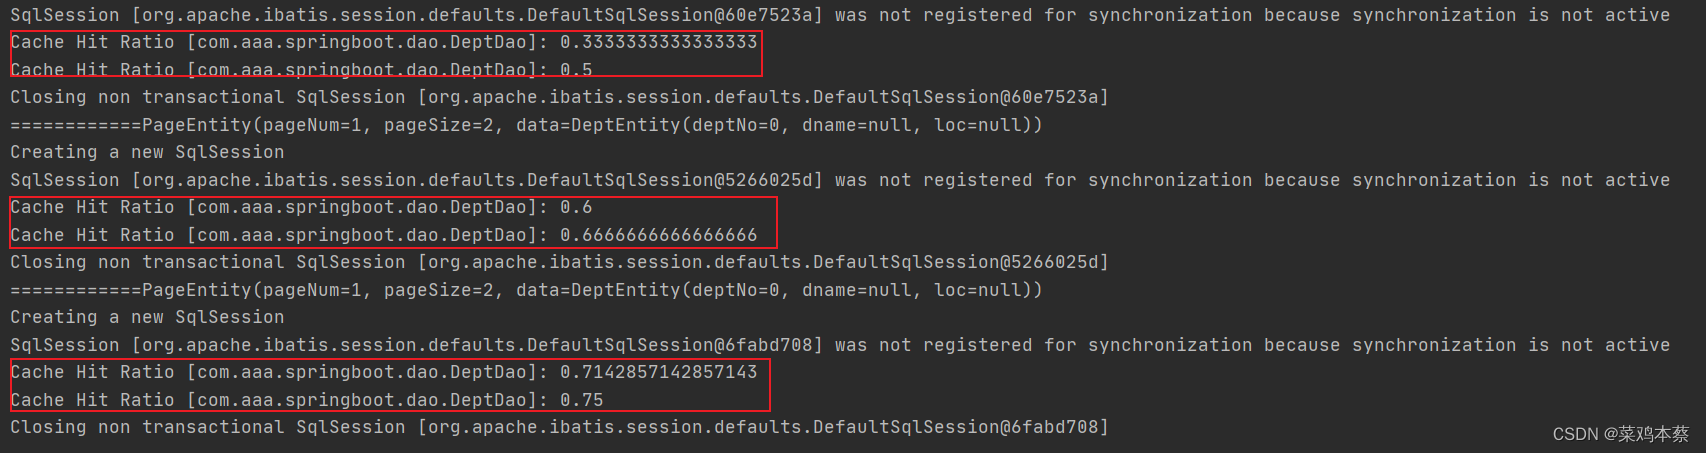
第一次请求时,在idea控制台可以看到执行语句(sql语句),说明是从数据获取

第二次: 清空控制台,再次请求,发现控制台就不再执行语句,而是看到cache hit Ratio 命中率
请求两次,从缓存中取了一次 1/2

第三次:2次从缓存中获取 2/3

第四次:3次从缓存中获取 3/4

。。。。。
4、查看缓存是否存在
/usr/redis/bin/redis-cli -c -h 192.168.140.41 -p 8001
缓存到那个节点不确定 要一个一个试

5、清空缓存,再次请求,再观察控制台
/usr/redis/bin/redis-cli -c -h 192.168.140.41 -p 8001
192.168.140.41:8001> flushdb
/usr/redis/bin/redis-cli -c -h 192.168.140.43 -p 8005
192.168.140.43:8005> flushdb

说明清空缓存后,会再次从数据获取
继续刷新请求
增删改后,再次观察控制台(增删改后,一定会自动清空缓存,再次从数据库查询,再次缓存)
先执行添加操作

在此查询
查询方法和CUD方法必须同一个mapper才会CUD后,清空缓存,重新缓存
最后
以上就是体贴羊最近收集整理的关于redis05_springboot+mybatis整合redis cluster一、springboot+mybatis整合redis cluster整合流程图二、springboot+mybatis整合redis cluster具体实现的全部内容,更多相关redis05_springboot+mybatis整合redis内容请搜索靠谱客的其他文章。

![redis java 存储图片_Redis 存储图片 [base64/url/path]vs[object]](https://www.shuijiaxian.com/files_image/reation/bcimg1.png)


发表评论 取消回复