我是靠谱客的博主 心灵美吐司,这篇文章主要介绍Faster R-CNN系列(三):用keras构建多输入-多输出-多自定义loss的模型用keras构建多输入-多输出-多自定义loss的模型,现在分享给大家,希望可以做个参考。
用keras构建多输入-多输出-多自定义loss的模型
keras 有两种模型
- Sequential 顺序模型
- Model 函数式模型 Model(inputs,outputs,name=None)
from keras import Sequential, Model
import keras.layers as KL
import keras.backend as K
import numpy as np
Using TensorFlow backend.
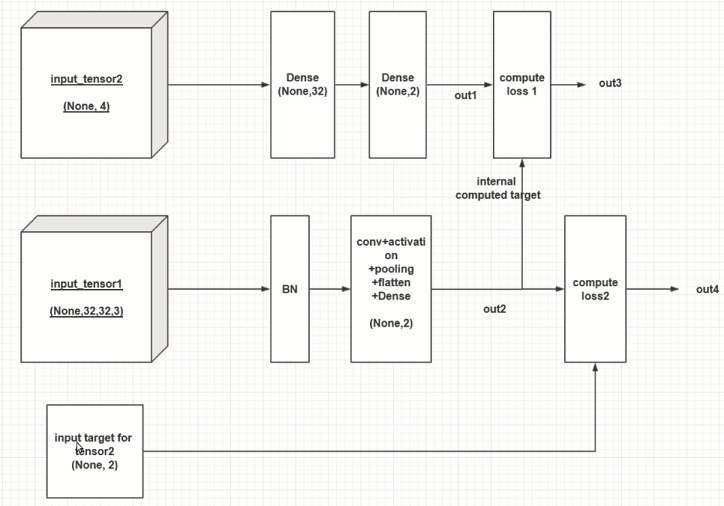
本文实现的模型

定义输入
input_tensor1=KL.Input((32,32,3))
input_tensor2=KL.Input((4,))
input_target=KL.Input((2,))
input_tensor1 支路
x=KL.BatchNormalization(axis=-1)(input_tensor1)
x=KL.Conv2D(16,(3,3),padding="same")(x)
x=KL.Activation("relu")(x)
x=KL.MaxPooling2D(2)(x)
x=KL.Conv2D(32,(3,3),padding="same")(x)
x=KL.Activation("relu")(x)
x=KL.MaxPooling2D(2)(x)   #下采样两次后 从32->8
x=KL.Flatten()(x)
x=KL.Dense(32)(x)
x=KL.Dense(2)(x)
out2=x #命名问题 input_tensor1 对应 out2 见上图
input_tensor2 支路
y=KL.Dense(32)(input_tensor2)
y=KL.Dense(2)(y)
out1=y
定义模型
model_temp=Model([input_tensor1,input_tensor2,input_target],[out1,out2])
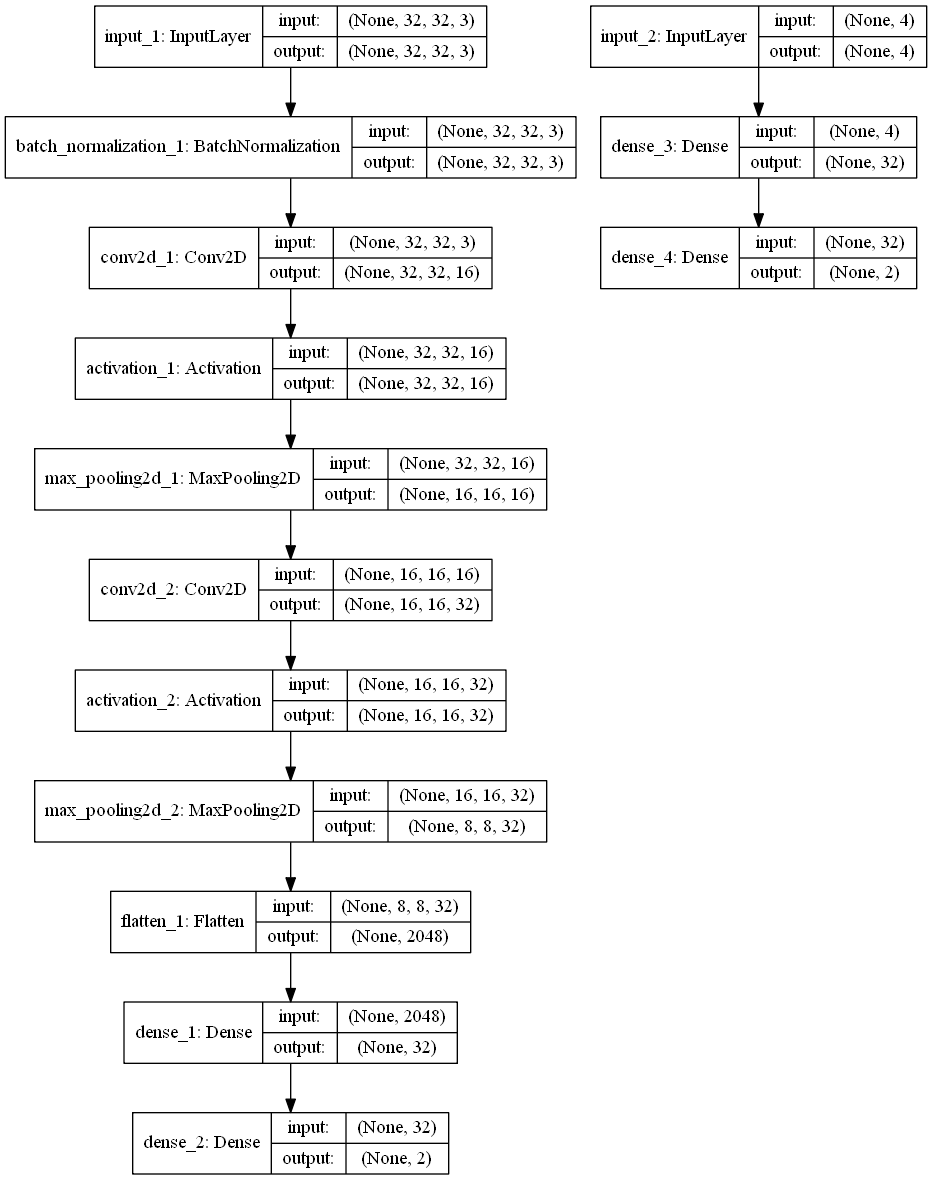
可视化之前编写的模型
- 查看模型结构
- 文字方法表述
model_temp.summary()
__________________________________________________________________________________________________
Layer (type)                    Output Shape         Param #     Connected to
==================================================================================================
input_1 (InputLayer)            (None, 32, 32, 3)    0
__________________________________________________________________________________________________
batch_normalization_1 (BatchNor (None, 32, 32, 3)    12          input_1[0][0]
__________________________________________________________________________________________________
conv2d_1 (Conv2D)               (None, 32, 32, 16)   448         batch_normalization_1[0][0]
__________________________________________________________________________________________________
activation_1 (Activation)       (None, 32, 32, 16)   0           conv2d_1[0][0]
__________________________________________________________________________________________________
max_pooling2d_1 (MaxPooling2D)  (None, 16, 16, 16)   0           activation_1[0][0]
__________________________________________________________________________________________________
conv2d_2 (Conv2D)               (None, 16, 16, 32)   4640        max_pooling2d_1[0][0]
__________________________________________________________________________________________________
activation_2 (Activation)       (None, 16, 16, 32)   0           conv2d_2[0][0]
__________________________________________________________________________________________________
max_pooling2d_2 (MaxPooling2D)  (None, 8, 8, 32)     0           activation_2[0][0]
__________________________________________________________________________________________________
input_2 (InputLayer)            (None, 4)            0
__________________________________________________________________________________________________
flatten_1 (Flatten)             (None, 2048)         0           max_pooling2d_2[0][0]
__________________________________________________________________________________________________
dense_3 (Dense)                 (None, 32)           160         input_2[0][0]
__________________________________________________________________________________________________
dense_1 (Dense)                 (None, 32)           65568       flatten_1[0][0]
__________________________________________________________________________________________________
dense_4 (Dense)                 (None, 2)            66          dense_3[0][0]
__________________________________________________________________________________________________
dense_2 (Dense)                 (None, 2)            66          dense_1[0][0]
==================================================================================================
Total params: 70,960
Trainable params: 70,954
Non-trainable params: 6
__________________________________________________________________________________________________
图形化可视化
- 下载graphviz 并添加 Graphviz2.38bin 到环境变量
- pip install pydot-ng
- 管理员权限开启jupyter notebook
from keras.utils.vis_utils import plot_model
plot_model(model_temp,to_file="images/model_temp.png",show_shapes=True)

定义loss
- 把loss 定义成一个层 比较有条理
- keras 定义层的方法(两种)
- 方法1 使用KL.Lambda构建层 func 为函数
KL.Lambda(func)(input) - 方法2 继承layer并重写类实现自定义layer
import keras.engine as KE
- 方法1 使用KL.Lambda构建层 func 为函数
#定义loss
def custom_loss1(y_true,y_pred):
    return K.mean(K.abs(y_true-y_pred))
# s使用方法1  使用KL.Lambda构建层  func 为函数
loss1=KL.Lambda(lambda x:custom_loss1(*x),name="loss1")([out2,out1])
loss2=KL.Lambda(lambda x:custom_loss1(*x),name="loss2")([input_target,out2])
model=Model([input_tensor1,input_tensor2,input_target],[out1,out2,loss1,loss2])
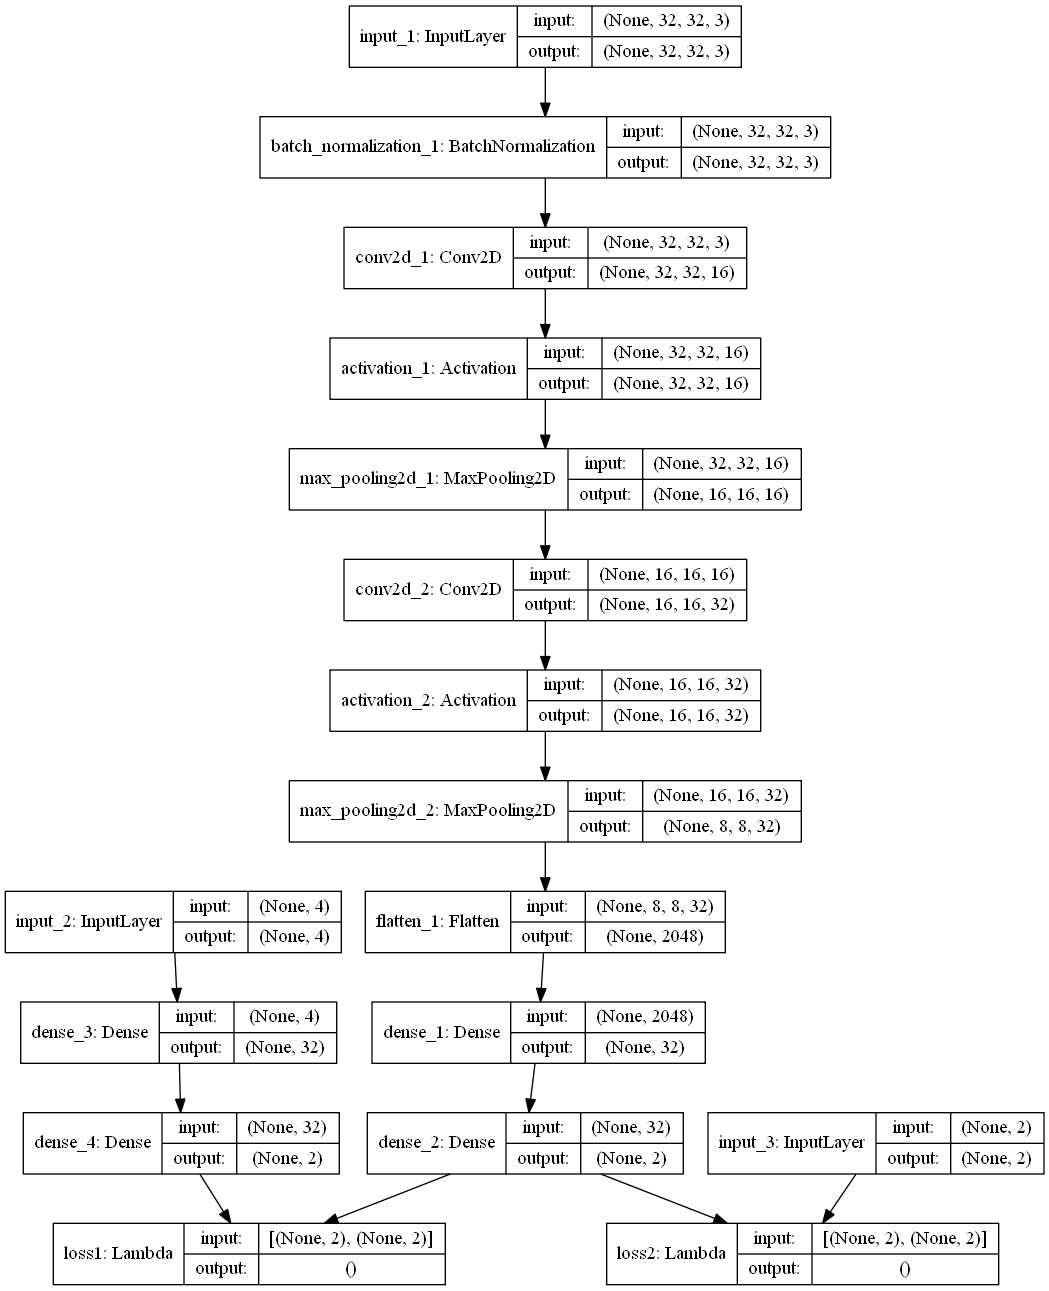
plot_model(model,to_file="images/model.png",show_shapes=True)

取出loss层model.get_layer() 并取出loss层的输出 model.get_layer(name).output
loss_layer1=model.get_layer("loss1").output
loss_layer2=model.get_layer("loss2").output
model.add_loss(loss_layer1)
model.add_loss(loss_layer2)
#已经add_loss 过了 所以一下可以设置为None
model.compile(optimizer='sgd',loss=[None,None,None,None])
最后
以上就是心灵美吐司最近收集整理的关于Faster R-CNN系列(三):用keras构建多输入-多输出-多自定义loss的模型用keras构建多输入-多输出-多自定义loss的模型的全部内容,更多相关Faster内容请搜索靠谱客的其他文章。
本图文内容来源于网友提供,作为学习参考使用,或来自网络收集整理,版权属于原作者所有。


发表评论 取消回复