摘要:超详细讲解Sqoop2应用与实践,从hdfs上的数据导入到postgreSQL中,再从postgreSQL数据库导入到hdfs上。详细讲解创建link和创建job的操作,以及如何查看sqoop2的工作状态。
1.准备,上一篇超详细讲解Sqoop2部署过程,Sqoop2自动部署源码
1.1.为了能查看sqoop2 status,编辑 mapred-site.xml
<property>
  <name>mapreduce.jobhistory.address</name>
  <value>localhost:10020</value>
</property>sbin/mr-jobhistory-daemon.sh start historyserver1.2.创建postgreSQL上的准备数据。创建表并填充数据-postgresql
CREATE TABLE products (
  product_no integer PRIMARY KEY,
  name text,
  price numeric
);

INSERT INTO products (product_no, name, price) VALUES (1,'Cheese',9.99);
1.3.创建hdfs上的准备数据
xiaolei@wang:~$ vim product.csv
2,'laoganma',13.5

xiaolei@wang:~$ hadoop fs -mkdir /hdfs2jdbc
xiaolei@wang:~$ hadoop fs -put product.csv /hdfs2jdbc
1.3.配置sqoop2的server
sqoop:000> set server --host localhost --port 12000 --webapp sqoop1.4.启动hadoop,特别是启动historyserver,启动sqoop2
sbin/start-dfs.sh
$HADOOP_HOME/sbin/start-yarn.sh
$HADOOP_HOME/sbin/mr-jobhistory-daemon.sh start historyserver

sqoop2-server start
1.5.如果未安装Sqoop2或者部署有问题,上一篇超详细讲解Sqoop2部署过程,Sqoop2自动部署源码
2.通过sqoop2,hdfs上的数据导入到postgreSQL
sqoop:000> show connector
2.1.创建hdfs-link,注明(必填)的要写正确,其他的可以回车跳过。
sqoop:000> create link --connector hdfs-connector
Creating link for connector with name hdfs-connector
Please fill following values to create new link object
Name: hdfs-link  #link名称(必填)

HDFS cluster

URI: hdfs://localhost:9000  #hdfs的地址(必填)
Conf directory: /opt/hadoop-2.7.3/etc/hadoop  #hadoop的配置地址(必填)
Additional configs::
There are currently 0 values in the map:
entry#
New link was successfully created with validation status OK and name hdfs-link
2.2.创建jdbc-link
sqoop:000> create link --connector generic-jdbc-connector
Creating link for connector with name generic-jdbc-connector
Please fill following values to create new link object
Name: jdbc-link  #link名称(必填)

Database connection

Driver class: org.postgresql.Driver  #jdbc驱动类(必填)
Connection String: jdbc:postgresql://localhost:5432/whaleaidb  # jdbc链接url(必填)
Username: whaleai  #数据库的用户(必填)
Password: ******   #数据库密码(必填)
Fetch Size:
Connection Properties:
There are currently 0 values in the map:
entry#

SQL Dialect

Identifier enclose:
New link was successfully created with validation status OK and name jdbc-link
2.3.查看已经创建好的hdfs-link和jdbc-link
sqoop:000> show link
+----------------+------------------------+---------+
|      Name      |     Connector Name     | Enabled |
+----------------+------------------------+---------+
| jdbc-link      | generic-jdbc-connector | true    |
| hdfs-link      | hdfs-connector         | true    |
+----------------+------------------------+---------+
2.4.创建从hdfs导入到postgreSQL的job
sqoop:000> create job -f hdfs-link -t jdbc-link
Creating job for links with from name hdfs-link and to name jdbc-link
Please fill following values to create new job object
Name: hdfs2jdbc  #job 名称(必填)

Input configuration

Input directory: /hdfs2jdbc #hdfs的输入路径 (必填)
Override null value:
Null value:

Incremental import

Incremental type:
  0 : NONE
  1 : NEW_FILES
Choose: 0 (必填)
Last imported date:

Database target

Schema name: public  #postgreSQL默认的public(必填)
Table name: products  #要导入的数据库表(必填)
Column names:
There are currently 0 values in the list:
element#
Staging table:
Clear stage table:

Throttling resources
Incremental type:
  0 : NONE
  1 : NEW_FILES
Choose: 0 #(必填)
Last imported date:
Throttling resources
Extractors:
Loaders:

Classpath configuration

Extra mapper jars:
There are currently 0 values in the list:
element#
New job was successfully created with validation status OK  and name hdfs2jdbc
2.5.启动 hdfs2jdbc job
sqoop:000> start job -name "hdfs2jdbc"
2.6.查看job执行状态,成功。
sqoop:000> status job -name "hdfs2jdbc"
3.通过sqoop2,postgreSQL上的数据导入到hdfs上
3.1.因为所需的link在第2部分已经,这里只需创建从postgreSQL导入到hdfs上的job。
sqoop:000> create job -f jdbc-link -t hdfs-link
Creating job for links with from name jdbc-link and to name hdfs-link
Please fill following values to create new job object
Name: jdbc2hdfs #job 名称(必填)

Database source

Schema name: public #postgreSQL默认的为public(必填)
Table name: products #数据源 数据库的表(必填)
SQL statement:
Column names:
There are currently 0 values in the list:
element#
Partition column:
Partition column nullable:
Boundary query:

Incremental read

Check column:
Last value:

Target configuration

Override null value:
Null value:
File format:
  0 : TEXT_FILE
  1 : SEQUENCE_FILE
  2 : PARQUET_FILE
Choose: 0 #(必填)
Compression codec:
  0 : NONE
  1 : DEFAULT
  2 : DEFLATE
  3 : GZIP
  4 : BZIP2
  5 : LZO
  6 : LZ4
  7 : SNAPPY
  8 : CUSTOM
Choose: 0  #(必填)
Custom codec:
Output directory: /jdbc2hdfs  #hdfs上的输出路径(必填)
Append mode:

Throttling resources

Extractors:
Loaders:

Classpath configuration

Extra mapper jars:
There are currently 0 values in the list:
element#
New job was successfully created with validation status OK  and name jdbc2hdfs
3.2. 启动jdbc2hdfs job
sqoop:000> start job -name "jdbc2hdfs"

Submission details
Job Name: jdbc2hdfs
Server URL: http://localhost:12000/sqoop/
Created by: xiaolei
Creation date: 2017-07-10 09:26:42 CST
Lastly updated by: xiaolei
External ID: job_1499648118116_0002
    http://wang:8088/proxy/application_1499648118116_0002/
2017-07-10 09:26:42 CST: BOOTING  - Progress is not available
3.3.查看job执行状态,成功。
sqoop:000> status job -name "jdbc2hdfs"
3.4.查看hdfs上的数据已经存在
xiaolei@wang:~$ hadoop fs -ls /jdbc2hdfs
Found 1 items
-rw-r--r--   1 xiaolei supergroup         30 2017-07-10 09:26 /jdbc2hdfs/4d2e5754-c587-4fcd-b1db-ca64fa545515.txt
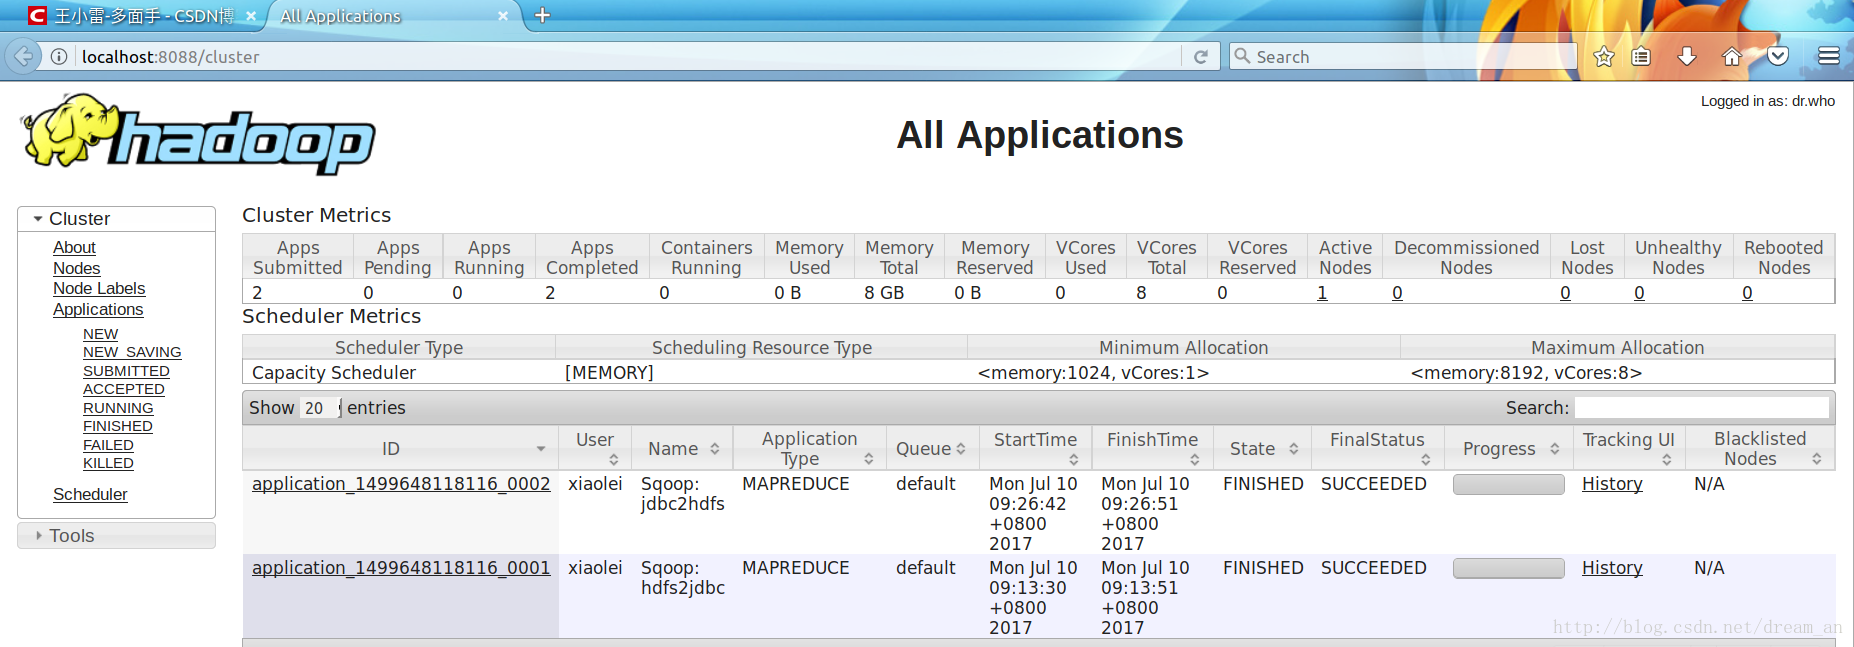
3.5.通过web UI,可见两次执行的job都已成功 http://localhost:8088/cluster

上一篇超详细讲解Sqoop2部署过程,Sqoop2自动部署源码
完结-彩蛋
1.踩坑
sqoop:000> stop job -name joba
Exception has occurred during processing command
Exception: org.apache.sqoop.common.SqoopException Message: MAPREDUCE_0003:Can’t get RunningJob instance -
解决: 编辑 mapred-site.xml
<property>
  <name>mapreduce.jobhistory.address</name>
  <value>localhost:10020</value>
</property>
2.踩坑
sbin/mr-jobhistory-daemon.sh start historyserver### Exception: org.apache.sqoop.common.SqoopException Message: GENERIC_JDBC_CONNECTOR_0001:Unable to get a connection -
解决: jdbc url写错,重新配置
3.踩坑
java.lang.Integer cannot be cast to java.math.BigDecimal
解决:数据库中的数据与hdfs上的数据无法转换,增加数据或者替换数据。
最后
以上就是大意外套最近收集整理的关于超详细讲解Sqoop2应用与实践1.准备,上一篇超详细讲解Sqoop2部署过程,Sqoop2自动部署源码2.通过sqoop2,hdfs上的数据导入到postgreSQL3.通过sqoop2,postgreSQL上的数据导入到hdfs上的全部内容,更多相关超详细讲解Sqoop2应用与实践1.准备,上一篇超详细讲解Sqoop2部署过程,Sqoop2自动部署源码2.通过sqoop2,hdfs上内容请搜索靠谱客的其他文章。


![[Hadoop] Sqoop安装过程详解](https://www.shuijiaxian.com/files_image/reation/bcimg14.png)
发表评论 取消回复