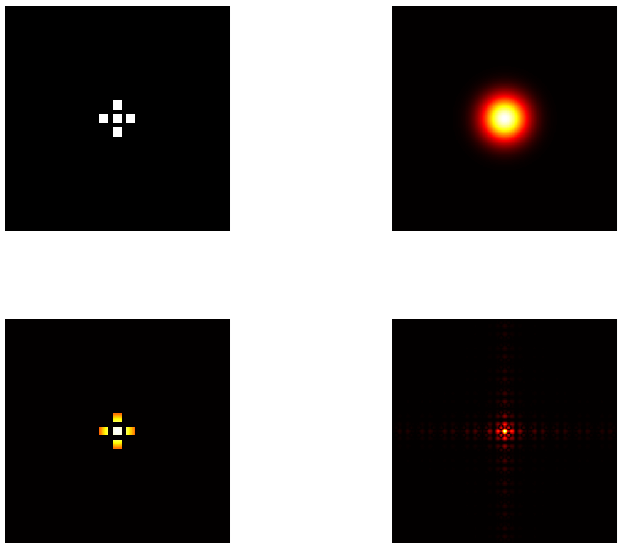
本文基于光学原理,用Matlab实现自定义矩形孔阵列远场衍射现象仿真。
Project Code
% 作者:ZQJ
% 日期:2022.1.21 星期五

%*********************** 矩形孔阵列的远场衍射 **************************
clear,clc,close all;
% ********************** 系统参数设定
lamda = 1550e-9;     % 波长
N = 500;             % 一边像素数目
x_length = 0.01;     % 矩阵长度
w0 = 1.4e-3;         % 高斯光束腰半径
Gs_z = 1e-3;         % 高斯光传输距离

% ********************** 矩阵孔阵列(可自定义)
mask_hole = mask2(0,0,x_length/N,N,N,20*x_length/N,20*x_length/N);
mask_hole = mask_hole | mask2(30,0,x_length/N,N,N,20*x_length/N,20*x_length/N);
mask_hole = mask_hole | mask2(-30,0,x_length/N,N,N,20*x_length/N,20*x_length/N);
mask_hole = mask_hole | mask2(0,30,x_length/N,N,N,20*x_length/N,20*x_length/N);
mask_hole = mask_hole | mask2(0,-30,x_length/N,N,N,20*x_length/N,20*x_length/N);

Gaussian_I = f_Gaussian_beams(w0,Gs_z,lamda,x_length,x_length,N,N);
E0 = Gaussian_I.*mask_hole;
E1 = fftshift(fft2(E0));

figure;subplot(2,2,1),imagesc(mask_hole);colormap(subplot(2,2,1),gray);axis off;axis square;
subplot(2,2,2),imagesc(Gaussian_I), colormap(subplot(2,2,2),hot);axis off;axis square;
subplot(2,2,3),imagesc(E0);colormap(subplot(2,2,3),hot);axis off;axis square;
subplot(2,2,4),imagesc(abs(E1));colormap(subplot(2,2,4),hot);axis off;axis square;

function my_mask = mask2(center_x,center_y,m_unit_width,Nx,Ny,rect_width,rect_height)
% 函数功能:利用二维矩形函数产生矩形孔掩膜
% 参数
% center_x:矩形孔的中心坐标x
% center_y:矩形孔的中心坐标y
% m_unit_width:掩膜的单位像素宽度
% Nx:x方向上的像素点个数(即总掩膜像素)
% Ny:y方向上的像素点个数
% rect_width:矩形孔的宽度
% rect_height:矩形孔的高度

mask_x = -m_unit_width*Nx/2 : m_unit_width : m_unit_width*(Nx/2-1);
mask_y = -m_unit_width*Ny/2 : m_unit_width : m_unit_width*(Ny/2-1);
[mask_x_axis,mask_y_axis] = meshgrid(mask_x,mask_y);
mask_z_axis = rectpuls(mask_x_axis-center_x*m_unit_width,rect_width).*rectpuls(mask_y_axis+center_y*m_unit_width,rect_height);
my_mask = mask_z_axis;
end
仿真结果图:

专栏内容供作者本人或大家学习使用,多多指教 ~
最后
以上就是标致果汁最近收集整理的关于Matlab:实现自定义矩形孔阵列远场衍射仿真的全部内容,更多相关Matlab内容请搜索靠谱客的其他文章。
本图文内容来源于网友提供,作为学习参考使用,或来自网络收集整理,版权属于原作者所有。


![设计巴特沃思滤波器matlab实现[转载]](https://www.shuijiaxian.com/files_image/reation/bcimg7.png)


发表评论 取消回复