现有环境:
Java JDK1.8
MySQL5.7
【ps】本文是很早前的基于隐马尔科夫模型进行中文词性标注的后续升级完善版,任务就是将之前的写入文件的模型参数写入MySQL
下载Hibernate http://hibernate.org/orm/releases/
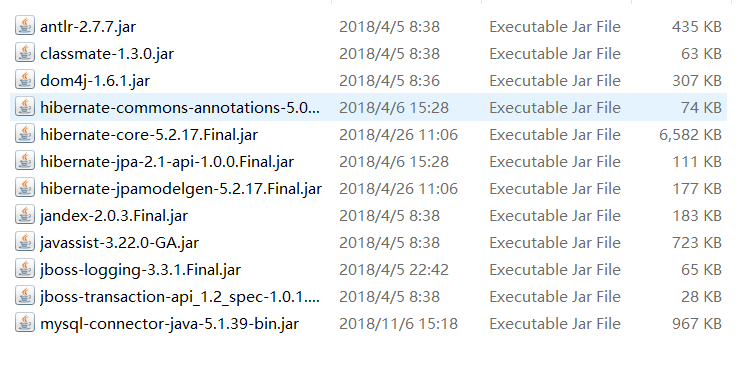
下载好后解压,将jpa和required路径下的Jar包全部复制出来到自己创建的lib文件夹

构建的lib

还有:要下载Java连接MySQL的驱动 地址 http://static.runoob.com/download/mysql-connector-java-5.1.39-bin.jar 也就是上图中最下面的那个Jar包
现在创建一个项目,并将上述lib文件夹拷贝到项目的根目录下,如果使用Eclipse就可以在项目上右键,点击最下方的属性,然后在弹窗的左边选择 Java Build Path
然后点击 Add JARs,选择lib中全部Jar包点击Apply完成Jar包的导入
1 基于 ClassName.hbm.xml 构建映射
一个类对应于一个 .hbm.xml文件,并且起名一定是类名加上.hbm.xml
还需要一个hibernate的配置文件 hibernate.cfg.xml
文件位置:
ClassName.hbm.xml要存放在与此类在同一个包下
hibernate.cfg.xml要存放在src路径下
下面是这个将参数写入数据库的详细过程:
首先我构造三个Table

table1:

table2:

table3:

解释:
table1只有一行,就是存储词表、词性表、以及共有多少个分词以及词性,由于模型的参数Pi是一个一维向量,我把它也存在了table1中,只是多分配一个字段而已
table2和table3的关键字段就是rowA和rowB,由于模型的参数A以及B是二维矩阵,所以这里设计是每一行存储矩阵对应的一行,在每一行中不同列的参数以空格分割并拼接为串
然后构建项目
由于有三个表,所以定义三个与之对应的实体类,当然要在同路径下创建三个配置文件:

对于Table1:
public class Table1 {
private int id;
private String wordList;
private String labelList;
private int wordSize;
private int labelSize;
private String pi;
//Getter and Setter
}
同理,Table2和Table3就更好构建了
现在到了关键的配置文件,以Table1.hbm.xml为例
<!--在xlc包下-->
<hibernate-mapping package="hmmtrainmysql.xlc">
<!--类名为User,表名也为User-->
<class name="Table1"
table="table1">
<!--主键映射,属性名为id,列名也为id-->
<id name="id" column="id">
<!--根据底层数据库主键自动增长-->
<generator class="native"/>
</id>
<!--非主键映射,属性和列名一一对应-->
<property name="wordList" type="text">
<!--length="16777216 表示使用LONGTEXT类型-->
<column name="wordList" length="16777216"/>
</property>
<property name="labelList" type="text">
<column name="labelList" sql-type="text"/>
</property>
<property name="wordSize" column="wordSize"/>
<property name="labelSize" column="labelSize"/>
<property name="pi" type="text">
<column name="pi" length="16777216"/>
</property>
</class>
</hibernate-mapping>
接下来就是hibernate.cfg.xml
<hibernate-configuration>
<!-- 通常,一个session-factory节点代表一个数据库 -->
<session-factory>
<!-- 1. 数据库连接配置 -->
<property name="hibernate.connection.driver_class">com.mysql.jdbc.Driver</property>
<property name="hibernate.connection.url">jdbc:mysql:///parameter</property>
<property name="hibernate.connection.username">root</property>
<property name="hibernate.connection.password">123456</property>
<!--
数据库方法配置, hibernate在运行的时候,会根据不同的方言生成符合当前数据库语法的sql
-->
<property name="hibernate.dialect">org.hibernate.dialect.MySQL5Dialect</property>
<!-- 2. 其他相关配置 -->
<!-- 2.1 显示hibernate在运行时候执行的sql语句 由于代码中有频繁操作数据库我就把它注释掉了
-->
<!-- <property name="hibernate.show_sql">true</property>
-->
<!-- 2.2 格式化sql -->
<property name="hibernate.format_sql">true</property>
<!-- 2.3 自动建表
-->
<property name="hibernate.hbm2ddl.auto">create</property>
<!--3. 加载三个映射-->
<mapping resource="hmmtrainmysql/xlc/Table1.hbm.xml"/>
<mapping resource="hmmtrainmysql/xlc/Table2.hbm.xml"/>
<mapping resource="hmmtrainmysql/xlc/Table3.hbm.xml"/>
</session-factory>
</hibernate-configuration>
最后是操作数据库的核心代码,这里给出如何将数据存储到数据库的
Configuration configuration = new Configuration();
//不给参数就默认加载hibernate.cfg.xml文件,

configuration.configure();
SessionFactory factory = configuration.buildSessionFactory();
Session session = factory.openSession();
Transaction transaction = session.getTransaction();
transaction.begin();
Table1 table1 = new Table1();
table1.setLabelSize(httm.labelSize);
table1.setWordSize(httm.wordSize);
table1.setLabelList(strLabel);

table1.setWordList(strWord);
table1.setPi(strPi);
session.save(table1);
for (int i = 0; i < httm.labelSize; i++) {
Table2 table2 = new Table2();
Table3 table3 = new Table3();
String strA = "";
String strB = "";
for (int j = 0; j < httm.labelSize; j++) {
strA += httm.A[i][j] + " ";
}
for (int k = 0; k < httm.wordSize; k++) {
strB += httm.B[i][k] + " ";
}
System.out.println(i);
table2.setRowA(strA);
session.save(table2);
table3.setRowB(strB);
session.save(table3);
}
transaction.commit();
session.close();
运行程序结束后,成功写库


Github:https://github.com/xinglicha0/Offline-Train-Hmm-To-MySQL
2 基于Java注释 构建映射
后续完善
转载于:https://www.cnblogs.com/xinglichao/p/9935419.html
最后
以上就是大意月光最近收集整理的关于Java采用Hibernate连接MySQL的全部内容,更多相关Java采用Hibernate连接MySQL内容请搜索靠谱客的其他文章。

![Unable to resolve name [org.hibernate.connection.ProxoolConnectionProvider] as strategy ...](https://file2.kaopuke.com:8081/files_image/reation/bcimg14.png)


发表评论 取消回复