文章目录
- 前言
- 一、思路
- 二、解数独
- 三、处理图片
- 1、最开始的脚本
- 2、改进脚本
- 四、结果
前言
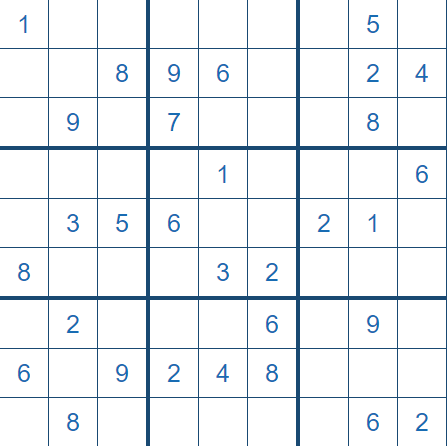
前不久做到一道挺有意思的 misc 题,如下两张图,一张藏着 flag,一张是数独
通过这题学习了一下 python3 pillow 模块的简单使用,在此记录一下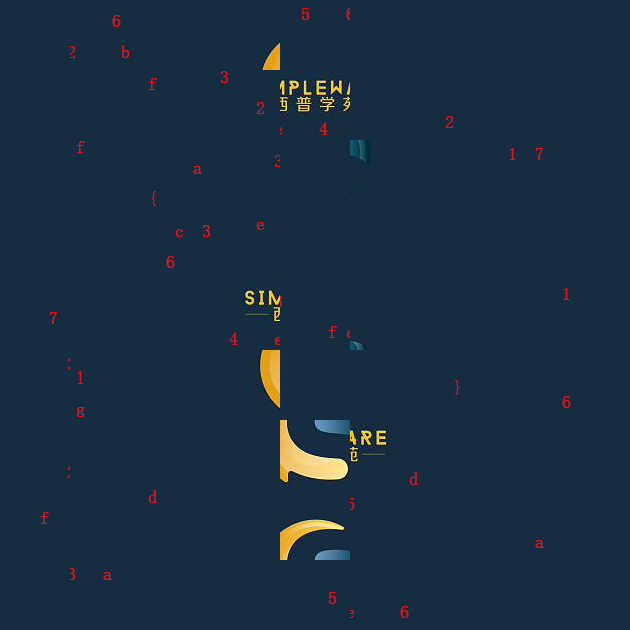
一、思路
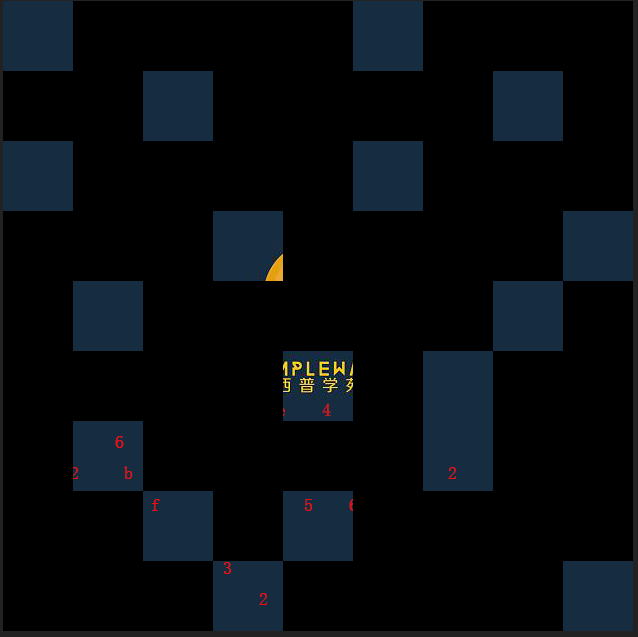
大概观察了一下,发现第一张图是拆分成小方块重组的,想到把两张图重叠,如下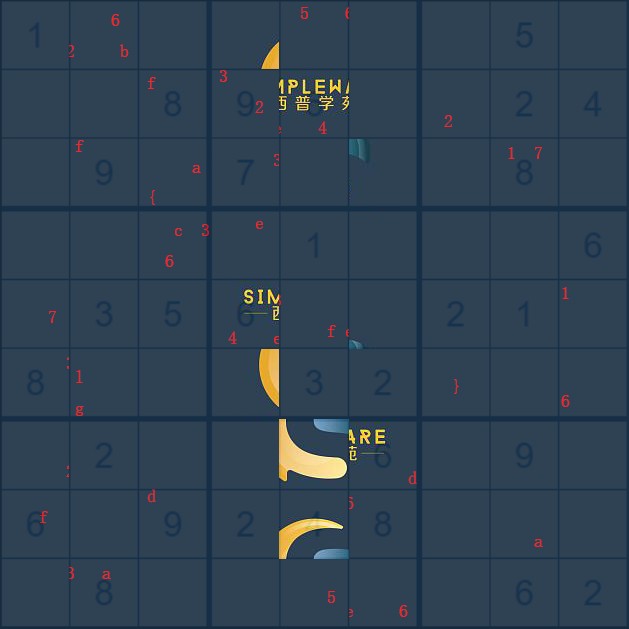
可以看到第四、五、六列的数字 6 并列排放刚好是西普学苑
所以思路出来了,应该先解出数独,然后按数独的数字重新排列图片,将1放在第一行,2放在第二行,以此类推
二、解数独
大佬的脚本,一两秒钟就出结果
https://blog.csdn.net/MG_ApinG/article/details/83145382
三、处理图片
1、最开始的脚本
将图片切割下来并一个个保存,然后将保存下来的图片合并
from PIL import Image

# 为了防止图片名重复,在解得的数独前加上列号
name_list = [[11, 27, 32, 44, 58, 63, 76, 85, 99],
             [13, 25, 38, 49, 56, 61, 77, 82, 94],
             [14, 29, 36, 47, 52, 65, 71, 88, 93],
             [12, 24, 37, 48, 51, 69, 75, 83, 96],
             [19, 23, 35, 46, 57, 64, 72, 81, 98],
             [18, 26, 31, 45, 53, 62, 79, 84, 97],
             [17, 22, 34, 43, 55, 66, 78, 89, 91],
             [16, 21, 39, 42, 54, 68, 73, 87, 95],
             [15, 28, 33, 41, 59, 67, 74, 86, 92]]

img = Image.open("./image.png")  # 读取要操作的图片

width, height = img.size          # 获取图片的宽度和高度

crop_width = width // 9           # 截切后图片的宽度
crop_height = height // 9         # 截切后图片的高度

# 利用循环将原图片截成 9*9 个图片,并保存
for i in range(9):
    for j in range(9):
        box = (crop_width * j, crop_height * i, crop_width * (j + 1), crop_height * (i + 1))    # 截切下来的图片在原图片的位置 (left,up,right,down)
        new_img = img.crop(box)
        name = "./image/" + str(name_list[i][j]) + ".png"
        new_img.save(name)

# 创建一个新图片
image = Image.new('RGB', (width, height))

# 利用循环将所有图片拼接到创建的新图片上
for i in range(1, 10):
    for j in range(1, 10):
        name = str(j) + str(i) + ".png"
        s_image = Image.open("./image/" + name)
        box2 = (crop_width * (j - 1), crop_height * (i - 1), crop_width * j, crop_height * i)
        image.paste(s_image, box2)

# 调用图片查看工具展示图片
image.show()
# image.save("./image/flag.png")      # 保存图片
要是运行目录下没有 image 目录,脚本会报错,可以添加如下代码,或者在运行目录下新建 image 目录
import os

dir_name = './image'

if not os.path.exists(dir_name):	# 如果目录不存在就创建一个
    os.mkdir(dir_name)
2、改进脚本
每截取一个方块就找到其对应的位置,不需要保存图片
from PIL import Image

name_list = [[11, 27, 32, 44, 58, 63, 76, 85, 99],
             [13, 25, 38, 49, 56, 61, 77, 82, 94],
             [14, 29, 36, 47, 52, 65, 71, 88, 93],
             [12, 24, 37, 48, 51, 69, 75, 83, 96],
             [19, 23, 35, 46, 57, 64, 72, 81, 98],
             [18, 26, 31, 45, 53, 62, 79, 84, 97],
             [17, 22, 34, 43, 55, 66, 78, 89, 91],
             [16, 21, 39, 42, 54, 68, 73, 87, 95],
             [15, 28, 33, 41, 59, 67, 74, 86, 92]]

image_path = "./image.png"
img = Image.open(image_path)

width, height = img.size

crop_width = width // 9
crop_height = height // 9

image = Image.new('RGB', (width, height))

for i in range(9):
    for j in range(9):
        box = (crop_width * j, crop_height * i, crop_width * (j + 1), crop_height * (i + 1))
        new_img = img.crop(box)

        y = int(str(name_list[i][j])[0:1])
        x = int(str(name_list[i][j])[1:2])

        box2 = (crop_width * (y - 1), crop_height * (x - 1), crop_width * y, crop_height * x)
        image.paste(new_img, box2)

image.show()
因为是根据上面改的,所以没有动 name_list,如果不加列号的话应该会更简洁
那么 x,y 的值如下
y = j + 1
x = name_list[i][j]
四、结果
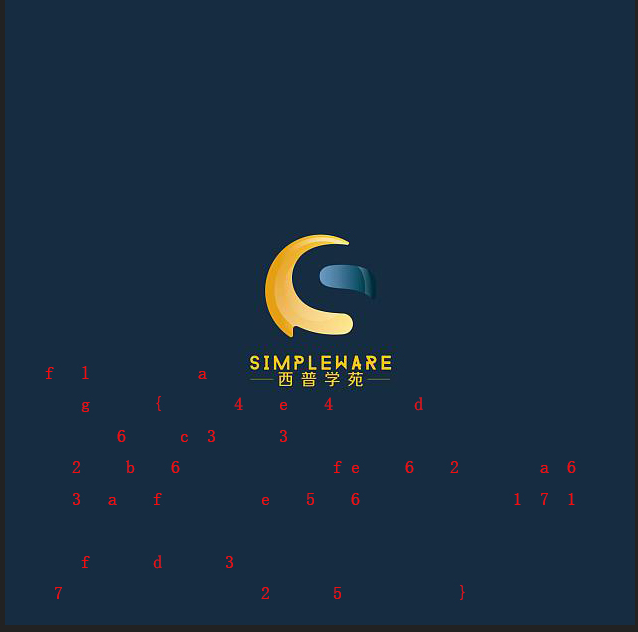
在循环体中加一个 image.show() 可以看到图片一个个拼接的过程,还是很舒适的
第一个脚本的运行效果

第二个脚本的运行效果
最后
以上就是儒雅巨人最近收集整理的关于通过一道CTF题,学习pillow模块切割、合并图片前言一、思路二、解数独三、处理图片四、结果的全部内容,更多相关通过一道CTF题内容请搜索靠谱客的其他文章。
本图文内容来源于网友提供,作为学习参考使用,或来自网络收集整理,版权属于原作者所有。


发表评论 取消回复