初次接触TensorFlow,而手写数字训练识别是其最基本的入门教程,网上关于训练的教程很多,但是模型的测试大多都是官方提供的一些素材,能不能自己随便写一串数字让机器识别出来呢?纸上得来终觉浅,带着这个疑问昨晚研究了下,利用这篇文章来记录下自己的一些心得!
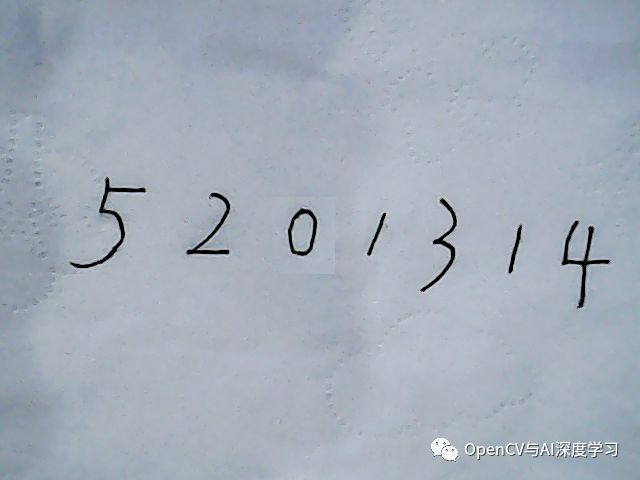
以下这个图片是我随机写的一串数字,我的目标是利用训练好的模型来识别出图片里面的手写数字,开始实战!
2层卷积神经网络的训练:
from tensorflow.examples.tutorials.mnist import input_data# 保存模型需要的库from tensorflow.python.framework.graph_util import convert_variables_to_constantsfrom tensorflow.python.framework import graph_util# 导入其他库import tensorflow as tfimport cv2import numpy as np# 获取MINIST数据mnist = input_data.read_data_sets("MNIST_data", one_hot=True)# 创建会话sess = tf.InteractiveSession()# 占位符x = tf.placeholder("float", shape=[None, 784], name="Mul")y_ = tf.placeholder("float", shape=[None, 10], name="y_")# 变量W = tf.Variable(tf.zeros([784, 10]), name='x')b = tf.Variable(tf.zeros([10]), 'y_')# 权重def weight_variable(shape):initial = tf.truncated_normal(shape, stddev=0.1)return tf.Variable(initial)# 偏差def bias_variable(shape):initial = tf.constant(0.1, shape=shape)return tf.Variable(initial)# 卷积def conv2d(x, W):return tf.nn.conv2d(x, W, strides=[1, 1, 1, 1], padding='SAME')# 最大池化def max_pool_2x2(x):return tf.nn.max_pool(x, ksize=[1, 2, 2, 1],strides=[1, 2, 2, 1], padding='SAME')# 相关变量的创建W_conv1 = weight_variable([5, 5, 1, 32])b_conv1 = bias_variable([32])x_image = tf.reshape(x, [-1, 28, 28, 1])h_conv1 = tf.nn.relu(conv2d(x_image, W_conv1) + b_conv1)h_pool1 = max_pool_2x2(h_conv1)W_conv2 = weight_variable([5, 5, 32, 64])b_conv2 = bias_variable([64])# 激活函数h_conv2 = tf.nn.relu(conv2d(h_pool1, W_conv2) + b_conv2)h_pool2 = max_pool_2x2(h_conv2)W_fc1 = weight_variable([7 * 7 * 64, 1024])b_fc1 = bias_variable([1024])W_fc2 = weight_variable([1024, 10])b_fc2 = bias_variable([10])h_pool2_flat = tf.reshape(h_pool2, [-1, 7 * 7 * 64])h_fc1 = tf.nn.relu(tf.matmul(h_pool2_flat, W_fc1) + b_fc1)keep_prob = tf.placeholder("float", name='rob')h_fc1_drop = tf.nn.dropout(h_fc1, keep_prob)# 用于训练用的softmax函数y_conv = tf.nn.softmax(tf.matmul(h_fc1_drop, W_fc2) + b_fc2, name='res')# 用于训练作完后,作测试用的softmax函数y_conv2 = tf.nn.softmax(tf.matmul(h_fc1, W_fc2) + b_fc2, name="final_result")# 交叉熵的计算,返回包含了损失值的Tensor。cross_entropy = -tf.reduce_sum(y_ * tf.log(y_conv))# 优化器,负责最小化交叉熵train_step = tf.train.AdamOptimizer(1e-4).minimize(cross_entropy)correct_prediction = tf.equal(tf.argmax(y_conv, 1), tf.argmax(y_, 1))# 计算准确率accuracy = tf.reduce_mean(tf.cast(correct_prediction, "float"))# 初始化所以变量sess.run(tf.global_variables_initializer())# 保存输入输出,可以为之后用tf.add_to_collection('res', y_conv)tf.add_to_collection('output', y_conv2)tf.add_to_collection('x', x)# 训练开始for i in range(10000):batch = mnist.train.next_batch(100)if i % 100 == 0:train_accuracy = accuracy.eval(feed_dict={x: batch[0], y_: batch[1], keep_prob: 1.0})print("step %d, training accuracy %g" % (i, train_accuracy))# run()可以看做输入相关值给到函数中的占位符,然后计算的出结果,这里将batch[0],给xbatch[1]给y_train_step.run(feed_dict={x: batch[0], y_: batch[1], keep_prob: 0.5})# 将当前图设置为默认图graph_def = tf.get_default_graph().as_graph_def()# 将上面的变量转化成常量,保存模型为pb模型时需要,注意这里的final_result和前面的y_con2是同名,只有这样才会保存它,否则会报错,# 如果需要保存其他tensor只需要让tensor的名字和这里保持一直即可output_graph_def = tf.graph_util.convert_variables_to_constants(sess, graph_def, ['final_result'])# 用saver 保存模型saver = tf.train.Saver()saver.save(sess, "model/model")
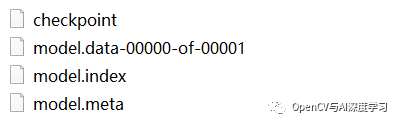
网络训练成功后在model_data文件夹里有如下四个文件:
网络模型的验证可大致从以下三个部分来进行:
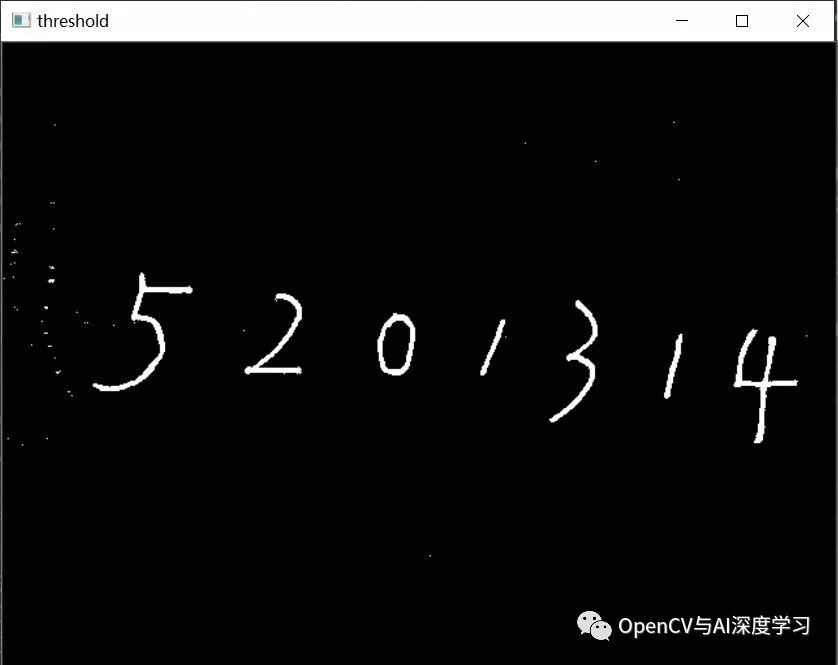
接下来就是要利用上面的图片来测试我们的模型。实际上图像的预处理部分很关键,也就是如何准确的提取出上面图像中的数字的区域,并且进行阈值分割,传统的单一阈值分割很难达到要求,因此本次分割采用基于改进的Niblack的分割方法,大家有兴趣可以查阅相关的资料。
分割完了之后要标记连通区域,去除那些小点区域。找到其外接矩形,可认为这个矩形区域就是我们感兴趣的区域。
降采样为28*28的大小来进行识别。
代码部分如下所示:
import numpy as npimport cv2import matplotlib.pyplot as pltimport imutilsimport matplotlib.patches as mpatchesfrom skimage import data, segmentation, measure, morphology, colorimport tensorflow as tfclass Number_recognition():""" 模型恢复初始化"""def __init__(self, img):self.sess = tf.InteractiveSession()saver = tf.train.import_meta_graph('model/model.meta')saver.restore(self.sess, 'model/model') # 模型恢复# graph = tf.get_default_graph()# 获取输入tensor,,获取输出tensorself.input_x = self.sess.graph.get_tensor_by_name("Mul:0")self.y_conv2 = self.sess.graph.get_tensor_by_name("final_result:0")self.Preprocessing(img) # 图像预处理def recognition(self, im):im = cv2.resize(im, (28, 28), interpolation=cv2.INTER_CUBIC)x_img = np.reshape(im, [-1, 784])output = self.sess.run(self.y_conv2, feed_dict={self.input_x: x_img})print('您输入的数字是 %d' % (np.argmax(output)))return np.argmax(output) # 返回识别的结果def Preprocessing(self, image):if image.shape[0] > 1000:image = imutils.resize(image, height=800) # 如果图像太大局部阈值分割速度会稍慢些,因此图像太大时进行降采样img = cv2.cvtColor(image, cv2.COLOR_BGR2GRAY) # convert to gray picturem1, n1 = img.shapek = int(m1 / 19) + 1l = int(n1 / 19) + 1#img = cv2.GaussianBlur(img, (3, 3), 0) # 高斯滤波imm = img.copy()# 基于Niblack的局部阈值分割法,对于提取文本类图像分割效果比较好for x in range(k):for y in range(l):s = imm[19 * x:19 * (x + 1), 19 * y:19 * (y + 1)]me = s.mean() # 均值var = np.std(s) # 方差t = me * (1 - 0.2 * ((125 - var) / 125))ret, imm[19 * x:19 * (x + 1), 19 * y:19 * (y + 1)] = cv2.threshold(imm[19 * x:19 * (x + 1), 19 * y:19 * (y + 1)], t, 255, cv2.THRESH_BINARY_INV)label_image = measure.label(imm) # 连通区域标记for region in measure.regionprops(label_image): # 循环得到每一个连通区域属性集# 忽略小区域if region.area < 100:continueminr, minc, maxr, maxc = region.bbox # 得到外包矩形参数cv2.rectangle(image, (minc, minr), (maxc, maxr), (0, 255, 0), 2) # 绘制连通区域im2 = imm[minr - 15:maxr + 15, minc - 15:maxc + 15] # 获得感兴趣区域,也即每个数字的区number = self.recognition(im2) # 进行识别cv2.putText(image, str(number), (minc, minr - 10), 0, 2, (0, 0, 255), 2) # 将识别结果写在原图上cv2.imshow("threshold", imm)cv2.imshow("recgonize result", image)cv2.waitKey(0)if __name__ == '__main__':img = cv2.imread("./imgs/1.png")x = Number_recognition(img)
分割结果如下所示:
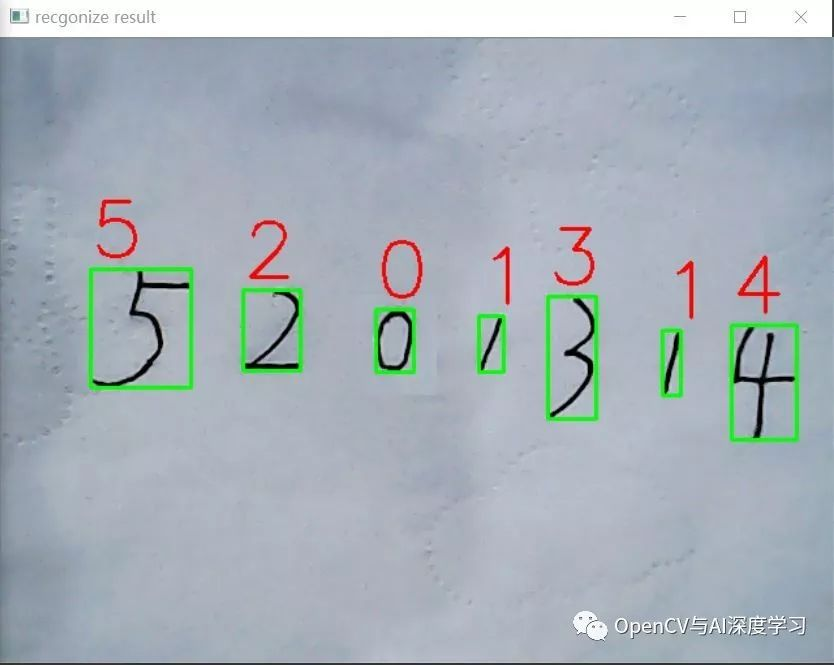
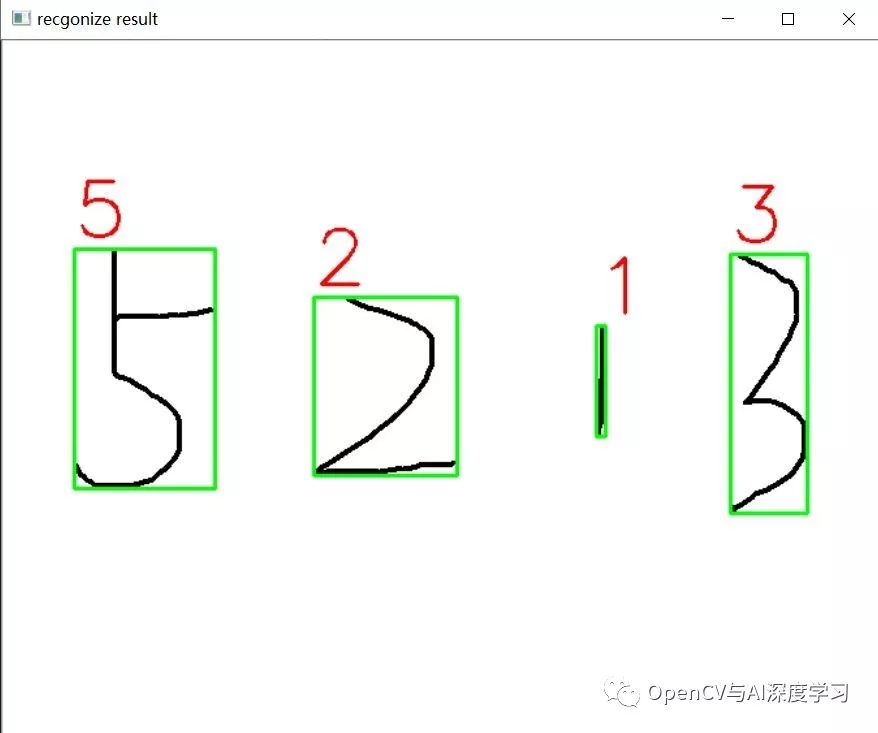
识别结果如下所示:
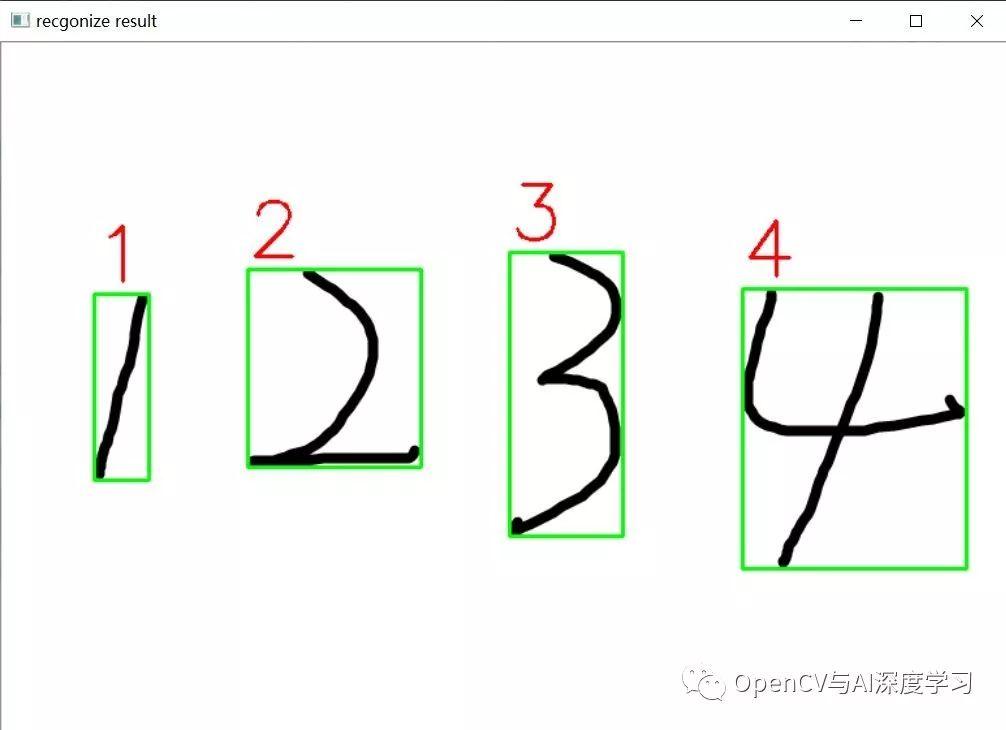
其他图片测试:
关注【OpenCV与AI深度学习】
长按或者扫描下面二维码即可关注

最后
以上就是顺利路灯最近收集整理的关于OpenCV+TensorFlow图片手写数字识别(附源码)的全部内容,更多相关OpenCV+TensorFlow图片手写数字识别(附源码)内容请搜索靠谱客的其他文章。
本图文内容来源于网友提供,作为学习参考使用,或来自网络收集整理,版权属于原作者所有。


发表评论 取消回复