文章目录
- 1. 入门案例
- 2. 完成官方Demo中的hello world案例
- 2.1 创建1个工程,2个模块
- 2.1.1 父工程的依赖,子工程不需要导入额外的依赖
- 2.1.2 配置子工程的配置文件(内容一样)
- 2.1.3 编写发布者的test文件
- 2.1.4 编写消费者的test文件
- 2.1.5 基本消息队列工作流程
- 3. SpringAMQP
- 3.1 SpringAMQP介绍
- 3.2 利用SpringAMQP实现HelloWorld中的基础消息队列功能
- 3.2.1.消息发送
- 3.2.2.消息接收
- 3.2.3 小结
- 3.3.WorkQueue 工作队列
- 3.4 案例:模拟WorkQueue,实现一个队列绑定多个消费者
- 3.4.1.消息发送
- 3.4.2.消息接收
- 3.4.3 运行结果(发现消息预取机制)
- 3.4.5 修改消费预取机制上限
- 3.4.6 再次运行
- 3.4.7 小结
- 3.4 发布订阅模式
- 3.5 案例:利用SpringAMQP演示FanoutExchange的使用
- 3.5.1 步骤1:在consumer服务声明Exchange、Queue、Binding
- 3.5.2 步骤2:消息发送
- 3.5.3 步骤3:消息接收
- 3.5.4 运行结果
- 3.5.5 小结
- 3.6 案例:利用SpringAMQP演示DirectExchange的使用
- 3.6.1 步骤1:基于注解声明队列和交换机
- 3.6.2 步骤2:消息发送
- 3.6.3 运行结果
- 3.6.4 总结
- 3.7 案例:利用SpringAMQP演示TopicExchange的使用
- 3.7.1 TopicExchange说明
- 3.7.2 案例说明
- 3.7.3 步骤1:消息发送
- 3.7.4 步骤2:消息接收
- 3.7.5 运行结果
- 3.7.6 小结
- 4. 消息转换器
- 4.1 测试默认转换器
- 4.2 配置JSON转换器
- 4.2.1 我们现在父工程中引入依赖
- 4.2.2 我们在publisher服务声明MessageConverter(消息序列化)
- 4.2.3 消息反序列化
- 4.3 小结
请先在服务器上面安装启动RabbitMQ
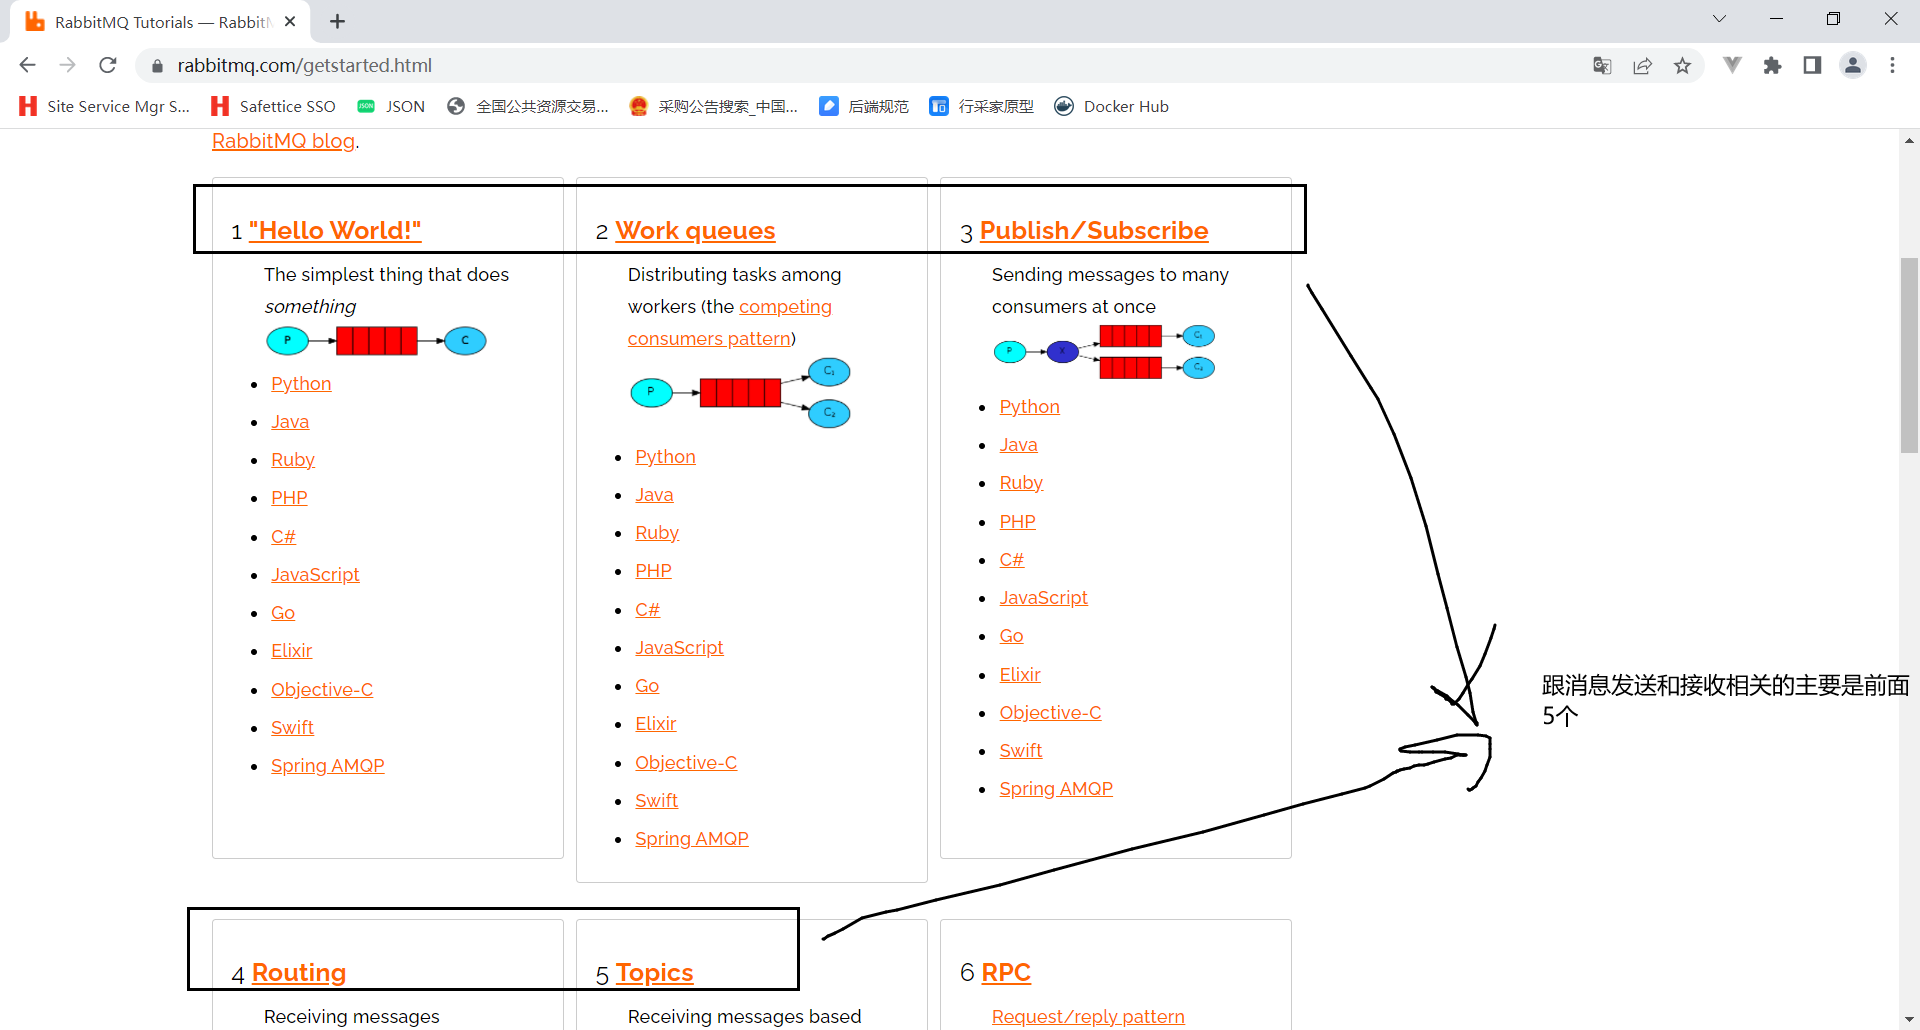
1. 入门案例
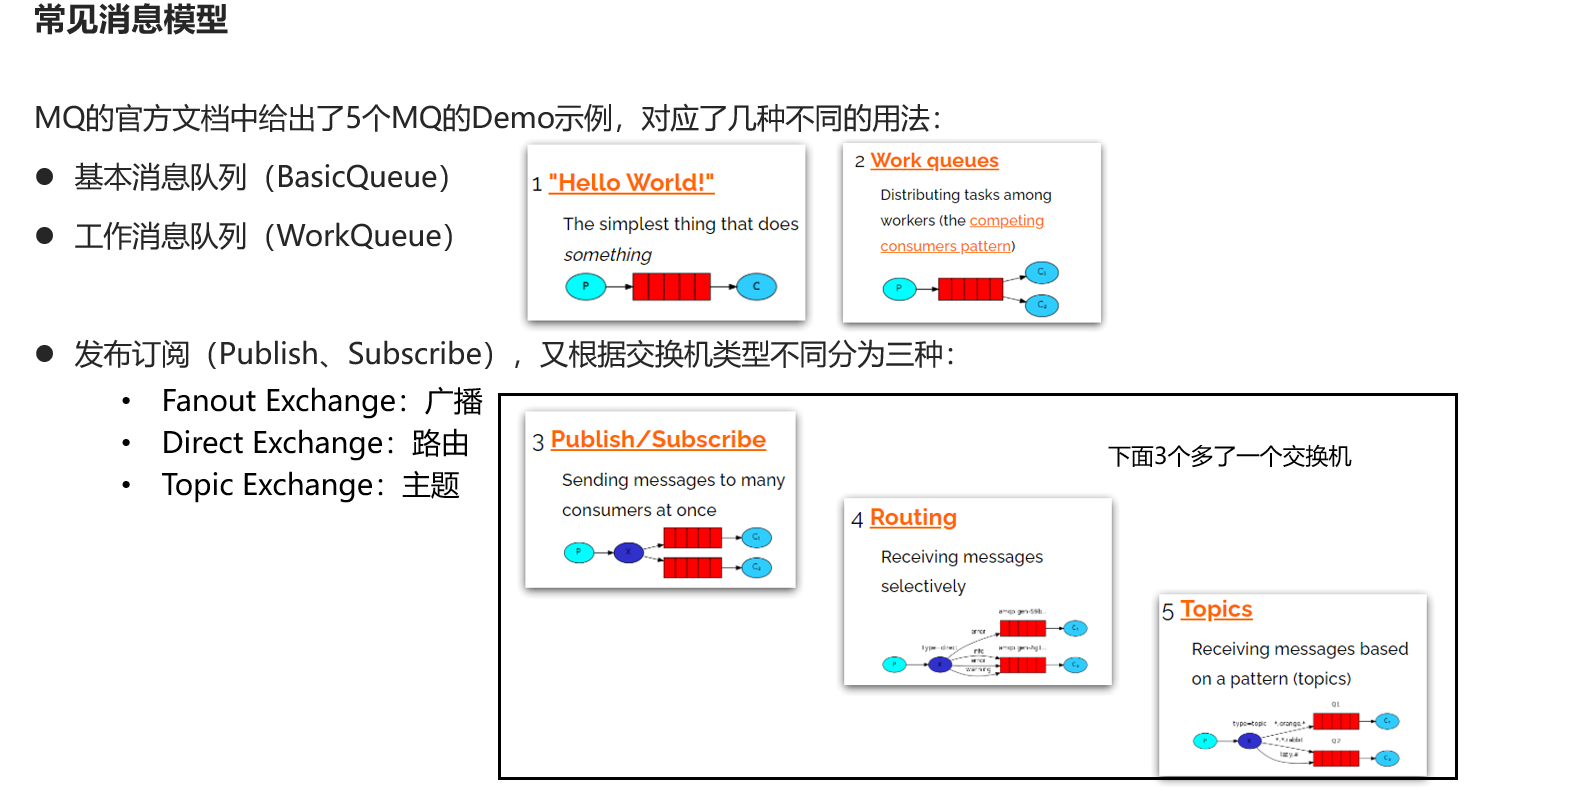
官方MQdemo
2. 完成官方Demo中的hello world案例
2.1 创建1个工程,2个模块

2.1.1 父工程的依赖,子工程不需要导入额外的依赖
    <dependencies>
        <dependency>
            <groupId>org.projectlombok</groupId>
            <artifactId>lombok</artifactId>
        </dependency>
        <!--AMQP依赖,包含RabbitMQ-->
        <dependency>
            <groupId>org.springframework.boot</groupId>
            <artifactId>spring-boot-starter-amqp</artifactId>
        </dependency>
        <!--单元测试-->
        <dependency>
            <groupId>org.springframework.boot</groupId>
            <artifactId>spring-boot-starter-test</artifactId>
        </dependency>
    </dependencies>
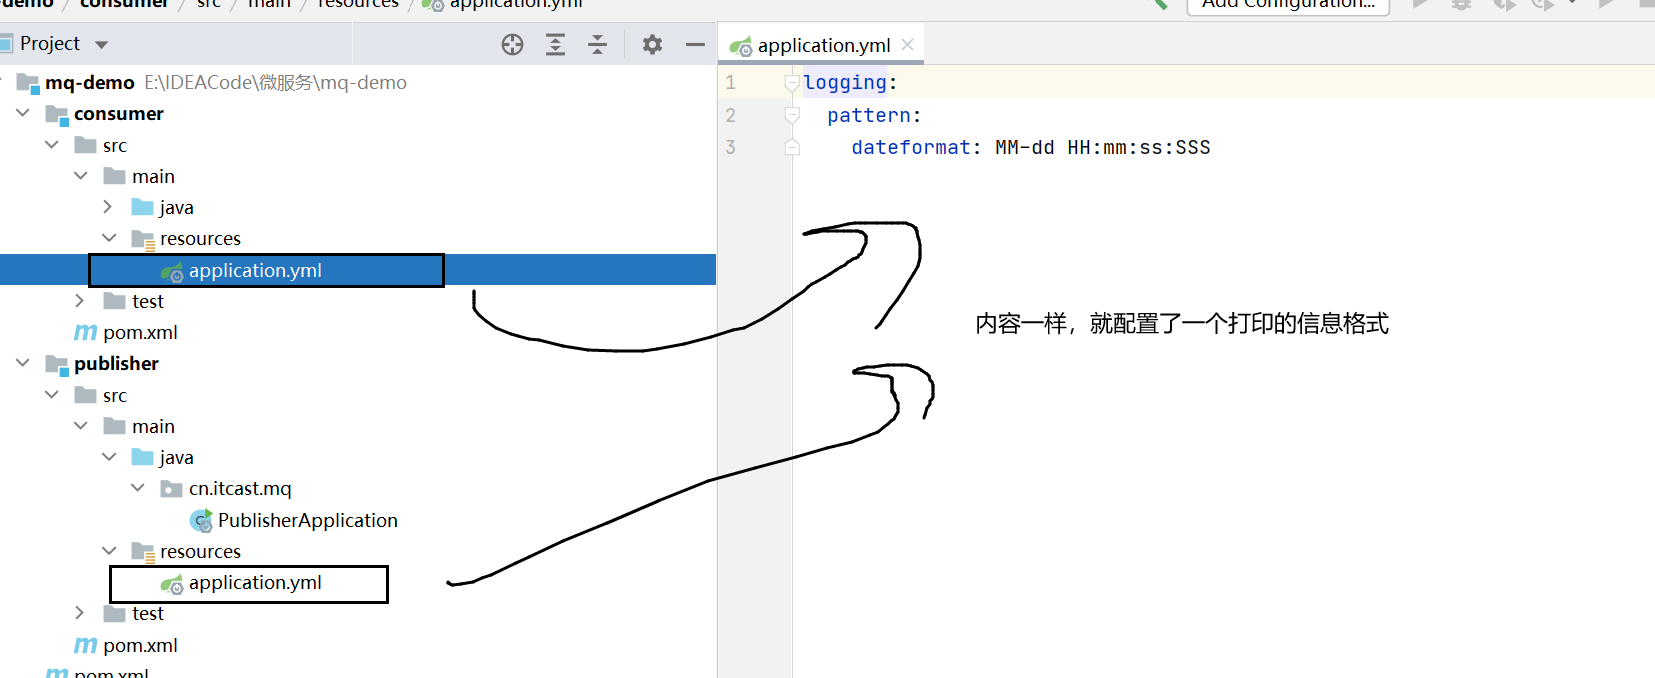
2.1.2 配置子工程的配置文件(内容一样)
logging:
  pattern:
    dateformat: MM-dd HH:mm:ss:SSS
2.1.3 编写发布者的test文件
package cn.itcast.mq.helloworld;

import com.rabbitmq.client.Channel;
import com.rabbitmq.client.Connection;
import com.rabbitmq.client.ConnectionFactory;
import org.junit.Test;

import java.io.IOException;
import java.util.concurrent.TimeoutException;

public class PublisherTest {
    @Test
    public void testSendMessage() throws IOException, TimeoutException {
        // 1.建立连接
        ConnectionFactory factory = new ConnectionFactory();
        // 1.1.设置连接参数,分别是:主机名、端口号、vhost、用户名、密码
        factory.setHost("192.168.135.130");
        factory.setPort(5672);
        factory.setVirtualHost("/");
        factory.setUsername("codejiao");
        factory.setPassword("317525");
        // 1.2.建立连接
        Connection connection = factory.newConnection();

        // 2.创建通道Channel
        Channel channel = connection.createChannel();

        // 3.创建队列
        String queueName = "simple.queue";
        channel.queueDeclare(queueName, false, false, false, null);

        // 4.发送消息
        String message = "hello, rabbitmq!";
        channel.basicPublish("", queueName, null, message.getBytes());
        System.out.println("发送消息成功:【" + message + "】");

        // 5.关闭通道和连接
        channel.close();
        connection.close();
    }
}
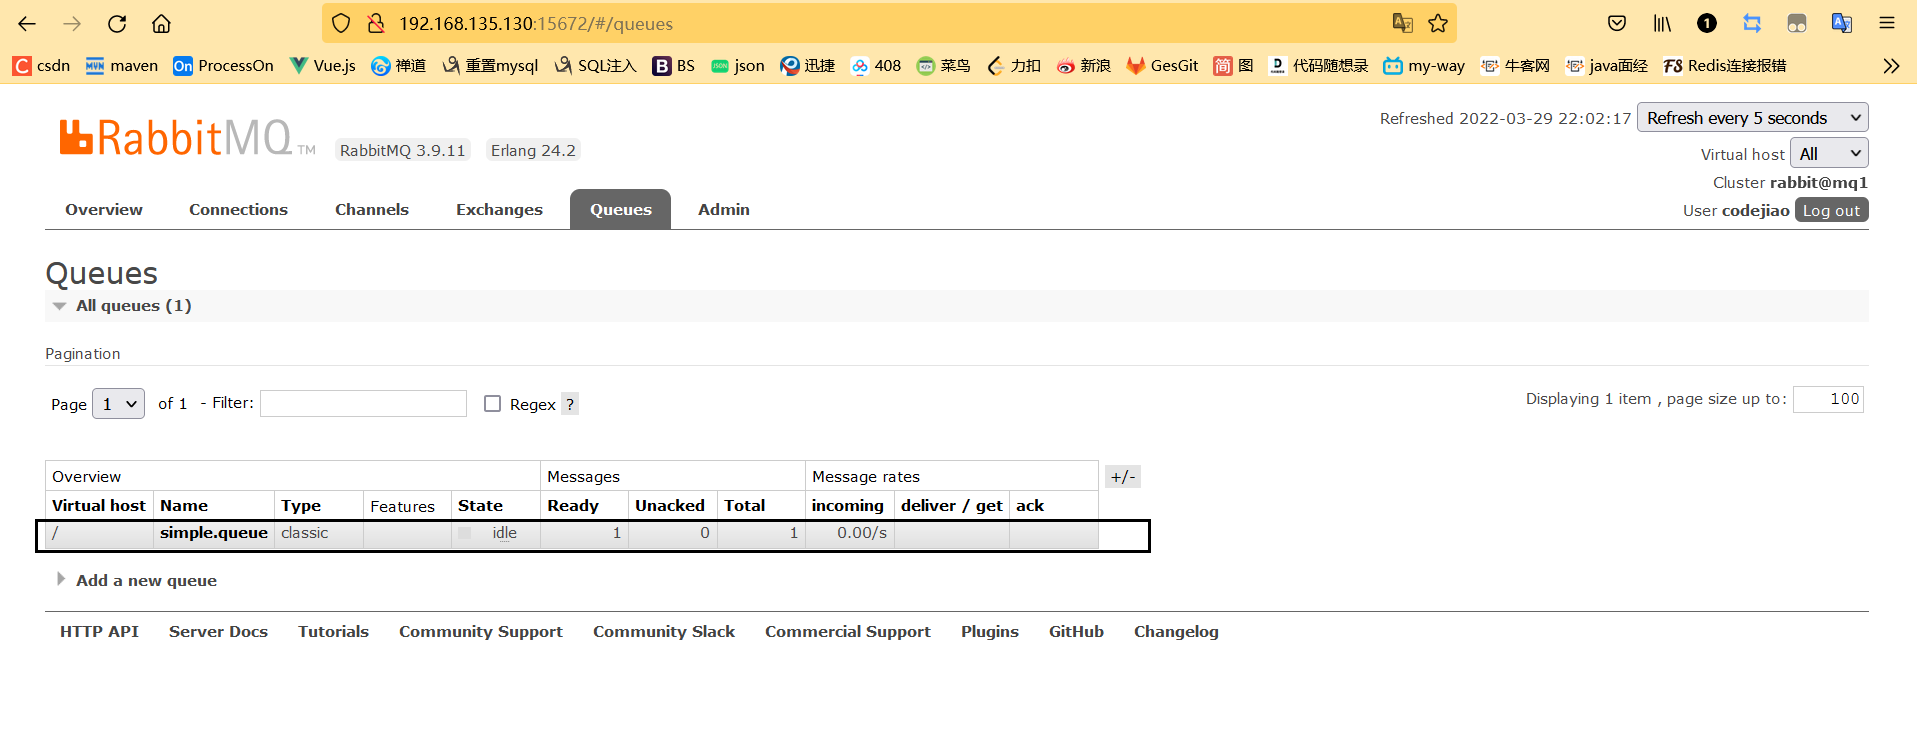
运行结果:

2.1.4 编写消费者的test文件
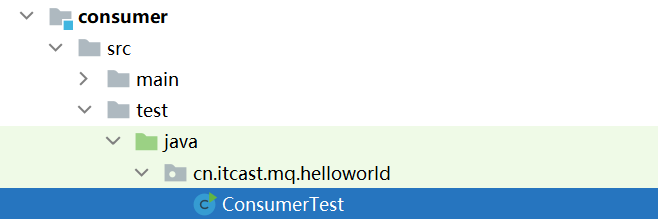
package cn.itcast.mq.helloworld;

import com.rabbitmq.client.*;

import java.io.IOException;
import java.util.concurrent.TimeoutException;

public class ConsumerTest {

    public static void main(String[] args) throws IOException, TimeoutException {
        // 1.建立连接
        ConnectionFactory factory = new ConnectionFactory();
        // 1.1.设置连接参数,分别是:主机名、端口号、vhost、用户名、密码
        factory.setHost("192.168.135.130");
        factory.setPort(5672);
        factory.setVirtualHost("/");
        factory.setUsername("codejiao");
        factory.setPassword("317525");
        // 1.2.建立连接
        Connection connection = factory.newConnection();

        // 2.创建通道Channel
        Channel channel = connection.createChannel();

        // 3.创建队列
        String queueName = "simple.queue";
        channel.queueDeclare(queueName, false, false, false, null);

        // 4.订阅消息
        channel.basicConsume(queueName, true, new DefaultConsumer(channel){
            @Override
            public void handleDelivery(String consumerTag, Envelope envelope,
                                       AMQP.BasicProperties properties, byte[] body) throws IOException {
                // 5.处理消息
                String message = new String(body);
                System.out.println("接收到消息:【" + message + "】");
            }
        });
        System.out.println("等待接收消息。。。。");
    }
}
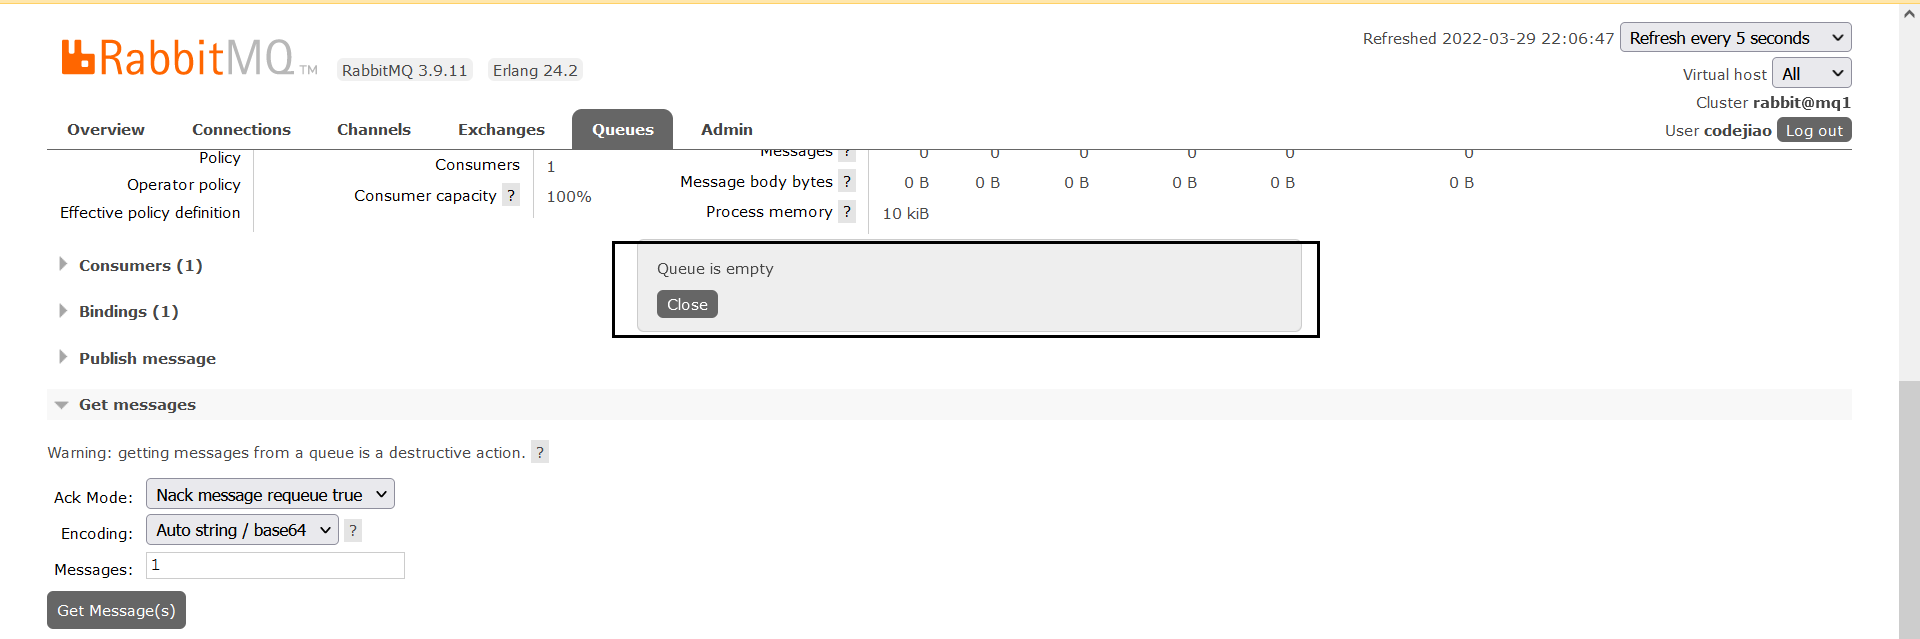
运行结果:

消息被消费者消费以后,会消失。
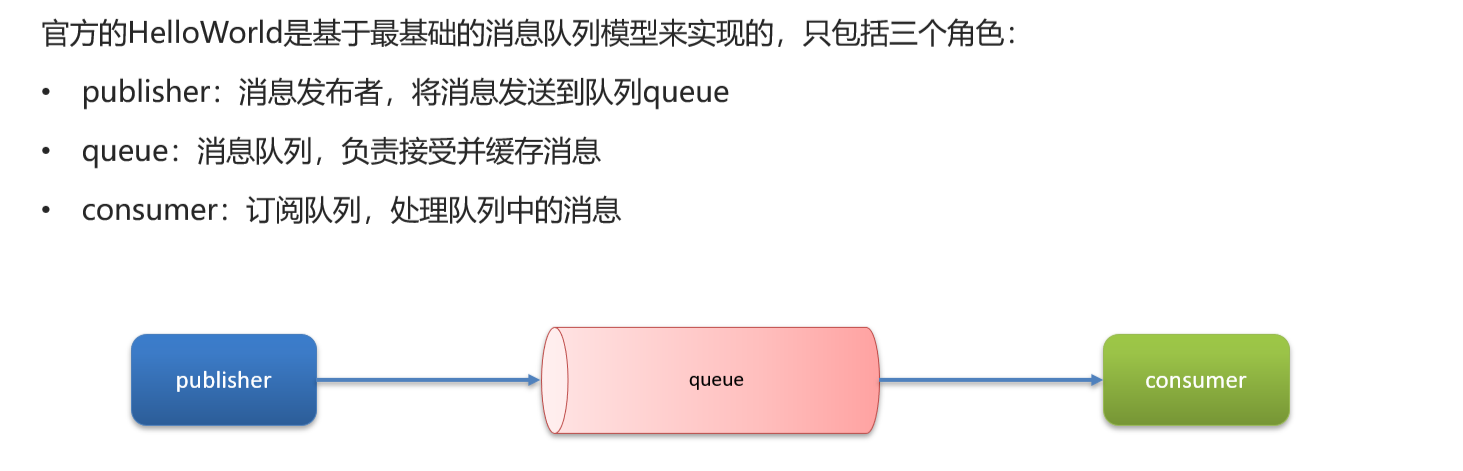
2.1.5 基本消息队列工作流程
基本消息队列的消息发送流程:
-
建立
connection -
创建
channel -
利用
channel声明队列 -
利用
channel向队列发送消息
基本消息队列的消息接收流程:
-
建立
connection -
创建
channel -
利用
channel声明队列 -
定义
consumer的消费行为handleDelivery() -
利用
channel将消费者与队列绑定
3. SpringAMQP
3.1 SpringAMQP介绍
SpringAMQP是基于RabbitMQ封装的一套模板,并且还利用SpringBoot对其实现了自动装配,使用起来非常方便。
SpringAmqp的官方地址:
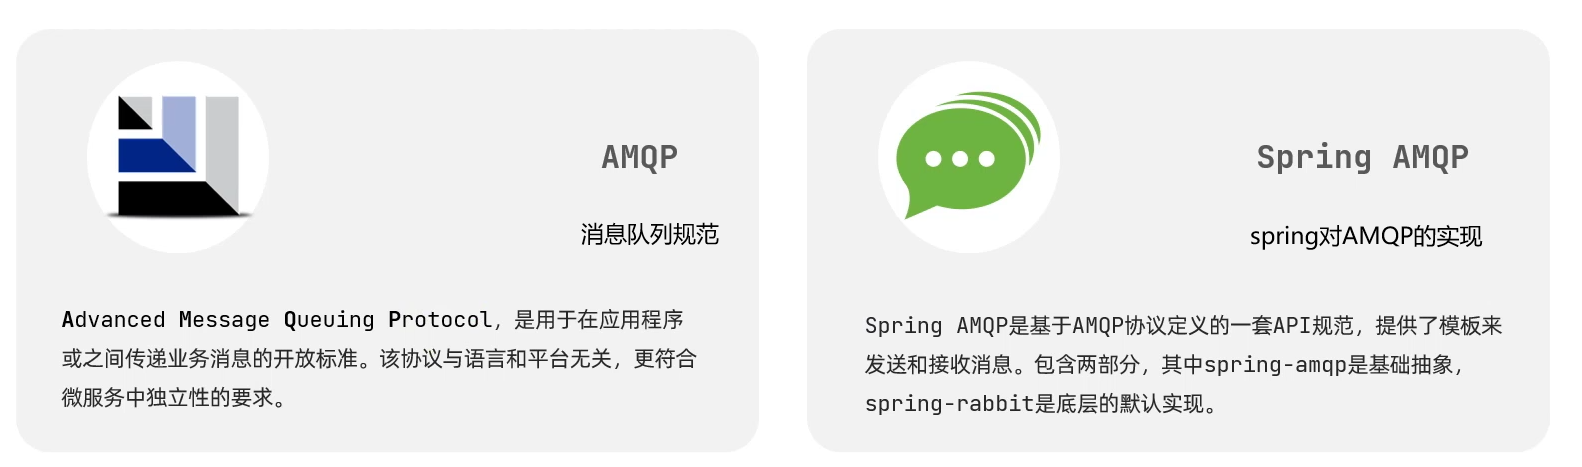
SpringAMQP提供了三个功能:
- 自动声明队列、交换机及其绑定关系
- 基于注解的监听器模式,异步接收消息
- 封装了
RabbitTemplate工具,用于发送消息
3.2 利用SpringAMQP实现HelloWorld中的基础消息队列功能
在父工程mq-demo中引入依赖
<!--AMQP依赖,包含RabbitMQ-->
<dependency>
    <groupId>org.springframework.boot</groupId>
    <artifactId>spring-boot-starter-amqp</artifactId>
</dependency>
3.2.1.消息发送
首先配置MQ地址,在publisher服务的application.yml中添加配置:
spring:
  rabbitmq:
    host: 192.168.135.130 # 主机名
    port: 5672 # 端口
    virtual-host: / # 虚拟主机
    username: codejiao # 用户名
    password: 317525 # 密码
然后在publisher服务中编写测试类SpringAmqpTest,并利用RabbitTemplate实现消息发送:

package cn.itcast.mq.spring;

import org.junit.Test;
import org.junit.runner.RunWith;
import org.springframework.amqp.rabbit.core.RabbitTemplate;
import org.springframework.beans.factory.annotation.Autowired;
import org.springframework.boot.test.context.SpringBootTest;
import org.springframework.test.context.junit4.SpringRunner;

@RunWith(SpringRunner.class)
@SpringBootTest
public class SpringAmqpTest {

    @Autowired
    private RabbitTemplate rabbitTemplate;

    @Test
    public void testSimpleQueue() {
        // 队列名称
        String queueName = "simple.queue";
        // 消息
        String message = "hello, spring amqp!";
        // 发送消息 发送的前提是simple.queue这个队列已经存在, 下面这句话不会创建消息队列
        rabbitTemplate.convertAndSend(queueName, message);
    }
}
运行结果:


小结:
3.2.2.消息接收
首先配置MQ地址,在consumer服务的application.yml中添加配置:
spring:
  rabbitmq:
    host: 192.168.135.130 # 主机名
    port: 5672 # 端口
    virtual-host: / # 虚拟主机
    username: codejiao # 用户名
    password: 317525 # 密码
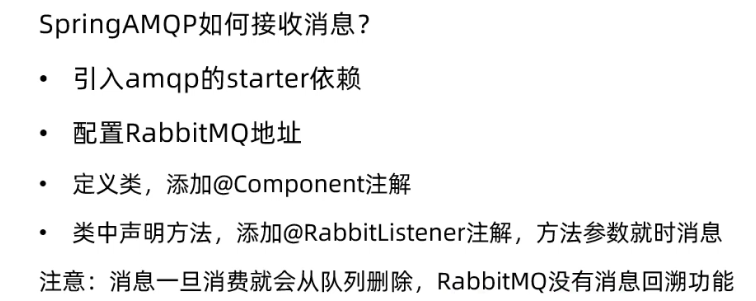
然后在consumer服务的cn.itcast.mq.listener包中新建一个类SpringRabbitListener,代码如下:
package cn.itcast.mq.listener;
import org.springframework.amqp.rabbit.annotation.RabbitListener;
import org.springframework.stereotype.Component;
@Component
public class SpringRabbitListener {
// 这里可以指定多个队列
@RabbitListener(queues = "simple.queue")
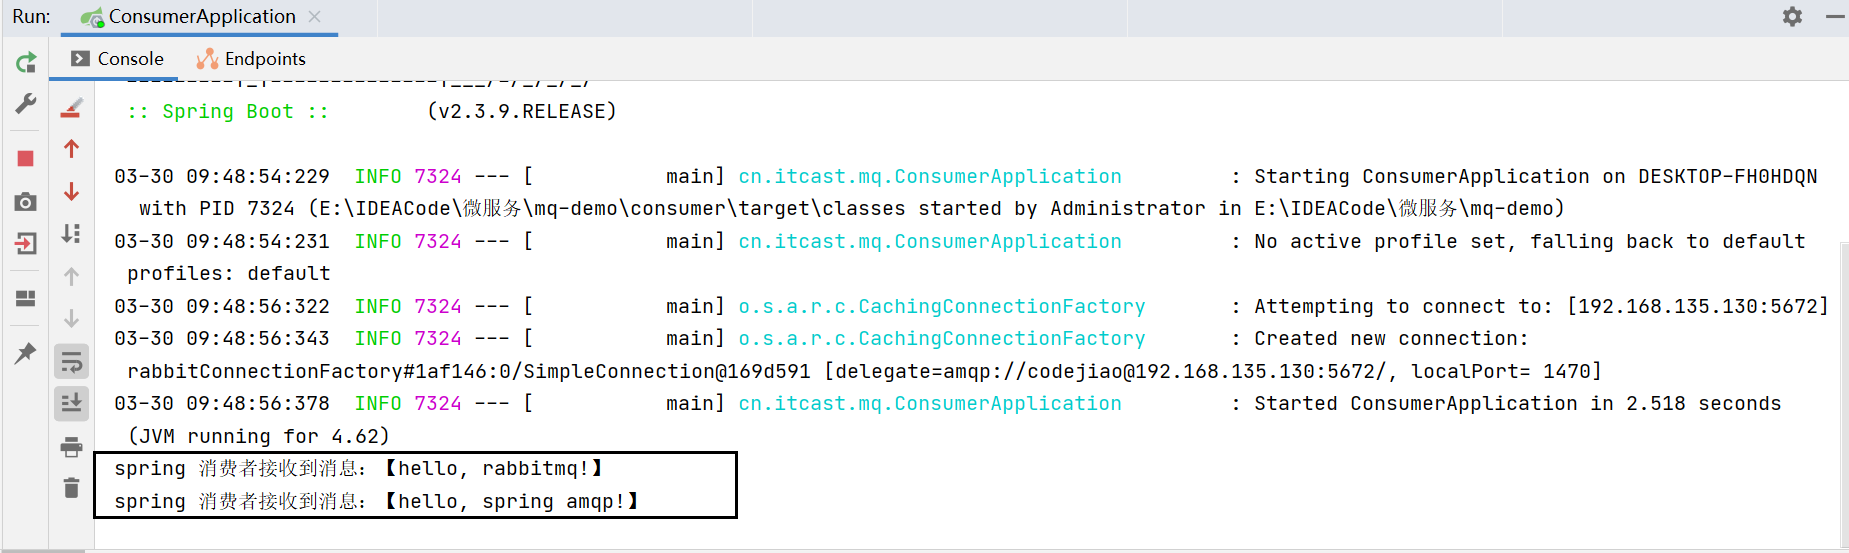
public void listenSimpleQueueMessage(String msg) throws InterruptedException {
System.out.println("spring 消费者接收到消息:【" + msg + "】");
}
}
运行结果:

3.2.3 小结
3.3.WorkQueue 工作队列
Work queues,也被称为(Task queues),任务模型。简单来说就是让多个消费者绑定到一个队列,共同消费队列中的消息。
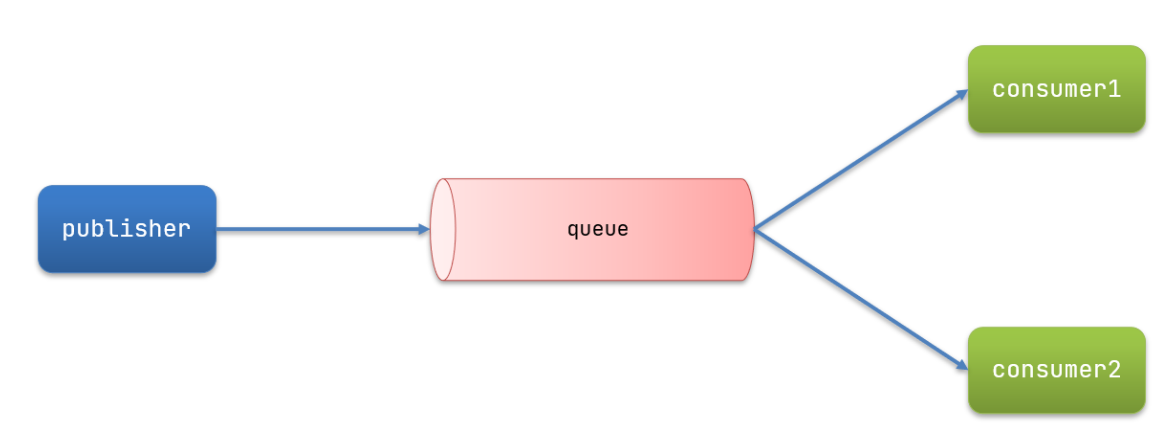
当消息处理比较耗时的时候,可能生产消息的速度会远远大于消息的消费速度。长此以往,消息就会堆积越来越多,无法及时处理。
此时就可以使用work 模型,多个消费者共同处理消息处理,速度就能大大提高了。
3.4 案例:模拟WorkQueue,实现一个队列绑定多个消费者
3.4.1.消息发送
这次我们循环发送,模拟大量消息堆积现象。
在publisher服务中的SpringAmqpTest类中添加一个测试方法:
/**
     * workQueue
     * 向队列中不停发送消息,模拟消息堆积。
     */
@Test
public void testWorkQueue() throws InterruptedException {
    // 队列名称
    String queueName = "simple.queue";
    // 消息
    String message = "hello, message_";
    for (int i = 0; i < 50; i++) {
        // 发送消息
        rabbitTemplate.convertAndSend(queueName, message + i);
        // 模拟发布者1s发布50条消息
        Thread.sleep(20);
    }
}
3.4.2.消息接收
要模拟多个消费者绑定同一个队列,我们在consumer服务的SpringRabbitListener中添加2个新的方法:
@RabbitListener(queues = "simple.queue")
public void listenWorkQueue1(String msg) throws InterruptedException {
    System.out.println("消费者1接收到消息:【" + msg + "】" + LocalTime.now());
    // 模拟消费者1 1s处理50条消息
    Thread.sleep(20);
}

@RabbitListener(queues = "simple.queue")
public void listenWorkQueue2(String msg) throws InterruptedException {
    System.err.println("消费者2........接收到消息:【" + msg + "】" + LocalTime.now());
      // 模拟消费者2 1s处理5条消息
    Thread.sleep(200);
}
注意到这个消费者sleep了1000秒,模拟任务耗时。
3.4.3 运行结果(发现消息预取机制)
我们来分析消息处理的结果:我们发现消费者1处理的全是偶数的消息,消费者2处理的全是奇数的消息。本来打算1s处理完发布者发布的50条消息,结果6s才处理完所有的消息。究其原因是因为消息预取机制,给所有的消费者分配了一样多的消息。
消费者1接收到消息:【hello, message_0】10:11:56.488
消费者2........接收到消息:【hello, message_1】10:11:56.501
消费者1接收到消息:【hello, message_2】10:11:56.520
消费者1接收到消息:【hello, message_4】10:11:56.562
消费者1接收到消息:【hello, message_6】10:11:56.604
消费者1接收到消息:【hello, message_8】10:11:56.646
消费者1接收到消息:【hello, message_10】10:11:56.688
消费者2........接收到消息:【hello, message_3】10:11:56.701
消费者1接收到消息:【hello, message_12】10:11:56.728
消费者1接收到消息:【hello, message_14】10:11:56.769
消费者1接收到消息:【hello, message_16】10:11:56.812
消费者1接收到消息:【hello, message_18】10:11:56.854
消费者1接收到消息:【hello, message_20】10:11:56.895
消费者2........接收到消息:【hello, message_5】10:11:56.901
消费者1接收到消息:【hello, message_22】10:11:56.937
消费者1接收到消息:【hello, message_24】10:11:56.979
消费者1接收到消息:【hello, message_26】10:11:57.020
消费者1接收到消息:【hello, message_28】10:11:57.062
消费者2........接收到消息:【hello, message_7】10:11:57.102
消费者1接收到消息:【hello, message_30】10:11:57.104
消费者1接收到消息:【hello, message_32】10:11:57.145
消费者1接收到消息:【hello, message_34】10:11:57.186
消费者1接收到消息:【hello, message_36】10:11:57.231
消费者1接收到消息:【hello, message_38】10:11:57.272
消费者2........接收到消息:【hello, message_9】10:11:57.302
消费者1接收到消息:【hello, message_40】10:11:57.312
消费者1接收到消息:【hello, message_42】10:11:57.355
消费者1接收到消息:【hello, message_44】10:11:57.397
消费者1接收到消息:【hello, message_46】10:11:57.439
消费者1接收到消息:【hello, message_48】10:11:57.481
消费者2........接收到消息:【hello, message_11】10:11:57.503
消费者2........接收到消息:【hello, message_13】10:11:57.703
消费者2........接收到消息:【hello, message_15】10:11:57.903
消费者2........接收到消息:【hello, message_17】10:11:58.104
消费者2........接收到消息:【hello, message_19】10:11:58.304
消费者2........接收到消息:【hello, message_21】10:11:58.505
消费者2........接收到消息:【hello, message_23】10:11:58.706
消费者2........接收到消息:【hello, message_25】10:11:58.906
消费者2........接收到消息:【hello, message_27】10:11:59.107
消费者2........接收到消息:【hello, message_29】10:11:59.308
消费者2........接收到消息:【hello, message_31】10:11:59.508
消费者2........接收到消息:【hello, message_33】10:11:59.709
消费者2........接收到消息:【hello, message_35】10:11:59.910
消费者2........接收到消息:【hello, message_37】10:12:00.110
消费者2........接收到消息:【hello, message_39】10:12:00.310
消费者2........接收到消息:【hello, message_41】10:12:00.510
消费者2........接收到消息:【hello, message_43】10:12:00.711
消费者2........接收到消息:【hello, message_45】10:12:00.911
消费者2........接收到消息:【hello, message_47】10:12:01.111
消费者2........接收到消息:【hello, message_49】10:12:01.312
消息预取机制说明(默认是有多少拿多少):
3.4.5 修改消费预取机制上限
修改application.yml文件,设置preFetch这个值,可以控制预取消息的上限:
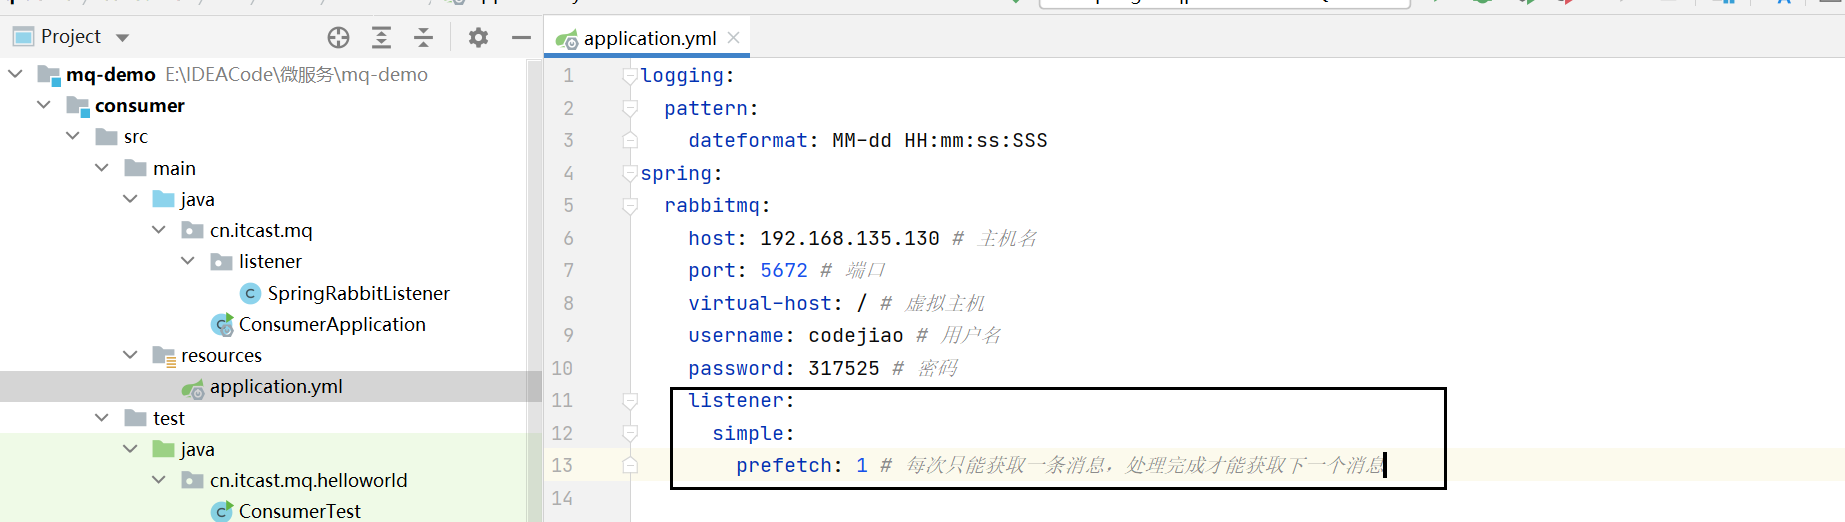
spring:
  rabbitmq:
    listener:
      simple:
        prefetch: 1 # 每次只能获取一条消息,处理完成才能获取下一个消息
3.4.6 再次运行
运行结果:发现现在在1s内处理完了消息队列里面得消息。
消费者1接收到消息:【hello, message_0】21:26:51.555
消费者2........接收到消息:【hello, message_1】21:26:51.578
消费者1接收到消息:【hello, message_2】21:26:51.598
消费者1接收到消息:【hello, message_3】21:26:51.620
消费者1接收到消息:【hello, message_4】21:26:51.642
消费者1接收到消息:【hello, message_5】21:26:51.664
消费者1接收到消息:【hello, message_6】21:26:51.685
消费者1接收到消息:【hello, message_7】21:26:51.706
消费者1接收到消息:【hello, message_8】21:26:51.727
消费者1接收到消息:【hello, message_9】21:26:51.749
消费者1接收到消息:【hello, message_10】21:26:51.772
消费者2........接收到消息:【hello, message_11】21:26:51.786
消费者1接收到消息:【hello, message_12】21:26:51.806
消费者1接收到消息:【hello, message_13】21:26:51.827
消费者1接收到消息:【hello, message_14】21:26:51.849
消费者1接收到消息:【hello, message_15】21:26:51.869
消费者1接收到消息:【hello, message_16】21:26:51.891
消费者1接收到消息:【hello, message_17】21:26:51.913
消费者1接收到消息:【hello, message_18】21:26:51.935
消费者1接收到消息:【hello, message_19】21:26:51.958
消费者1接收到消息:【hello, message_20】21:26:51.980
消费者2........接收到消息:【hello, message_21】21:26:51.993
消费者1接收到消息:【hello, message_22】21:26:52.015
消费者1接收到消息:【hello, message_23】21:26:52.037
消费者1接收到消息:【hello, message_24】21:26:52.058
消费者1接收到消息:【hello, message_25】21:26:52.079
消费者1接收到消息:【hello, message_26】21:26:52.100
消费者1接收到消息:【hello, message_27】21:26:52.122
消费者1接收到消息:【hello, message_28】21:26:52.143
消费者1接收到消息:【hello, message_29】21:26:52.165
消费者1接收到消息:【hello, message_30】21:26:52.186
消费者2........接收到消息:【hello, message_31】21:26:52.200
消费者1接收到消息:【hello, message_32】21:26:52.221
消费者1接收到消息:【hello, message_33】21:26:52.242
消费者1接收到消息:【hello, message_34】21:26:52.263
消费者1接收到消息:【hello, message_35】21:26:52.284
消费者1接收到消息:【hello, message_36】21:26:52.306
消费者1接收到消息:【hello, message_37】21:26:52.327
消费者1接收到消息:【hello, message_38】21:26:52.349
消费者1接收到消息:【hello, message_39】21:26:52.371
消费者1接收到消息:【hello, message_40】21:26:52.392
消费者2........接收到消息:【hello, message_41】21:26:52.406
消费者1接收到消息:【hello, message_42】21:26:52.425
消费者1接收到消息:【hello, message_43】21:26:52.446
消费者1接收到消息:【hello, message_44】21:26:52.467
消费者1接收到消息:【hello, message_45】21:26:52.488
消费者1接收到消息:【hello, message_46】21:26:52.509
消费者1接收到消息:【hello, message_47】21:26:52.531
消费者1接收到消息:【hello, message_48】21:26:52.553
消费者1接收到消息:【hello, message_49】21:26:52.574
3.4.7 小结
Work模型的使用:
- 多个消费者绑定到一个队列,同一条消息只会被一个消费者处理
- 通过设置prefetch来控制消费者预取的消息数量
3.4 发布订阅模式
发布订阅的模型如图:
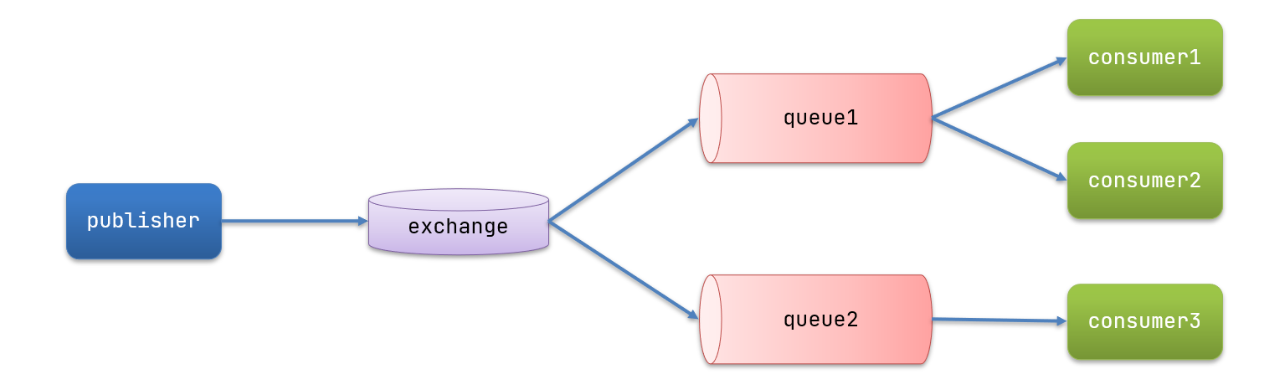
可以看到,在订阅模型中,多了一个exchange角色,而且过程略有变化:
- Publisher:生产者,也就是要发送消息的程序,但是不再发送到队列中,而是发给exchange(交换机)。
- Exchange:交换机,图中的exchange。一方面,接收生产者发送的消息。另一方面,知道如何处理消息,例如递交给某个特别队列、递交给所有队列、或是将消息丢弃。到底如何操作,取决于Exchange的类型。Exchange有以下3种类型:
- Fanout:广播,将消息交给所有绑定到交换机的队列。
- Direct:定向,把消息交给符合指定routing key 的队列。
- Topic:通配符,把消息交给符合routing pattern(路由模式) 的队列。
- Consumer:消费者,与以前一样,订阅队列,没有变化。
- Queue:消息队列也与以前一样,接收消息、缓存消息。
Exchange(交换机)只负责转发消息,不具备存储消息的能力,因此如果没有任何队列与Exchange绑定,或者没有符合路由规则的队列,那么消息会丢失!
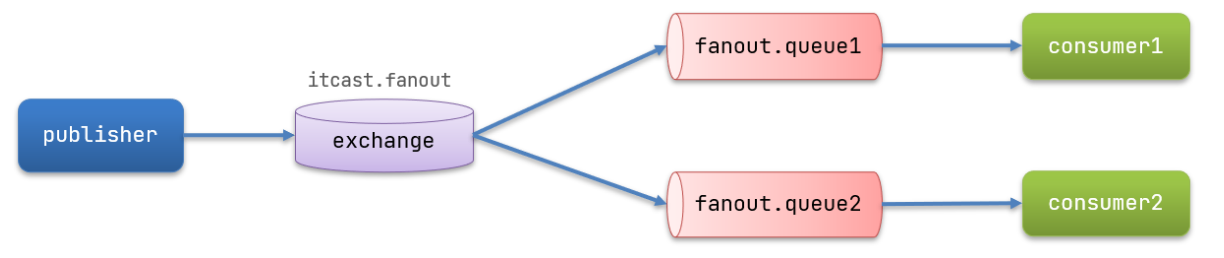
3.5 案例:利用SpringAMQP演示FanoutExchange的使用

在广播模式下,消息发送流程是这样的:
- 1) 可以有多个队列
- 2) 每个队列都要绑定到Exchange(交换机)
- 3) 生产者发送的消息,只能发送到交换机,交换机来决定要发给哪个队列,生产者无法决定
- 4) 交换机把消息发送给绑定过的所有队列
- 5) 订阅队列的消费者都能拿到消息
我们的计划是这样的:
- 创建一个交换机 itcast.fanout,类型是Fanout
- 创建两个队列fanout.queue1和fanout.queue2,绑定到交换机itcast.fanout
3.5.1 步骤1:在consumer服务声明Exchange、Queue、Binding
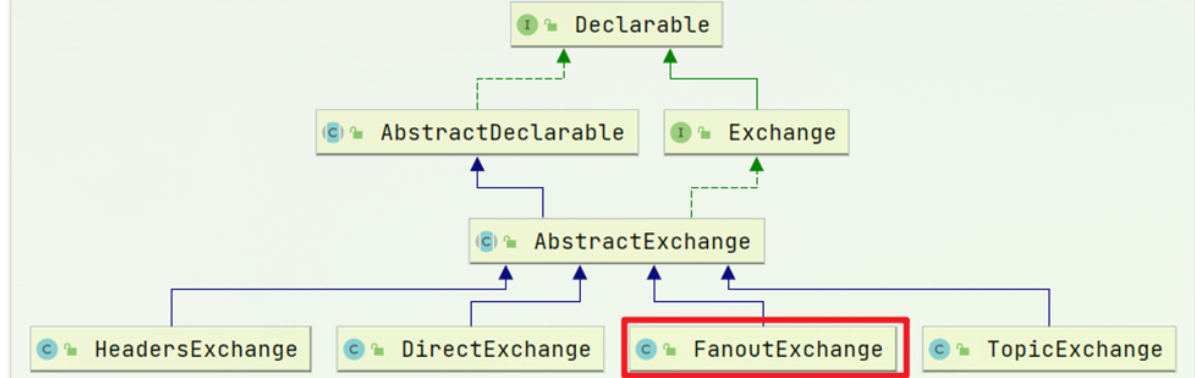
Spring提供了一个接口Exchange,来表示所有不同类型的交换机:
在consumer中创建一个类,声明队列和交换机:
package cn.itcast.mq.config;

import org.springframework.amqp.core.Binding;
import org.springframework.amqp.core.BindingBuilder;
import org.springframework.amqp.core.FanoutExchange;
import org.springframework.amqp.core.Queue;
import org.springframework.context.annotation.Bean;
import org.springframework.context.annotation.Configuration;

@Configuration
public class FanoutConfig {
    /**
     * 声明交换机
     *
     * @return Fanout类型交换机
     */
    @Bean
    public FanoutExchange fanoutExchange() {
        return new FanoutExchange("itcast.fanout");
    }

    /**
     * 第1个队列
     */
    @Bean
    public Queue fanoutQueue1() {
        return new Queue("fanout.queue1");
    }

    /**
     * 绑定第一个队列和交换机
     */
    @Bean
    public Binding bindingQueue1(Queue fanoutQueue1, FanoutExchange fanoutExchange) {
        // 注意这个fanoutQueue1必须和前面得fanout.queue1对应
        return BindingBuilder.bind(fanoutQueue1).to(fanoutExchange);
    }

    /**
     * 第2个队列
     */
    @Bean
    public Queue fanoutQueue2() {
        return new Queue("fanout.queue2");
    }

    /**
     * 绑定第2个队列和交换机
     */
    @Bean
    public Binding bindingQueue2(Queue fanoutQueue2, FanoutExchange fanoutExchange) {
        return BindingBuilder.bind(fanoutQueue2).to(fanoutExchange);
    }
}
3.5.2 步骤2:消息发送
在publisher服务的SpringAmqpTest类中添加测试方法:
@Test
public void testFanoutExchange() {
    // 队列名称
    String exchangeName = "itcast.fanout";
    // 消息
    String message = "hello, everyone!";
    rabbitTemplate.convertAndSend(exchangeName, "", message);
}
3.5.3 步骤3:消息接收
在consumer服务的SpringRabbitListener中添加两个方法,作为消费者:
@RabbitListener(queues = "fanout.queue1")
public void listenFanoutQueue1(String msg) {
    System.out.println("消费者1接收到Fanout消息:【" + msg + "】");
}

@RabbitListener(queues = "fanout.queue2")
public void listenFanoutQueue2(String msg) {
    System.out.println("消费者2接收到Fanout消息:【" + msg + "】");
}
3.5.4 运行结果
发现两个消费者收到了同一条消息:
3.5.5 小结
交换机的作用是什么?
- 接收publisher发送的消息
- 将消息按照规则路由到与之绑定的队列
- 不能缓存消息,路由失败,消息丢失
- FanoutExchange的会将消息路由到每个绑定的队列
声明队列、交换机、绑定关系的Bean是什么?
- Queue 声明队列
- FanoutExchange 交换机
- Binding 绑定关系
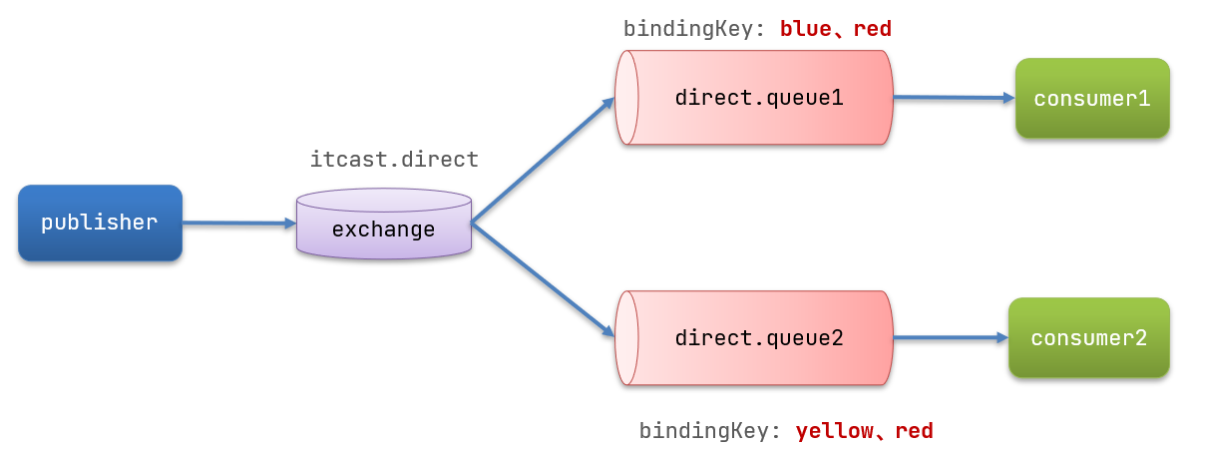
3.6 案例:利用SpringAMQP演示DirectExchange的使用
在Fanout模式中,一条消息,会被所有订阅的队列都消费。但是,在某些场景下,我们希望不同的消息被不同的队列消费。这时就要用到Direct类型的Exchange。

在Direct模型下:
- 队列与交换机的绑定,不能是任意绑定了,而是要指定一个
RoutingKey(路由key) - 消息的发送方在 向 Exchange发送消息时,也必须指定消息的
RoutingKey。 - Exchange不再把消息交给每一个绑定的队列,而是根据消息的
Routing Key进行判断,只有队列的Routingkey与消息的Routing key完全一致,才会接收到消息
案例需求如下:
- 利用
@RabbitListener声明Exchange、Queue、RoutingKey - 在
consumer服务中,编写两个消费者方法,分别监听direct.queue1和direct.queue2 - 在
publisher中编写测试方法,向itcast. direct发送消息
3.6.1 步骤1:基于注解声明队列和交换机
基于@Bean的方式声明队列和交换机比较麻烦,Spring还提供了基于注解方式来声明。
在consumer的SpringRabbitListener中添加两个消费者,同时基于注解来声明队列和交换机:
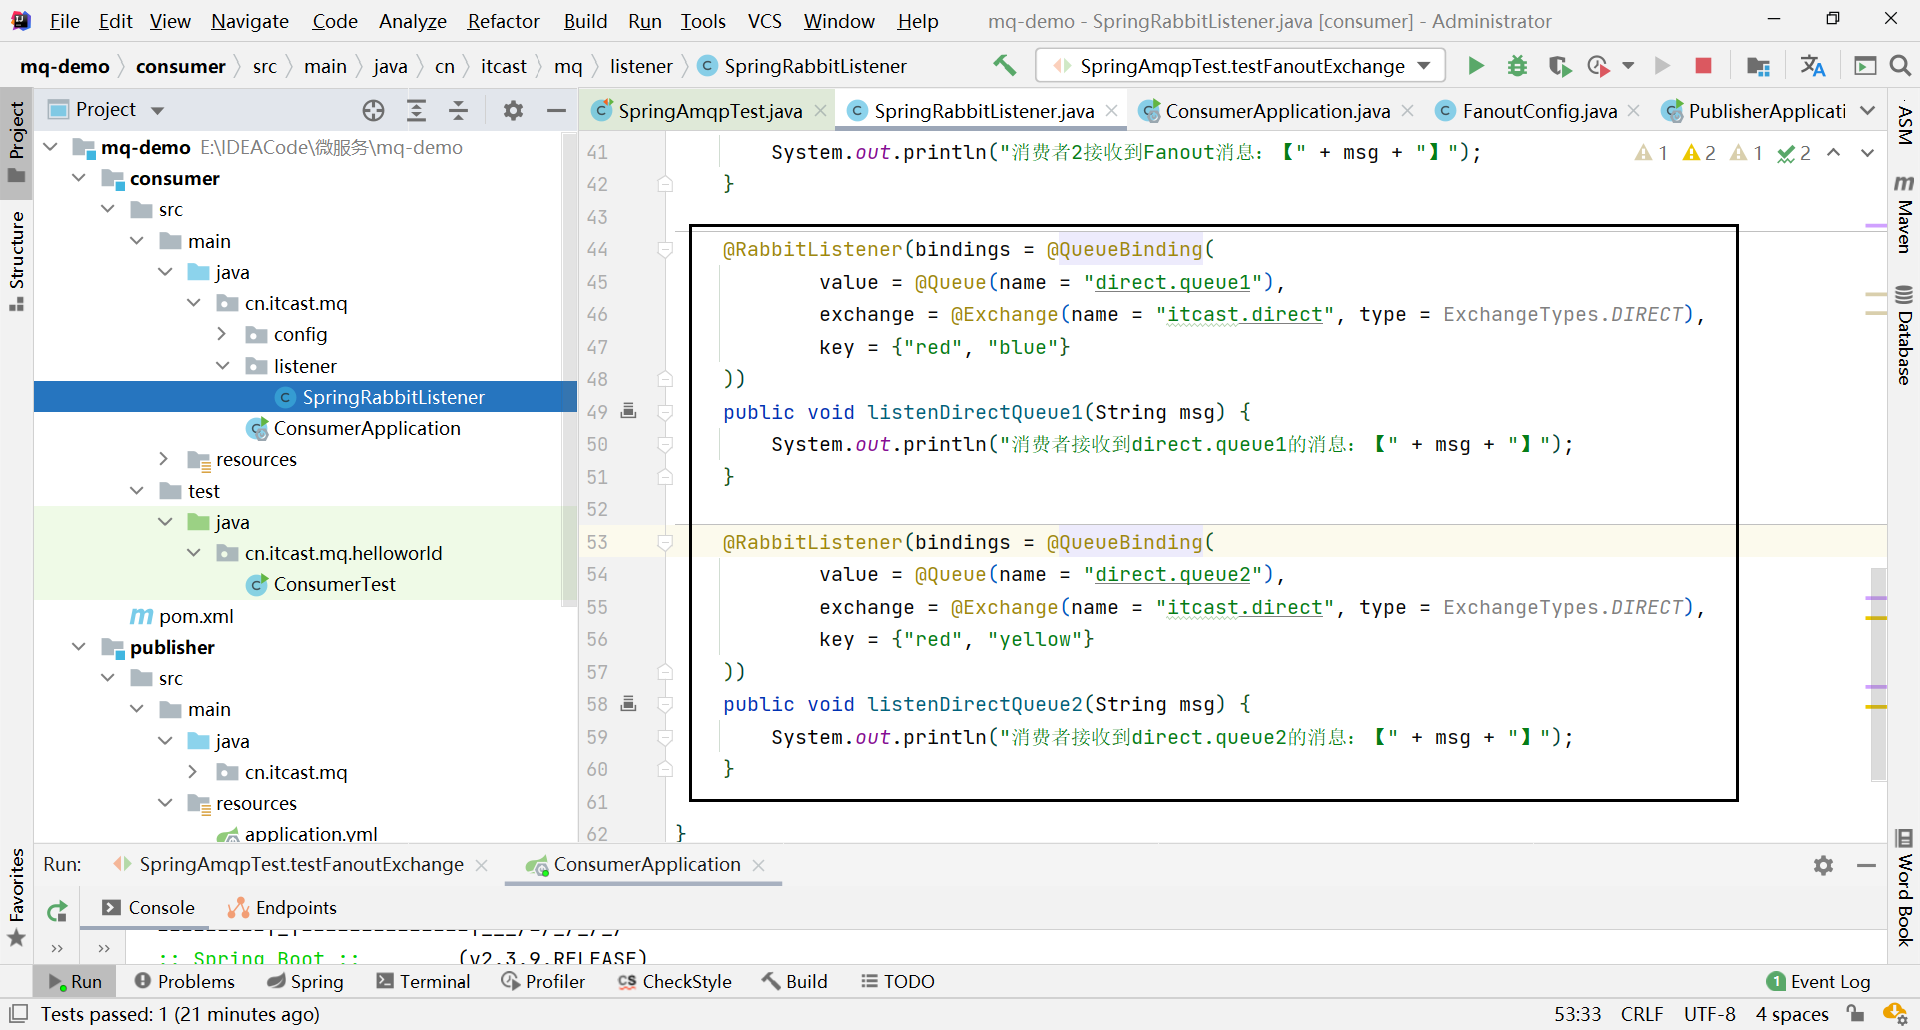
@RabbitListener(bindings = @QueueBinding(
    value = @Queue(name = "direct.queue1"),
    exchange = @Exchange(name = "itcast.direct", type = ExchangeTypes.DIRECT),
    key = {"red", "blue"}
))
public void listenDirectQueue1(String msg){
    System.out.println("消费者接收到direct.queue1的消息:【" + msg + "】");
}

@RabbitListener(bindings = @QueueBinding(
    value = @Queue(name = "direct.queue2"),
    exchange = @Exchange(name = "itcast.direct", type = ExchangeTypes.DIRECT),
    key = {"red", "yellow"}
))
public void listenDirectQueue2(String msg){
    System.out.println("消费者接收到direct.queue2的消息:【" + msg + "】");
}
3.6.2 步骤2:消息发送
在publisher服务的SpringAmqpTest类中添加测试方法:
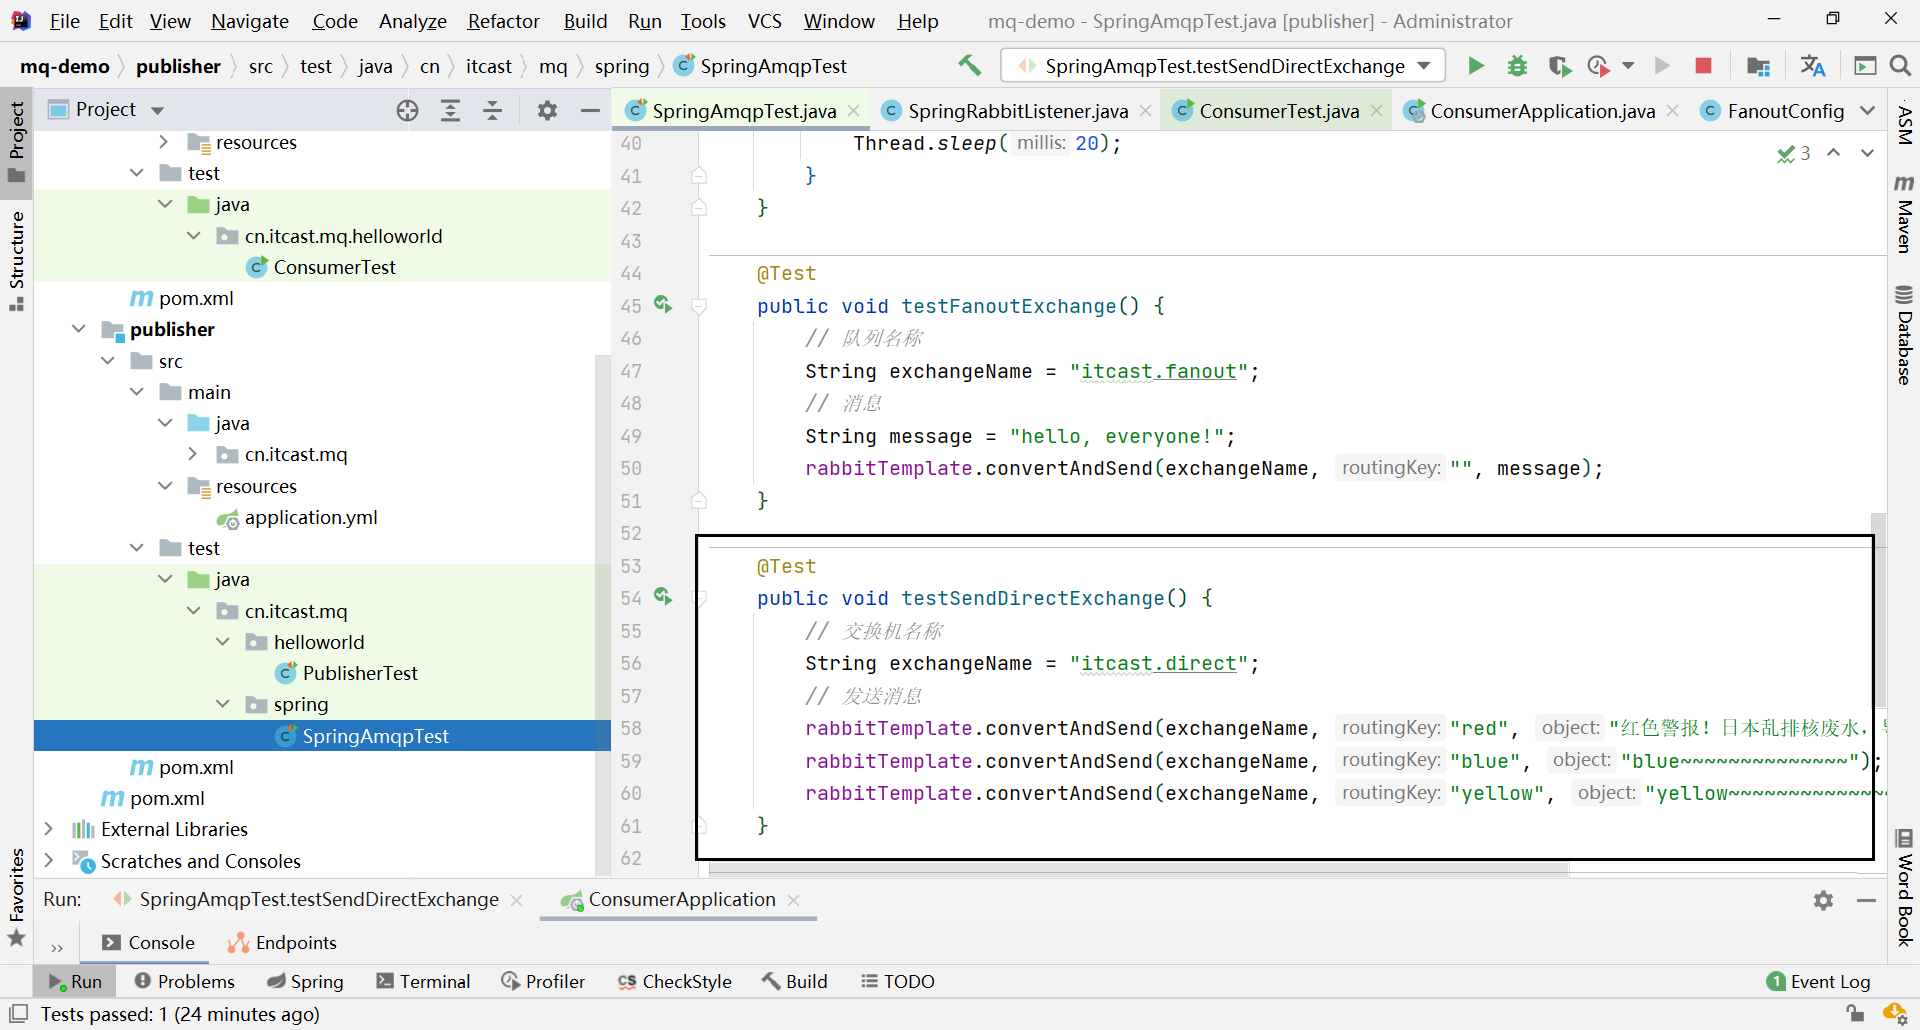
    @Test
    public void testSendDirectExchange() {
        // 交换机名称
        String exchangeName = "itcast.direct";
        // 发送消息
        rabbitTemplate.convertAndSend(exchangeName, "red", "红色警报!日本乱排核废水,导致海洋生物变异,惊现哥斯拉!");
        rabbitTemplate.convertAndSend(exchangeName, "blue", "blue~~~~~~~~~~~~~~");
        rabbitTemplate.convertAndSend(exchangeName, "yellow", "yellow~~~~~~~~~~~~~~");
    }
3.6.3 运行结果
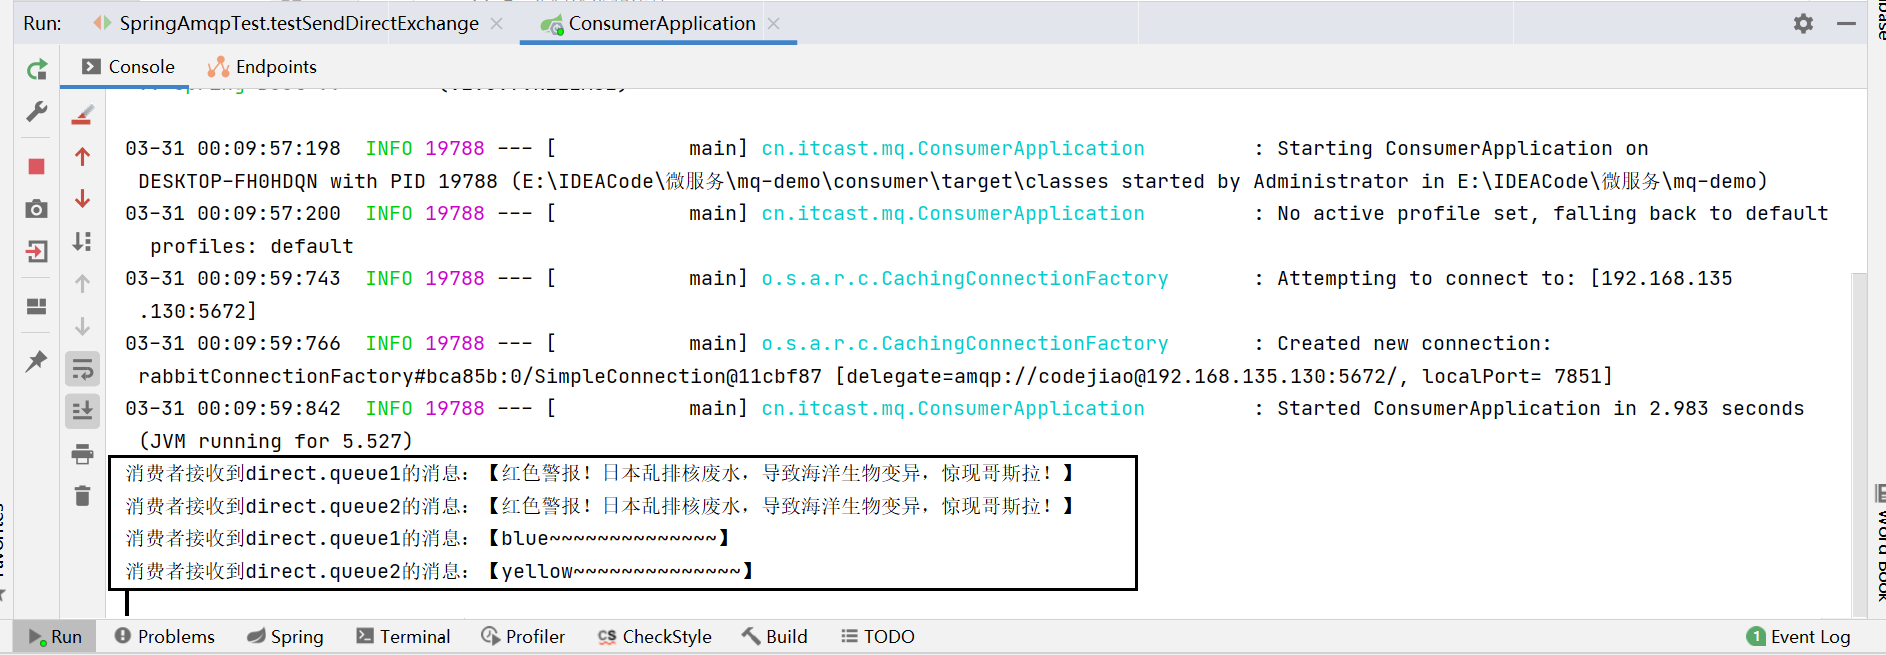
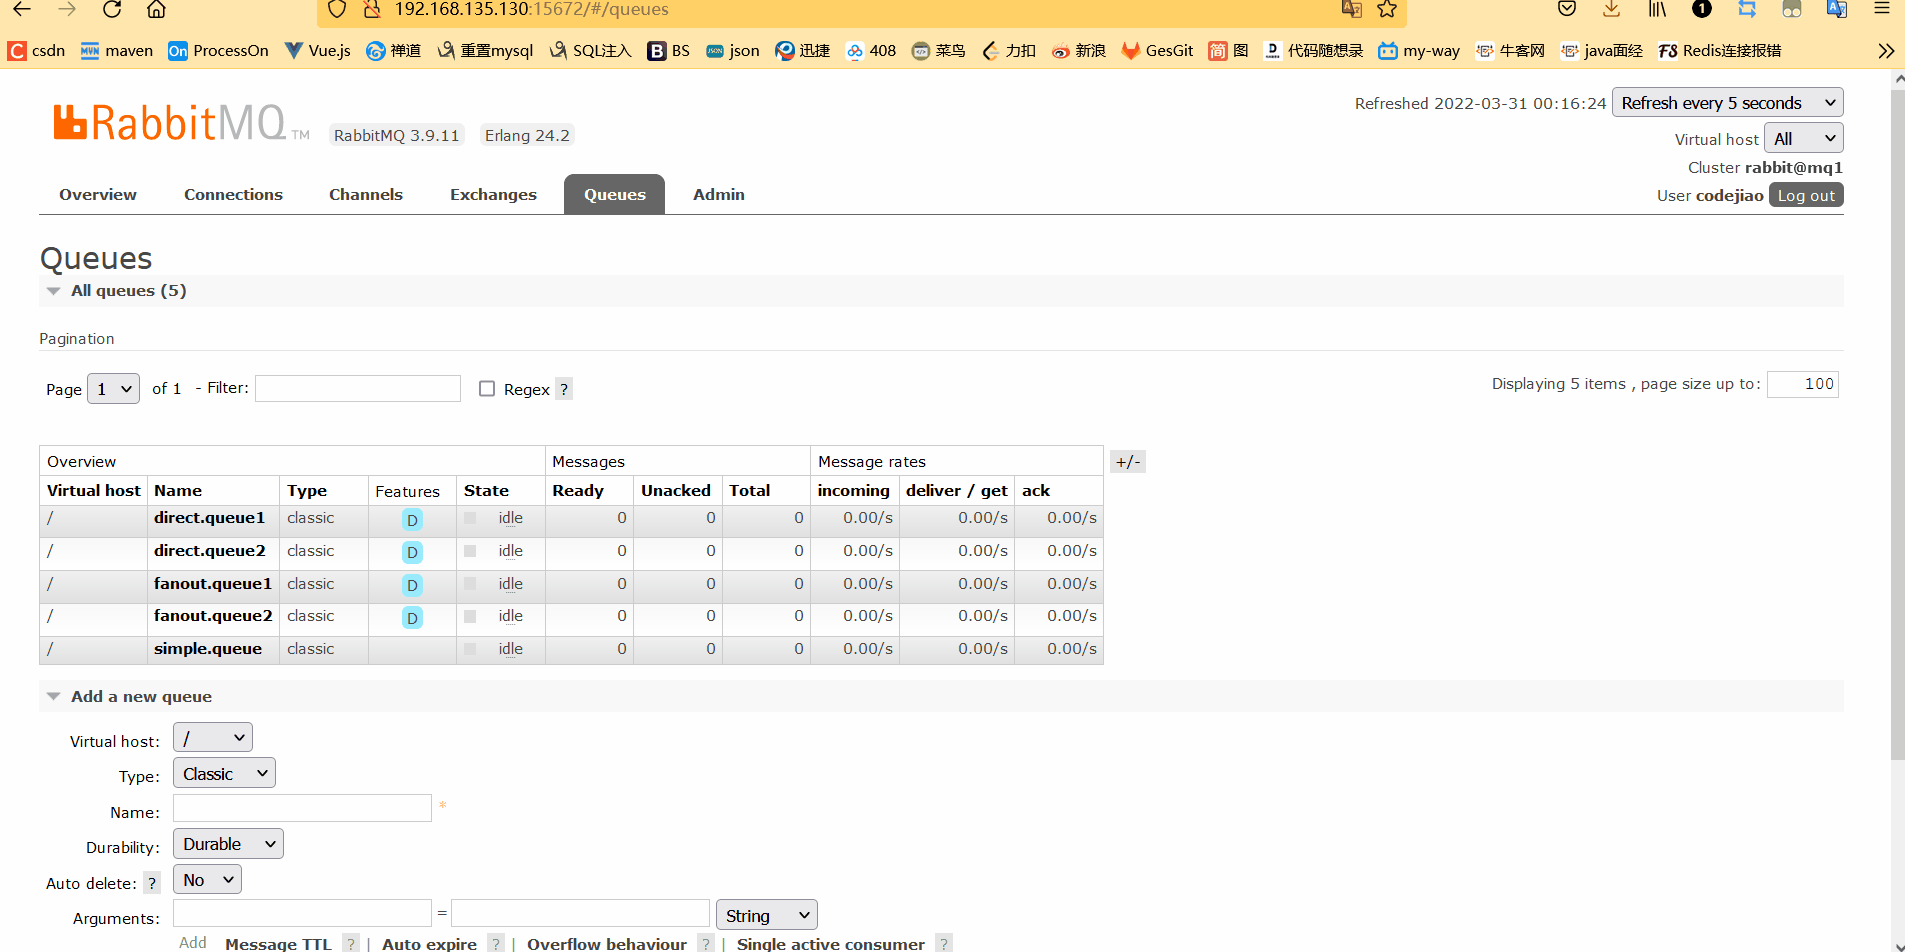
查看队列绑定的key:
3.6.4 总结
描述下Direct交换机与Fanout交换机的差异?
Fanout交换机将消息路由给每一个与之绑定的队列Direct交换机根据RoutingKey判断路由给哪个队列- 如果多个队列具有相同的
RoutingKey,则与Fanout功能类似
基于@RabbitListener注解声明队列和交换机有哪些常见注解?
@Queue队列@Exchange交换机
3.7 案例:利用SpringAMQP演示TopicExchange的使用
3.7.1 TopicExchange说明
Topic类型的Exchange与Direct相比,都是可以根据RoutingKey把消息路由到不同的队列。只不过Topic类型Exchange可以让队列在绑定Routing key 的时候使用通配符!
Routingkey 一般都是有一个或多个单词组成,多个单词之间以”.”分割,例如: item.insert
通配符规则:
#:匹配一个或多个词
*:匹配不多不少恰好1个词
举例:
item.#:能够匹配item.spu.insert 或者 item.spu
item.*:只能匹配item.spu
图示:
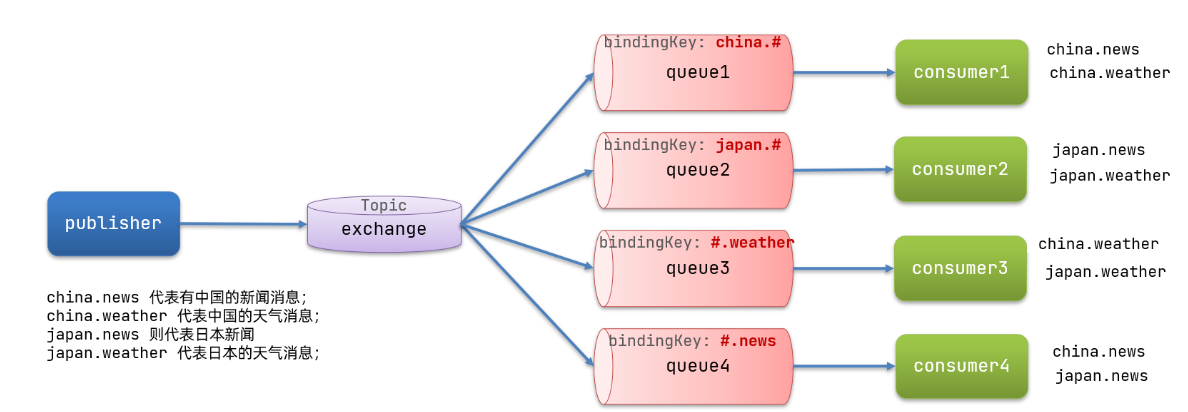
- Queue1:绑定的是
china.#,因此凡是以china.开头的routing key都会被匹配到。包括china.news和china.weather - Queue2:绑定的是
#.news,因此凡是以.news结尾的routing key都会被匹配。包括china.news和japan.news
3.7.2 案例说明
案例需求:
实现思路如下:
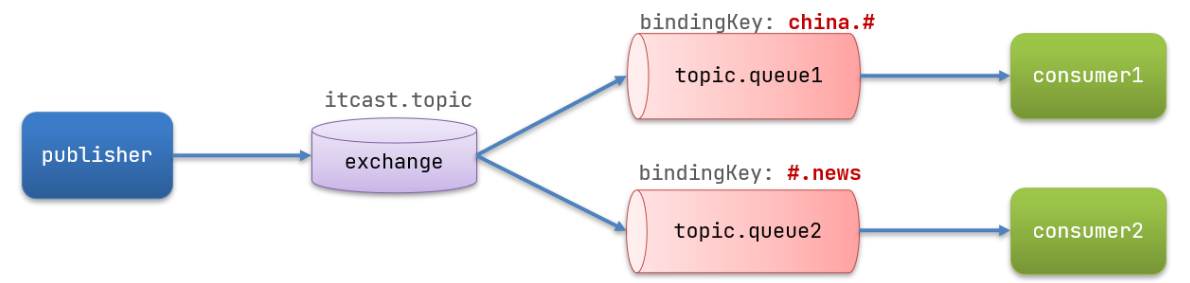
- 并利用
@RabbitListener声明Exchange、Queue、RoutingKey - 在
consumer服务中,编写两个消费者方法,分别监听topic.queue1和topic.queue2 - 在
publisher中编写测试方法,向itcast. topic发送消息
3.7.3 步骤1:消息发送
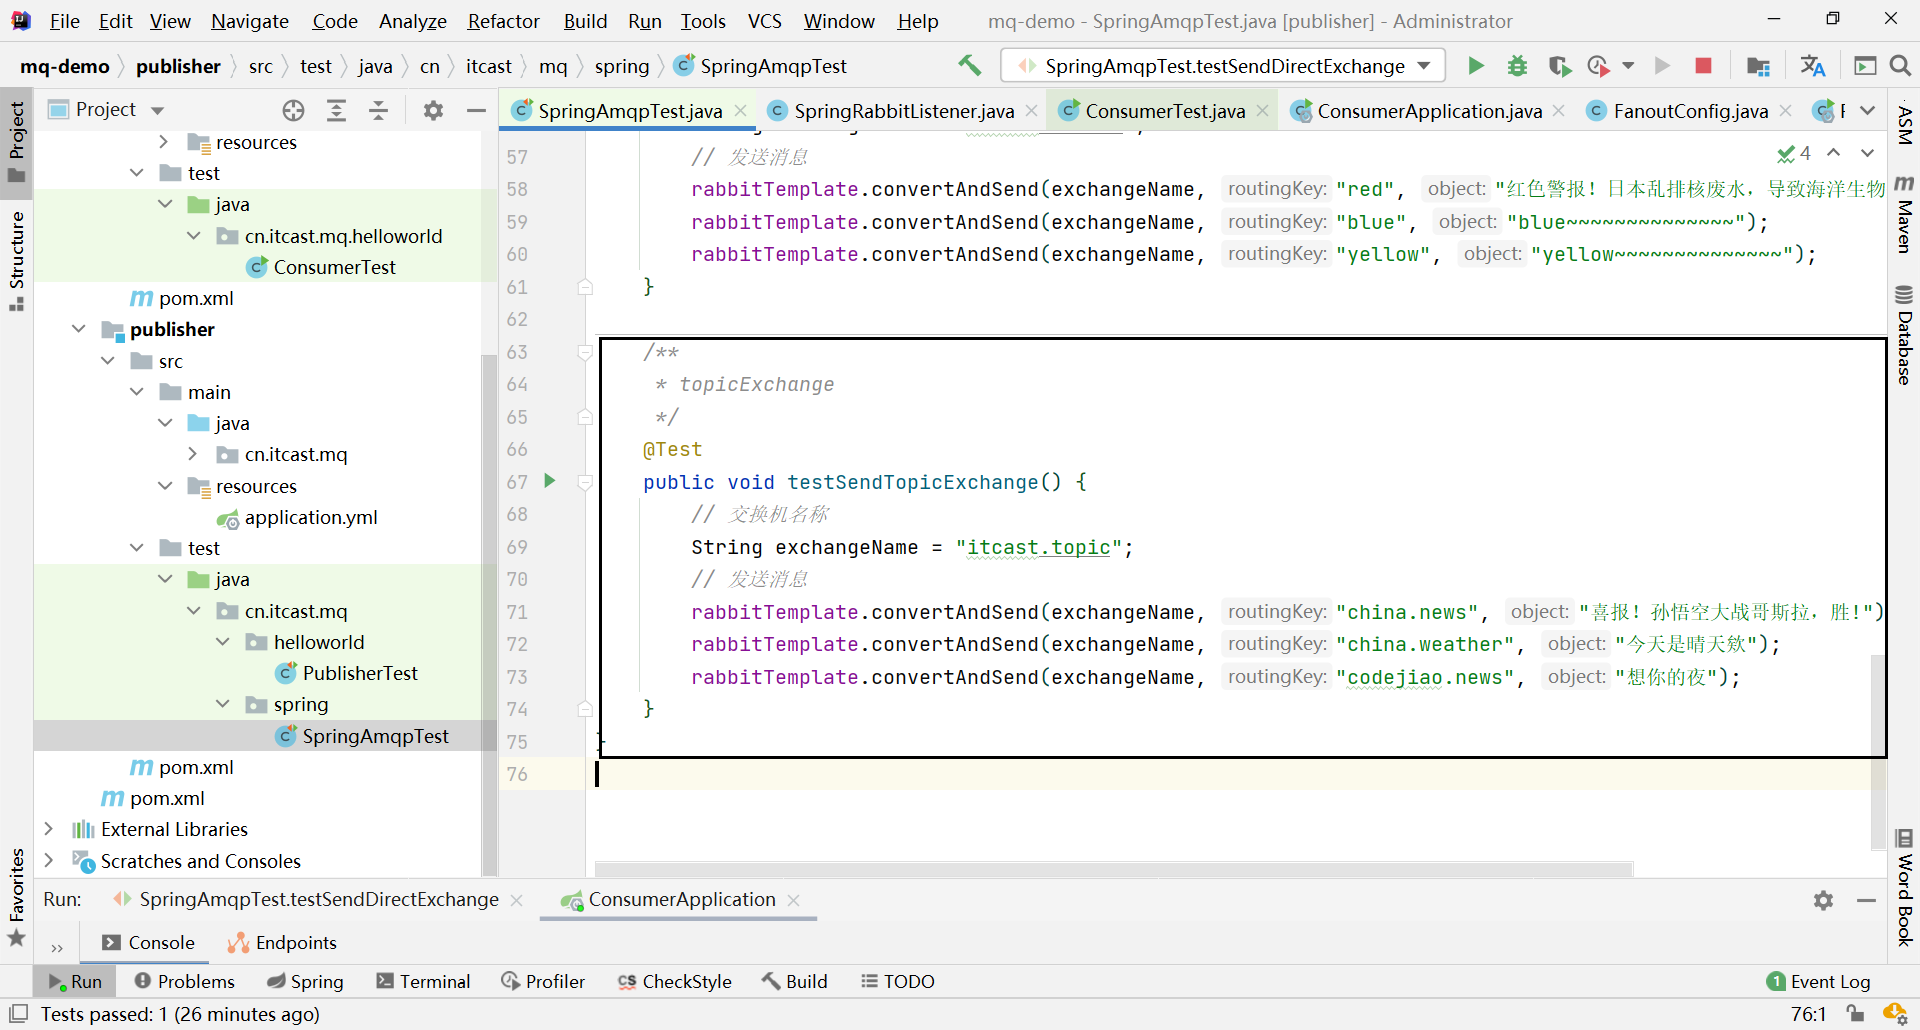
在publisher服务的SpringAmqpTest类中添加测试方法:
/**
* topicExchange
*/
@Test
public void testSendTopicExchange() {
// 交换机名称
String exchangeName = "itcast.topic";
// 发送消息
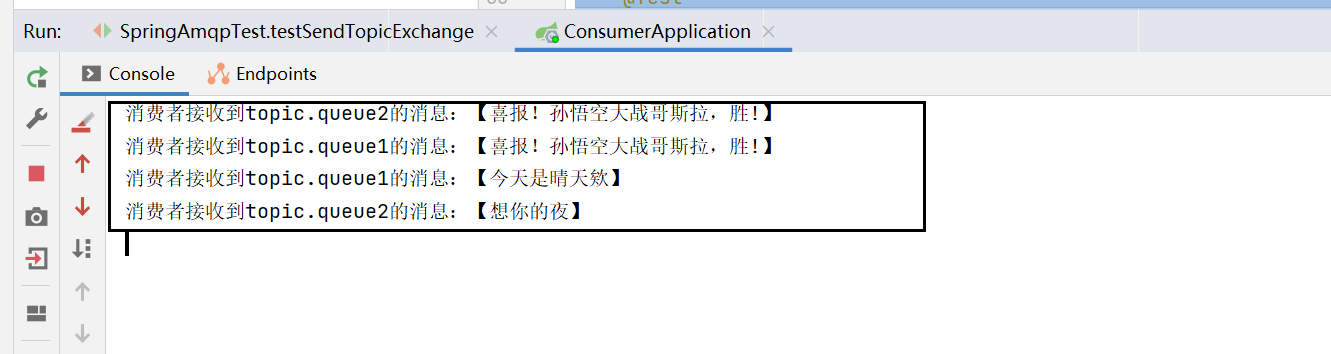
rabbitTemplate.convertAndSend(exchangeName, "china.news", "喜报!孙悟空大战哥斯拉,胜!");
rabbitTemplate.convertAndSend(exchangeName, "china.weather", "今天是晴天欸");
rabbitTemplate.convertAndSend(exchangeName, "codejiao.news", "想你的夜");
}
3.7.4 步骤2:消息接收
在consumer服务的SpringRabbitListener中添加方法:
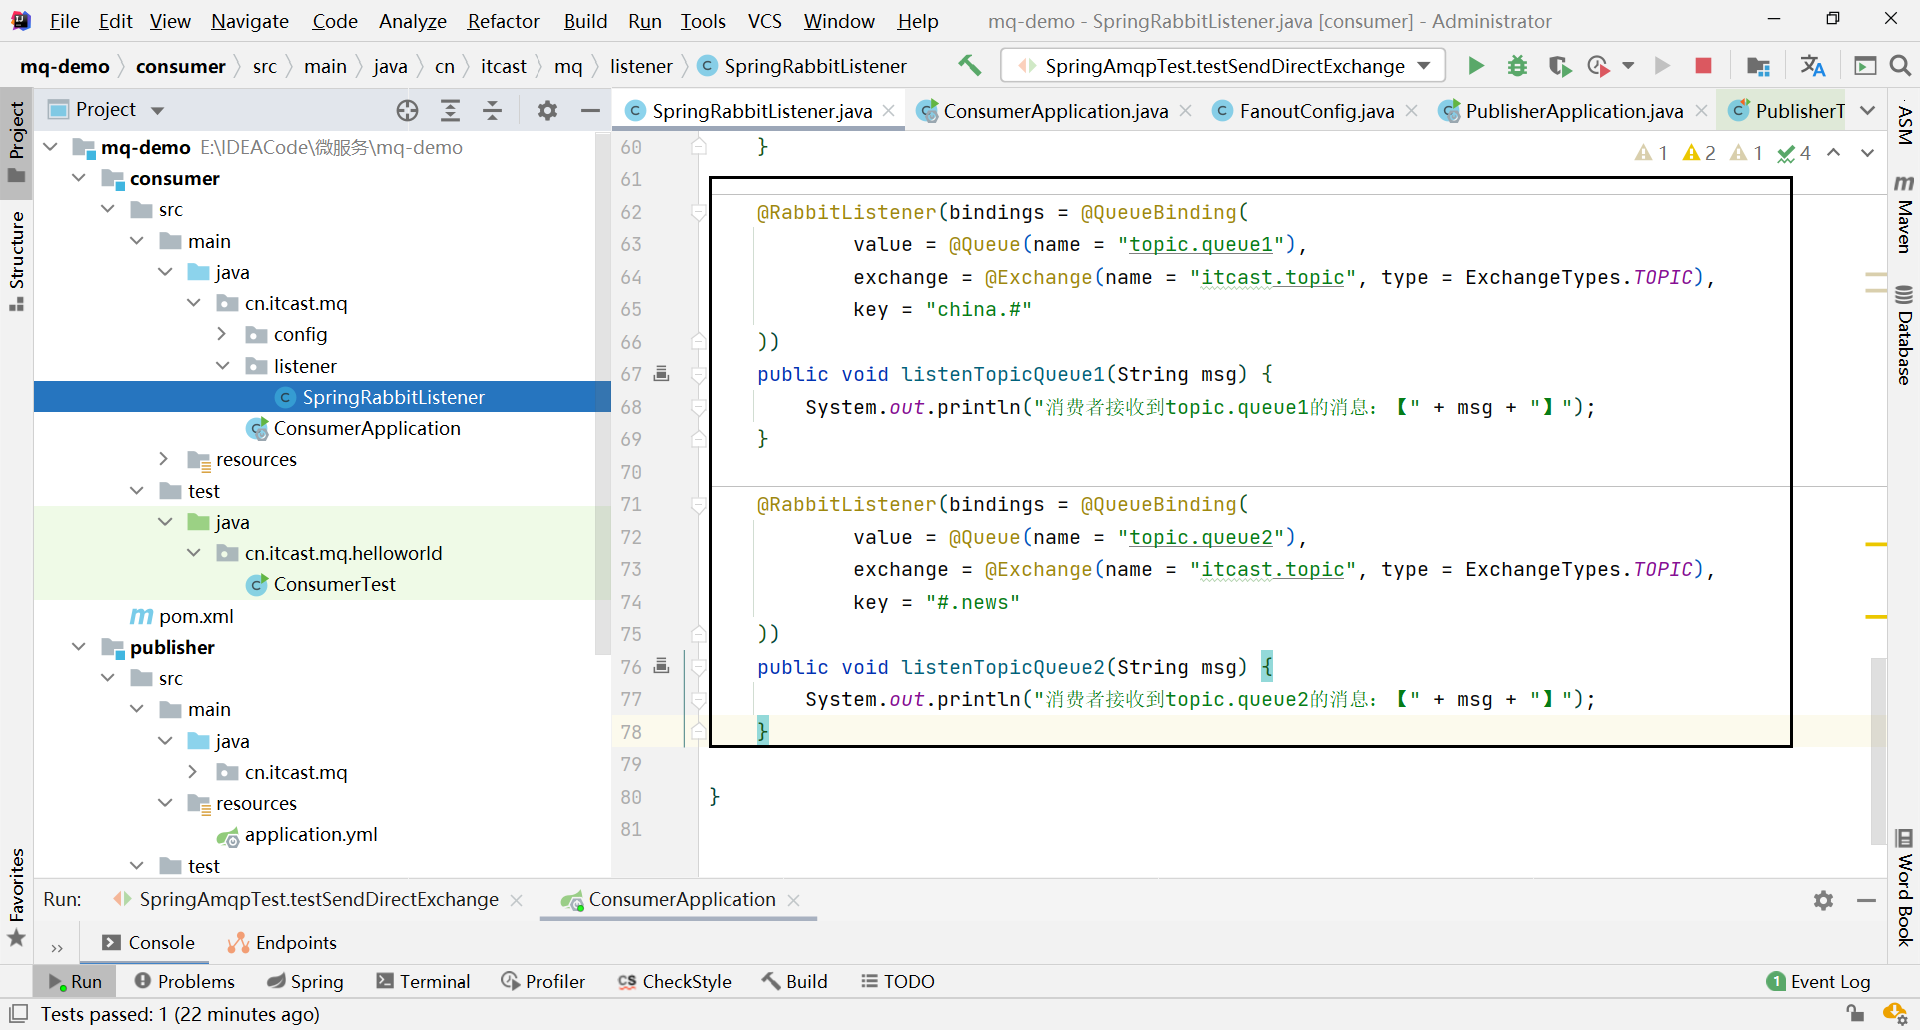
@RabbitListener(bindings = @QueueBinding(
    value = @Queue(name = "topic.queue1"),
    exchange = @Exchange(name = "itcast.topic", type = ExchangeTypes.TOPIC),
    key = "china.#"
))
public void listenTopicQueue1(String msg){
    System.out.println("消费者接收到topic.queue1的消息:【" + msg + "】");
}

@RabbitListener(bindings = @QueueBinding(
    value = @Queue(name = "topic.queue2"),
    exchange = @Exchange(name = "itcast.topic", type = ExchangeTypes.TOPIC),
    key = "#.news"
))
public void listenTopicQueue2(String msg){
    System.out.println("消费者接收到topic.queue2的消息:【" + msg + "】");
}
3.7.5 运行结果
3.7.6 小结
描述下Direct交换机与Topic交换机的差异?
- Topic交换机接收的消息RoutingKey必须是多个单词,以
**.**分割 - Topic交换机与队列绑定时的bindingKey可以指定通配符
#:代表0个或多个词*:代表1个词
4. 消息转换器
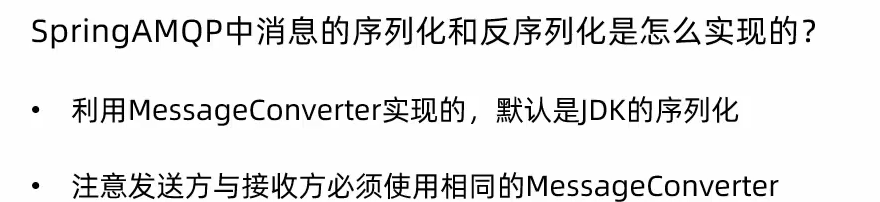
Spring会把你发送的消息序列化为字节发送给MQ,接收消息的时候,还会把字节反序列化为Java对象。
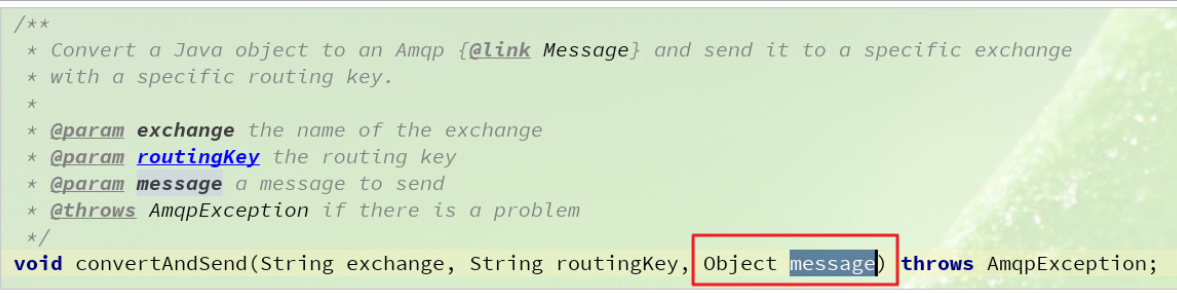
说明:在SpringAMQP的发送方法中,接收消息的类型是Object,也就是说我们可以发送任意对象类型的消息,SpringAMQP会帮我们序列化为字节后发送。
只不过,默认情况下Spring采用的序列化方式是JDK序列化。众所周知,JDK序列化存在下列问题:
- 数据体积过大
- 有安全漏洞
- 可读性差
4.1 测试默认转换器
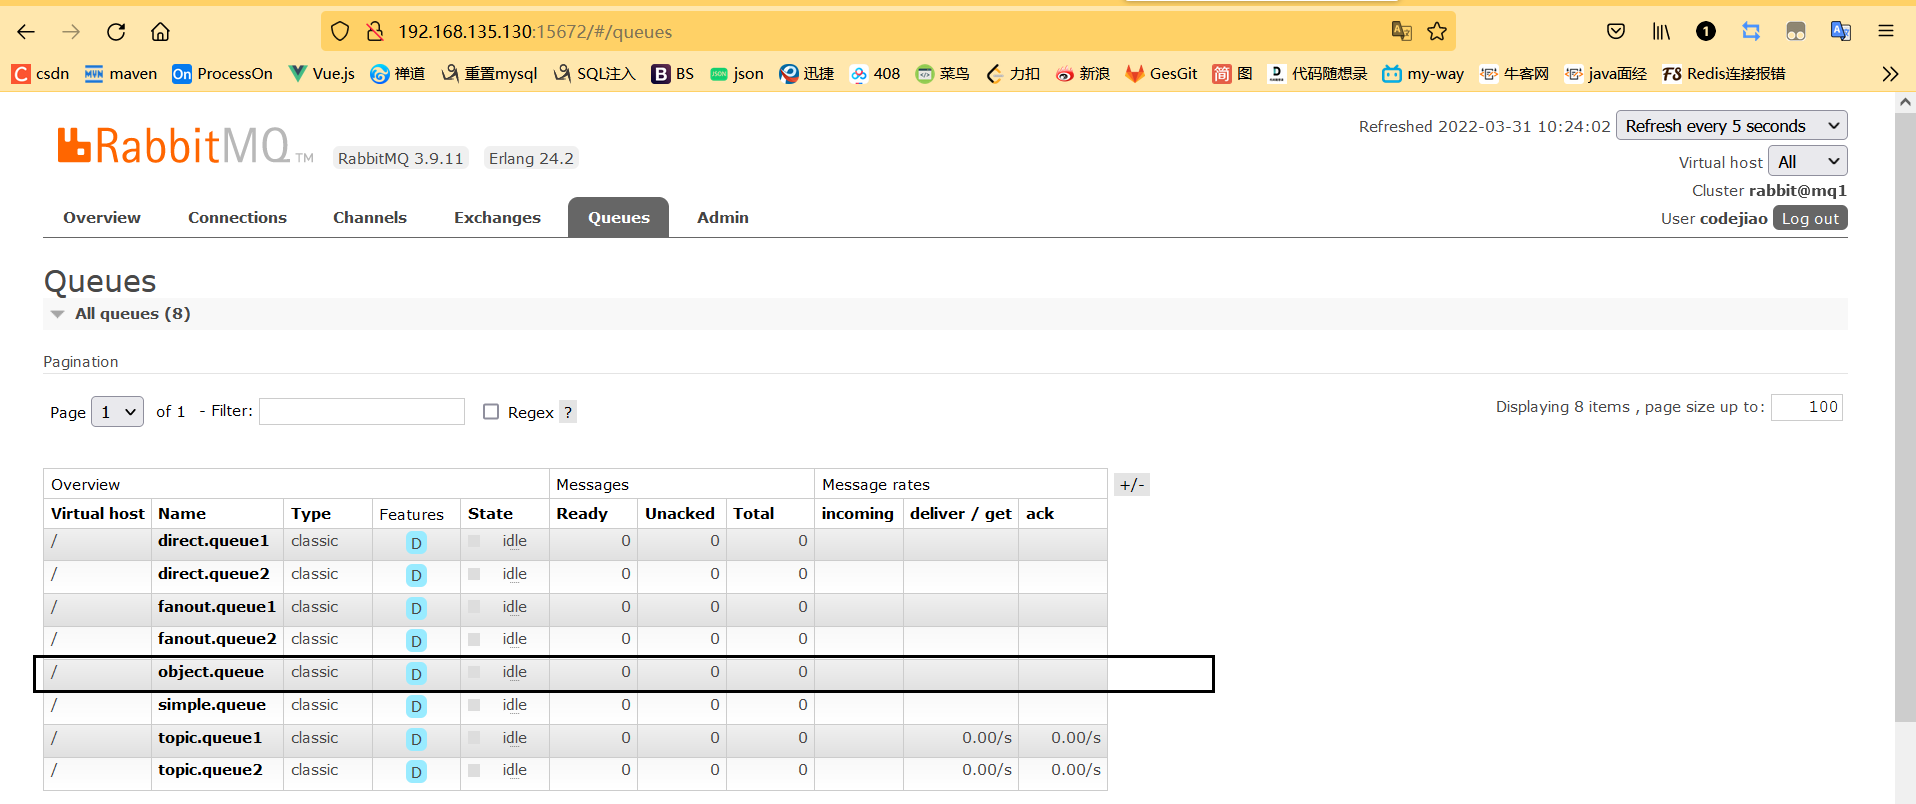
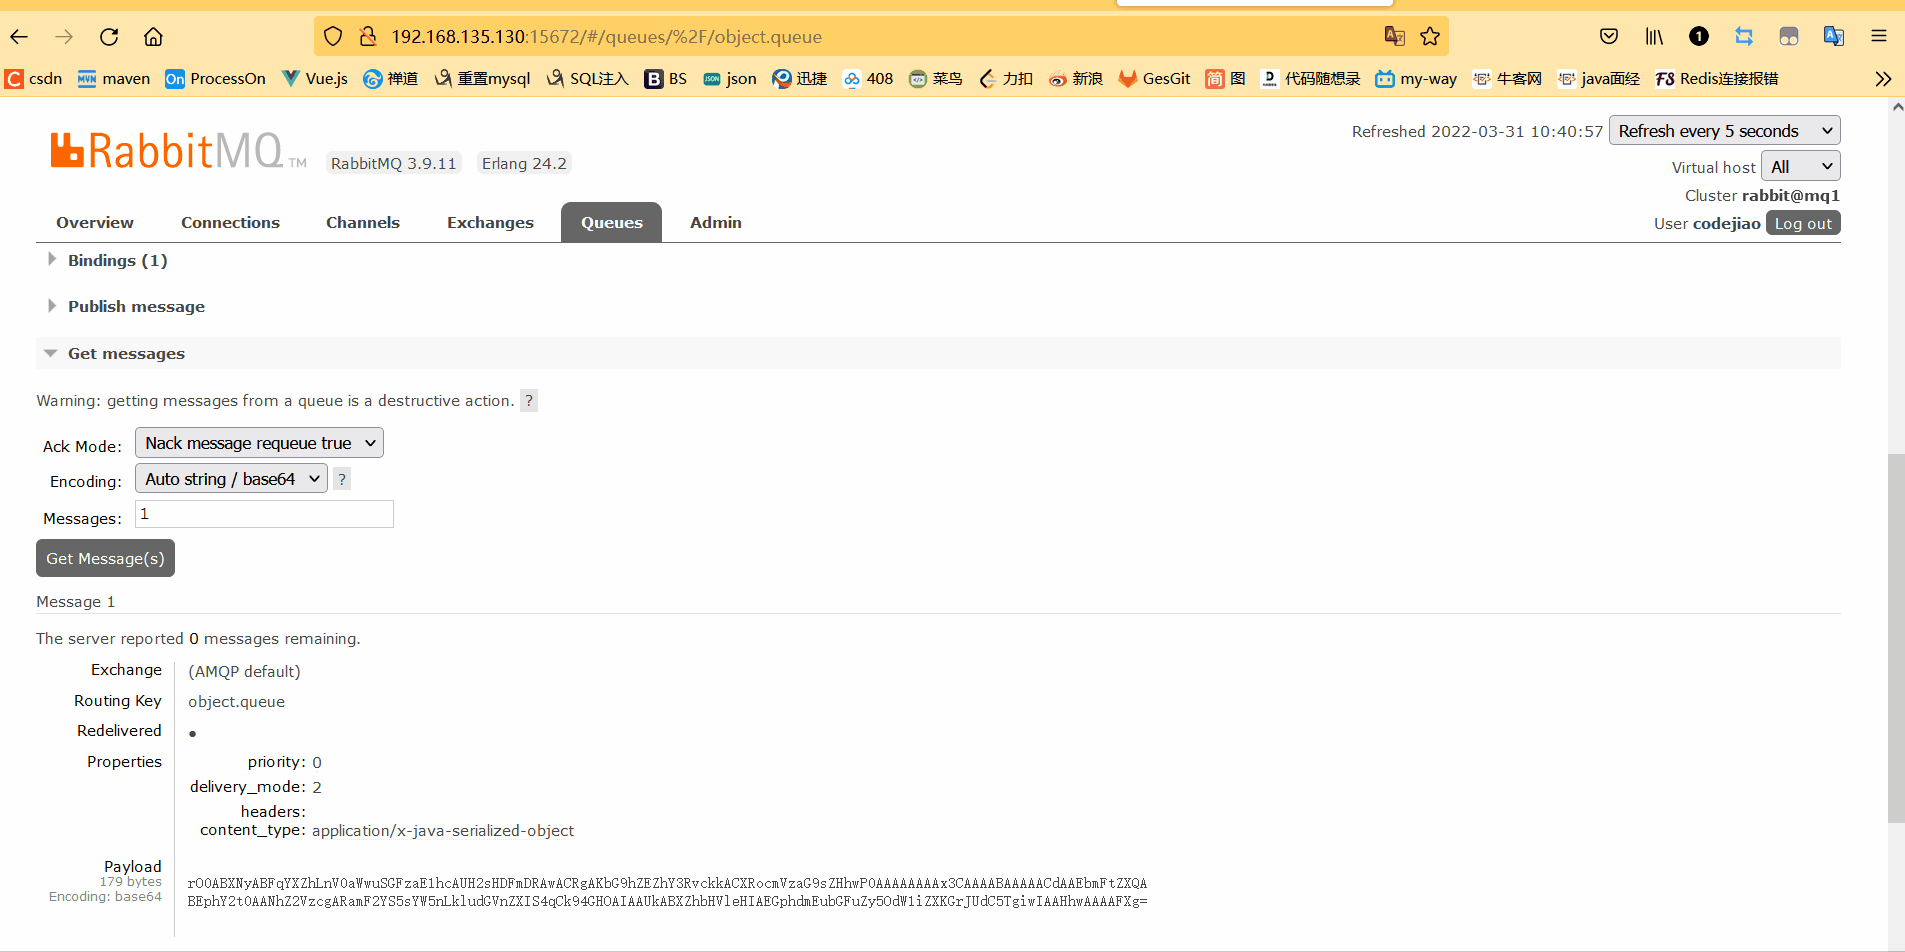
生成一个新的queue:
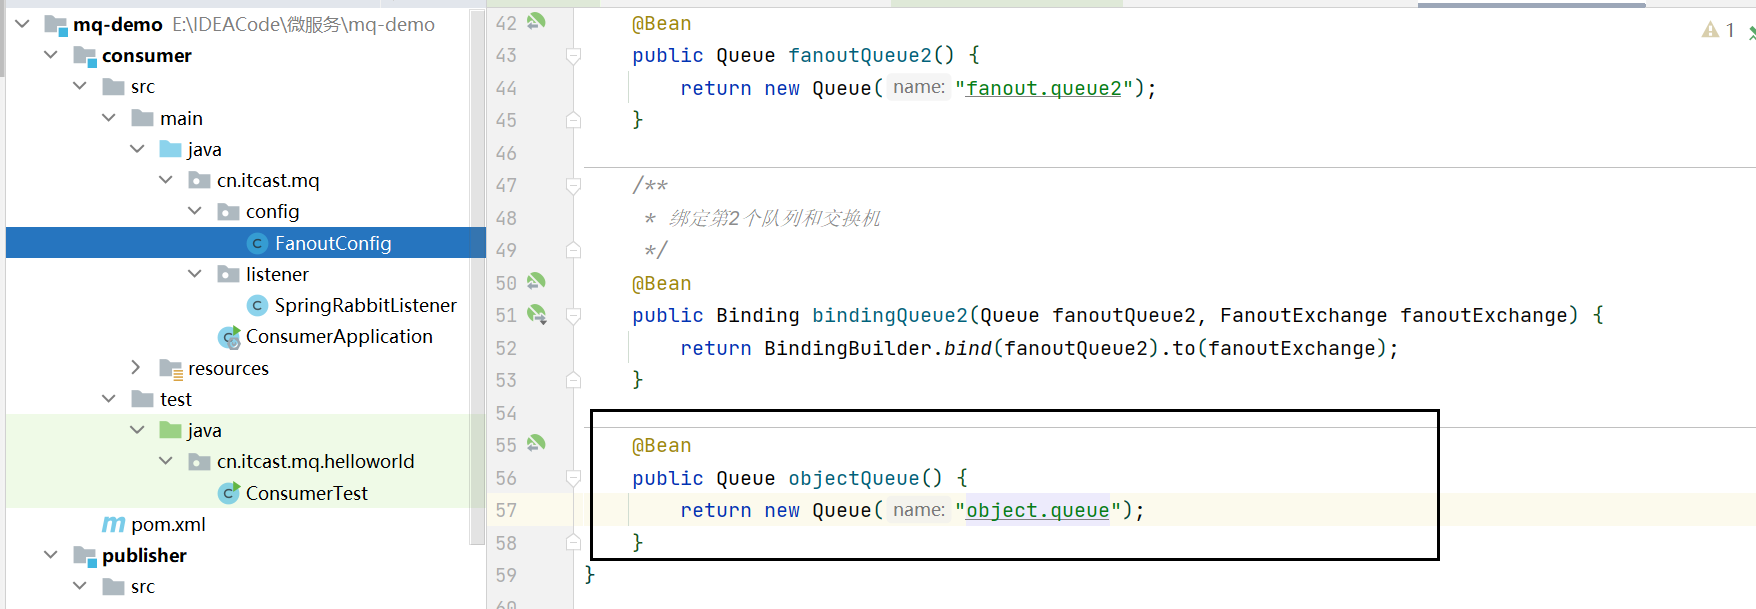
    @Bean
    public Queue objectQueue() {
        return new Queue("object.queue");
    }
重启consumer发现object.queue队列已经生成成功:
我们修改消息发送的代码,发送一个Map对象:
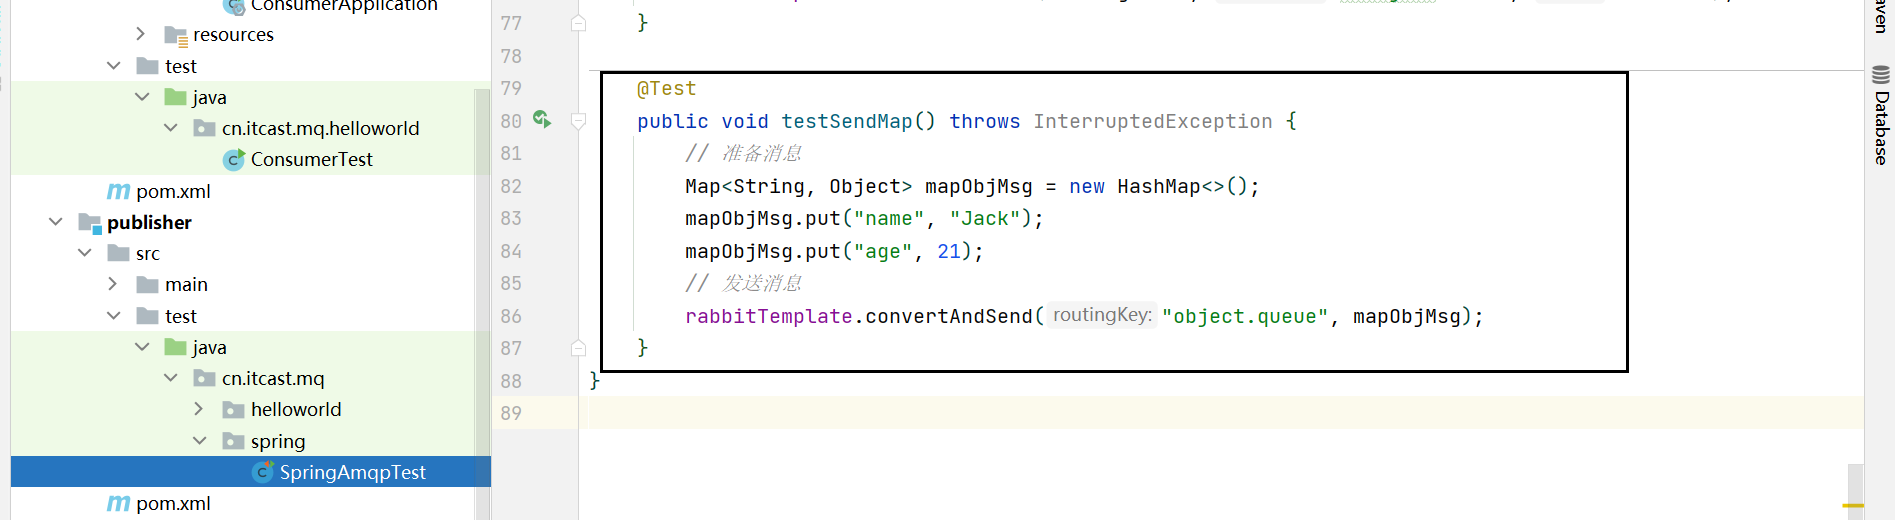
    @Test
    public void testSendMap() throws InterruptedException {
        // 准备消息
        Map<String, Object> mapObjMsg = new HashMap<>();
        mapObjMsg.put("name", "Jack");
        mapObjMsg.put("age", 21);
        // 发送消息
        rabbitTemplate.convertAndSend("object.queue", mapObjMsg);
    }
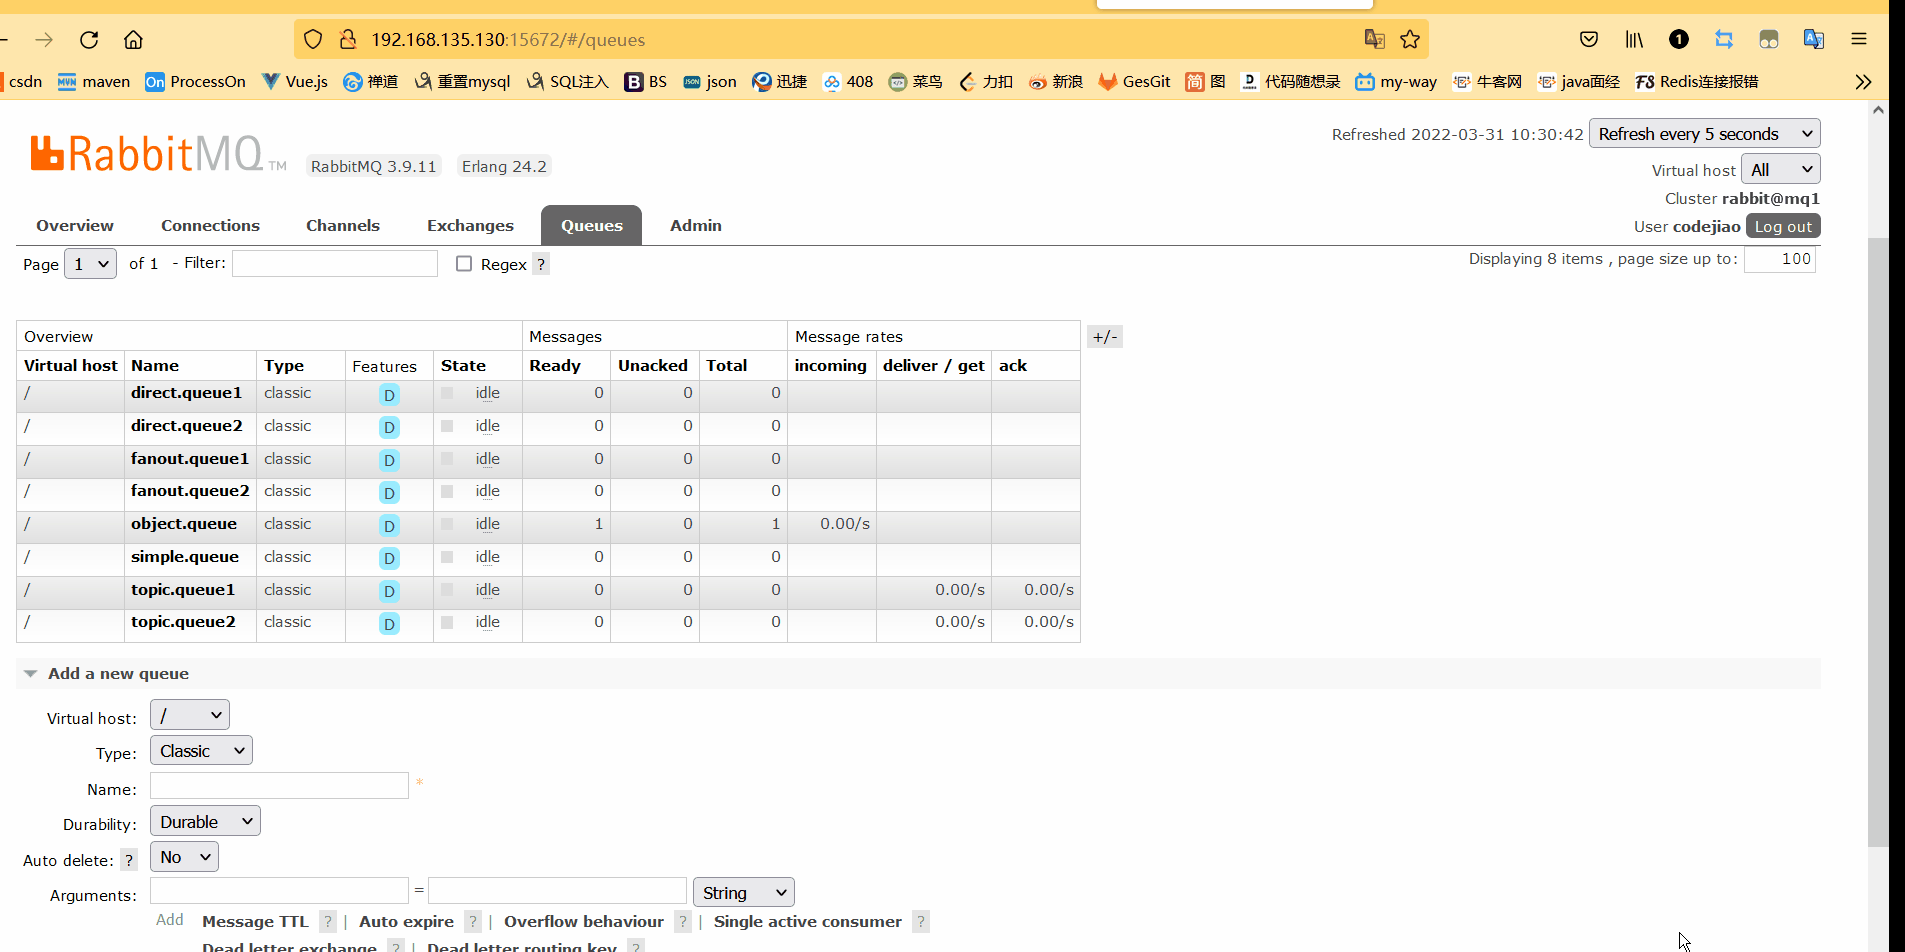
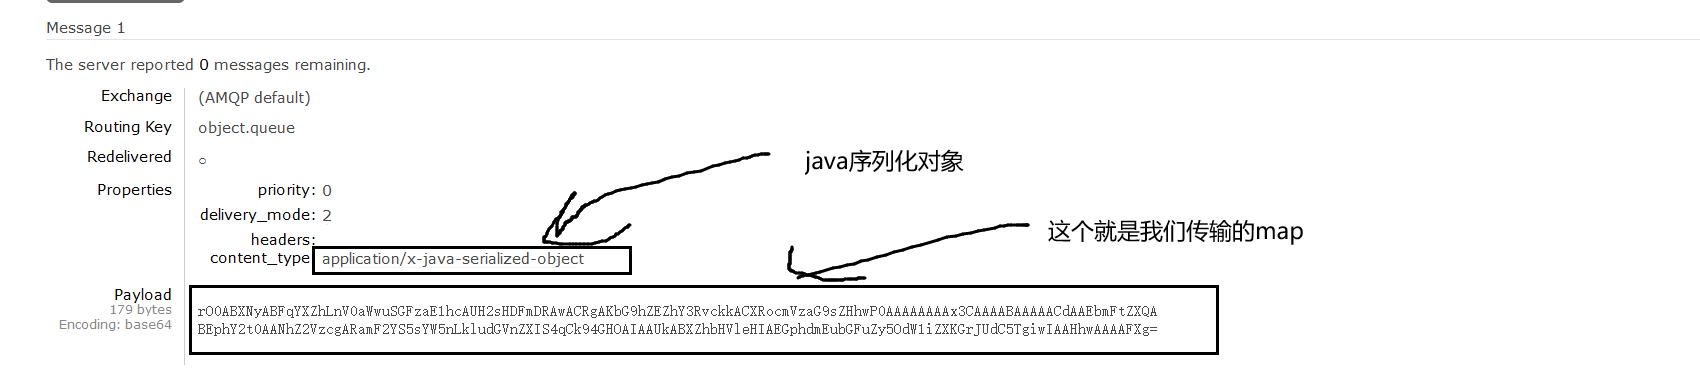
发送消息后查看RabbitMQ UI界面:
4.2 配置JSON转换器

显然,JDK序列化方式并不合适。我们希望消息体的体积更小、可读性更高,因此可以使用JSON方式来做序列化和反序列化。
4.2.1 我们现在父工程中引入依赖
<dependency>
    <groupId>com.fasterxml.jackson.dataformat</groupId>
    <artifactId>jackson-dataformat-xml</artifactId>
    <version>2.9.10</version>
</dependency>
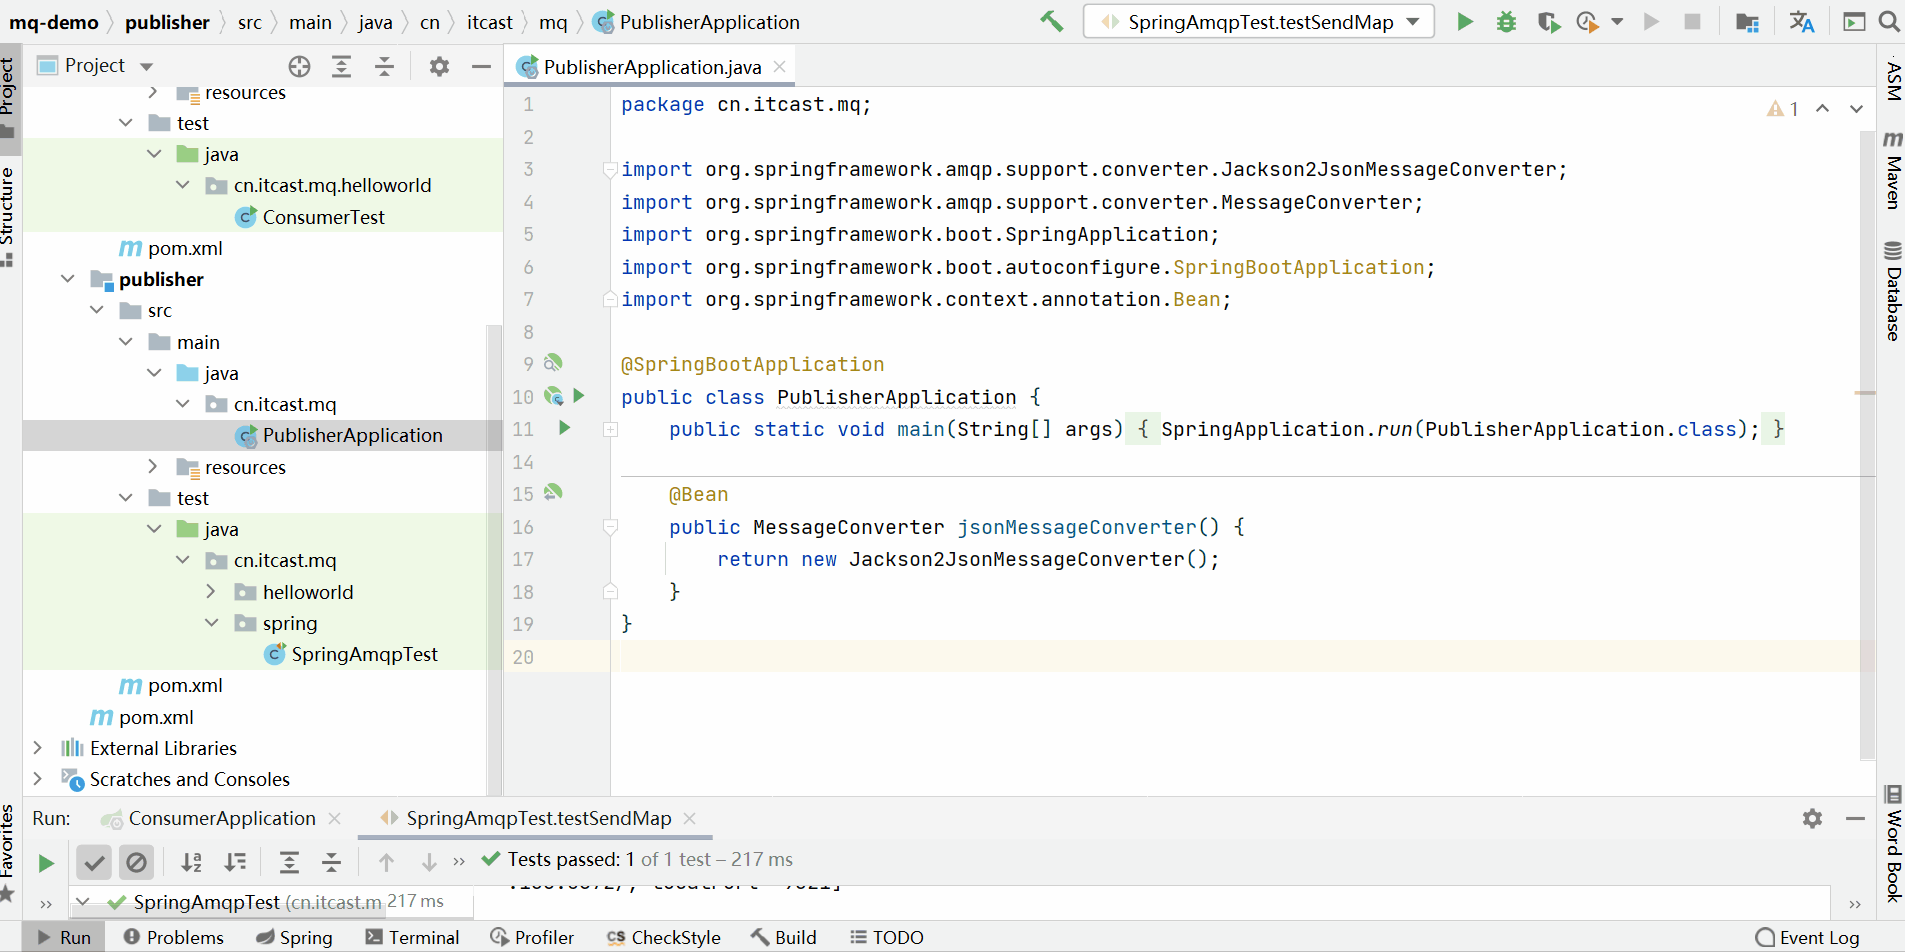
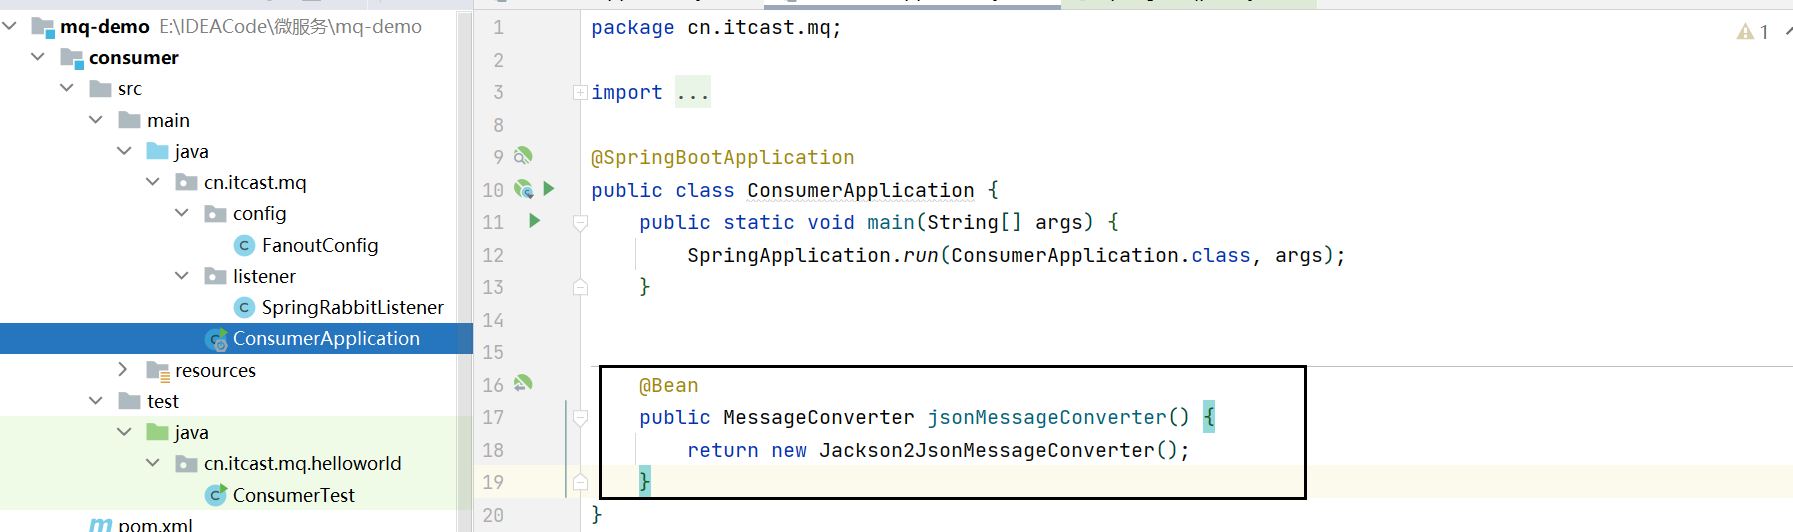
4.2.2 我们在publisher服务声明MessageConverter(消息序列化)
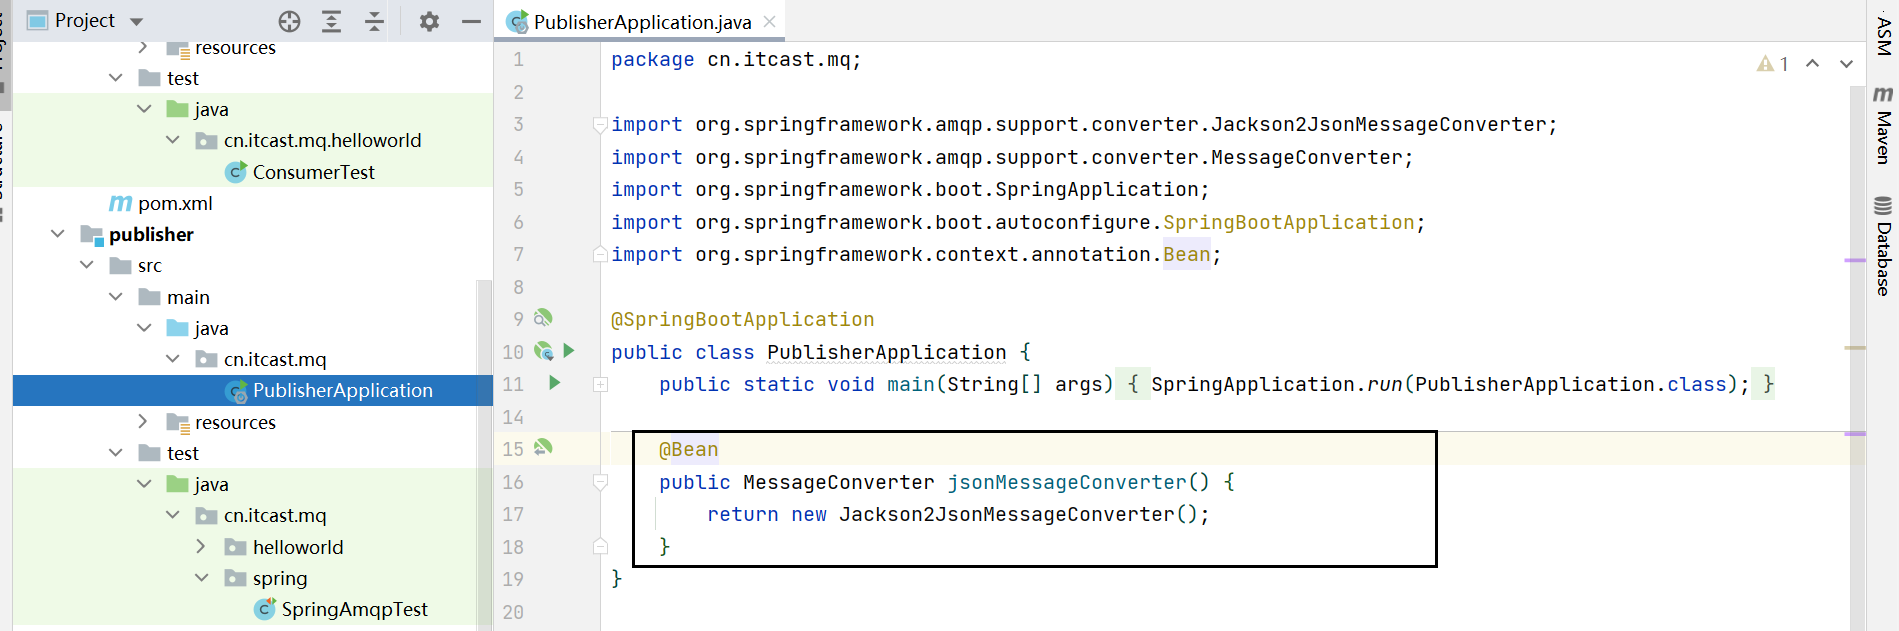
PublisherApplication.java
package cn.itcast.mq;

import org.springframework.amqp.support.converter.Jackson2JsonMessageConverter;
import org.springframework.amqp.support.converter.MessageConverter;
import org.springframework.boot.SpringApplication;
import org.springframework.boot.autoconfigure.SpringBootApplication;
import org.springframework.context.annotation.Bean;

@SpringBootApplication
public class PublisherApplication {
    public static void main(String[] args) {
        SpringApplication.run(PublisherApplication.class);
    }

    @Bean
    public MessageConverter jsonMessageConverter() {
        return new Jackson2JsonMessageConverter();
    }
}
为了方便测试,我们先把队列里面旧的消息清理掉:
再次运行发消息的代码:
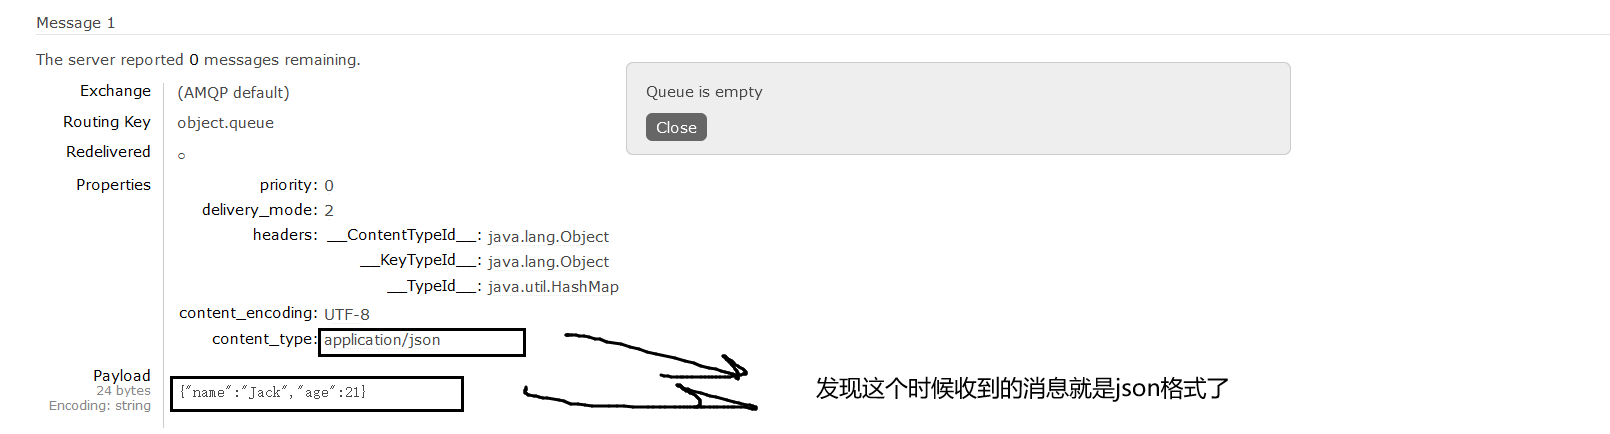
4.2.3 消息反序列化
我们在consumer服务定义MessageConverter,这里配置的和publisher配置的是一样的。
然后编写消息监听的代码:
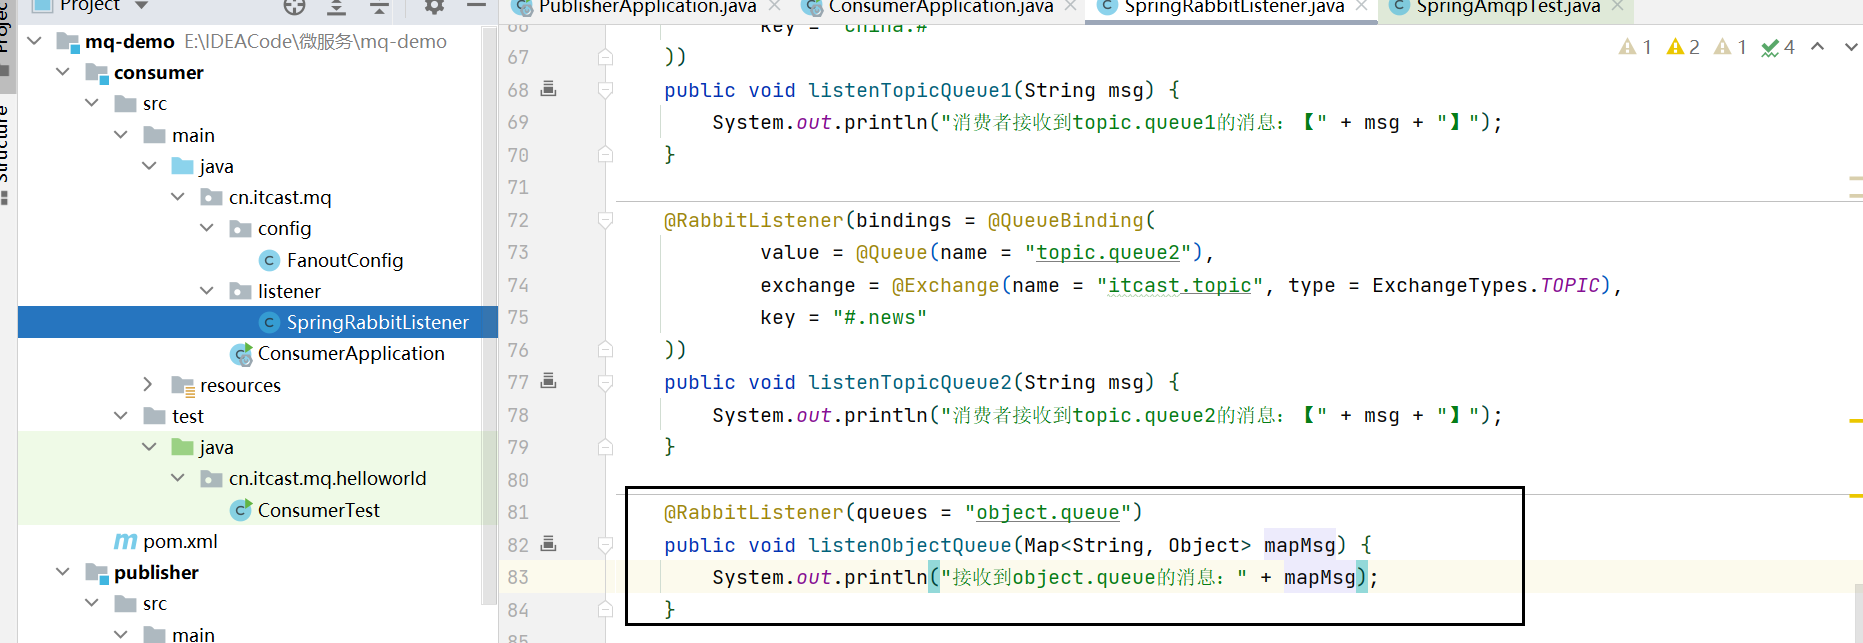
@RabbitListener(queues = "object.queue")
public void listenObjectQueue(Map<String, Object> mapMsg) {
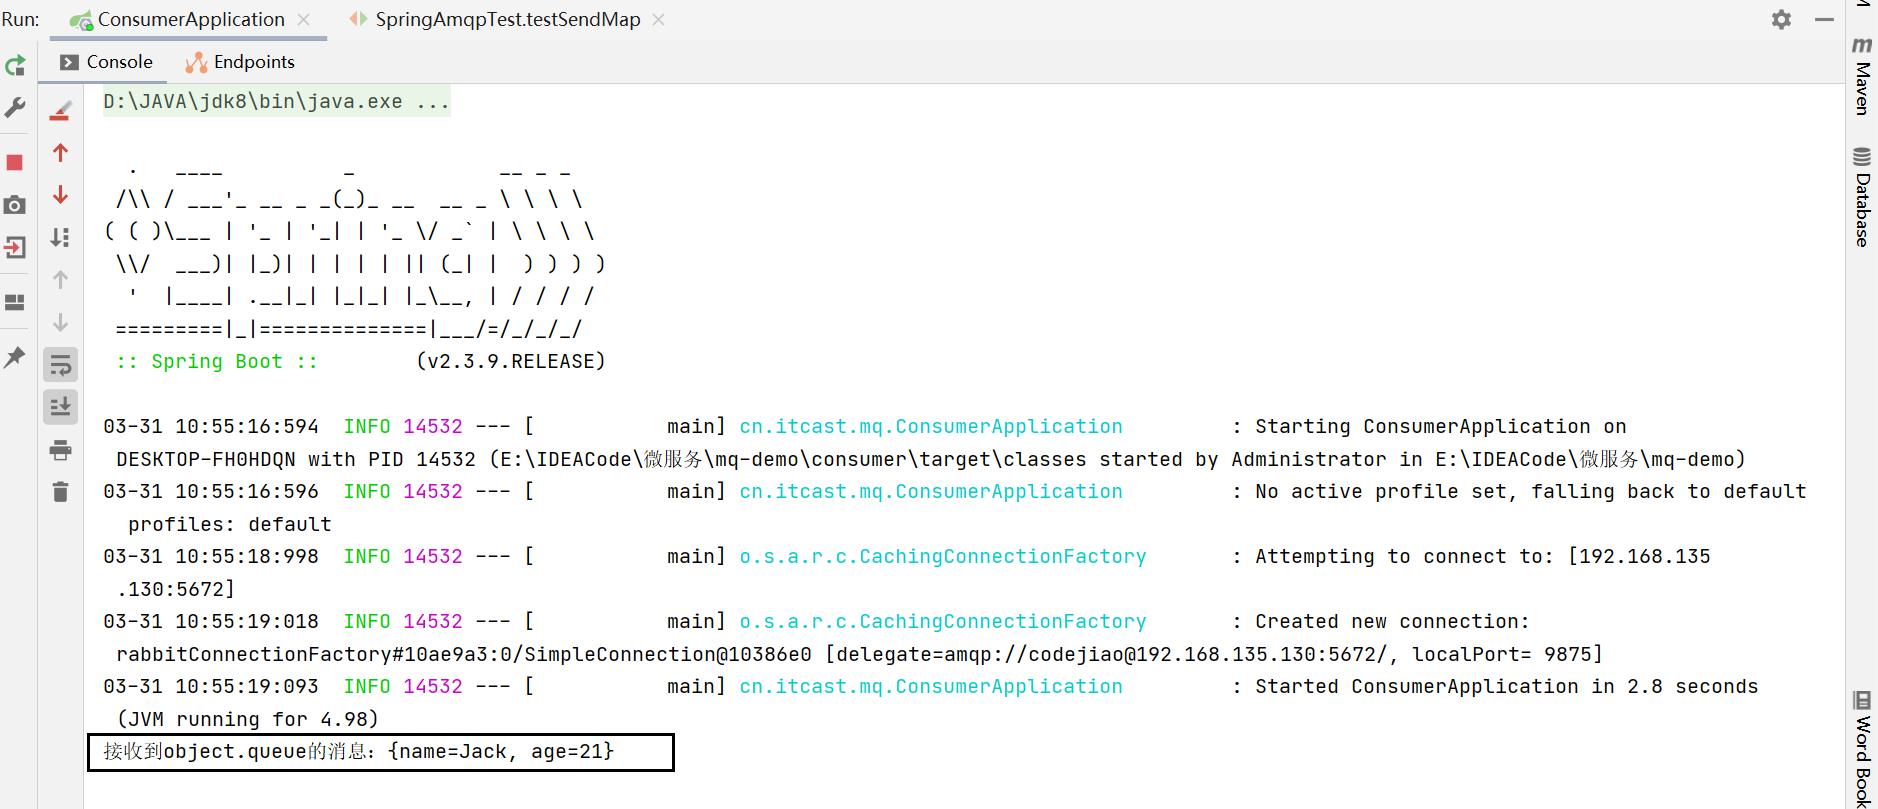
System.out.println("接收到object.queue的消息:" + mapMsg);
}
现在重启consumer:发现已经收到消息了。
4.3 小结
最后
以上就是聪慧太阳最近收集整理的关于RabbitMQ 服务异步通信 -- 入门案例(消息预存机制)、SpringAMQP、发布订阅模式(FanoutExchange、DirectExchange、TopicExchange)、消息转换器1. 入门案例2. 完成官方Demo中的hello world案例3. SpringAMQP4. 消息转换器的全部内容,更多相关RabbitMQ内容请搜索靠谱客的其他文章。


发表评论 取消回复