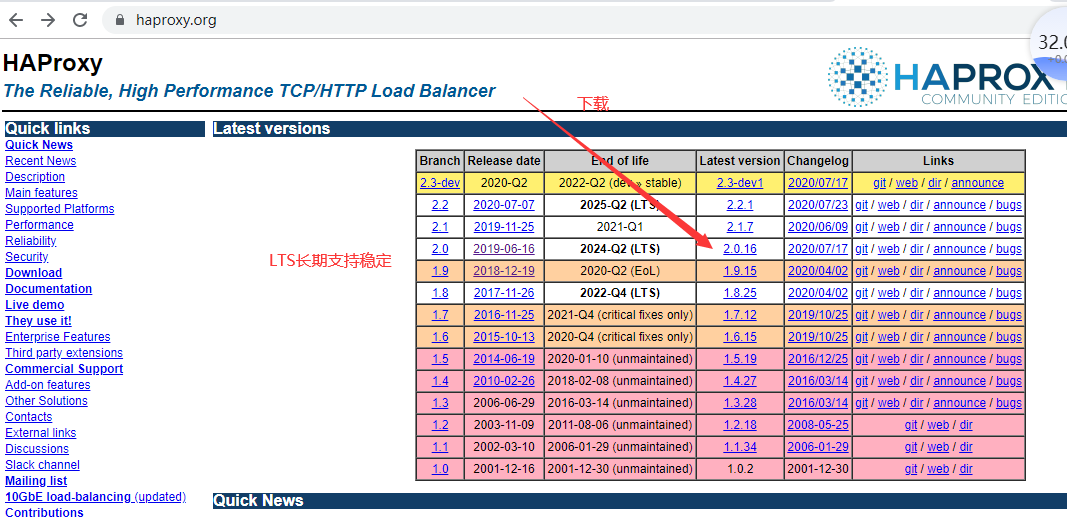
笔记参考:http://www.wangxiaochun.com/
企业版:https://www.haproxy.com(花钱)
社区版:https://www.haproxy.org
第三方包rpm: https://pkgs.org/download/haproxy
github: https://github.com/haproxy

支持功能:
支持http反向代理
支持动态程序的反向代理
支持基于数据库的反向代理
不支持功能:
正向代理--squid,nginx
缓存代理--varnish
web--nginx,apache,php,tomcat
udp--目前不支持udp协议
单机性能--相比lvs较差(10万左右)
编译安装:
yum -y install gcc readline-devel安装依赖lua

 wget http://www.lua.org/ftp/lua-5.3.5.tar.gz
 tar -xf lua-5.3.5.tar.gz
cd lua-5.3.5
make linux test


[root@localhost lua-5.4.0]# src/lua -v
Lua 5.3.5  Copyright (C) 1994-2018 Lua.org, PUC-Rio
yum -y install gcc openssl-devel pcre-devel systemd-develtar -xf haproxy-2.0.16.tar.gz -C /usr/local/src/
cd /usr/local/src/haproxy-2.0.16/ make ARCH=x86_64 TARGET=linux-glibc USE_PCRE=1 USE_OPENSSL=1 USE_ZLIB=1 USE_SYSTEMD=1 USE_LUA=1 LUA_INC=/usr/local/src/lua-5.3.5/src/ LUA_LIB=/usr/local/src/lua-5.3.5/src/ make install PREFIX=/apps/haproxy[root@localhost haproxy-2.0.16]# ln -s /apps/haproxy/sbin/haproxy /usr/sbin/
[root@localhost ~]# haproxy -v
HA-Proxy version 2.0.16 2020/07/17 - https://haproxy.org/
[root@localhost ~]# cat /usr/lib/systemd/system/haproxy.service
[Unit]
Description= root
After=network.target

[Service]
Type=forking
PIDFile=/var/lib/haproxy/haproxy.pid
ExecStart=/usr/sbin/haproxy -f /etc/haproxy/haproxy.cfg
ExecReload=/bin/kill -s HUP $MAINPID
ExecStop=/bin/kill -s TERM $MAINPID

[Install]
WantedBy=multi-user.target
systemctl daemon-reload
[root@localhost ~]# systemctl start haproxy
Failed to start haproxy.service: Unit is not loaded properly: Bad message.
See system logs and 'systemctl status haproxy.service' for details.
创建目录
mkdir /etc/haproxy
mkdir /var/lib/haproxy
创建用户
useradd -r -s /sbin/nologin -d /var/lib/haproxy/ haproxy[root@localhost haproxy-2.0.16]# id haproxy
uid=997(haproxy) gid=995(haproxy) 组=995(haproxy)
创建配置文件
[root@localhost examples]#  cat  /etc/haproxy/haproxy.cfg
global
        maxconn 100000
        chroot /apps/haproxy
        stats socket /var/lib/haproxy/haproxy.sock mode 600 level admin
	user haproxy
	group haproxy
	daemon
	nbproc 1
        spread-checks 3
	pidfile /var/lib/haproxy/haproxy.pid
        log 127.0.0.1 local2 info
defaults
        option http-keep-alive
        option forwardfor
        maxconn 100000
        mode http
        timeout connect 300000ms
        timeout client 300000ms
        timeout server 300000ms

listen proxy_status
        mode http
        bind 0.0.0.0:9999
        stats enable
        log global
        stats uri     /haproxy-status
        stats auth   haadmin:123456
listen http_80
        bind 192.168.3.100:80
        log global
        server web_1 192.168.3.50:80 check inter 3000 fall 2 rise 5
        server web_2 192.168.3.51:80 check inter 3000 fall 2 rise 5
systemctl restart haproxy###############################################################
haproxy特殊调度
listen http_80
        bind 192.168.3.100:80
        log global
        server web_1 192.168.3.50:80 check inter 3000 fall 2 rise 5 weight 3
        server web_2 192.168.3.51:80 check inter 3000 fall 2 rise 5
        server local_web 127.0.0.1:81 backup
当web1和web2 都宕机,backup 会起来提供服务,当weight权重为0 的时候不参与调度,可以直接下线
haproxy 重定向 redir http://www.baidu.com
listen http_80
        bind 192.168.3.100:80
        log global
        server web_1 192.168.3.50:80 check inter 3000 fall 2 rise 5 weight 3 redir http://www.baidu.com
        server web_2 192.168.3.51:80 check inter 3000 fall 2 rise 5
        server local_web 127.0.0.1:81 backup
########################################################################################
创建conf.d文件区分不同的业务,文件名以*.cfg 结尾
mkdir /etc/haproxy/conf.d
[root@localhost ~]# cat   /etc/haproxy/conf.d/http.cfg
listen http_80
        bind 192.168.3.100:80
        log global
        server web_1 192.168.3.50:80 check inter 3000 fall 2 rise 5 weight 3 redir http://www.baidu.com
        server web_2 192.168.3.51:80 check inter 3000 fall 2 rise 5
        server local_web 127.0.0.1:81 backup
[root@localhost ~]# cat  /usr/lib/systemd/system/haproxy.service
[Unit]
Description= root
After=network.target

[Service]
Type=forking
PIDFile=/var/lib/haproxy/haproxy.pid
ExecStart=/usr/sbin/haproxy -f /etc/haproxy/haproxy.cfg -f /etc/haproxy/conf.d/
ExecReload=/bin/kill -s HUP $MAINPID
ExecStop=/bin/kill -s TERM $MAINPID

[Install]
WantedBy=multi-user.target
最后
以上就是忧伤钢笔最近收集整理的关于Haproxy 安装和部署-适合新手的全部内容,更多相关Haproxy内容请搜索靠谱客的其他文章。
本图文内容来源于网友提供,作为学习参考使用,或来自网络收集整理,版权属于原作者所有。


发表评论 取消回复