环境信息
1. 硬件:
内存ddr3 4G及以上的x86架构主机一部
系统环境:windows
2. 软件:
运行vmware或者virtualbox
Hadoop 集群
3. 其他: 无
步骤与方法
1.安装MapReduce并配置运行环境
1.在此主要介绍在master服务器下,使用eclipse进行MapReduce开发。
2.首先安装eclipse命令如下:apt-get install eclipse
3.下载eclipse开发hadoop2.20MapReduce插件hadoop-eclipse-plugin-2.2.0.jar提供一个网址免费下载链接:http://download.csdn.net/detail/jintiaozhuang/7684553
4.将下载好的插件放入eclipse安装目录下的dropins文件夹中。

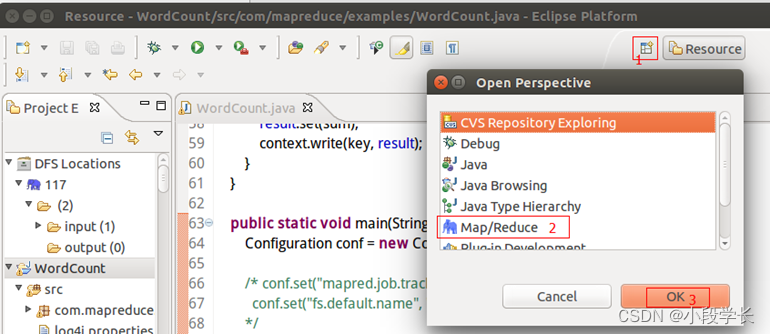
5.放置好之后,重启eclipse,按照1、2、3进行操作,如下图
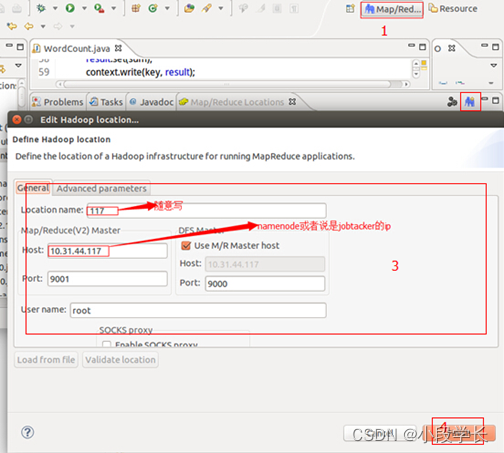
6.紧接着如下图进行如下操作:
7.以上步骤完成后,会在eclipse左边出现DFSXX目录可以进行如下操作:
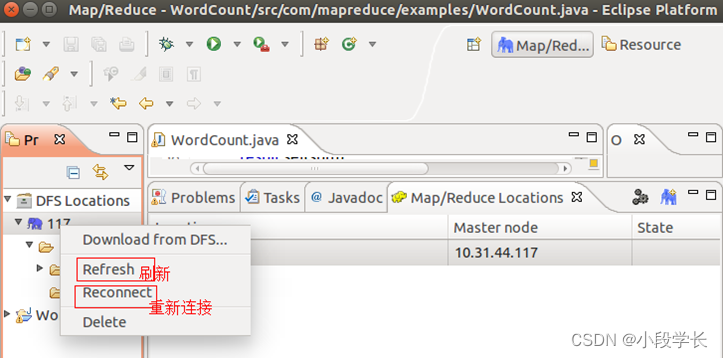
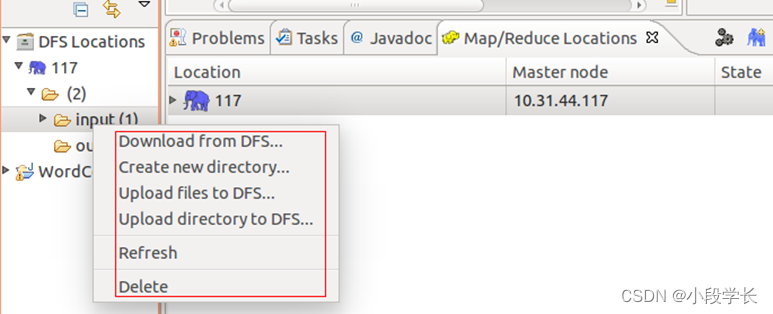
此时将可以看到HDFS文件存储结构,并可以尝试进行上传,下载创建等操作如能正常操作则至此Hadoop MapReduce开发平台搭建完毕。
2. 使用Eclipse创建MapReduce工程
1.首先在浏览器下载eclipse,解压eclipse安装包
首先将eclipse安装包复制到/opt下:
cp/home/hadoop/Downloads/eclipse-jee-neon-1a-linux-gtk-x86_64.tar.gz /opt/
2.接着解压:
tar -zxvf eclipse-jee-neon-1a-linux-gtk-x86_64.tar.gz
3.使用符号连接目录
ln -s /opt/eclipse/eclipse /usr/bin/eclipse
4.创建一个桌面启动器
vim /usr/share/applications/eclipse.desktop
添加如下代码:
1.	[Desktop Entry]
2.	Encoding=UTF-8
3.	Name=Eclipse
4.	Comment=Eclipse
5.	Exec=/usr/bin/eclipse
6.	Icon=/opt/eclipse/icon.xpm
7.	Categories=Application;Development;Java;IDE
8.	Version=1.0
9.	Type=Application
10.	Terminal=0
5.下载Hadoop-Eclipse插件,要注意hadoop版本的对应
下载网址为
http://download.csdn.net/detail/tondayong1981/9668289
6.将插件放在解压后的eclipse的plugins目录下
7.重启eclipse,然后打开Windows-Preferences,在窗口左侧的Hadoop Map/Reduce选项设置hadoop的安装路径
8.Eclipse上,打开Windows-Perspective-Open Perspective-Other,选择MapReduce,点击OK,然后在General处配置MapReduce的Location name(此处我填的是myhadoop)、Map/Reduce Master(此处我填的是Host:master,Port:9001)以及DFS Master(此处我填的是Port:9000)。只要保证Map/Reduce Master和DFS Mastrer,Host和Port配置成与core-site.xml的设置一致即可。
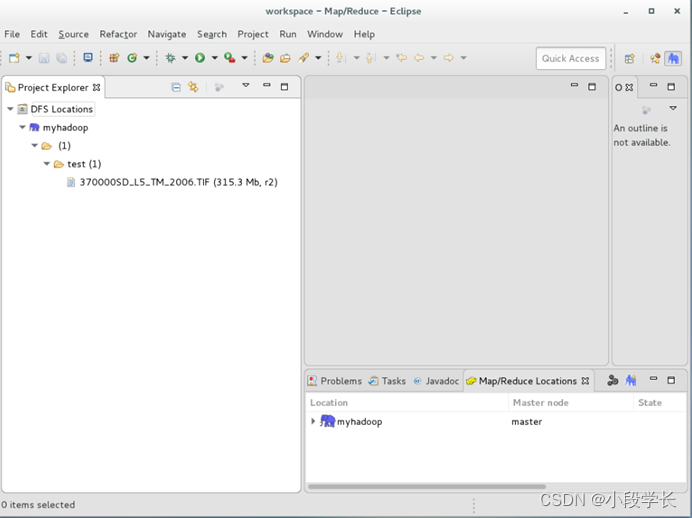
9.上述配置完毕后会在eclipse左侧Project Explorer处有DFS Locations显示
3. 理解分析WordCount分布式程序
运行环境:
CentOS-7.6-Minimal * 3 由Vmware平台搭建
三台主机对应IP地址:192.168.239.100 hadoop100
192.168.239.101 hadoop101
192.168.239.102 hadoop102
环境:hadoop-3.3.1 + JDK-8-251
三台虚拟机上节点分配:
hadoop100:DataNode NameNode NodeManager
hadoop200: ResourceManager NodeManager DataNode
hadoop300:NodeManager DataNode JobHistoryServer
程序的开发验证由PC机实现
Intellij IDEA 2018.4 + hadoop-2.7.7 + JDK-8-251 + Maven-3.3.9
这里我们对词频做出统计,我自己的刚开始是找的demo跑的,后来发现hadoop源码里面给出了这个算法的实现,不过自己网页的代码和源码里的代码是一致的运行的方式也大同小异。
原始数据:
word word
ss ss
ls
期望结果
cls 2
ss 2
word 2
(1)启动Hadoop
11.	cd hadoop-3.3.1/
12.	./sbin/start-all.sh
(2) Mapper
① 将MapperTask传过来的原始文本内容转化成String
13. 第一行:word word
② 根据空格将每一行的String切分成独立的单词
③ 将单词输出为<key,<1,1,1,1, …> >,输出给Reducer
14. <word,<1,1>>
(3)Reducer
① 汇总接收的单词,计数每个单词”1“的数量
② 输出<单词,key的总次数(累加)>
15. 输出:word,2
(4)Driver
① 获取配置信息,configuration不设定为默认值,创建job对象实例
② 指定本程序的jar包所在的本地路径
③ 关联Mapper和Reducer的业务类
④ 设置Mapper和Reducer的输出格式
⑤ 指定job的输入原始文件所在目录,输出文件所在目录
⑥ 提交job,提交成功打印数字0,否则打印1
数据与程序清单
在Hadoop集群上运行wordcount
1) 源码
16.	public class WordCount {
17.
18.	  public static class TokenizerMapper
19.	       extends Mapper<Object, Text, Text, IntWritable>{
20.
21.	    private final static IntWritable one = new IntWritable(1);
22.	    private Text word = new Text();
23.
24.	    public void map(Object key, Text value, Context context
25.	                    ) throws IOException, InterruptedException {
26.	      StringTokenizer itr = new StringTokenizer(value.toString());
27.	      while (itr.hasMoreTokens()) {
28.	        word.set(itr.nextToken());
29.	        context.write(word, one);
30.	      }
31.	    }
32.	  }
33.
34.	  public static class IntSumReducer
35.	       extends Reducer<Text,IntWritable,Text,IntWritable> {
36.	    private IntWritable result = new IntWritable();
37.
38.	    public void reduce(Text key, Iterable<IntWritable> values,
39.	                       Context context
40.	                       ) throws IOException, InterruptedException {
41.	      int sum = 0;
42.	      for (IntWritable val : values) {
43.	        sum += val.get();
44.	      }
45.	      result.set(sum);
46.	      context.write(key, result);
47.	    }
48.	  }
49.
50.	  public static void main(String[] args) throws Exception {
51.	    Configuration conf = new Configuration();
52.	    String[] otherArgs = new GenericOptionsParser(conf, args).getRemainingArgs();
53.	    if (otherArgs.length < 2) {
54.	      System.err.println("Usage: wordcount <in> [<in>...] <out>");
55.	      System.exit(2);
56.	    }
57.	    Job job = Job.getInstance(conf, "word count");
58.	    job.setJarByClass(WordCount.class);
59.	    job.setMapperClass(TokenizerMapper.class);
60.	    job.setCombinerClass(IntSumReducer.class);
61.	    job.setReducerClass(IntSumReducer.class);
62.	    job.setOutputKeyClass(Text.class);
63.	    job.setOutputValueClass(IntWritable.class);
64.	    for (int i = 0; i < otherArgs.length - 1; ++i) {
65.	      FileInputFormat.addInputPath(job, new Path(otherArgs[i]));
66.	    }
67.	    FileOutputFormat.setOutputPath(job,
68.	      new Path(otherArgs[otherArgs.length - 1]));
69.	    System.exit(job.waitForCompletion(true) ? 0 : 1);
70.	  }
71.	}
2) 测试数据
1.	import random
2.	import string
3.
4.	f1 = open('1.txt', 'x')
5.	for x in range(10000):
6.	    string0 = str(''.join(random.sample(
7.	        ['z', 'n', 'm', 'l', 'k', 'j', 'i', 'h', 'g', 'f', 'e', 'd', 'c', 'b', 'a'], 4)))
8.	    f1.write(string0)
9.	    if x % random.randint(1, 50) == 0:
10.	        f1.write(' ')
11.	        continue
12.	    if x != 9999:
13.	        f1.write('n')
14.	f1.close()
3) 上传自己的txt文件到hdfs
1.	$ hadoop fs -put /home/hadoop1/data/input/1.txt hdfs://192.168.239.100:9000/input
2.	#或者
3.	$ hadoop fs -put /home/hadoop1/data/input/1.txt /input
4.	#查看上传结果
5.	$ hadoop fs -ls /input
6.
7.	#另:hdfs常用命令
8.	hdfs dfs -copyFromLocal #local/data /hdfs/data:将本地文件上传到 hdfs 上(原路径只能是一个文件)
9.	hdfs dfs -put /tmp/ /hdfs/ #和 copyFromLocal 区别是,put 原路径可以是文件夹等
10.	hadoop fs -ls / #查看根目录文件
11.	hadoop fs -ls /tmp/data #查看/tmp/data目录
12.	hadoop fs -cat /tmp/a.txt #查看 a.txt,与 -text 一样
13.	hadoop fs -mkdir dir #创建目录dir
14.	hadoop fs -rmr dir:#删除目录dir
4) 执行mapreduce
1.	#执行自己打包的demo
2.	$ hadoop jar WordCount_1-1.0-SNAPSHOT.jar com/hadoop1/wordcount.WdDriver /input/1.txt /out
3.	#在此之后,自己写的代码都需要如此执行,该执行方式的说明:
4.	#com/hadoop1/wordcount.WdDriver 对应的类是WdDriver,所在包:com.hadoop1.wordcount
5.	$ hadoop jar <jar文件>  <注明主类> <hdfs输入文件>  <hdfs输出文件>
6.
7.	#执行官方源码中的WordCount
8.	$ hadoop jar /opt/module/hadoop-2.7.7/share/hadoop/mapreduce/hadoop-mapreduce-examples-2.7.7.jar wordcount /input/1.txt /out
5) 查看运行结果
1.	$ hadoop fs -ls /out
2.	$ hadoop fs -cat /out/part-r-00000
出现的问题及解决方法
出现问题:未找到hadoop命令
Javajdk未找见,需要重新安装JDK
解决方案1: javaJDK指向出现问题,进入root后重新配置javaJDK,再从重新启动配置文件,问题解决。
结果、结果分析
编程实现如输⼊/输出内容。
输入:
1.	Hello Hadoop BigData
2.	Hello Hadoop MapReduce
3.	Hello Hadoop HDFS
4.	BigData Perfect
输出:
1.	BigData 2
2.	MapReduce 1
3.	Hello 3
4.	Hadoop 3
5.	HDFS 1
心得体会
我们学习了Hadoop中,Mapreduce计算的相关知识,我们了解到了Hadoop中最重要组重要组成部分之一的MapReduce,了解到他主要用于海量大数据的计算和数据处理,MapReduce运行时分为两步,Map和Reduce部,客户端先向Mapreduce提交作业,首先Hadoop需要将这个大作业分解,分解为一个个特别小的数据集,然后分给Hadoop集群中的各个节点,每一个节点都需要先执行Map操作,然后在进行接下来的Reduce操作,当各个节点完成数据处理之后,再次统一提交,输出结果到客户端,完成此次MapReduce作业。本次实验我们学会了如何在Eclipse中进行MapReduce编程作业,这是大数据转业必须学会的基础分布式操作,在实验期间,我们遇见了很多问题,但经过团队的不懈努力,终于完成了本次实验,本次实验我们收获颇丰,也为我们以后的就业开拓了更广阔的视野。
欢迎大家加我微信交流讨论(请备注csdn上添加)

最后
以上就是寂寞帆布鞋最近收集整理的关于Hadoop的伪分布式安装环境信息步骤与方法数据与程序清单出现的问题及解决方法结果、结果分析心得体会的全部内容,更多相关Hadoop内容请搜索靠谱客的其他文章。


发表评论 取消回复