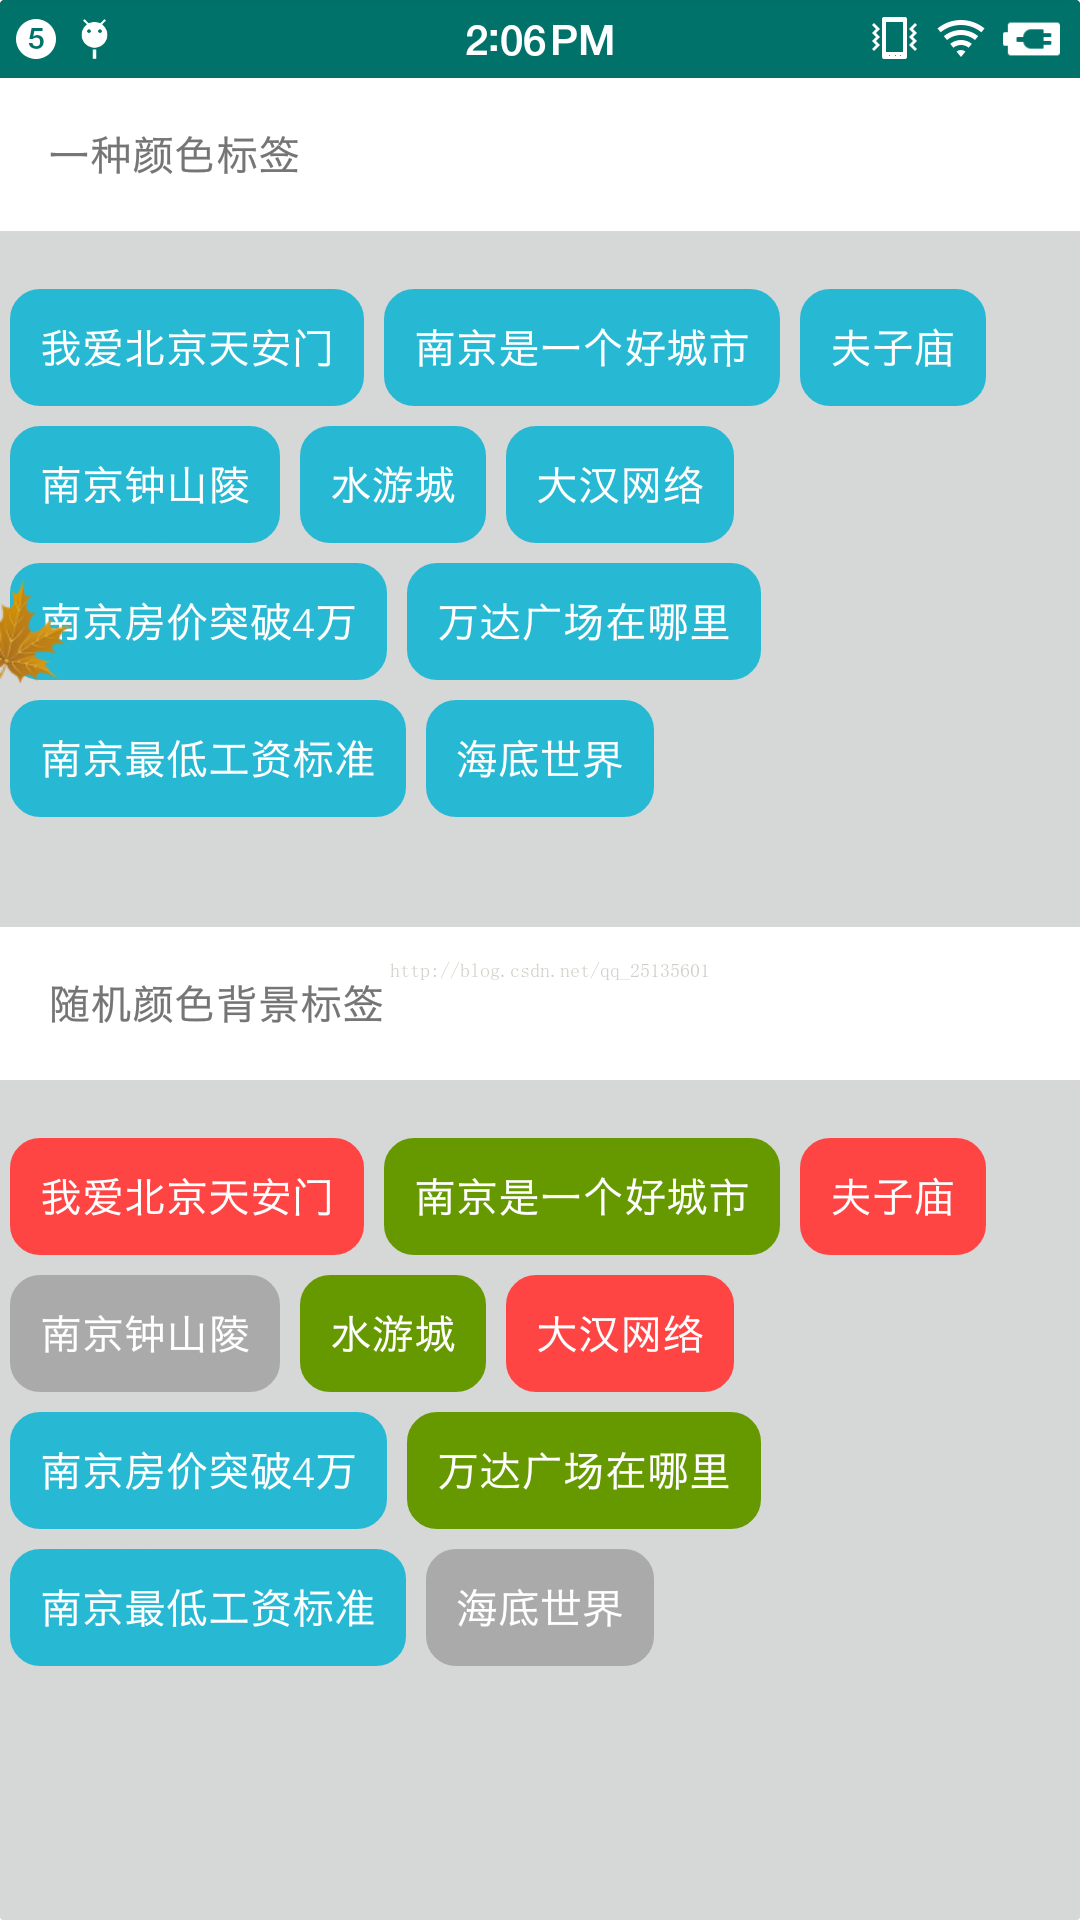
热门标签(流式布局)
在当前主流标签中都有热门选项,经过本人参考网上的写法并加入自己的理解实现了流式布局的使用,方便简单。
通过继承ViewGroup 计算每个view 的宽高,时间自动换行的功能。
效果图:

代码如下:
1、流式布局
public class FlowLayout extends ViewGroup{
    //存储所有子View
    private List<List<View>> mAllChildViews = new ArrayList<>();
    //每一行的高度
    private List<Integer> mLineHeight = new ArrayList<>();

    public FlowLayout(Context context) {
        super(context);
    }

    public FlowLayout(Context context, AttributeSet attrs) {
        super(context, attrs);
    }

    public FlowLayout(Context context, AttributeSet attrs, int defStyleAttr) {
        super(context, attrs, defStyleAttr);
    }

    @Override
    protected void onMeasure(int widthMeasureSpec, int heightMeasureSpec) {
        // TODO Auto-generated method stub

        //父控件传进来的宽度和高度以及对应的测量模式
        int sizeWidth = MeasureSpec.getSize(widthMeasureSpec);
        int modeWidth = MeasureSpec.getMode(widthMeasureSpec);
        int sizeHeight = MeasureSpec.getSize(heightMeasureSpec);
        int modeHeight = MeasureSpec.getMode(heightMeasureSpec);

        //如果当前ViewGroup的宽高为wrap_content的情况
        int width = 0;//自己测量的 宽度
        int height = 0;//自己测量的高度
        //记录每一行的宽度和高度
        int lineWidth = 0;
        int lineHeight = 0;

        //获取子view的个数
        int childCount = getChildCount();
        for(int i = 0;i < childCount; i ++){
            View child = getChildAt(i);
            //测量子View的宽和高
            measureChild(child, widthMeasureSpec, heightMeasureSpec);
            //得到LayoutParams
            MarginLayoutParams lp = (MarginLayoutParams) getLayoutParams();
            //子View占据的宽度
            int childWidth = child.getMeasuredWidth() + lp.leftMargin + lp.rightMargin;
            //子View占据的高度
            int childHeight = child.getMeasuredHeight() + lp.topMargin + lp.bottomMargin;
            //换行时候
            if(lineWidth + childWidth > sizeWidth){
                //对比得到最大的宽度
                width = Math.max(width, lineWidth);
                //重置lineWidth
                lineWidth = childWidth;
                //记录行高
                height += lineHeight;
                lineHeight = childHeight;
            }else{//不换行情况
                //叠加行宽
                lineWidth += childWidth;
                //得到最大行高
                lineHeight = Math.max(lineHeight, childHeight);
            }
            //处理最后一个子View的情况
            if(i == childCount -1){
                width = Math.max(width, lineWidth);
                height += lineHeight;
            }
        }
        //wrap_content
        setMeasuredDimension(modeWidth == MeasureSpec.EXACTLY ? sizeWidth : width,
                modeHeight == MeasureSpec.EXACTLY ? sizeHeight : height);
        super.onMeasure(widthMeasureSpec, heightMeasureSpec);
    }

    @Override
    protected void onLayout(boolean changed, int l, int t, int r, int b) {
        mAllChildViews.clear();
        mLineHeight.clear();
        //获取当前ViewGroup的宽度
        int width = getWidth();

        int lineWidth = 0;
        int lineHeight = 0;
        //记录当前行的view
        List<View> lineViews = new ArrayList<View>();
        int childCount = getChildCount();
        for(int i = 0;i < childCount; i ++){
            View child = getChildAt(i);
            MarginLayoutParams lp = (MarginLayoutParams) child.getLayoutParams();
            int childWidth = child.getMeasuredWidth();
            int childHeight = child.getMeasuredHeight();

            //如果需要换行
            if(childWidth + lineWidth + lp.leftMargin + lp.rightMargin > width){
                //记录LineHeight
                mLineHeight.add(lineHeight);
                //记录当前行的Views
                mAllChildViews.add(lineViews);
                //重置行的宽高
                lineWidth = 0;
                lineHeight = childHeight + lp.topMargin + lp.bottomMargin;
                //重置view的集合
                lineViews = new ArrayList();
            }
            lineWidth += childWidth + lp.leftMargin + lp.rightMargin;
            lineHeight = Math.max(lineHeight, childHeight + lp.topMargin + lp.bottomMargin);
            lineViews.add(child);
        }
        //处理最后一行
        mLineHeight.add(lineHeight);
        mAllChildViews.add(lineViews);

        //设置子View的位置
        int left = 0;
        int top = 0;
        //获取行数
        int lineCount = mAllChildViews.size();
        for(int i = 0; i < lineCount; i ++){
            //当前行的views和高度
            lineViews = mAllChildViews.get(i);
            lineHeight = mLineHeight.get(i);
            for(int j = 0; j < lineViews.size(); j ++){
                View child = lineViews.get(j);
                //判断是否显示
                if(child.getVisibility() == View.GONE){
                    continue;
                }
                MarginLayoutParams lp = (MarginLayoutParams) child.getLayoutParams();
                int cLeft = left + lp.leftMargin;
                int cTop = top + lp.topMargin;
                int cRight = cLeft + child.getMeasuredWidth();
                int cBottom = cTop + child.getMeasuredHeight();
                //进行子View进行布局
                child.layout(cLeft, cTop, cRight, cBottom);
                left += child.getMeasuredWidth() + lp.leftMargin + lp.rightMargin;
            }
            left = 0;
            top += lineHeight;
        }
    }
    @Override
    public LayoutParams generateLayoutParams(AttributeSet attrs) {
        // TODO Auto-generated method stub

        return new MarginLayoutParams(getContext(), attrs);
    }

    @Override
    public void addView(View child, LayoutParams params) {
        super.addView(child, params);

    }
    /**
     * @param view  添加的控件
     * @param textColor 字体颜色
     * @param backgrooundDrawable  控件的背景
     * @param leftMargin  左外边距
     * @param  rightMargin 右外边距
     * */
    public void addTextView(TextView view,int textColor,Drawable backgrooundDrawable,int leftMargin,int rightMargin,int topMargin,int bottomMargin){
        LayoutParams params=new LayoutParams(WRAP_CONTENT,WRAP_CONTENT);
        MarginLayoutParams lp = new MarginLayoutParams(params);
        lp.leftMargin=leftMargin;
        lp.rightMargin=rightMargin;
        lp.topMargin=topMargin;
        lp.bottomMargin=bottomMargin;
        view.setTextColor(textColor);
        view.setBackground(backgrooundDrawable);
        addView(view, lp);
    }
    /**
     * 此方法和addTextView差不多,唯一的区别就是使用了一个随机数可以改变textview的background的属性
     *调用此方法时需要根据自己的实际情况引用drawable的资源——可自定义
     * */
   public void moreColorrTextView(TextView view,int textColor,int leftMargin,int rightMargin,int topMargin,int bottomMargin){
      LayoutParams params=new LayoutParams(WRAP_CONTENT,WRAP_CONTENT);
       MarginLayoutParams lp = new MarginLayoutParams(params);
       lp.leftMargin=leftMargin;
       lp.rightMargin=rightMargin;
       lp.topMargin=topMargin;
       lp.bottomMargin=bottomMargin;

       view.setTextColor(textColor);
//       view.setBackground(backgrooundDrawable);
       Random rad=new Random();
       int radom=rad.nextInt(5);
       Log.i("hhj", Math.random() * 10 + "") ;
       if (radom==0){
           view.setBackground(getResources().getDrawable(R.drawable.hotsearch_selector));
       }else if (radom==1){
           view.setBackground(getResources().getDrawable(R.drawable.hotsearch_selector1));
       } else if (radom==2){
           view.setBackground(getResources().getDrawable(R.drawable.hotsearch_selector2));
       }else if (radom==3){
           view.setBackground(getResources().getDrawable(R.drawable.hotsearch_selector3));
       }else if (radom==4){
           view.setBackground(getResources().getDrawable(R.drawable.hotsearch_selector4));
       }
       addView(view, lp);
   }
}
2、activity:
package com.example.admin.demo.flowlayout;

import android.app.Activity;
import android.graphics.Color;
import android.os.Bundle;
import android.util.Log;
import android.view.View;
import android.view.ViewGroup;
import android.widget.TextView;
import android.widget.Toast;

import com.example.admin.demo.R;
import com.example.admin.demo.flowlayout.view.FlowLayout;


/**
 * Created by admin on 2017/4/1.
 */

public class FlowLayoutActivity  extends Activity {
    private FlowLayout flowlayout,flowlayout1;
    String[] strings=new String[]{"我爱北京天安门","南京是一个好城市","夫子庙","南京钟山陵","水游城","大汉网络","南京房价突破4万","万达广场在哪里","南京最低工资标准","海底世界"};
    @Override
    protected void onCreate(Bundle savedInstanceState) {
        super.onCreate(savedInstanceState);
        setContentView(R.layout.flowlayout_activity);
        flowlayout=(FlowLayout)findViewById(R.id.flowlayout);
        flowlayout1=(FlowLayout)findViewById(R.id.flowlayout1);
        showMoreColorTextView();
        showTextView();

    }
    /**
     * 定义好的TextView只需传入view以及字体的颜色,背景资源文件,以及上下左右的外边距。
     *
     * **/
    public void showTextView(){
        for (int i=0;i<10;i++){
            final TextView textView=new TextView(this);
            textView.setId(i);
            textView.setText(strings[i]);
            textView.setOnClickListener(new View.OnClickListener() {
                @Override
                public void onClick(View view) {
                    Toast.makeText(FlowLayoutActivity.this, textView.getText().toString(), Toast.LENGTH_SHORT).show();
                }
            });
            flowlayout.addTextView(textView, Color.WHITE,getResources().getDrawable(R.drawable.hotsearch_selector),10,10,10,10);
        }
    }
    /***
     *  通过原始的addview()可以自己定义view的属性
     * 这是多种热门标签的随机背景颜色
     */

    public void showMoreColorTextView(){
        for (int i=0;i<10;i++){
            final TextView textView=new TextView(this);
            textView.setText(strings[i]);
            textView.setOnClickListener(new View.OnClickListener() {
                @Override
                public void onClick(View view) {
                    Toast.makeText(FlowLayoutActivity.this, textView.getText().toString(), Toast.LENGTH_SHORT).show();
                }
            });
            flowlayout1.moreColorrTextView(textView, Color.WHITE, 10, 10, 10, 10);
        }
    }


}
3、布局
<?xml version="1.0" encoding="utf-8"?>
<LinearLayout xmlns:android="http://schemas.android.com/apk/res/android"
    android:orientation="vertical" android:layout_width="match_parent"
    android:layout_height="match_parent"
    android:background="@color/activty_bg"
    >
    <TextView
        android:layout_width="match_parent"
        android:layout_height="wrap_content"
        android:padding="@dimen/activity_vertical_margin"
        android:text="一种颜色标签"
        android:background="@color/white"
        />
    <com.example.admin.demo.flowlayout.view.FlowLayout
        android:layout_marginTop="@dimen/activity_vertical_margin"
        android:id="@+id/flowlayout"
        android:layout_width="match_parent"
        android:layout_height="200dp"
        ></com.example.admin.demo.flowlayout.view.FlowLayout>
    <TextView
        android:layout_marginTop="@dimen/activity_vertical_margin"
        android:layout_width="match_parent"
        android:layout_height="wrap_content"
        android:padding="@dimen/activity_vertical_margin"
        android:text="随机颜色背景标签"
        android:background="@color/white"
        />
    <com.example.admin.demo.flowlayout.view.FlowLayout
        android:layout_marginTop="@dimen/activity_vertical_margin"
        android:id="@+id/flowlayout1"
        android:layout_width="match_parent"
        android:layout_height="200dp"
        ></com.example.admin.demo.flowlayout.view.FlowLayout>

</LinearLayout>
有什么不足之处或者改进的欢迎大家留言交流
最后
以上就是无限大米最近收集整理的关于android 流式布局(热门标签)的全部内容,更多相关android内容请搜索靠谱客的其他文章。
本图文内容来源于网友提供,作为学习参考使用,或来自网络收集整理,版权属于原作者所有。


发表评论 取消回复