转载请注明出处:http://blog.csdn.net/hjf_huangjinfu/article/details/51173516
概述
Android中View框架的工作机制中,主要有三个过程:
1、View树的测量(measure) Android View框架的measure机制
2、View树的布局(layout)Android View框架的layout机制
3、View树的绘制(draw)Android View框架的draw机制
View框架的工作流程为:测量每个View大小(measure)-->把每个View放置到相应的位置(layout)-->绘制每个View(draw)。
本文主要讲述三大流程中的layout过程。不清楚measure过程的,可以参考这篇文章 Android View框架的measure机制。
带着问题来思考整个layout过程。
1、系统为什么要有layout过程?
View框架在经过第一步的measure过程后,成功计算了每一个View的尺寸。但是要成功的把View绘制到屏幕上,只有View的尺寸还不行,还需要准确的知道该View应该被绘制到什么位置。除此之外,对一个ViewGroup而言,还需要根据自己特定的layout规则,来正确的计算出子View的绘制位置,已达到正确的layout目的。这也就是layout过程的职责。
该位置是View相对于父布局坐标系的相对位置,而不是以屏幕坐标系为准的绝对位置。这样更容易保持树型结构的递归性和内部自治性。而View的位置,可以无限大,超出当前ViewGroup的可视范围,这也是通过改变View位置而实现滑动效果的原理。
2、layout过程都干了点什么事?
由于View是以树结构进行存储,所以典型的数据操作就是递归操作,所以,View框架中,采用了内部自治的layout过程。
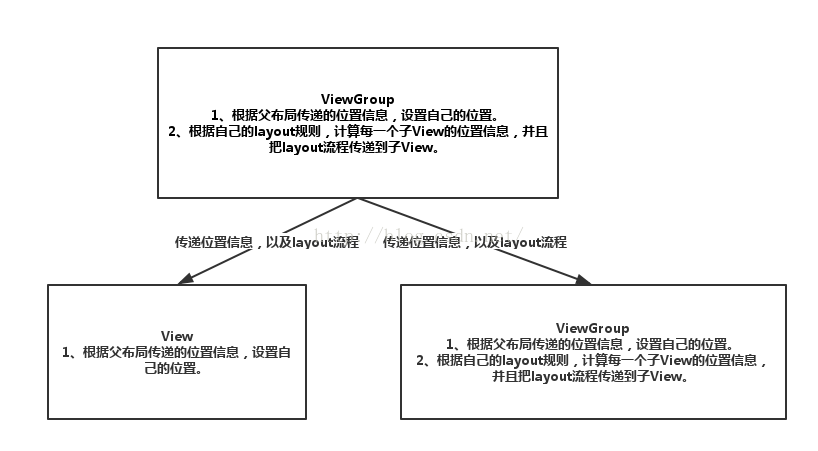
每个叶子节点根据父节点传递过来的位置信息,设置自己的位置数据,每个非叶子节点,除了负责根据父节点传递过来的位置信息,设置自己的位置数据外(如果有父节点的话),还需要根据自己内部的layout规则(比如垂直排布等),计算出每一个子节点的位置信息,然后向子节点传递layout过程。
对于ViewGroup,除了根据自己的parent传递的位置信息,来设置自己的位置之外,还需要根据自己的layout规则,为每一个子View计算出准确的位置(相对于子View的父布局的位置)。
对于View,根据自己的parent传递的位置信息,来设置自己的位置。

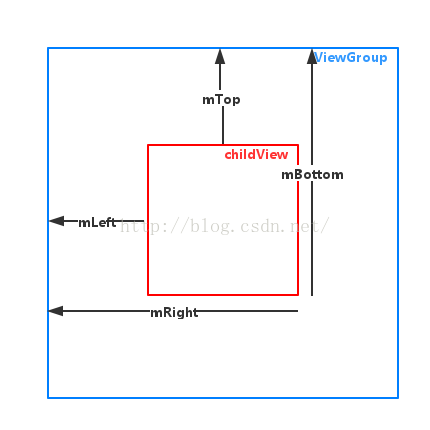
View对象的位置信息,在内部是以4个成员变量的保存的,分别是mLeft、mRight、mTop、mBottom。他们的含义如图所示。

源代码分析
在View的源代码中,提取到了下面一些关于layout过程的信息。
我们知道,整棵View树的根节点是DecorView,它是一个FrameLayout,所以它是一个ViewGroup,所以整棵View树的测量是从一个ViewGroup对象的layout方法开始的。
View:
1、layout
/**
分配一个位置信息到一个View上面,每个parent会调用children的layout方法来设置children的位置。最好不要覆写该方法,有children的viewGroup,应该覆写onLayout方法
*/
public void layout(int l, int t, int r, int b) ;
源代码:
这里不给出,如果有兴趣,自行查阅SDK。
伪代码:
public void layout(int l, int t, int r, int b) {
    if (根据一些flag,发现需要进一步measure) {
        onMeasure(mOldWidthMeasureSpec, mOldHeightMeasureSpec);
    }
 //暂存旧的位置信息
 int oldL = mLeft;
    int oldT = mTop;
    int oldB = mBottom;
    int oldR = mRight;
    //设置新的位置信息
    mLeft = l;
    mTop = t;
    mBottom = b;
    mRight = r;

    if (layout改变了 || 需要layout) {
        onLayout(changed, l, t, r, b);

  //回调layoutChange事件
        for (遍历监听对象) {
            listener.onLayoutChange(this, l, t, r, b, oldL, oldT, oldR, oldB);
        }
    }

    标记为已经执行过layout;
}
2、onLayout
/** 根据布局规则,计算每一个子View的位置,View类默认是空实现。 所以这里没有源代码*/
protected void onLayout(boolean changed, int left, int top, int right, int bottom);
ViewGroup:
ViewGroup中,只需要覆写onLayout方法,来计算出每一个子View的位置,并且把layout流程传递给子View。
源代码:
ViewGroup没有实现,具体可以参考LinearLayout和RelativeLayout的onLayout方法。虽然各个具体实现都很复杂,但是基本流程是一样的,可以参考下面的伪代码。
伪代码:
protected void onLayout(boolean changed, int l, int t, int r, int b) {
	for (遍历子View) {
		/**
		根据如下数据计算。
			1、自己当前布局规则。比如垂直排放或者水平排放。
			2、子View的测量尺寸。
			3、子View在所有子View中的位置。比如位置索引,第一个或者第二个等。
		*/
		计算每一个子View的位置信息;

		child.layout(上面计算出来的位置信息);
	}
}
结论
一般来说,自定义View,如果该View不包含子View,类似于TextView这种的,是不需要覆写onLayout方法的。而含有子View的,比如LinearLayout这种,就需要根据自己的布局规则,来计算每一个子View的位置。
动手操作
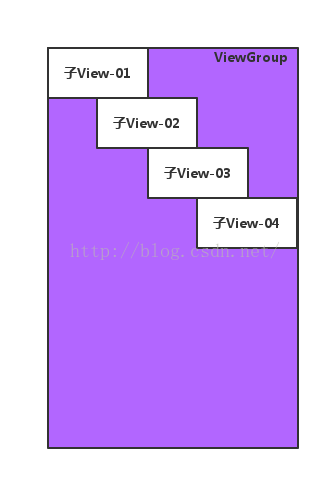
下面我们自己写一个自定义的ViewGroup,让它内部的每一个子View都垂直排布,并且让每一个子View的左边界都距离上一个子View的左边界一定的距离,大概看起来如下图所示:

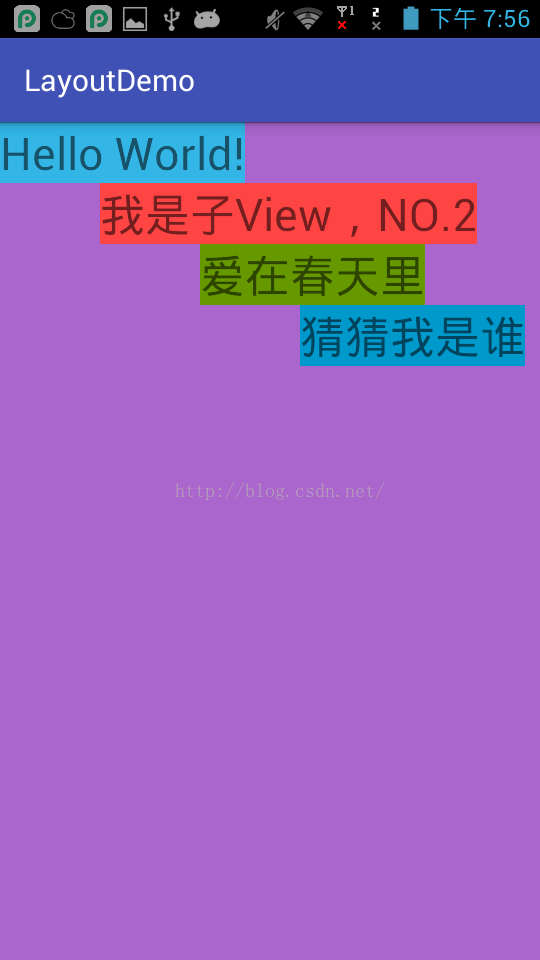
实际运行效果如下:

代码如下:
public class VerticalOffsetLayout extends ViewGroup {

    private static final int OFFSET = 100;

    public VerticalOffsetLayout(Context context) {
        super(context);
    }

    public VerticalOffsetLayout(Context context, AttributeSet attrs) {
        super(context, attrs);
    }

    public VerticalOffsetLayout(Context context, AttributeSet attrs, int defStyleAttr) {
        super(context, attrs, defStyleAttr);
    }

    @Override
    protected void onMeasure(int widthMeasureSpec, int heightMeasureSpec) {
        super.onMeasure(widthMeasureSpec, heightMeasureSpec);

        int widthMode = MeasureSpec.getMode(widthMeasureSpec);
        int heightMode = MeasureSpec.getMode(heightMeasureSpec);
        int widthSize = MeasureSpec.getSize(widthMeasureSpec);
        int heightSize = MeasureSpec.getSize(heightMeasureSpec);

        int width = 0;
        int height = 0;

        int childCount = getChildCount();
        for (int i = 0; i < childCount; i++) {
            View child = getChildAt(i);
            ViewGroup.LayoutParams lp = child.getLayoutParams();
            int childWidthSpec = getChildMeasureSpec(widthMeasureSpec, 0, lp.width);
            int childHeightSpec = getChildMeasureSpec(heightMeasureSpec, 0, lp.height);
            child.measure(childWidthSpec, childHeightSpec);
        }

        switch (widthMode) {
            case MeasureSpec.EXACTLY:
                width = widthSize;
                break;
            case MeasureSpec.AT_MOST:
            case MeasureSpec.UNSPECIFIED:
                for (int i = 0; i < childCount; i++) {
                    View child = getChildAt(i);
                    int widthAddOffset = i * OFFSET + child.getMeasuredWidth();
                    width = Math.max(width, widthAddOffset);
                }
                break;
            default:
                break;

        }

        switch (heightMode) {
            case MeasureSpec.EXACTLY:
                height = heightSize;
                break;
            case MeasureSpec.AT_MOST:
            case MeasureSpec.UNSPECIFIED:
                for (int i = 0; i < childCount; i++) {
                    View child = getChildAt(i);
                    height = height + child.getMeasuredHeight();
                }
                break;
            default:
                break;

        }

        setMeasuredDimension(width, height);
    }

    @Override
    protected void onLayout(boolean changed, int l, int t, int r, int b) {
        int left = 0;
        int right = 0;
        int top = 0;
        int bottom = 0;

        int childCount = getChildCount();

        for (int i = 0; i < childCount; i++) {
            View child = getChildAt(i);
            left = i * OFFSET;
            right = left + child.getMeasuredWidth();
            bottom = top + child.getMeasuredHeight();

            child.layout(left, top, right, bottom);

            top += child.getMeasuredHeight();
        }
    }
}
最后
以上就是酷炫大炮最近收集整理的关于Android View框架的layout机制 概述带着问题来思考整个layout过程。源代码分析结论动手操作的全部内容,更多相关Android内容请搜索靠谱客的其他文章。


发表评论 取消回复