目录
- editItem.vue的封装
- UserEdit.vue

editItem.vue的封装
- 这是修改个人中心中的 个人详情的组件封装
- 左侧 与 右侧
- 左侧需要从父组件 传递值过来
- 右侧需要从父组件 传递值过来 还有可以使用插槽的方式替换
<template>
  <div>
    <div class="edit-item" @click="itemClcik">
      <span>{{ left }}</span>
      <span>
        <slot name="right">{{ right }}</slot>
      </span>
    </div>
  </div>
</template>

<script>
export default {
  name: "editUser",
  props: ["left", "right"],
  data() {
    return {};
  },
  methods: {
    itemClcik() {
      //点击的 时候 触发父元素的事件
      this.$emit("itemClcik");
    }
  },
  components: {}
};
</script>
<style  lang="scss" scoped>
.edit-item {
  padding: 15px;
  border-bottom: 1px solid #ccc;
  display: flex;
  justify-content: space-between;

  // span{

  // }
}
</style>
UserEdit.vue
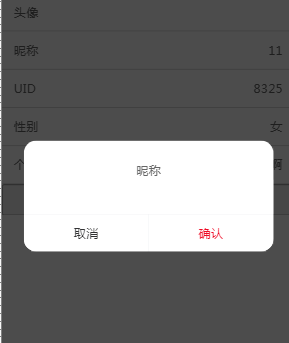
- 点击昵称等 弹出 对应的修改用户信息
- 点击性别等 弹出 修改性别的
<template>
  <div v-if="selectUser">
    <nav-bar></nav-bar>
    <div class="upload_box">
      <van-uploader preview-size="100vw" class="upload_img" :after-read="afterRead" />
      <edit-item left="头像">
        <img v-if="selectUser.user_img" :src="selectUser.user_img" />
        <img v-else class="touxian" slot="right" src="@/assets/default_img.jpg" />
      </edit-item>
    </div>
    <edit-item left="昵称" @itemClcik="show = true">
      <a href="###" slot="right">{{ selectUser.name }}</a>
    </edit-item>
    <edit-item left="UID">
      <span slot="right">{{ selectUser.id }}</span>
    </edit-item>
    <edit-item left="性别" @itemClcik="genderShow = true">
      <span slot="right">{{ selectUser.gender }}</span>
    </edit-item>
    <edit-item left="个性签名" @itemClcik="textShow = true">
      <span slot="right">{{ selectUser.user_desc }}</span>
    </edit-item>

    <button class="goback" @click="$router.push('/userinfo')">返回个人中心</button>

    <!-- 修改昵称的 弹出 -->
    <van-dialog
      v-model="show"
      title="昵称"
      show-cancel-button
      @confirm="confirmClick"
      @cancel="cancelClick"
    >
      <van-field v-model="content" />
    </van-dialog>

    <!-- 修改性别 -->
    <van-action-sheet v-model="genderShow" :actions="actions" @select="onSelect" cancel-text="取消" />

    <!-- 修改个性的 弹出 -->
    <van-dialog
      v-model="textShow"
      title="个性签名"
      show-cancel-button
      @confirm="confirmTextClick"
      @cancel="cancelClick"
    >
      <van-field v-model="content" type="textarea" />
    </van-dialog>
  </div>
</template>

<script>
import Vue from "vue";
import { Uploader, ActionSheet } from "vant";

Vue.use(ActionSheet);
Vue.use(Uploader);
import NavBar from "../../components/comtent/NavBar";
import EditItem from "../../components/comtent/EditItem";
export default {
  name: "UserEdits",
  data() {
    return {
      //当前用户信息
      selectUser: {},
      //是否显示 弹出窗
      show: false,
      textShow: false,
      genderShow: false,
      //表单的数据
      content: "",
      actions: [
        { name: "男", val: 0 },
        { name: "女", val: 1 }
      ]
    };
  },
  created() {
    this.getUserInfo();
  },
  methods: {
    //根据 id 拿到当前的用户信息
    async getUserInfo() {
      const id = localStorage.getItem("id");
      const { data } = await this.$request.get("/user/" + id);
      // console.log("编辑的res", data, data[0]);
      this.selectUser = data[0];
    },
    async afterRead(file) {
      // 此时可以自行将文件上传至服务器
      console.log(file);
      //图片上传的 时候 需要 定义一个 fromDate对象 然后往里面传入 要更新的头像
      const fromdata = new FormData();
      fromdata.append("file", file.file); // file.file 才是具体的图片文件
      //然后把图片 向后端传入数据
      const { data } = await this.$request.post("/upload", fromdata);
      console.log("data", data, data.url);
      // 然后 把img的url路径更改为 后端返回的路径
      this.selectUser.user_img = data.url;
      this.userUpdata();
    },
    //更新用户信息 上传头像后
    async userUpdata() {
      const id = localStorage.getItem("id");
      const res = await this.$request.post("/update/" + id, this.selectUser);
      console.log("更新res", res);
    },
    //显示 要编辑的
    async showEdit() {
      this.show = true;
    },
    //点击 修改昵称 确认按钮的时候
    confirmClick() {
      this.selectUser.name = this.content;
      this.userUpdata();
      this.content = "";
    },
    // 修改个性签名的 确认按钮
    confirmTextClick() {
      this.selectUser.user_desc = this.content;
      // console.log("更新res2", this.selectUser);
      this.userUpdata();
      this.content = "";
    },
    //点击取消按钮
    cancelClick() {
      this.content = "";
    },
    //修改性别
    onSelect(item) {
      console.log("修改", item);
      this.selectUser.gender = item.name;
      this.userUpdata();
      this.genderShow = false;
    }
  },
  components: {
    NavBar,
    EditItem
  }
};
</script>
<style  lang="scss" scoped>
.upload_box {
  position: relative;
  overflow: hidden;

  .upload_img {
    opacity: 0;
    position: absolute;
  }
}
.touxian {
  width: 0.3rem;
  height: 0.3rem;
}
.goback {
  width: 100%;
  height: 0.4rem;
}
</style>
最后
以上就是傻傻美女最近收集整理的关于vue之个人中心编辑的全部内容,更多相关vue之个人中心编辑内容请搜索靠谱客的其他文章。
本图文内容来源于网友提供,作为学习参考使用,或来自网络收集整理,版权属于原作者所有。


发表评论 取消回复