Springboot+swagger2.7集成开发
Springboot+swagger2.7集成开发
本篇文章是介绍最新的springboot和swagger2.7集成开发和2.0稍微有一些出入:
- Springboot集成环境配置
- Swagger2.7集成
- 集成测试
Springboot集成环境配置
Spring Boot是由Pivotal团队提供的全新框架,其设计目的是用来简化新Spring应用的初始搭建以及开发过程。该框架使用了特定的方式来进行配置,从而使开发人员不再需要定义样板化的配置。通过这种方式,Boot致力于在蓬勃发展的快速应用开发领域(rapid application development)成为领导者。 —— [ INFO深入学习]
代码块
开发Spring Boot应用,例如:
@RestController
class App {
  @RequestMapping("/")
  String home() {
    "hello"
  }
}
引入SpringBoot的JAR文件.
<parent>
    <groupId>org.springframework.boot</groupId>
    <artifactId>spring-boot-starter-parent</artifactId>
    <version>1.2.7.RELEASE</version>
</parent>
<dependencies>
    <dependency>
        <groupId>org.springframework.boot</groupId>
        <artifactId>spring-boot-starter-web</artifactId>
    </dependency>
<dependency>
    <groupId>org.springframework.boot</groupId>
    <artifactId>spring-boot-starter-test</artifactId>
    <scope>test</scope>
</dependency>
<dependency>
    <groupId>org.springframework.boot</groupId>
    <artifactId>spring-boot-starter-jdbc</artifactId>
</dependency>
import org.springframework.boot.autoconfigure.EnableAutoConfiguration;
import org.springframework.web.bind.annotation.PathVariable;
import org.springframework.web.bind.annotation.RequestMapping;
import org.springframework.web.bind.annotation.RestController;

@RestController
@EnableAutoConfiguration
public class Example {

    @RequestMapping("/")
    String index() {
        return "Hello World!";
    }

    @RequestMapping("/index/{sayHello}")
    String index(@PathVariable String sayHello) {
        return "Hello "+sayHello+"!!!";
    }
}
application.hellowmsg=Hello World
server.port=8081 #端口
logging.level.=INFO
编制Application.java
@EnableScheduling
@EnableTransactionManagement
@SpringBootApplication
public class App extends WebMvcConfigurerAdapter {
    public static void main(String[] args) throws Exception {
        SpringApplication app = new SpringApplication(App.class);
        app.setWebEnvironment(true);
        app.setShowBanner(false);
        Set<Object> set = new HashSet<Object>();
        // set.add("classpath:applicationContext.xml");
        app.setSources(set);
        app.run(args);
    }
运行Application.java
看到
2017-11-15 16:14:08.391  INFO 12524 --- [           main] s.d.s.w.s.ApiListingReferenceScanner     : Scanning for api listing references
2017-11-15 16:14:08.607  INFO 12524 --- [           main] s.b.c.e.t.TomcatEmbeddedServletContainer : Tomcat started on port(s): 8081 (http)
并没有出错,表示成功,直接访问http://localhost:8081/,输出Hello World!
Swagger2.7集成
加入maven的仓库文件
<!--swagger2 integration -->
    <dependency>
        <groupId>io.springfox</groupId>
        <artifactId>springfox-swagger2</artifactId>
        <version>2.7.0</version>
    </dependency>
    <dependency>
        <groupId>io.springfox</groupId>
        <artifactId>springfox-swagger-ui</artifactId>
        <version>2.7.0</version>
    </dependency>
创建SwaggerConfig的配置文件
import static com.google.common.collect.Lists.newArrayList;
import java.util.List;
import org.springframework.beans.factory.annotation.Autowired;
import org.springframework.beans.factory.annotation.Value;
import org.springframework.boot.context.properties.ConfigurationProperties;
import org.springframework.context.annotation.Bean;
import org.springframework.context.annotation.Configuration;
import com.fasterxml.classmate.TypeResolver;
import springfox.documentation.builders.ApiInfoBuilder;
import springfox.documentation.builders.PathSelectors;
import springfox.documentation.builders.RequestHandlerSelectors;
import springfox.documentation.service.ApiInfo;
import springfox.documentation.service.ApiKey;
import springfox.documentation.service.AuthorizationScope;
import springfox.documentation.service.SecurityReference;
import springfox.documentation.spi.DocumentationType;
import springfox.documentation.spi.service.contexts.SecurityContext;
import springfox.documentation.spring.web.plugins.Docket;
import springfox.documentation.swagger2.annotations.EnableSwagger2;

@Configuration
@EnableSwagger2
@ConfigurationProperties
public class SwaggerConfig {

    @Value("${swagger.version}")
    private String version;
    @Autowired
    private TypeResolver typeResolver;

    @Bean
    public Docket createRestApi() {
        return new Docket(DocumentationType.SWAGGER_2).select().apis(RequestHandlerSelectors.basePackage("com.hp.ctrl"))
                .paths(PathSelectors.any()).build().apiInfo(apiInfo());
    }


    private ApiInfo apiInfo() {
        return new ApiInfoBuilder().title("构建RESTful APIs").description("更多请关注:http://my.csdn.net/elvishehai")
                .license("The Apache License, Version 2.0")
                .licenseUrl("http://www.apache.org/licenses/LICENSE-2.0.html").termsOfServiceUrl("http://my.csdn.net/elvishehai")
                .version(version).build();
    }
}
下一步写REST的COTR
@Api(value = "API - SMSController")
@RestController
public class SmsController { @ApiOperation(value = "测试服务", notes = "测试服务") @ApiImplicitParam(name = "smsRequestBean", value = "用户详细实体SmsRequestBean", required = true, dataType = "SmsRequestBean") @RequestMapping(value = "/post", method = RequestMethod.POST) public String post(@RequestBody SmsRequestBean smsRequestBean) { return "服务测试成功,你输入的参数为:" + smsRequestBean.getApplicationId(); } @ApiOperation(value = "测试服务", notes = "测试服务", consumes = "application/json", produces = "application/json") @RequestMapping(value = "/test/{input}", method = RequestMethod.GET) @ResponseBody public String getUser(@PathVariable("input") String input) { return "服务测试成功,你输入的参数为:" + input; } }
- swagger通过注解表明该接口会生成文档,包括接口名、请求方法、参数、返回信息的等等。
- @Api:修饰整个类,描述Controller的作用
- @ApiOperation:描述一个类的一个方法,或者说一个接口
- @ApiParam:单个参数描述
- @ApiModel:用对象来接收参数
- @ApiProperty:用对象接收参数时,描述对象的一个字段
- @ApiResponse:HTTP响应其中1个描述
- @ApiResponses:HTTP响应整体描述
- @ApiIgnore:使用该注解忽略这个API
- @ApiError :发生错误返回的信息
- @ApiParamImplicitL:一个请求参数
- @ApiParamsImplicit 多个请求参数
运行application.java
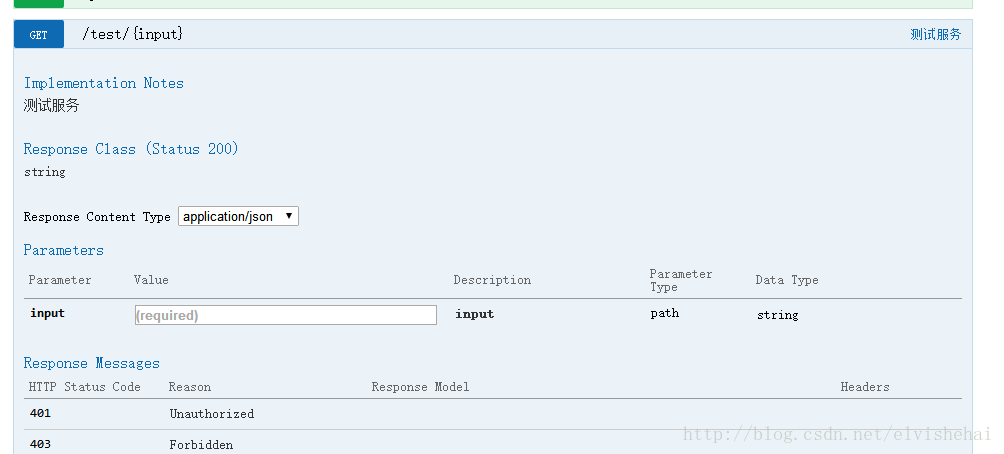
在浏览器上输入http://localhost:8081/swagger-ui.html

可以看到上面,测试就成功。
在上图请求的页面中,我们看到user的Value是个输入框?是的,Swagger除了查看接口功能外,还提供了调试测试功能,我们可以点击上图中右侧的Model Schema(黄色区域:它指明了User的数据结构),此时Value中就有了user对象的模板,我们只需要稍适修改,点击下方“Try it out!”按钮,即可完成了一次请求调用!
此时,你也可以通过几个GET请求来验证之前的POST请求是否正确。
相比为这些接口编写文档的工作,我们增加的配置内容是非常少而且精简的,对于原有代码的侵入也在忍受范围之内。因此,在构建RESTful API的同时,加入swagger来对API文档进行管理,是个不错的选择。
+参考信息
http://swagger.io/ Swagger官方网站
posted on 2017-11-15 17:43 phlive 阅读(...) 评论(...) 编辑 收藏
最后
以上就是幽默唇膏最近收集整理的关于Springboot+swagger2.7集成开发Springboot+swagger2.7集成开发的全部内容,更多相关Springboot+swagger2内容请搜索靠谱客的其他文章。


发表评论 取消回复