1.下载jar包(spring-boot-starter-parent版本2.1.3.RELEASE)
     <parent>
        <groupId>org.springframework.boot</groupId>
        <artifactId>spring-boot-starter-parent</artifactId>
        <version>2.1.3.RELEASE</version>
        <relativePath/>
    </parent>


        <!--swagger2 start-->
        <!-- https://mvnrepository.com/artifact/io.springfox/springfox-swagger2 -->
        <dependency>
            <groupId>io.springfox</groupId>
            <artifactId>springfox-swagger2</artifactId>
            <version>2.9.2</version>
        </dependency>
        <!-- https://mvnrepository.com/artifact/io.springfox/springfox-swagger-ui -->
        <dependency>
            <groupId>io.springfox</groupId>
            <artifactId>springfox-swagger-ui</artifactId>
            <version>2.9.2</version>
        </dependency>

        <!--swagger2 end-->
2.项目结构+创建SwaggerConfig文件
package com.ruoyi.framework.config;
import java.util.ArrayList;
import java.util.List;
import org.springframework.beans.factory.annotation.Autowired;
import org.springframework.beans.factory.annotation.Value;
import org.springframework.context.annotation.Bean;
import org.springframework.context.annotation.Configuration;
import io.swagger.annotations.ApiOperation;
import springfox.documentation.builders.ApiInfoBuilder;
import springfox.documentation.builders.PathSelectors;
import springfox.documentation.builders.RequestHandlerSelectors;
import springfox.documentation.service.ApiInfo;
import springfox.documentation.service.ApiKey;
import springfox.documentation.service.AuthorizationScope;
import springfox.documentation.service.Contact;
import springfox.documentation.service.SecurityReference;
import springfox.documentation.spi.DocumentationType;
import springfox.documentation.spi.service.contexts.SecurityContext;
import springfox.documentation.spring.web.plugins.Docket;
import springfox.documentation.swagger2.annotations.EnableSwagger2;
/**
* Swagger2的接口配置
*
*/
@Configuration
@EnableSwagger2
public class SwaggerConfig
{
/** 系统基础配置 */
@Autowired
private RuoYiConfig ruoyiConfig;
/** 是否开启swagger */
@Value("${swagger.enabled}")
private boolean enabled;
/** 设置请求的统一前缀 */
@Value("${swagger.pathMapping}")
private String pathMapping;
/**
* 创建API
*/
@Bean
public Docket createRestApi()
{
return new Docket(DocumentationType.SWAGGER_2)
// 是否启用Swagger
.enable(enabled)
// 用来创建该API的基本信息,展示在文档的页面中(自定义展示的信息)
.apiInfo(apiInfo())
// 设置哪些接口暴露给Swagger展示
.select()
// 扫描所有有注解的api,用这种方式更灵活
.apis(RequestHandlerSelectors.withMethodAnnotation(ApiOperation.class))
// 扫描指定包中的swagger注解
// .apis(RequestHandlerSelectors.basePackage("com.ruoyi.project.tool.swagger"))
// 扫描所有 .apis(RequestHandlerSelectors.any())
.paths(PathSelectors.any())
.build()
/* 设置安全模式,swagger可以设置访问token */
.securitySchemes(securitySchemes())
.securityContexts(securityContexts())
.pathMapping(pathMapping);
}
/**
* 安全模式,这里指定token通过Authorization头请求头传递
*/
private List<ApiKey> securitySchemes()
{
List<ApiKey> apiKeyList = new ArrayList<ApiKey>();
apiKeyList.add(new ApiKey("Authorization", "Authorization", "header"));
return apiKeyList;
}
/**
* 安全上下文
*/
private List<SecurityContext> securityContexts()
{
List<SecurityContext> securityContexts = new ArrayList<>();
securityContexts.add(
SecurityContext.builder()
.securityReferences(defaultAuth())
.forPaths(PathSelectors.regex("^(?!auth).*$"))
.build());
return securityContexts;
}
/**
* 默认的安全上引用
*/
private List<SecurityReference> defaultAuth()
{
AuthorizationScope authorizationScope = new AuthorizationScope("global", "accessEverything");
AuthorizationScope[] authorizationScopes = new AuthorizationScope[1];
authorizationScopes[0] = authorizationScope;
List<SecurityReference> securityReferences = new ArrayList<>();
securityReferences.add(new SecurityReference("Authorization", authorizationScopes));
return securityReferences;
}
/**
* 添加摘要信息
*/
private ApiInfo apiInfo()
{
// 用ApiInfoBuilder进行定制
return new ApiInfoBuilder()
// 设置标题
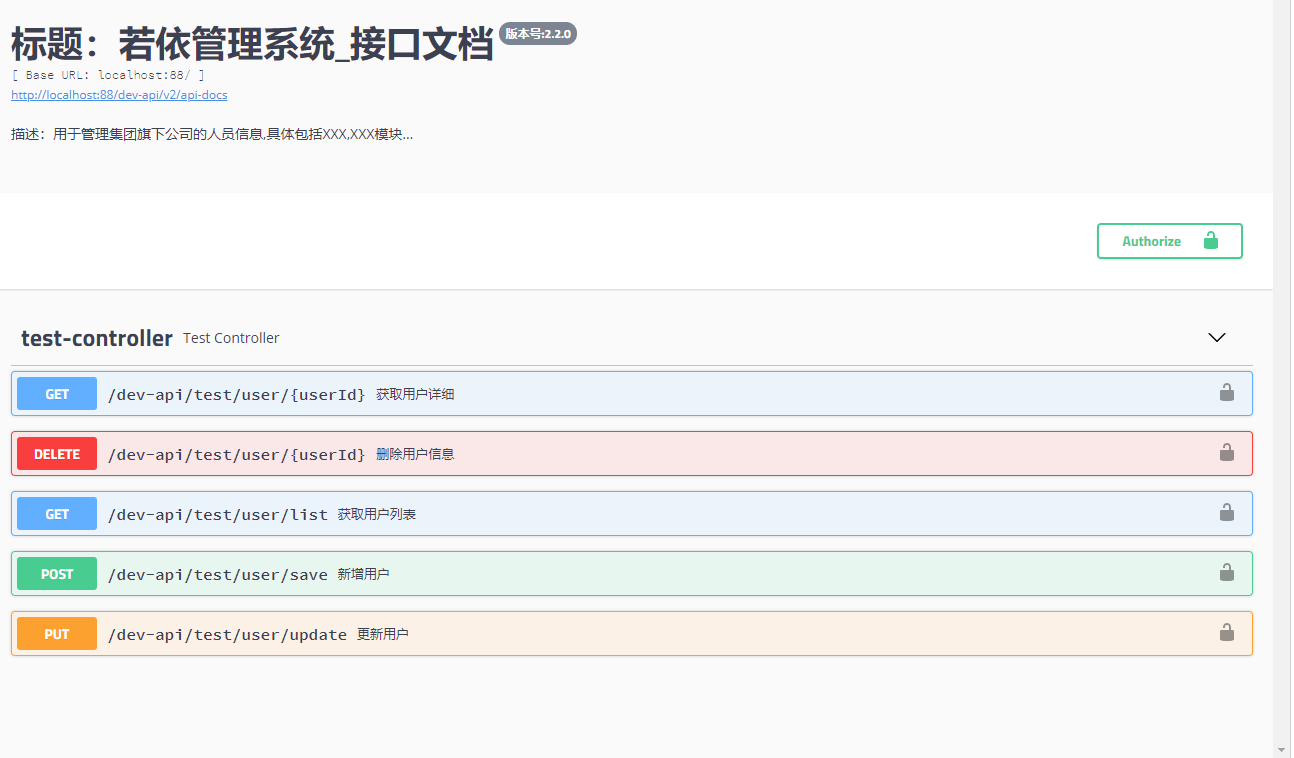
.title("标题:若依管理系统_接口文档")
// 描述
.description("描述:用于管理集团旗下公司的人员信息,具体包括XXX,XXX模块...")
// 作者信息
.contact(new Contact(ruoyiConfig.getName(), null, null))
// 版本
.version("版本号:" + ruoyiConfig.getVersion())
.build();
}
}
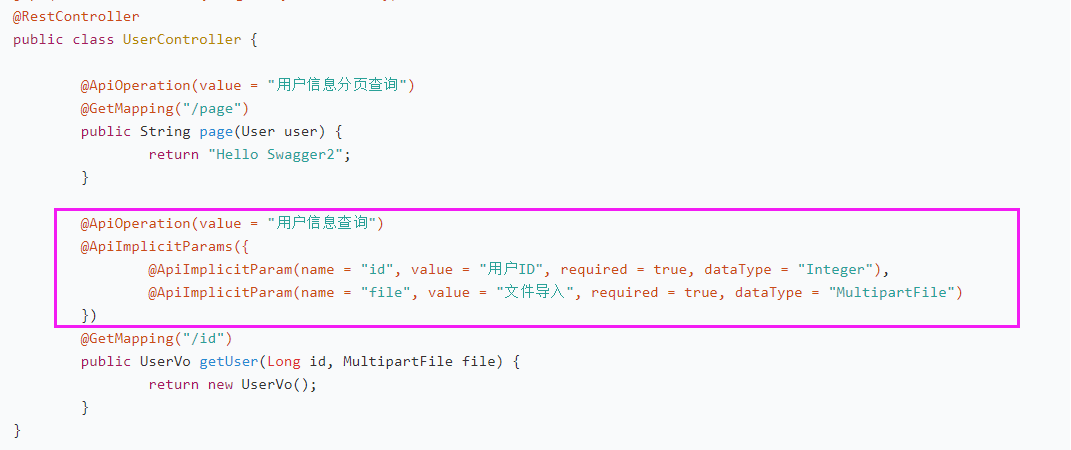
3.controller注解
package com.ruoyi.project.tool.swagger;

import java.util.ArrayList;
import java.util.LinkedHashMap;
import java.util.List;
import java.util.Map;
import org.springframework.web.bind.annotation.DeleteMapping;
import org.springframework.web.bind.annotation.GetMapping;
import org.springframework.web.bind.annotation.PathVariable;
import org.springframework.web.bind.annotation.PostMapping;
import org.springframework.web.bind.annotation.PutMapping;
import org.springframework.web.bind.annotation.RequestMapping;
import org.springframework.web.bind.annotation.RestController;
import com.ruoyi.common.utils.StringUtils;
import com.ruoyi.framework.web.controller.BaseController;
import com.ruoyi.framework.web.domain.AjaxResult;
import io.swagger.annotations.Api;
import io.swagger.annotations.ApiImplicitParam;
import io.swagger.annotations.ApiModel;
import io.swagger.annotations.ApiModelProperty;
import io.swagger.annotations.ApiOperation;

/**
 * swagger 用户测试方法
 *
 * @author ruoyi
 */
@Api("用户信息管理")
@RestController
@RequestMapping("/test/user")
public class TestController extends BaseController
{
    private final static Map<Integer, UserEntity> users = new LinkedHashMap<Integer, UserEntity>();
    {
        users.put(1, new UserEntity(1, "admin", "admin123", "15888888888"));
        users.put(2, new UserEntity(2, "ry", "admin123", "15666666666"));
    }

    @ApiOperation("获取用户列表")
    @GetMapping("/list")
    public AjaxResult userList()
    {
        List<UserEntity> userList = new ArrayList<UserEntity>(users.values());
        return AjaxResult.success(userList);
    }

    @ApiOperation("获取用户详细")
    @ApiImplicitParam(name = "userId", value = "用户ID", required = true, dataType = "int", paramType = "path")
    @GetMapping("/{userId}")
    public AjaxResult getUser(@PathVariable Integer userId)
    {
        if (!users.isEmpty() && users.containsKey(userId))
        {
            return AjaxResult.success(users.get(userId));
        }
        else
        {
            return AjaxResult.error("用户不存在");
        }
    }

    @ApiOperation("新增用户")
    @ApiImplicitParam(name = "userEntity", value = "新增用户信息", dataType = "UserEntity")
    @PostMapping("/save")
    public AjaxResult save(UserEntity user)
    {
        if (StringUtils.isNull(user) || StringUtils.isNull(user.getUserId()))
        {
            return AjaxResult.error("用户ID不能为空");
        }
        return AjaxResult.success(users.put(user.getUserId(), user));
    }

    @ApiOperation("更新用户")
    @ApiImplicitParam(name = "userEntity", value = "新增用户信息", dataType = "UserEntity")
    @PutMapping("/update")
    public AjaxResult update(UserEntity user)
    {
        if (StringUtils.isNull(user) || StringUtils.isNull(user.getUserId()))
        {
            return AjaxResult.error("用户ID不能为空");
        }
        if (users.isEmpty() || !users.containsKey(user.getUserId()))
        {
            return AjaxResult.error("用户不存在");
        }
        users.remove(user.getUserId());
        return AjaxResult.success(users.put(user.getUserId(), user));
    }

    @ApiOperation("删除用户信息")
    @ApiImplicitParam(name = "userId", value = "用户ID", required = true, dataType = "int", paramType = "path")
    @DeleteMapping("/{userId}")
    public AjaxResult delete(@PathVariable Integer userId)
    {
        if (!users.isEmpty() && users.containsKey(userId))
        {
            users.remove(userId);
            return AjaxResult.success();
        }
        else
        {
            return AjaxResult.error("用户不存在");
        }
    }
}

@ApiModel("用户实体")
class UserEntity
{
    @ApiModelProperty("用户ID")
    private Integer userId;

    @ApiModelProperty("用户名称")
    private String username;

    @ApiModelProperty("用户密码")
    private String password;

    @ApiModelProperty("用户手机")
    private String mobile;

    public UserEntity()
    {

    }

    public UserEntity(Integer userId, String username, String password, String mobile)
    {
        this.userId = userId;
        this.username = username;
        this.password = password;
        this.mobile = mobile;
    }

    public Integer getUserId()
    {
        return userId;
    }

    public void setUserId(Integer userId)
    {
        this.userId = userId;
    }

    public String getUsername()
    {
        return username;
    }

    public void setUsername(String username)
    {
        this.username = username;
    }

    public String getPassword()
    {
        return password;
    }

    public void setPassword(String password)
    {
        this.password = password;
    }

    public String getMobile()
    {
        return mobile;
    }

    public void setMobile(String mobile)
    {
        this.mobile = mobile;
    }
}
实体类注解

最后的页面效果图
访问地址:项目ip+端口+项目跟路径+swagger-ui.html(图片上的路径我的端口是80)
(刚开始我以为这个页面是自己创建的,后来看了好多别人都没有创建页面,运行后就有的)
若依官网:http://www.ruoyi.vip/
最后
以上就是完美雨最近收集整理的关于springfox-swagger(swagger2)+Springboot的全部内容,更多相关springfox-swagger(swagger2)+Springboot内容请搜索靠谱客的其他文章。
本图文内容来源于网友提供,作为学习参考使用,或来自网络收集整理,版权属于原作者所有。


发表评论 取消回复