文章目录
- 新建空项目
- 项目发布
- 加入文件包
- 配置pom文件
- 加入配置文件
- 编写项目代码
新建空项目

![[外链图片转存失败,源站可能有防盗链机制,建议将图片保存下来直接上传(img-NuSISRkB-1618139302780)(E:周澜Picturesstudy博客图片clip_image001-1618133860858.png)]](https://www.shuijiaxian.com/files_image/2023061023/20210411191151655.png)
然后一直点击next,直到finish。
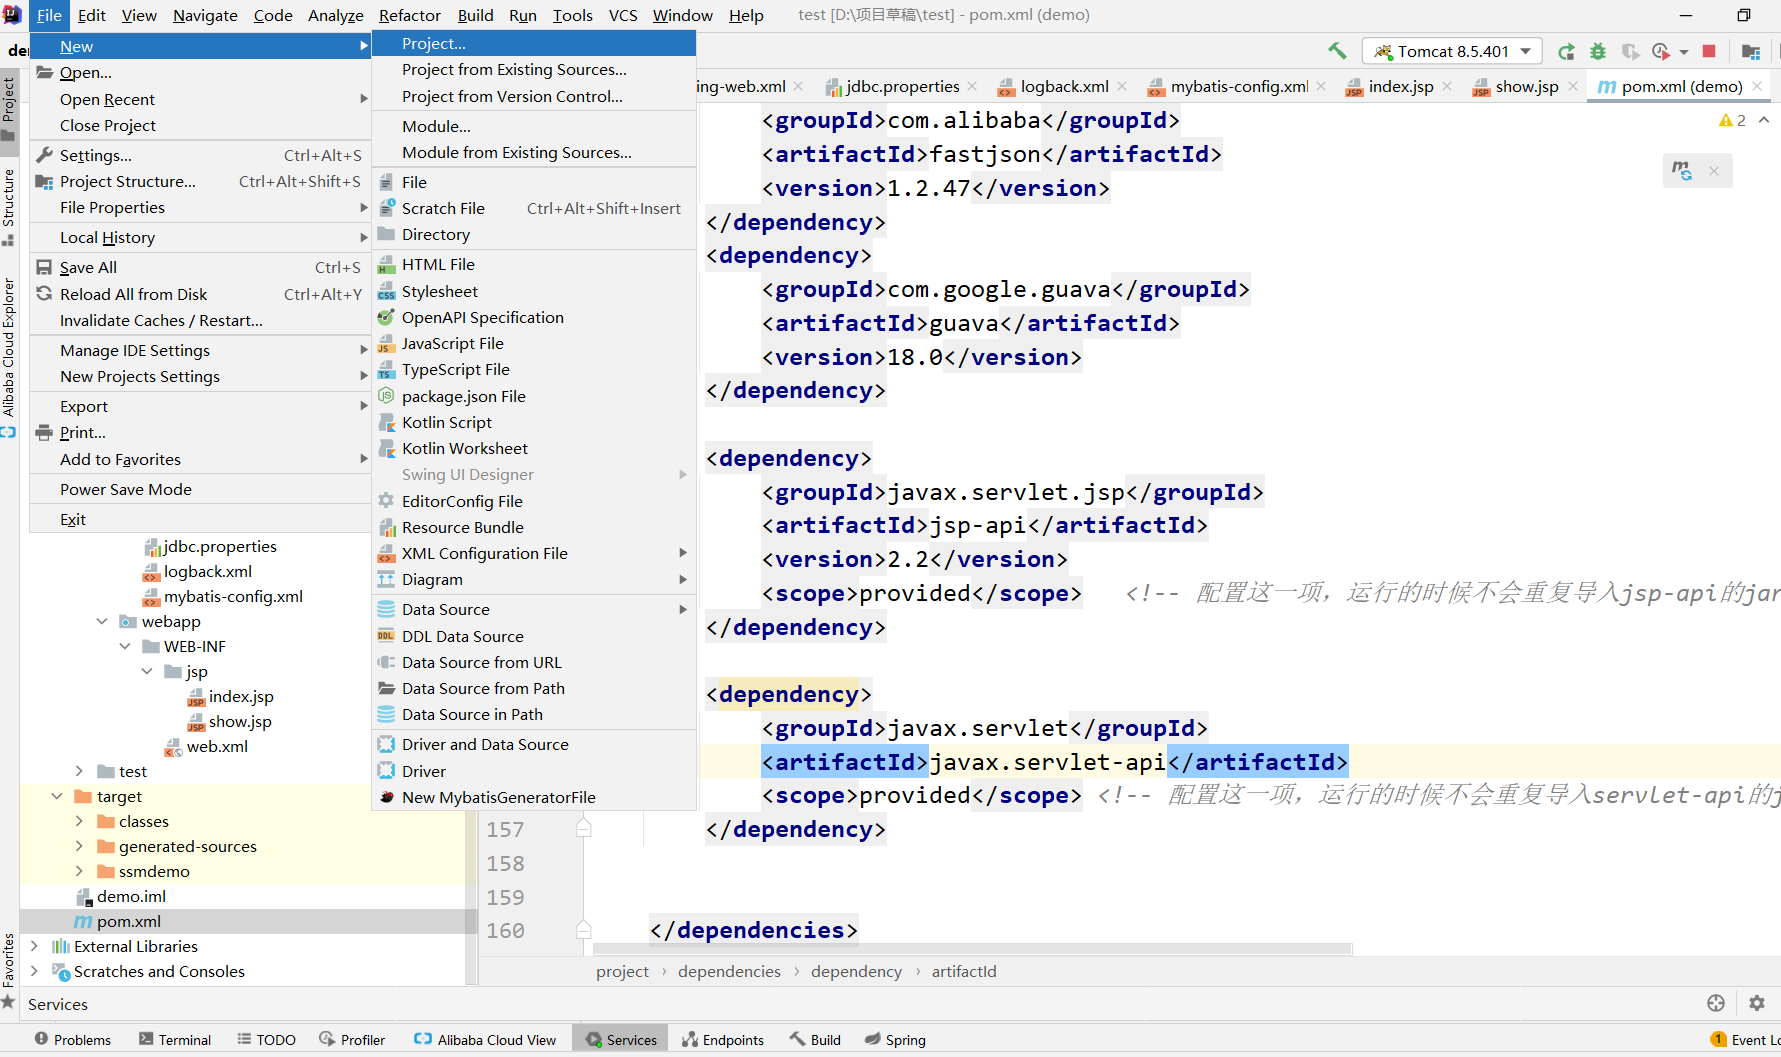
通过下面方式创建两个文件夹java和resources。
![[外链图片转存失败,源站可能有防盗链机制,建议将图片保存下来直接上传(img-G5wvSiaU-1618139302782)(E:周澜Picturesstudy博客图片clip_image001-1618133888608.png)]](https://www.shuijiaxian.com/files_image/2023061023/20210411191214618.png)
![[外链图片转存失败,源站可能有防盗链机制,建议将图片保存下来直接上传(img-40ADy3oj-1618139302786)(../../../../周澜/Pictures/study/博客图片/未命名图片.png)]](https://www.shuijiaxian.com/files_image/2023061023/2021041119131063.png)
完成后 ,项目骨架搭建完毕。
项目发布
![[外链图片转存失败,源站可能有防盗链机制,建议将图片保存下来直接上传(img-irUFFCCe-1618139302789)(E:周澜Picturesstudy博客图片clip_image001-1618134009257.png)]](https://www.shuijiaxian.com/files_image/2023061023/20210411191325182.png)
![[外链图片转存失败,源站可能有防盗链机制,建议将图片保存下来直接上传(img-mvSqaGhV-1618139302794)(../../../../周澜/Pictures/study/博客图片/image-20210411175905570.png)]](https://www.shuijiaxian.com/files_image/2023061023/20210411191344645.png)
![[外链图片转存失败,源站可能有防盗链机制,建议将图片保存下来直接上传(img-bElAvcJc-1618139302795)(E:周澜Picturesstudy博客图片clip_image001-1618134015909.png)]](https://www.shuijiaxian.com/files_image/2023061023/20210411191402753.png)
![[外链图片转存失败,源站可能有防盗链机制,建议将图片保存下来直接上传(img-R7AwYgV4-1618139302797)(E:周澜Picturesstudy博客图片clip_image001-1618134023678.png)]](https://www.shuijiaxian.com/files_image/2023061023/20210411191419457.png)
加入文件包
在对应的位置创建下列包。
![[外链图片转存失败,源站可能有防盗链机制,建议将图片保存下来直接上传(img-swtPBSZM-1618139302799)(E:周澜Picturesstudy博客图片clip_image001-1618134047239.png)]](https://www.shuijiaxian.com/files_image/2023061023/20210411191445459.png)
配置pom文件
<?xml version="1.0" encoding="UTF-8"?>

<project xmlns="http://maven.apache.org/POM/4.0.0" xmlns:xsi="http://www.w3.org/2001/XMLSchema-instance"
         xsi:schemaLocation="http://maven.apache.org/POM/4.0.0 http://maven.apache.org/xsd/maven-4.0.0.xsd">
  <modelVersion>4.0.0</modelVersion>

  <groupId>org.example</groupId>
  <artifactId>demo</artifactId>
  <version>1.0-SNAPSHOT</version>
  <packaging>war</packaging>

  <name>demo Maven Webapp</name>
  <!-- FIXME change it to the project's website -->
  <url>http://www.example.com</url>

  <properties>
    <project.build.sourceEncoding>UTF-8</project.build.sourceEncoding>
    <maven.compiler.source>1.7</maven.compiler.source>
    <maven.compiler.target>1.7</maven.compiler.target>
    <spring.version>5.0.5.RELEASE</spring.version>
  </properties>

  <dependencies>
    <dependency>
      <groupId>junit</groupId>
      <artifactId>junit</artifactId>
      <version>4.11</version>
      <scope>test</scope>
    </dependency>
    <!-- 实现slf4j接口并整合 -->
    <dependency>
      <groupId>ch.qos.logback</groupId>
      <artifactId>logback-classic</artifactId>
      <version>1.1.1</version>
    </dependency>
    <!-- jsp页面使用的jstl表达式 -->
    <dependency>
      <groupId>jstl</groupId>
      <artifactId>jstl</artifactId>
      <version>1.2</version>
    </dependency>
    <!--spring核心包-->
    <dependency>
      <groupId>org.springframework</groupId>
      <artifactId>spring-context</artifactId>
      <version>${spring.version}</version>
    </dependency>
    <dependency>
      <groupId>org.springframework</groupId>
      <artifactId>spring-core</artifactId>
      <version>${spring.version}</version>
    </dependency>
    <dependency>
      <groupId>org.springframework</groupId>
      <artifactId>spring-beans</artifactId>
      <version>${spring.version}</version>
    </dependency>
    <dependency>
      <groupId>org.springframework</groupId>
      <artifactId>spring-context-support</artifactId>
      <version>${spring.version}</version>
    </dependency>
    <dependency>
      <groupId>org.springframework</groupId>
      <artifactId>spring-aop</artifactId>
      <version>${spring.version}</version>
    </dependency>
    <dependency>
      <groupId>org.springframework</groupId>
      <artifactId>spring-aspects</artifactId>
      <version>${spring.version}</version>
    </dependency>
    <dependency>
      <groupId>org.springframework</groupId>
      <artifactId>spring-expression</artifactId>
      <version>${spring.version}</version>
    </dependency>
    <dependency>
      <groupId>org.springframework</groupId>
      <artifactId>spring-jdbc</artifactId>
      <version>${spring.version}</version>
    </dependency>
    <dependency>
      <groupId>org.springframework</groupId>
      <artifactId>spring-orm</artifactId>
      <version>${spring.version}</version>
    </dependency>
    <dependency>
      <groupId>org.springframework</groupId>
      <artifactId>spring-tx</artifactId>
      <version>${spring.version}</version>
    </dependency>
    <dependency>
      <groupId>org.springframework</groupId>
      <artifactId>spring-web</artifactId>
      <version>${spring.version}</version>
    </dependency>
    <dependency>
      <groupId>org.springframework</groupId>
      <artifactId>spring-webmvc</artifactId>
      <version>${spring.version}</version>
    </dependency>
    <!-- 数据库 -->
    <dependency>
      <groupId>mysql</groupId>
      <artifactId>mysql-connector-java</artifactId>
      <version>5.1.31</version>
    </dependency>
    <dependency>
      <groupId>com.mchange</groupId>
      <artifactId>c3p0</artifactId>
      <version>0.9.5.2</version>
    </dependency>
    <!--mybatis-->
    <dependency>
      <groupId>org.mybatis</groupId>
      <artifactId>mybatis</artifactId>
      <version>3.4.6</version>
    </dependency>

    <dependency>
      <groupId>org.mybatis</groupId>
      <artifactId>mybatis-spring</artifactId>
      <version>1.3.2</version>
    </dependency>

    <!-- 其他 -->
    <dependency>
      <groupId>javax.servlet</groupId>
      <artifactId>javax.servlet-api</artifactId>
      <version>4.0.1</version>
      <scope>provided</scope>
    </dependency>

    <dependency>
      <groupId>com.alibaba</groupId>
      <artifactId>fastjson</artifactId>
      <version>1.2.47</version>
    </dependency>

  </dependencies>

  <build>
    <finalName>demo</finalName>
    <pluginManagement><!-- lock down plugins versions to avoid using Maven defaults (may be moved to parent pom) -->
      <plugins>
        <plugin>
          <artifactId>maven-clean-plugin</artifactId>
          <version>3.1.0</version>
        </plugin>
        <!-- see http://maven.apache.org/ref/current/maven-core/default-bindings.html#Plugin_bindings_for_war_packaging -->
        <plugin>
          <artifactId>maven-resources-plugin</artifactId>
          <version>3.0.2</version>
        </plugin>
        <plugin>
          <artifactId>maven-compiler-plugin</artifactId>
          <version>3.8.0</version>
        </plugin>
        <plugin>
          <artifactId>maven-surefire-plugin</artifactId>
          <version>2.22.1</version>
        </plugin>
        <plugin>
          <artifactId>maven-war-plugin</artifactId>
          <version>3.2.2</version>
        </plugin>
        <plugin>
          <artifactId>maven-install-plugin</artifactId>
          <version>2.5.2</version>
        </plugin>
        <plugin>
          <artifactId>maven-deploy-plugin</artifactId>
          <version>2.8.2</version>
        </plugin>
      </plugins>
    </pluginManagement>

    <!--编译时包括xml文件和properties文件,不然编译后不包括此文件-->
    <resources>
      <resource>
        <directory>src/main/java</directory>
        <includes>
          <include>**/*.xml</include>
        </includes>
        <filtering>false</filtering>
      </resource>
    </resources>

  </build>


</project>
加入配置文件
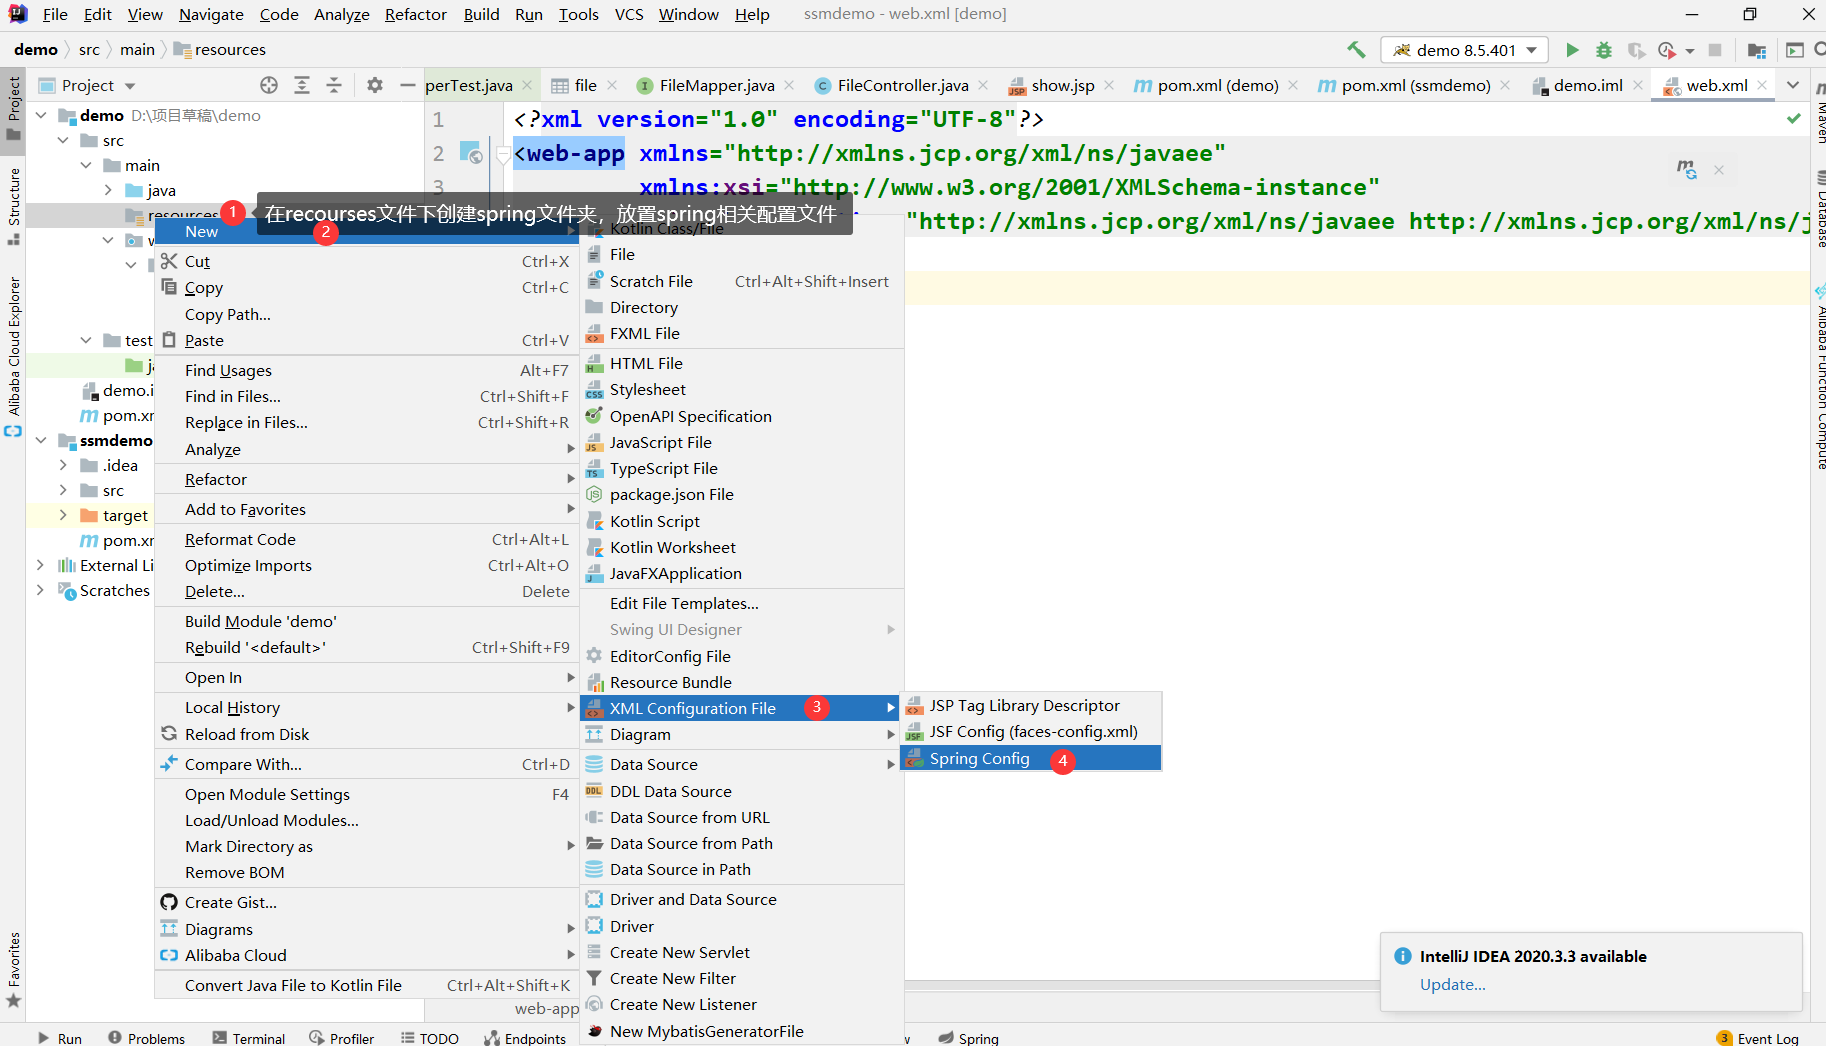
最终的配置文件如图所示,xml文件的创建如第二张图所示,普通文件的创建如第三张图所示。
![[外链图片转存失败,源站可能有防盗链机制,建议将图片保存下来直接上传(img-gMXrUzQZ-1618139302800)(E:周澜Picturesstudy博客图片clip_image001-1618134166325.png)]](https://www.shuijiaxian.com/files_image/2023061023/20210411191608471.png)

![[外链图片转存失败,源站可能有防盗链机制,建议将图片保存下来直接上传(img-dCDXX5ho-1618139302802)(../../../../周澜/Pictures/study/博客图片/3.png)]](https://www.shuijiaxian.com/files_image/2023061023/20210411191810681.png)
每个文件的代码如下,注意修改包名和数据库名
spring-dao.xml
<?xml version="1.0" encoding="UTF-8"?>
<beans xmlns="http://www.springframework.org/schema/beans"
       xmlns:xsi="http://www.w3.org/2001/XMLSchema-instance" xmlns:context="http://www.springframework.org/schema/context"
       xsi:schemaLocation="http://www.springframework.org/schema/beans
       	http://www.springframework.org/schema/beans/spring-beans.xsd
	http://www.springframework.org/schema/context
	http://www.springframework.org/schema/context/spring-context.xsd">
    <!-- 配置整合mybatis过程 -->
    <!-- 1.配置数据库相关参数properties的属性:${url} -->
    <context:property-placeholder location="classpath:jdbc.properties" />

    <!-- 2.数据库连接池 -->
    <bean id="dataSource" class="com.mchange.v2.c3p0.ComboPooledDataSource">
        <!-- 配置连接池属性 -->
        <property name="driverClass" value="${jdbc.driver}" />
        <property name="jdbcUrl" value="${jdbc.url}" />
        <property name="user" value="${jdbc.username}" />
        <property name="password" value="${jdbc.password}" />
        <!-- c3p0连接池的私有属性 -->
        <property name="maxPoolSize" value="30" />
        <property name="minPoolSize" value="10" />
        <!-- 关闭连接后不自动commit -->
        <property name="autoCommitOnClose" value="false" />
        <!-- 获取连接超时时间 -->
        <property name="checkoutTimeout" value="10000" />
        <!-- 当获取连接失败重试次数 -->
        <property name="acquireRetryAttempts" value="2" />
    </bean>

    <!-- 3.配置SqlSessionFactory对象 -->
    <bean id="sqlSessionFactory" class="org.mybatis.spring.SqlSessionFactoryBean">
        <!-- 注入数据库连接池 -->
        <property name="dataSource" ref="dataSource" />
        <!-- 配置MyBaties全局配置文件:mybatis-config.xml -->
        <property name="configLocation" value="classpath:mybatis-config.xml" />
        <!-- 扫描entity包 使用别名 -->
        <property name="typeAliasesPackage" value="com.nina.entity" />
        <!-- 扫描sql配置文件:mapper需要的xml文件 -->
        <property name="mapperLocations" value="classpath:com/nina/entity/*/*.xml" />
    </bean>

    <!-- 4.配置扫描Dao接口包,动态实现Dao接口,注入到spring容器中 -->
    <bean class="org.mybatis.spring.mapper.MapperScannerConfigurer">
        <!-- 注入sqlSessionFactory -->
        <property name="sqlSessionFactoryBeanName" value="sqlSessionFactory" />
        <!-- 给出需要扫描Dao接口包 -->
        <property name="basePackage" value="com.nina.mapper" />
    </bean>
</beans>
spring-service.xml
<?xml version="1.0" encoding="UTF-8"?>
<beans xmlns="http://www.springframework.org/schema/beans"
       xmlns:xsi="http://www.w3.org/2001/XMLSchema-instance"
       xmlns:context="http://www.springframework.org/schema/context"
       xmlns:tx="http://www.springframework.org/schema/tx"
       xsi:schemaLocation="http://www.springframework.org/schema/beans
	http://www.springframework.org/schema/beans/spring-beans.xsd
	http://www.springframework.org/schema/context
	http://www.springframework.org/schema/context/spring-context.xsd
	http://www.springframework.org/schema/tx
	http://www.springframework.org/schema/tx/spring-tx.xsd">
    <!-- 扫描service包下所有使用注解的类型 -->
    <context:component-scan base-package="com.nina.service" />
    <!-- 1.配置数据库相关参数properties的属性:${url} -->
    <context:property-placeholder location="classpath:jdbc.properties" />
    <!-- 2.数据库连接池 -->
    <bean id="dataSource" class="com.mchange.v2.c3p0.ComboPooledDataSource">
        <!-- 配置连接池属性 -->
        <property name="driverClass" value="${jdbc.driver}" />
        <property name="jdbcUrl" value="${jdbc.url}" />
        <property name="user" value="${jdbc.username}" />
        <property name="password" value="${jdbc.password}" />
        <!-- c3p0连接池的私有属性 -->
        <property name="maxPoolSize" value="30" />
        <property name="minPoolSize" value="10" />
        <!-- 关闭连接后不自动commit -->
        <property name="autoCommitOnClose" value="false" />
        <!-- 获取连接超时时间 -->
        <property name="checkoutTimeout" value="10000" />
        <!-- 当获取连接失败重试次数 -->
        <property name="acquireRetryAttempts" value="2" />
    </bean>
    <!-- 配置事务管理器 -->
    <bean id="transactionManager"
          class="org.springframework.jdbc.datasource.DataSourceTransactionManager">
        <!-- 注入数据库连接池 -->
        <property name="dataSource" ref="dataSource" />
    </bean>

    <!-- 配置基于注解的声明式事务 -->
    <tx:annotation-driven transaction-manager="transactionManager" />
</beans>
spring-web.xml
<?xml version="1.0" encoding="UTF-8"?>
<beans xmlns="http://www.springframework.org/schema/beans"
       xmlns:xsi="http://www.w3.org/2001/XMLSchema-instance"
       xmlns:context="http://www.springframework.org/schema/context"
       xmlns:mvc="http://www.springframework.org/schema/mvc"
       xsi:schemaLocation="http://www.springframework.org/schema/beans
	http://www.springframework.org/schema/beans/spring-beans.xsd
	http://www.springframework.org/schema/context
	http://www.springframework.org/schema/context/spring-context.xsd
	http://www.springframework.org/schema/mvc
	http://www.springframework.org/schema/mvc/spring-mvc-3.0.xsd">
    <!-- 配置SpringMVC -->
    <!-- 1.开启SpringMVC注解模式 -->
    <!-- 简化配置:
        (1)自动注册DefaultAnootationHandlerMapping,AnotationMethodHandlerAdapter
        (2)提供一些列:数据绑定,数字和日期的format @NumberFormat, @DateTimeFormat, xml,json默认读写支持
    -->
    <mvc:annotation-driven />

    <!-- 2.静态资源默认servlet配置
        (1)加入对静态资源的处理:js,gif,png
        (2)允许使用"/"做整体映射
     -->
    <mvc:default-servlet-handler/>

    <!-- 3.配置jsp 显示ViewResolver -->
    <bean class="org.springframework.web.servlet.view.InternalResourceViewResolver">
        <property name="viewClass" value="org.springframework.web.servlet.view.JstlView" />
        <property name="prefix" value="/WEB-INF/jsp/" />
        <property name="suffix" value=".jsp" />
    </bean>
    <!-- 4.扫描web相关的bean -->
    <context:component-scan base-package="com.nina.controller" />
</beans>
jdbc.properties
jdbc.driver=com.mysql.jdbc.Driver
jdbc.url=jdbc:mysql://127.0.0.1:3306/day14?useUnicode=true&characterEncoding=utf8
jdbc.username=root
jdbc.password=123456
logback.xml
<?xml version="1.0" encoding="UTF-8"?>
<configuration debug="true">
    <appender name="STDOUT" class="ch.qos.logback.core.ConsoleAppender">
        <!-- encoders are by default assigned the type ch.qos.logback.classic.encoder.PatternLayoutEncoder -->
        <encoder>
            <pattern>%d{HH:mm:ss.SSS} [%thread] %-5level %logger{36} - %msg%n</pattern>
        </encoder>
    </appender>

    <root level="debug">
        <appender-ref ref="STDOUT" />
    </root>
</configuration>
mybatis-config.xml
<?xml version="1.0" encoding="UTF-8" ?>
<!DOCTYPE configuration
        PUBLIC "-//mybatis.org//DTD Config 3.0//EN"
        "http://mybatis.org/dtd/mybatis-3-config.dtd">
<configuration>
    <settings>
        <!-- 打开延迟加载的全局开关 -->
        <setting name="lazyLoadingEnabled" value="true" />
        <setting name="aggressiveLazyLoading" value="false" />
        <!-- 使用jdbc的getGeneratedKeys获取数据库自增主键值 -->
        <setting name="useGeneratedKeys" value="true" />
        <!-- 使用列别名替换列名 默认:true -->
        <setting name="useColumnLabel" value="true" />

        <!-- 开启驼峰命名转换:Table{create_time} -> Entity{createTime} -->
        <setting name="mapUnderscoreToCamelCase" value="true" />
    </settings>
</configuration>
index.jsp
<html>
<body>
<h2>Hello World!</h2>
</body>
</html>
web.xml
<?xml version="1.0" encoding="UTF-8"?>

<web-app version="2.5" xmlns="http://java.sun.com/xml/ns/javaee"
         xmlns:xsi="http://www.w3.org/2001/XMLSchema-instance"
         xsi:schemaLocation="http://java.sun.com/xml/ns/javaee
         http://java.sun.com/xml/ns/javaee/web-app_2_5.xsd">


  <display-name>Archetype Created Web Application</display-name>
  <!--1.配置前置控制器 -->
  <servlet>
    <servlet-name>SpringDispatcherServlet</servlet-name>
    <servlet-class>org.springframework.web.servlet.DispatcherServlet</servlet-class>
    <init-param>
      <param-name>contextConfigLocation</param-name>
      <!-- 引入spring配置文件 -->
      <param-value>classpath:spring/spring-*.xml</param-value>
    </init-param>
  </servlet>
  <servlet-mapping>
    <servlet-name>SpringDispatcherServlet</servlet-name>
    <url-pattern>/</url-pattern>
  </servlet-mapping>

  <!--2.欢迎文件-->
  <welcome-file-list>
    <welcome-file>/WEB-INF/jsp/index.jsp</welcome-file>
  </welcome-file-list>
</web-app>
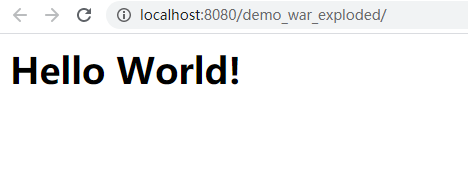
点击运行,出现hello world界面即可视为成功。

编写项目代码
创建数据库及表
DROP TABLE IF EXISTS `file`;
CREATE TABLE `file` (
  `id` int(11) NOT NULL AUTO_INCREMENT COMMENT '文件ID',
  `filename` varchar(255) NOT NULL COMMENT '文件名',
  `fileurl` varchar(255) NOT NULL COMMENT '文件地址',
  `isdel` varchar(255) NOT NULL COMMENT '是否删除',
  PRIMARY KEY (`id`)
);
insert into file values (1,'aaa','www.baidu',0);
写入项目源码,最终目录如下图所示。
![[外链图片转存失败,源站可能有防盗链机制,建议将图片保存下来直接上传(img-LvLcMGqQ-1618139302803)(E:周澜Picturesstudy博客图片image-20210411174553013.png)]](https://www.shuijiaxian.com/files_image/2023061023/20210411192006165.png)
FileController
package com.nina.controller;

import com.nina.entity.File;
import com.nina.service.FileService;
import org.springframework.stereotype.Controller;
import org.springframework.web.bind.annotation.RequestMapping;

import javax.annotation.Resource;
import javax.servlet.http.HttpServletRequest;

@Controller
@RequestMapping("/file")
public class FileController {

    @Resource
    private FileService fileService;

    @RequestMapping("get")
    public String getDataById(HttpServletRequest request){
        Integer id = 1;
        File file = fileService.selectByPrimaryKey(id);
        request.setAttribute("file",file);
        return "show";
    }

}
FileMapper.xml
<?xml version="1.0" encoding="UTF-8"?>
<!DOCTYPE mapper PUBLIC "-//mybatis.org//DTD Mapper 3.0//EN" "http://mybatis.org/dtd/mybatis-3-mapper.dtd">

<mapper namespace="com.nina.mapper.FileMapper">
    <resultMap id="BaseResultMap" type="com.nina.entity.File">
        <!--@mbg.generated-->
        <!--@Table file-->
        <id column="id" jdbcType="INTEGER" property="id" />
        <result column="filename" jdbcType="VARCHAR" property="filename" />
        <result column="fileurl" jdbcType="VARCHAR" property="fileurl" />
        <result column="isdel" jdbcType="INTEGER" property="isdel" />
    </resultMap>
    <sql id="Base_Column_List">
        <!--@mbg.generated-->
        id, filename, fileurl, isdel
    </sql>

    <select id="selectByPrimaryKey" parameterType="java.lang.Integer" resultMap="BaseResultMap">
        <!--@mbg.generated-->
        select
        <include refid="Base_Column_List" />
        from file
        where id = #{fileid,jdbcType=INTEGER}
    </select>
</mapper>
File
package com.nina.entity;

public class File {
    private Integer id;
    private String filename;
    private String fileurl;
    private Integer isdel;

    public Integer getId() {
        return id;
    }

    public void setId(Integer id) {
        this.id = id;
    }

    public String getFilename() {
        return filename;
    }public void setFilename(String filename) {
        this.filename = filename;
    }

    public String getFileurl() {
        return fileurl;
    }

    public void setFileurl(String fileurl) {
        this.fileurl = fileurl;
    }

    public Integer getIsdel() {
        return isdel;
    }

    public void setIsdel(Integer isdel) {
        this.isdel = isdel;
    }

    @Override
    public String toString() {
        return "File{" +
                "id=" + id +
                ", filename='" + filename + ''' +
                ", fileurl='" + fileurl + ''' +
                ", isdel=" + isdel +
                '}';
    }
}
FileMapper
package com.nina.mapper;

import com.nina.entity.File;

public interface FileMapper {
    File selectByPrimaryKey(Integer id);
}
FileServiceImpl
package com.nina.service.impl;

import org.springframework.stereotype.Service;
import javax.annotation.Resource;
import com.nina.mapper.FileMapper;
import com.nina.entity.File;
import com.nina.service.FileService;

@Service
public class FileServiceImpl implements FileService{
    @Resource
    private FileMapper fileMapper;
    @Override
    public File selectByPrimaryKey(Integer id) {
        return fileMapper.selectByPrimaryKey(id);
    }
}
FileService
package com.nina.service;

import com.nina.entity.File;

public interface FileService{
    File selectByPrimaryKey(Integer id);
}
show.jsp
<%@ page contentType="text/html;charset=UTF-8" language="java" %>
<html>
<head>
    <title>Title</title>
</head>
<body>
<h3>展示数据</h3>
<div>文件id:${file.id}</div>
<div>文件名称:${file.filename}</div>
<div>文件地址:${file.fileurl}</div>
</body>
</html>
点击运行,输入网址。
![[外链图片转存中...(img-D23BmGT9-1618139302804)]](https://www.shuijiaxian.com/files_image/2023061023/20210411192130548.png)
最后
以上就是悲凉路人最近收集整理的关于在IDEA上创建一个SSM项目的全部内容,更多相关在IDEA上创建一个SSM项目内容请搜索靠谱客的其他文章。
本图文内容来源于网友提供,作为学习参考使用,或来自网络收集整理,版权属于原作者所有。


发表评论 取消回复