Vue开发实战学习笔记
- 简易的Vue程序
- 组件
- 事件
- 插槽
- 单文件组件
- 双向绑定
- 虚拟DOM与key属性
- 组件更新
- 状态data与属性props
- vue的响应式更新
- 计算属性和侦听器
- 计算属性 computed
- 侦听器watch
- computed vs watch
- 生命周期的应用场景和函数式组件
- 生命周期
- 函数式组件
- 指令
- provide/inject
- 跨层级组件实例
简易的Vue程序
在vscode中新建一个html文件,输入html5快捷生成代码:
<!DOCTYPE html>
<html lang="en">
<head>
    <meta charset="UTF-8">
    <meta name="viewport" content="width=device-width, initial-scale=1.0">
    <title>Document</title>
</head>
<body>

</body>
</html>
添加vue的相关代码 查看双向绑定的结果
<!DOCTYPE html>
<html lang="en">

<head>
    <meta charset="UTF-8">
    <meta name="viewport" content="width=device-width, initial-scale=1.0">
    <meta http-equiv="X-UA-Compatible" content="ie=edge">
    <title>Document</title>
</head>

<body>
    <div id="app">
        {{message}} {{message + message}}
        <div :id="message"></div>
        <ul>
            <li v-for="item in list">
                <span v-if="!item.del">{{item.title}}</span>
                <span v-else style="text-decoration: line-through">{{item.title}}</span>
                <button v-show="!item.del">删除</button>
            </li>
        </ul>
    </div>
    <script src="https://cdn.jsdelivr.net/npm/vue/dist/vue.js"></script>
    <script>
        var vm = new Vue({
            el: '#app',
            data: {
                message: 'hello world',
                list: [{
                    title: '课程1',
                    del: false
                }, {
                    title: '课程2',
                    del: true
                }],
            }
        })
    </script>
</body>

</html>
组件
为了使用小型、独立和可复用的模块构建大型应用我们引入了组件的概念,来看一下基于上述内容的组件第一次抽象,我们抽离出了todo-list组件和todo-item组件:
<!DOCTYPE html>
<html lang="en">

<head>
    <meta charset="UTF-8">
    <meta name="viewport" content="width=device-width, initial-scale=1.0">
    <meta http-equiv="X-UA-Compatible" content="ie=edge">
    <title>Document</title>
</head>

<body>
    <div id="app">
        {{message}} {{message + message}}
        <div :id="message"></div>
        <!-- <ul>
            <todo-item v-for="item in list" :title="item.title" :del="item.del"></todo-item>
        </ul> -->
        <todo-list></todo-list>
    </div>
    <script src="https://cdn.jsdelivr.net/npm/vue/dist/vue.js"></script>
    <script>
        Vue.component('todo-item', {
            props: {
                title: String,
                del: {
                    type: Boolean,
                    default: false,
                },
            },
            template: `
            <li>
                <span v-if="!del">{{title}}</span>
                <span v-else style="text-decoration: line-through">{{title}}</span>
                <button v-show="!del">删除</button>
            </li>
          `,
            data: function() {
                return {}
            },
            methods: {

            },
        })
        Vue.component('todo-list', {
            template: `
            <ul>
              <todo-item v-for="item in list" :title="item.title" :del="item.del"></todo-item>
            </ul>
          `,
            data: function() {
                return {
                    list: [{
                        title: '课程1',
                        del: false
                    }, {
                        title: '课程2',
                        del: true
                    }],
                }
            }
        })
        var vm = new Vue({
            el: '#app',
            data: {
                message: 'hello world',

            }
        })
    </script>
</body>

</html>
事件
代码中的@click是绑定原生组件的方法,@delete是绑定自定义组件的方法,我们在handleClick中通过this.$emit('delete', this.title)抛出事件,在handelDelete中就能拿到对应的参数了。
<!DOCTYPE html>
<html lang="en">

<head>
    <meta charset="UTF-8">
    <meta name="viewport" content="width=device-width, initial-scale=1.0">
    <meta http-equiv="X-UA-Compatible" content="ie=edge">
    <title>Document</title>
</head>

<body>
    <div id="app">
        {{message}} {{message + message}}
        <div :id="message"></div>
        <!-- <ul>
            <todo-item v-for="item in list" :title="item.title" :del="item.del"></todo-item>
        </ul> -->
        <todo-list></todo-list>
    </div>
    <script src="https://cdn.jsdelivr.net/npm/vue/dist/vue.js"></script>
    <script>
        Vue.component('todo-item', {
            props: {
                title: String,
                del: {
                    type: Boolean,
                    default: false,
                },
            },
            template: `
            <li>
                <span v-if="!del">{{title}}</span>
                <span v-else style="text-decoration: line-through">{{title}}</span>
                <button v-show="!del" @click="handleClick">删除</button>
            </li>
          `,
            data: function() {
                return {}
            },
            methods: {
                handleClick(e) {
                    console.log('点击删除按钮')
                    this.$emit('delete', this.title)
                }
            },
        })
        Vue.component('todo-list', {
            template: `
            <ul>
              <todo-item @delete="handleDelete" v-for="item in list" :title="item.title" :del="item.del"></todo-item>
            </ul>
          `,
            data: function() {
                return {
                    list: [{
                        title: '课程1',
                        del: false
                    }, {
                        title: '课程2',
                        del: true
                    }],
                }
            },
            methods: {
                handleDelete(val) {
                    console.log('handleDelete', val)
                }
            }
        })
        var vm = new Vue({
            el: '#app',
            data: {
                message: 'hello world',

            }
        })
    </script>
</body>
</html>
诸如冒泡等方法也可以在vue中通过修饰符来进行实现。
插槽
在上面的代码中,我们的todo-item是直接写死在todo-list里面,这样其实是不是很合理的,我们希望能往todo-list中传入todo-item这样就能够自动进行渲染。
但是当我们把todo-item从todo-list中取出来,todo-list中就只剩下了ul标签,那么todo-item应该放置在什么位置呢?在这个基础上引入了插槽的概念。
插槽分为匿名插槽、具名插槽和作用域插槽,在作用域插槽中,template绑定:value = "value" ,父组件通过v-slot:pre-icon="{value}"来拿到value值。
<!DOCTYPE html>
<html lang="en">

<head>
    <meta charset="UTF-8">
    <meta name="viewport" content="width=device-width, initial-scale=1.0">
    <meta http-equiv="X-UA-Compatible" content="ie=edge">
    <title>Document</title>
</head>

<body>
    <div id="app">
        {{message}} {{message + message}}
        <div :id="message"></div>
        <!-- <ul>
            <todo-item v-for="item in list" :title="item.title" :del="item.del"></todo-item>
        </ul> -->
        <todo-list>
            <todo-item @delete="handleDelete" v-for="item in list" :title="item.title" :del="item.del">
                <template v-slot:pre-icon="{value}">
                    <span>前置图标 {{value}}</span>
                </template>

            </todo-item>
        </todo-list>
    </div>
    <script src="https://cdn.jsdelivr.net/npm/vue/dist/vue.js"></script>
    <script>
        Vue.component('todo-item', {
            props: {
                title: String,
                del: {
                    type: Boolean,
                    default: false,
                },
            },
            template: `
            <li>
                <slot name="pre-icon" :value="value"></slot>
                <span v-if="!del">{{title}}</span>
                <span v-else style="text-decoration: line-through">{{title}}</span>
                <slot name="suf-icon">????</slot>
                <button v-show="!del" @click="handleClick">删除</button>
            </li>
          `,
            data: function() {
                return {
                    value: Math.random()
                }
            },
            methods: {
                handleClick(e) {
                    console.log('点击删除按钮')
                    this.$emit('delete', this.title)
                }
            },
        })
        Vue.component('todo-list', {
            template: `
            <ul>
              <slot></slot>
            </ul>
          `,
            data: function() {
                return {

                }
            },
        })
        var vm = new Vue({
            el: '#app',
            data: {
                message: 'hello world',
                list: [{
                    title: '课程1',
                    del: false
                }, {
                    title: '课程2',
                    del: true
                }],
            },
            methods: {
                handleDelete(val) {
                    console.log('handleDelete', val)
                }
            }
        })
    </script>
</body>

</html>
单文件组件
上述方式在很多中小规模的项目中运作的很好,在这些项目里 JavaScript 只被用来加强特定的视图。但当在更复杂的项目中,或者你的前端完全由 JavaScript 驱动的时候,下面这些缺点将变得非常明显:
- 全局定义 (Global definitions) 强制要求每个 component 中的命名不得重复
- 字符串模板 (String templates) 缺乏语法高亮,在 HTML 有多行的时候,需要用到丑陋的
- 不支持 CSS (No CSS support) 意味着当 HTML 和 JavaScript 组件化时,CSS 明显被遗漏
- 没有构建步骤 (No build step) 限制只能使用 HTML 和 ES5 JavaScript,而不能使用预处理器,如 Pug (formerly Jade) 和 Babel
文件扩展名为 .vue 的 single-file components (单文件组件) 为以上所有问题提供了解决方法,并且还可以使用 webpack 或 Browserify 等构建工具。
将代码改成单文件组件的形式:
https://github.com/geektime-geekbang/geektime-vue-1/tree/master/vuex-demo1
双向绑定
众所周知,vue实现了双向绑定的功能,当我们的数据变化时我们的视图同步的更新,当我们的视图更新之后,我们的数据也会更新。在Vue中通过v-model实现双向绑定的功能。
v-model的本质仅仅是语法糖,它本质上是value和input的简写形式。
所以vue的双向绑定实际上还是单项数据流。
注意:v-model会在内部为不同的输入元素使用不同的属性并抛出不同的事件,比如text和textarea使用value属性和input事件,checkbox和radio使用checked和change事件等。
虚拟DOM与key属性
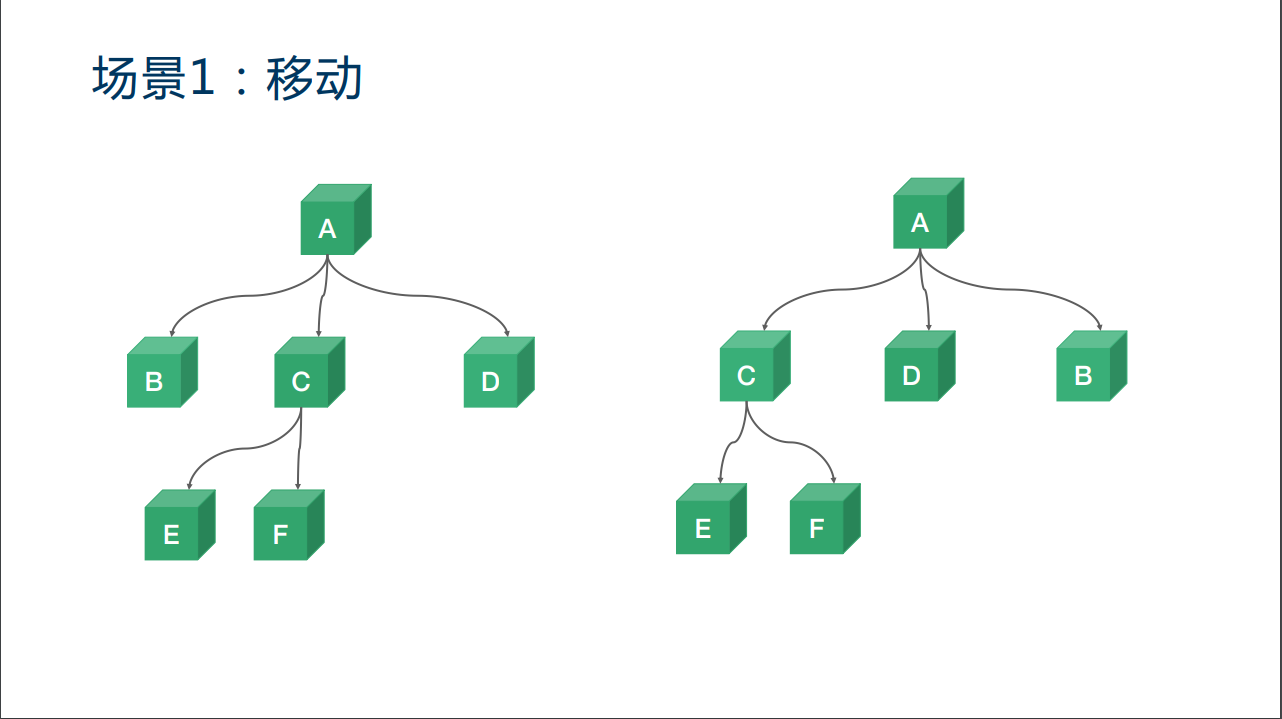
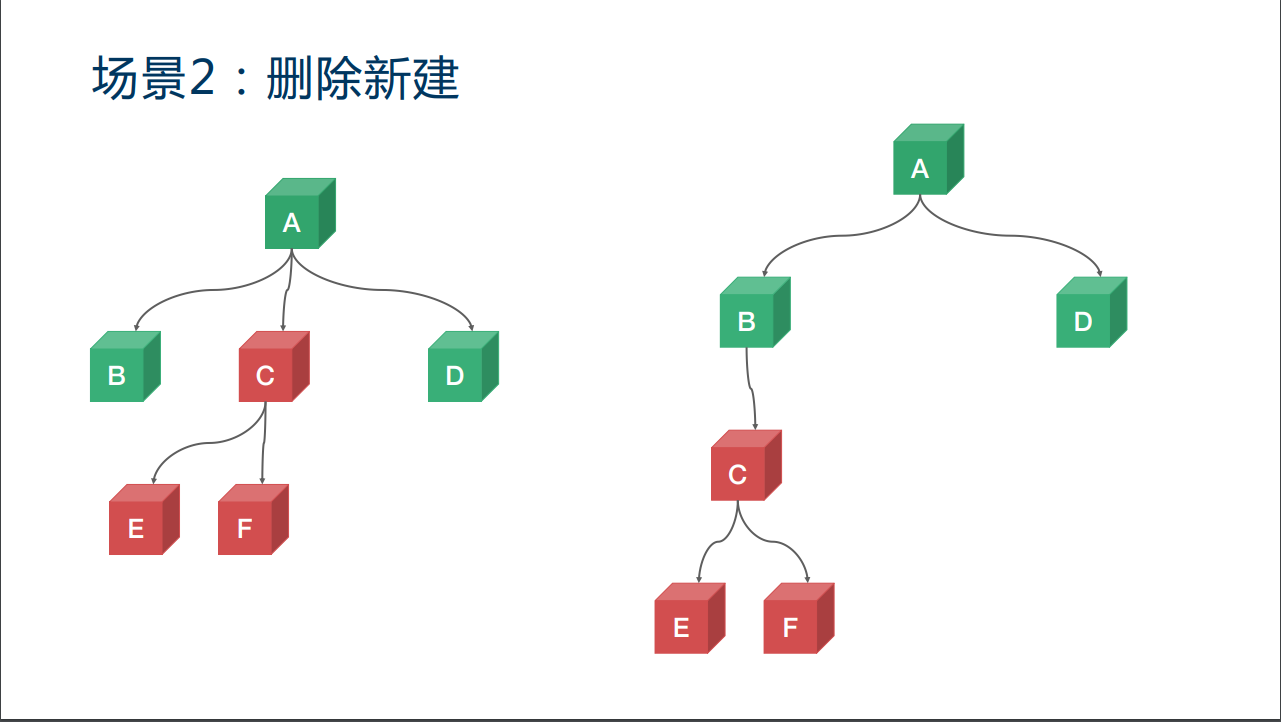
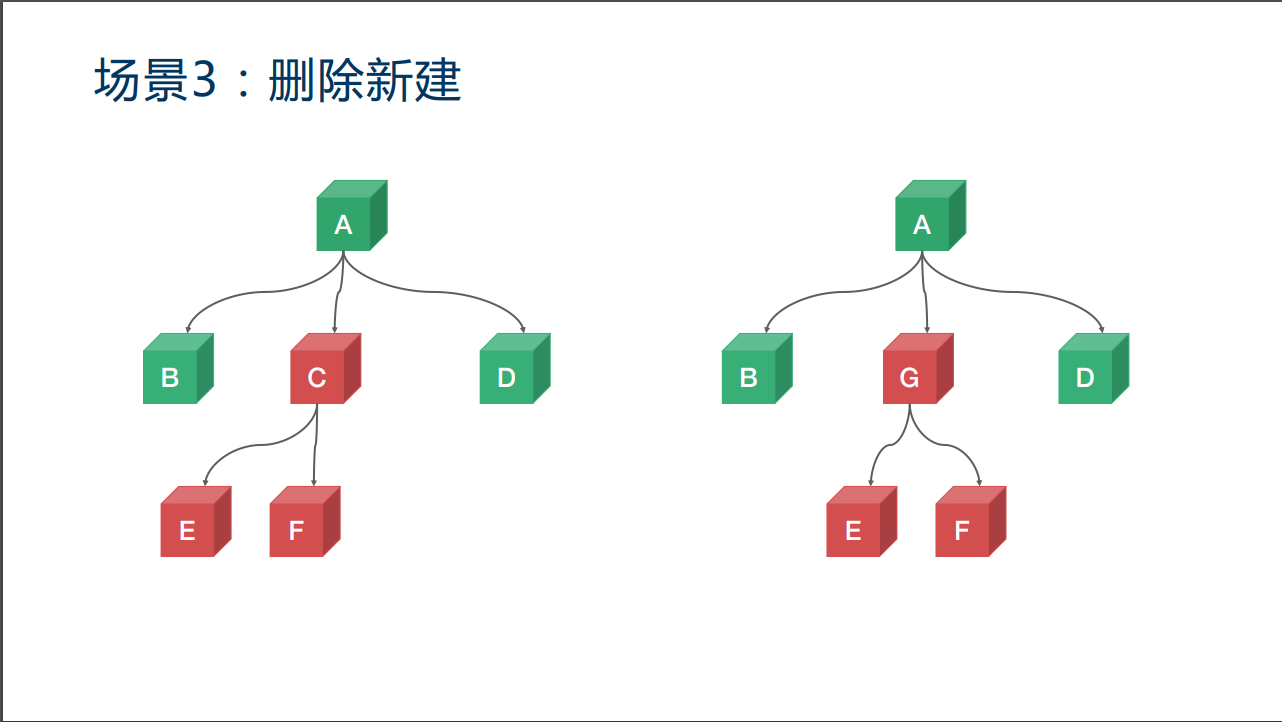
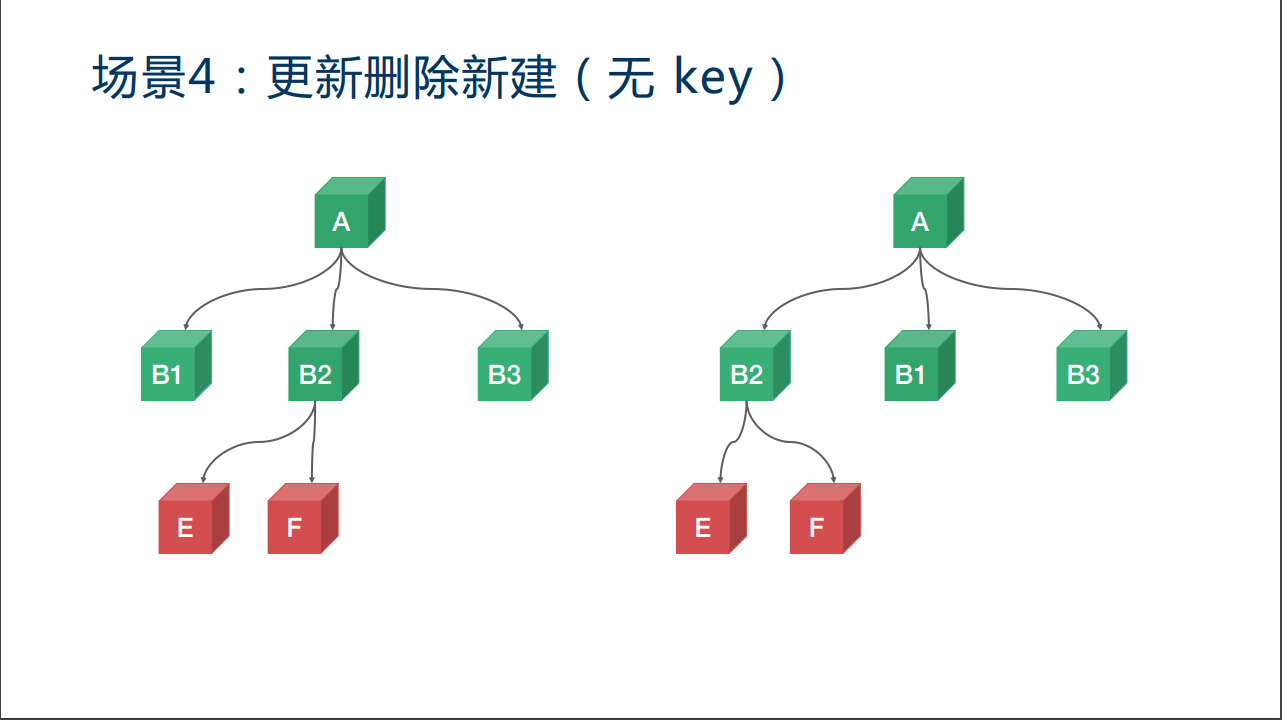
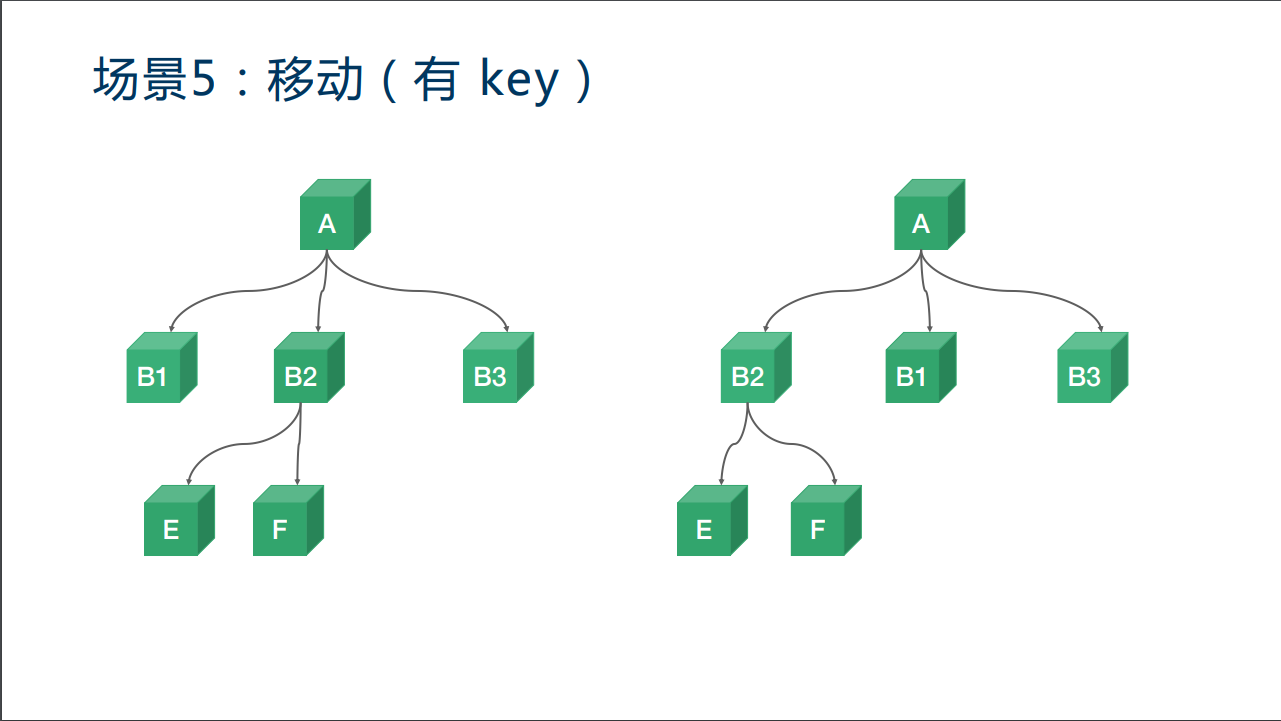
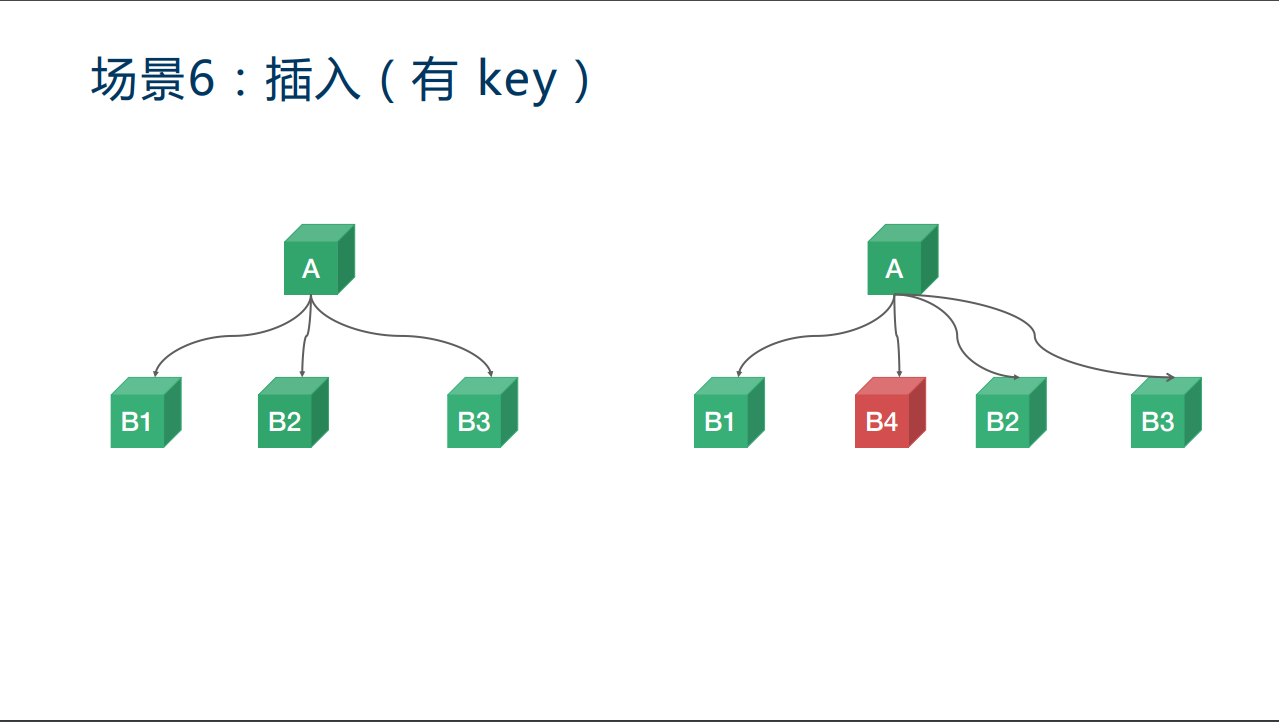
为了尽可能减少对真实dom节点的更新,提出了虚拟dom的概念。
看一下几个虚拟dom比较的方法:
组件更新
我们都知道vue是数据驱动的,只有在数据改变的时候,我们的视图才会改变。所以任何直接修改dom的行为都是在作死。
数据来源:
- 来自父元素的属性
- 来自组件自身的状态data
- 来自状态管理器,vuex,Vue.observable
状态data与属性props
- 状态时组件自身的数据
- 属性时来自父组件的数据
- 状态的改变未必会触发更新
- 属性的改变未必会触发更新
vue的响应式更新
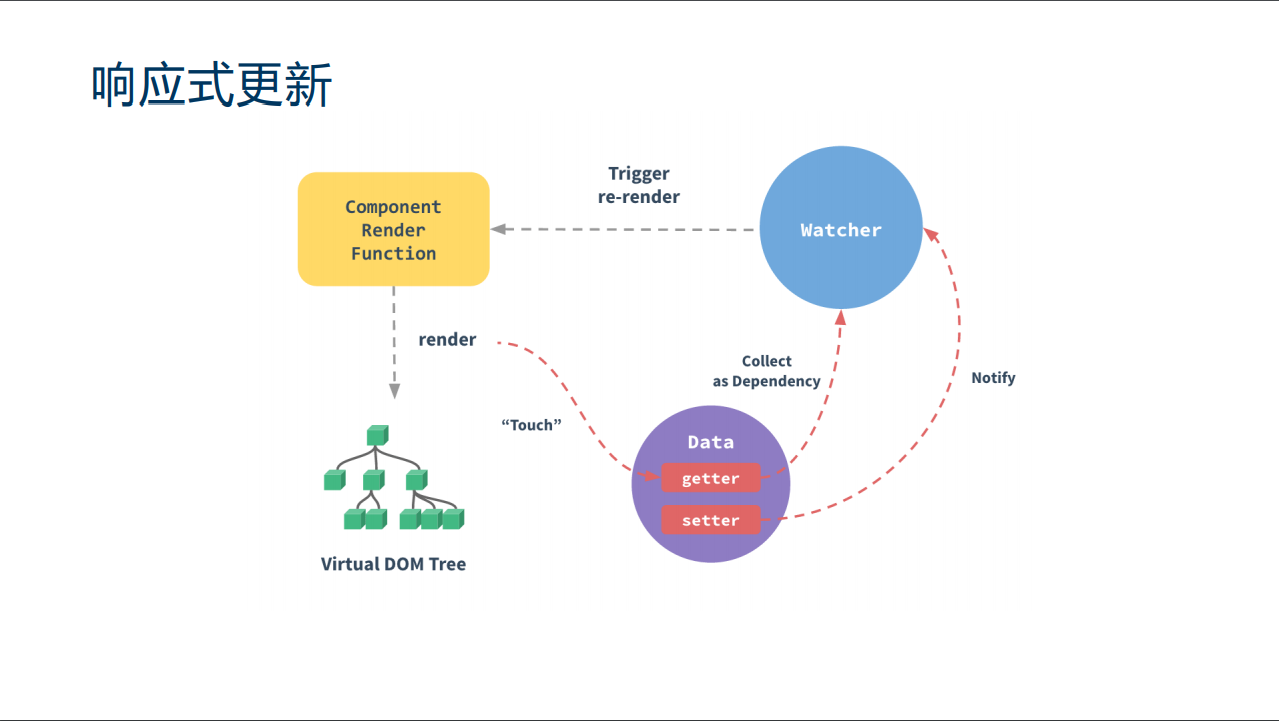
可以看到,在vue进行实例化的时候我们会对data下面的数据进行一些getter和setter的转化,我们在render的时候会对render到的数据进行watcher,只有被watcher的数据才会在改变时触发组件的更新。
计算属性和侦听器
计算属性 computed
- 减少模板中的计算逻辑
- 数据缓存
- 依赖固定的数据类型(响应式数据)
看下示例代码:
<template>
  <div>
    <p>Reversed message1: "{{ reversedMessage1 }}"</p>
    <p>Reversed message2: "{{ reversedMessage2() }}"</p>
    <p>{{ now }}</p>
    <button @click="() => $forceUpdate()">forceUpdate</button>
    <br />
    <input v-model="message" />
  </div>
</template>
<script>
export default {
  data() {
    return {
      message: "hello vue"
    };
  },
  computed: {
    // 计算属性的 getter
    reversedMessage1: function() {
      console.log("执行reversedMessage1");
      return this.message
        .split("")
        .reverse()
        .join("");
    },
    now: function() {
      return Date.now();
    }
  },
  methods: {
    reversedMessage2: function() {
      console.log("执行reversedMessage2");
      return this.message
        .split("")
        .reverse()
        .join("");
    }
  }
};
</script>
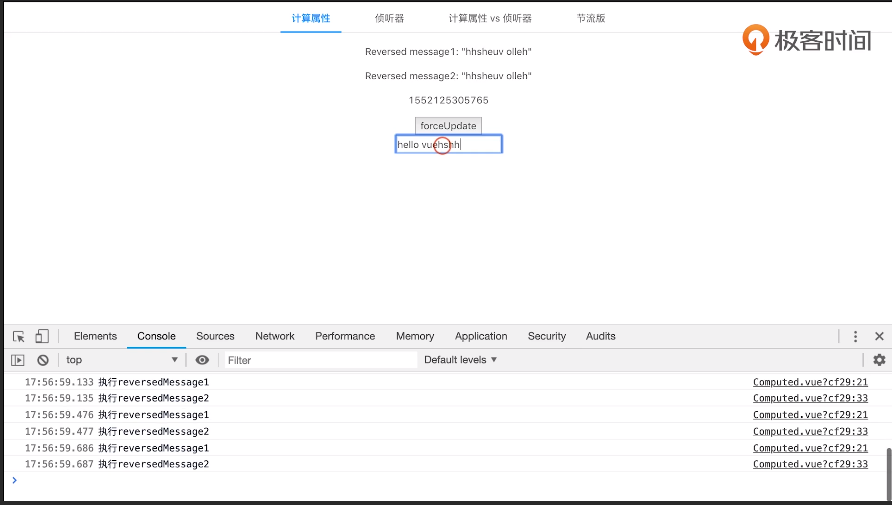
我们通过this.$forceUpdate()刷新数据,我们点击按钮的时候,可以看到只有reversedMessage2方法被调用了。
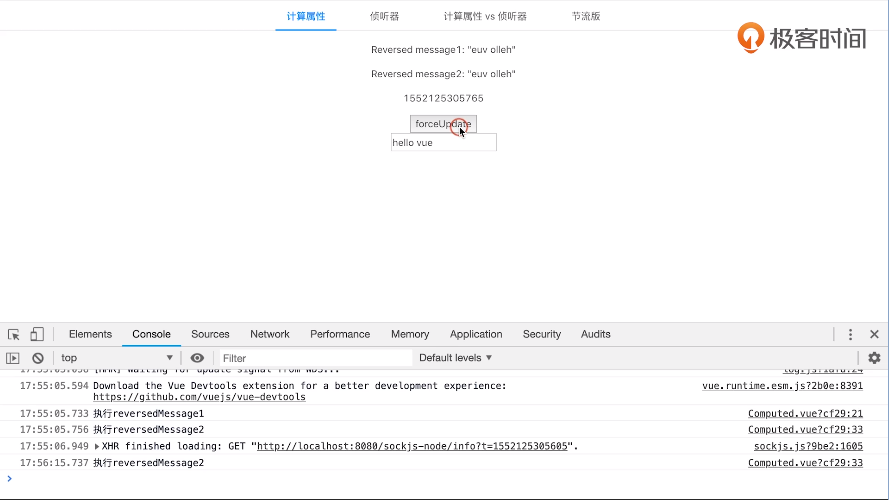
而当我们在输入框中输入数据时,reversedMessage1和reversedMessage2会同时被执行。
侦听器watch
- 更加灵活、通用
- watch中可以执行任何逻辑,如函数节流,ajax异步获取数据,甚至操作DOM
看下示例代码:
<template>
  <div>
    {{ $data }}
    <br />
    <button @click="() => (a += 1)">a+1</button>
  </div>
</template>
<script>
export default {
  data: function() {
    return {
      a: 1,
      b: { c: 2, d: 3 },
      e: {
        f: {
          g: 4
        }
      },
      h: []
    };
  },
  watch: {
    a: function(val, oldVal) {
      this.b.c += 1;
      console.log("new: %s, old: %s", val, oldVal);
    },
    "b.c": function(val, oldVal) {
      this.b.d += 1;
      console.log("new: %s, old: %s", val, oldVal);
    },
    "b.d": function(val, oldVal) {
      this.e.f.g += 1;
      console.log("new: %s, old: %s", val, oldVal);
    },
    e: {
      handler: function(val, oldVal) {
        this.h.push("????");
        console.log("new: %s, old: %s", val, oldVal);
      },
      deep: true
    },
    h(val, oldVal) {
      console.log("new: %s, old: %s", val, oldVal);
    }
  }
};
</script>
这里涉及到一个嵌套监听的概念,注意:如果在e中设置deep为false,那么对b.d的监听中更改e值不会涉及到e的handler事件的触发。
computed vs watch
- computed 能做的,watch都能做,反之则不行
- 能用computed的尽量用computed
看下以下用computed和watch实现的fullName的更新:
computed
<template>
  <div>
    {{ fullName }}

    <div>firstName: <input v-model="firstName" /></div>
    <div>lastName: <input v-model="lastName" /></div>
  </div>
</template>
<script>
export default {
  data: function() {
    return {
      firstName: "Foo",
      lastName: "Bar"
    };
  },
  computed: {
    fullName: function() {
      return this.firstName + " " + this.lastName;
    }
  },
  watch: {
    fullName: function(val, oldVal) {
      console.log("new: %s, old: %s", val, oldVal);
    }
  }
};
</script>
watch
<template>
  <div>
    {{ fullName }}

    <div>firstName: <input v-model="firstName" /></div>
    <div>lastName: <input v-model="lastName" /></div>
  </div>
</template>
<script>
export default {
  data: function() {
    return {
      firstName: "Foo",
      lastName: "Bar",
      fullName: "Foo Bar"
    };
  },
  watch: {
    firstName: function(val) {
      this.fullName = val + " " + this.lastName;
    },
    lastName: function(val) {
      this.fullName = this.firstName + " " + val;
    }
  }
};
</script>
这两段实现的功能是一样的,但是区别时一个时用计算属性实现的,一个是用侦听器实现的。
生命周期的应用场景和函数式组件
生命周期
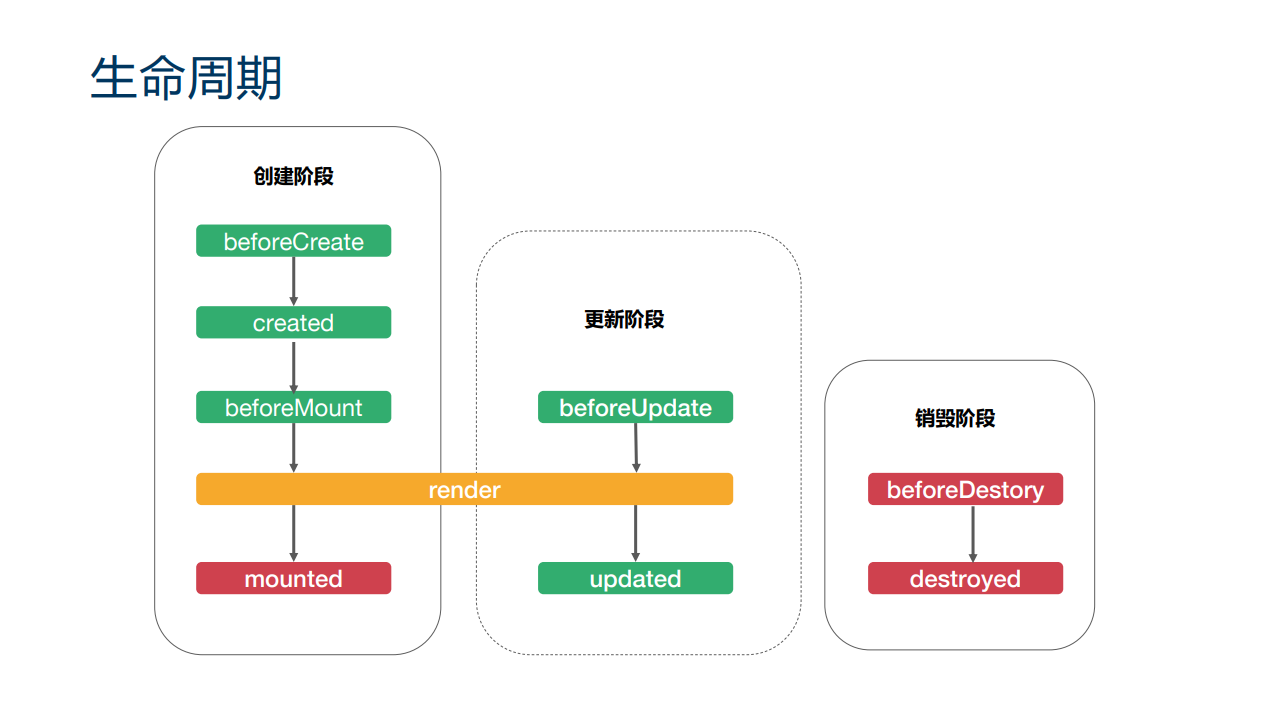
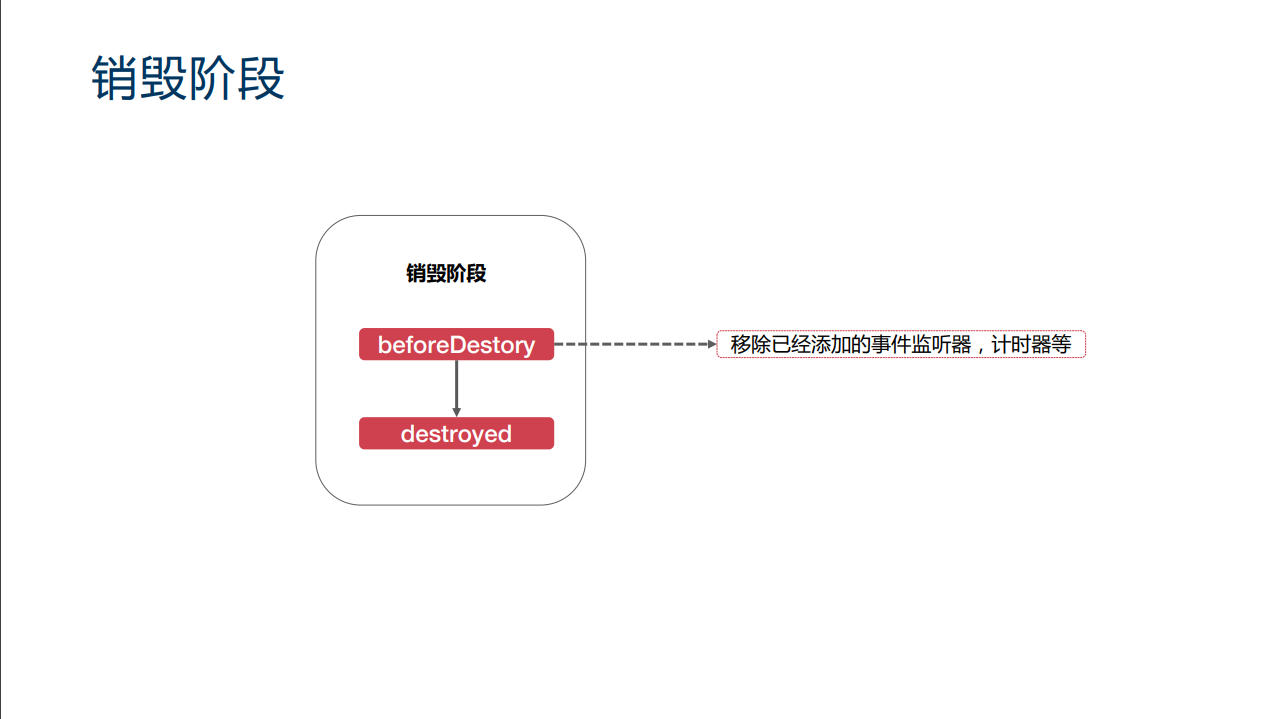
看下生命周期的各个阶段:创建阶段、更新阶段和销毁阶段
来详细看下各个阶段做的事情:
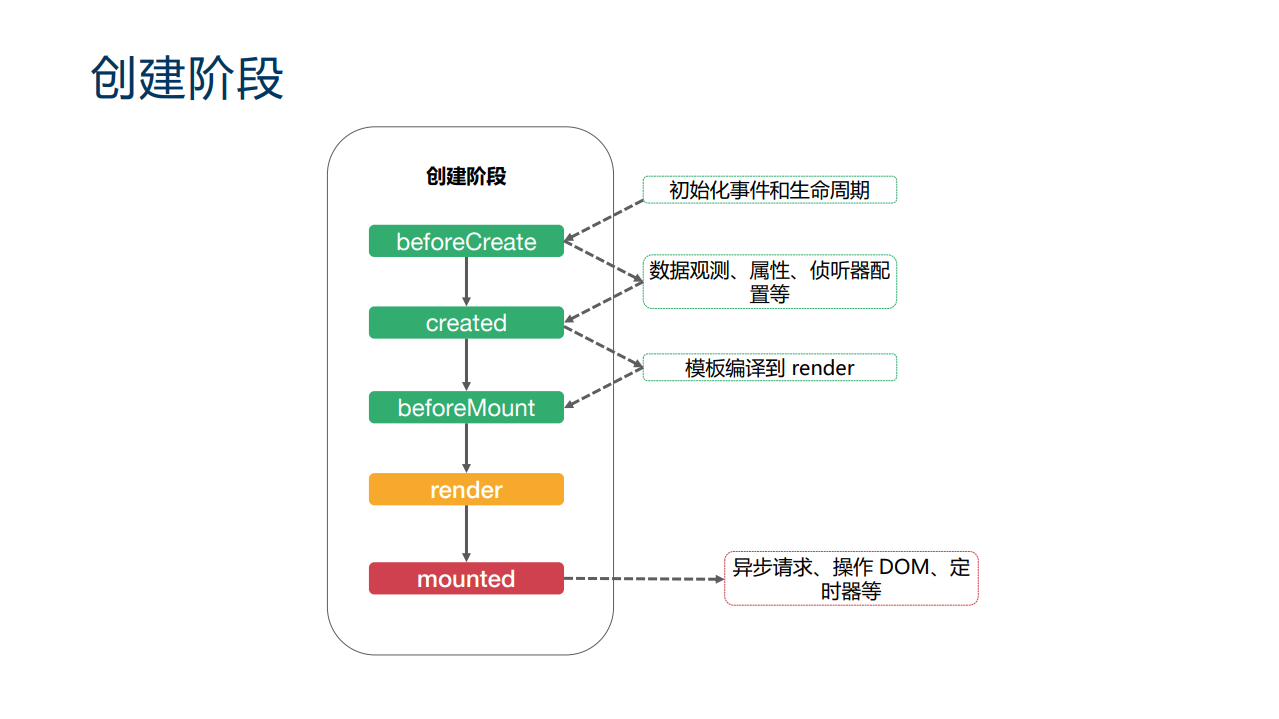
再mounted之后vue并不承诺子组件的DOM挂载到真实的DOM上,所以要时候需要this.
n
e
x
t
T
i
c
k
(
)
来
获
取
子
组
件
更
新
后
的
D
O
M
值
(
t
h
i
s
.
nextTick()来获取子组件更新后的DOM值(this.
nextTick()来获取子组件更新后的DOM值(this.ref[‘refName’])。
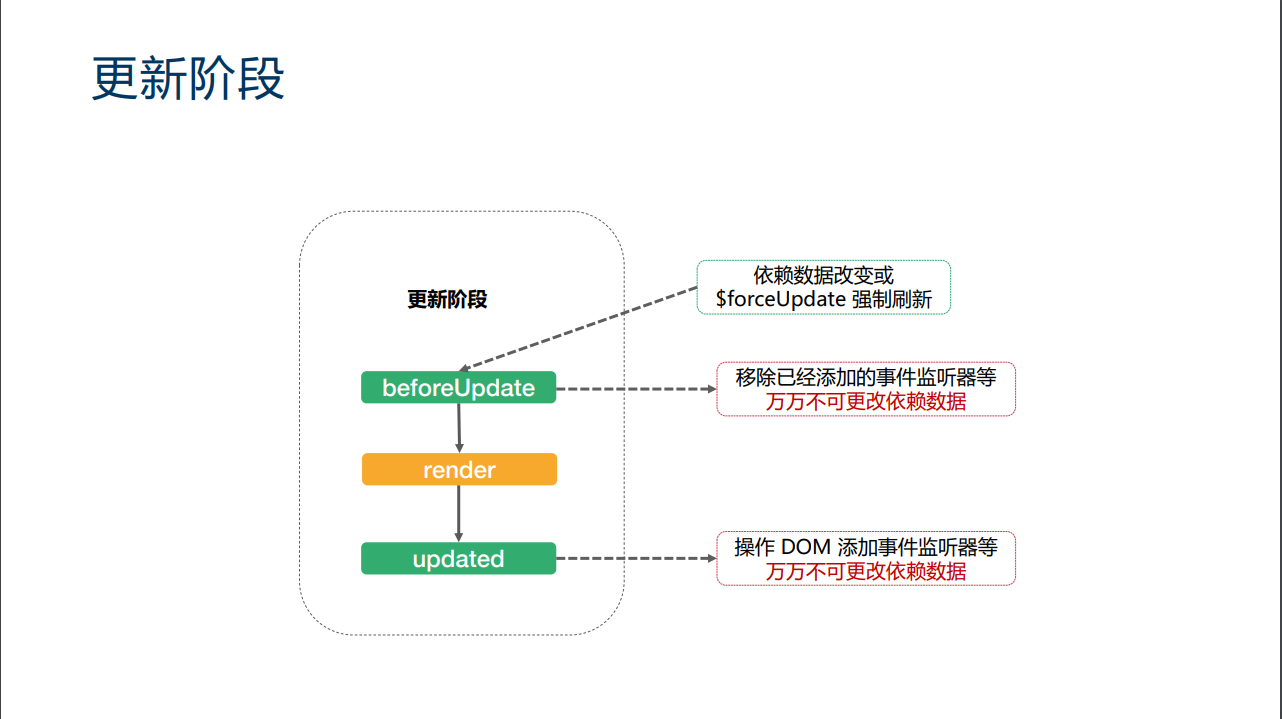
注意在此处更改数据会导致死循环(一旦更改就执行更新阶段,直到浏览器爆掉)。
函数式组件
- fuctional: true
- 无状态、无实例、没有this上下文、无生命周期
看一下示例,通过函数式组件实现临时变量的功能(虽然计算属性能帮我们搞定大部分的问题,但是计算属性更多的时针对一些被监听的变量的,有时候还是要用到临时变量。)
TempVar为一个函数式组件:
TempVar.js
export default {
  functional: true,
  render: (h, ctx) => {
    return ctx.scopedSlots.default && ctx.scopedSlots.default(ctx.props || {});
  }
};
index.vue
<template>
  <div>
    <a-tabs>
      <a-tab-pane key="clock" tab="时钟">
        <button @click="destroyClock = !destroyClock">
          {{ destroyClock ? "加载时钟" : "销毁时钟" }}
        </button>
        <Clock v-if="!destroyClock" />
      </a-tab-pane>
      <a-tab-pane key="Functional" tab="函数式组件">
        <Functional :name="name" />
        <TempVar
          :var1="`hello ${name}`"
          :var2="destroyClock ? 'hello vue' : 'hello world'"
        >
          <template v-slot="{ var1, var2 }">
            {{ var1 }}
            {{ var2 }}
          </template>
        </TempVar>
      </a-tab-pane>
    </a-tabs>
  </div>
</template>
<script>
import Clock from "./Clock";
import Functional from "./Functional";
import TempVar from "./TempVar";
export default {
  components: {
    Clock,
    Functional,
    TempVar
  },
  data() {
    return {
      destroyClock: false,
      name: "vue"
    };
  }
};
</script>
我们在index文件中使用作用域插槽,能够拿到var1和var2,并作为变量在下面的内容中进行使用。
指令
vue提供了14种内置指令:
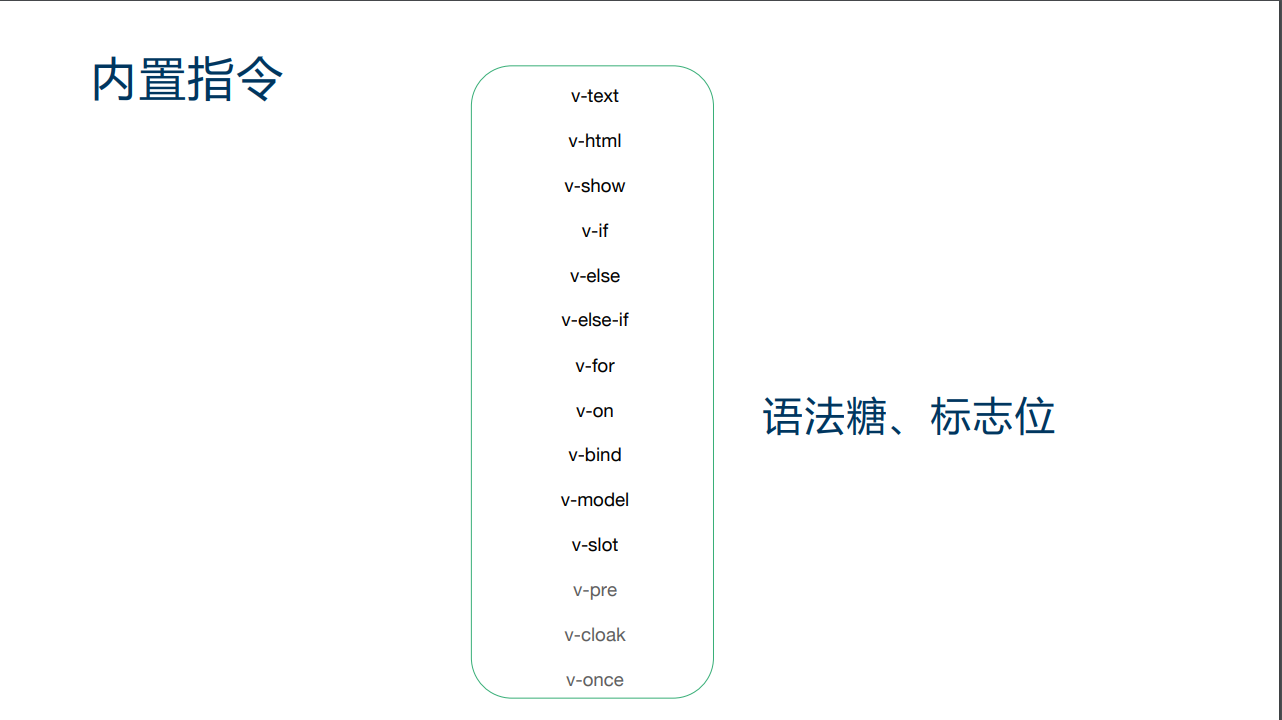
v-cloack在当前的单文件页面中不起作用
自定义指令:
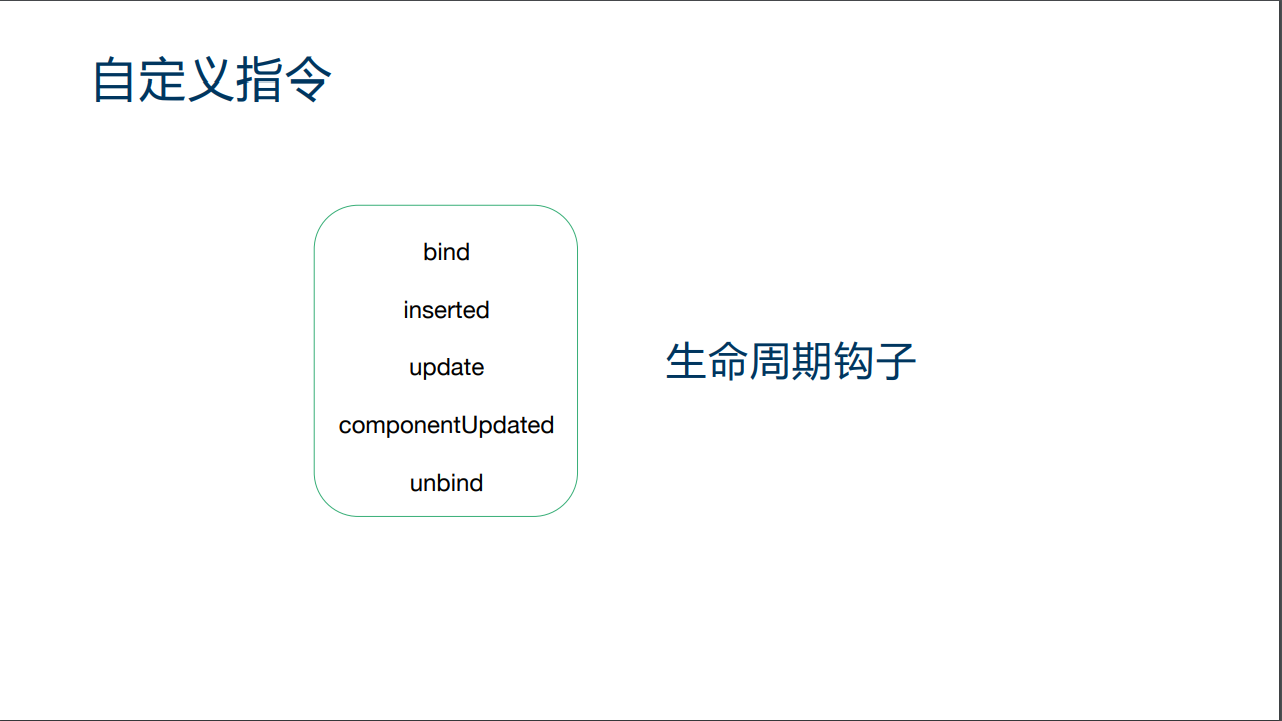
看下示例:
<template>
  <div>
    <button @click="show = !show">
      销毁
    </button>
    <button v-if="show" v-append-text="`hello ${number}`" @click="number++">
      按钮
    </button>
  </div>
</template>
<script>
export default {
  directives: {
    appendText: {
      bind() {
        console.log("bind");
      },
      inserted(el, binding) {
        el.appendChild(document.createTextNode(binding.value));
        console.log("inserted", el, binding);
      },
      update() {
        console.log("update");
      },
      componentUpdated(el, binding) {
        el.removeChild(el.childNodes[el.childNodes.length - 1]);
        el.appendChild(document.createTextNode(binding.value));
        console.log("componentUpdated");
      },
      unbind() {
        console.log("unbind");
      }
    }
  },
  data() {
    return {
      number: 1,
      show: true
    };
  }
};
</script>
这个append-text指令实现的是往当前的结点文本内容之后插入内容的指令,看下运行效果图:
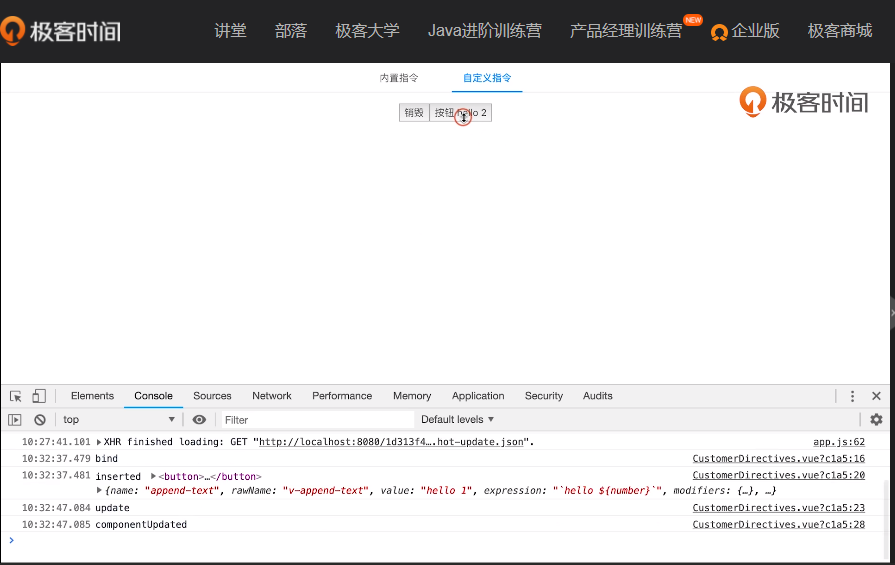
初始化时触发bind和insert,点击按钮触发update和componentUpdated。
provide/inject
provider和inject是为了解决组件通信时层层需要传递的问题。
我们看下示例:
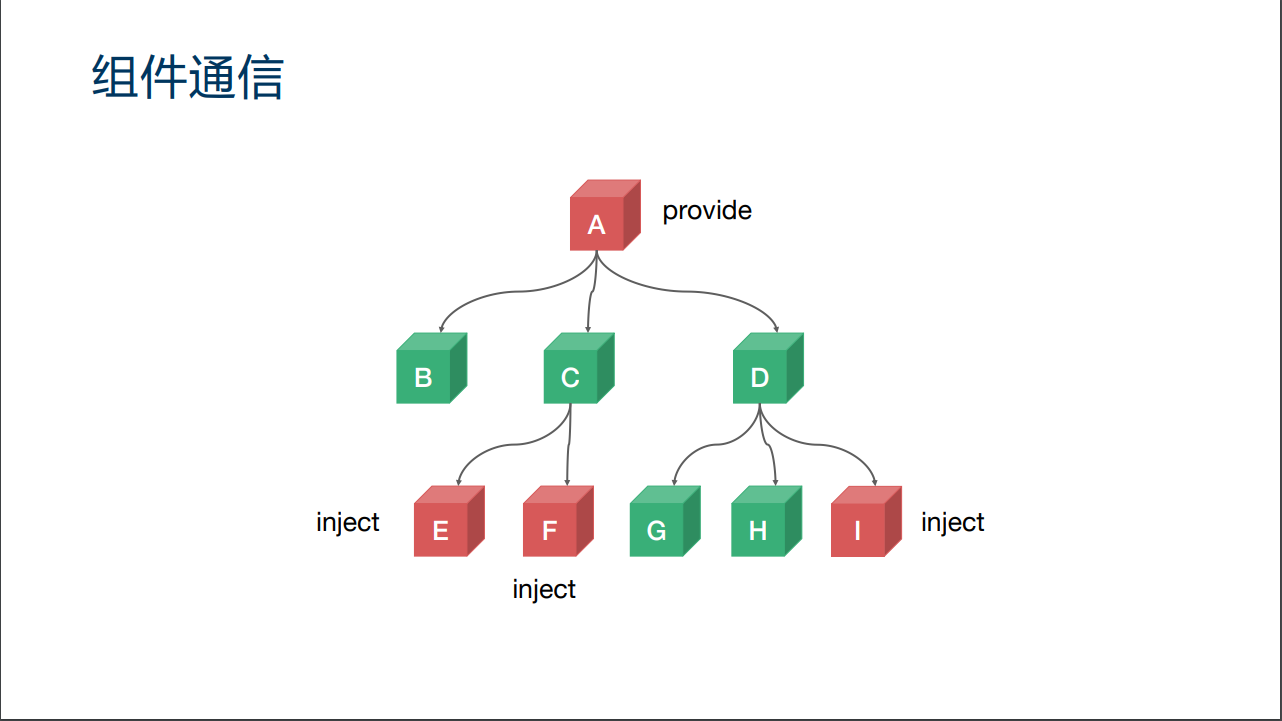
上图展示了各个节点之间的层级,我们按照这个层级书写代码:
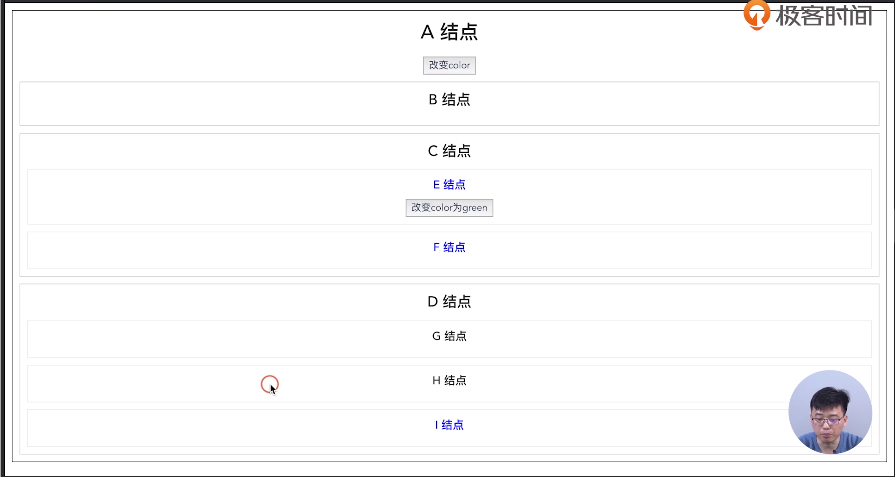
看下A节点的代码:
<template>
  <div class="border">
    <h1>A 结点</h1>
    <button @click="() => changeColor()">改变color</button>
    <ChildrenB />
    <ChildrenC />
    <ChildrenD />
  </div>
</template>
<script>
import ChildrenB from "./ChildrenB";
import ChildrenC from "./ChildrenC";
import ChildrenD from "./ChildrenD";
export default {
  components: {
    ChildrenB,
    ChildrenC,
    ChildrenD
  },
  provide() {
    return {
      theme: {
        color: this.color
      }
    };
  },
  // provide() {
  //   return {
  //     theme: this
  //   };
  // },
  data() {
    return {
      color: "blue"
    };
  },
  methods: {
    changeColor(color) {
      if (color) {
        this.color = color;
      } else {
        this.color = this.color === "blue" ? "red" : "blue";
      }
    }
  }
};
</script>
A节点通过provide提供了一个theme属性。
E节点代码:
<template>
  <div class="border2">
    <h3 :style="{ color: theme.color }">E 结点</h3>
    <button @click="handleClick">改变color为green</button>
  </div>
</template>
<script>
export default {
  components: {},
  inject: {
    theme: {
      default: () => ({})
    }
  },
  methods: {
    handleClick() {
      if (this.theme.changeColor) {
        this.theme.changeColor("green");
      }
    }
  }
};
</script>
E节点通过inject注入theme。
F节点(运用别名):
<template>
  <div class="border2">
    <h3 :style="{ color: theme1.color }">F 结点</h3>
  </div>
</template>
<script>
export default {
  components: {},
  inject: {
    theme1: {
      from: "theme",
      default: () => ({})
    }
  }
};
</script>
I节点(函数式组件):
<template functional>
  <div class="border2">
    <h3 :style="{ color: injections.theme.color }">I 结点</h3>
  </div>
</template>
<script>
export default {
  inject: {
    theme: {
      default: () => ({})
    }
  }
};
</script>
跨层级组件实例
我们可以通过ref获取组件实例:
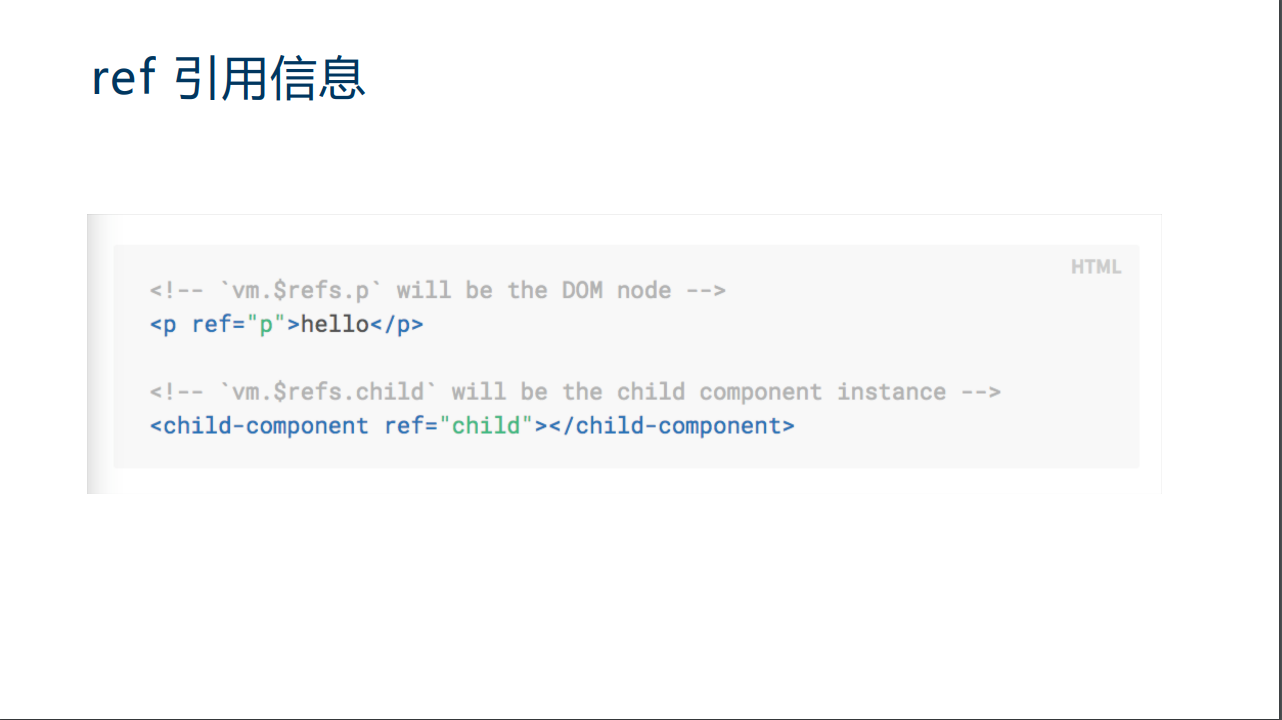
但是当我们层级多的时候就显得不合适了,递归查找的代码会繁琐,性能会低效。我们看一下callback ref的概念:
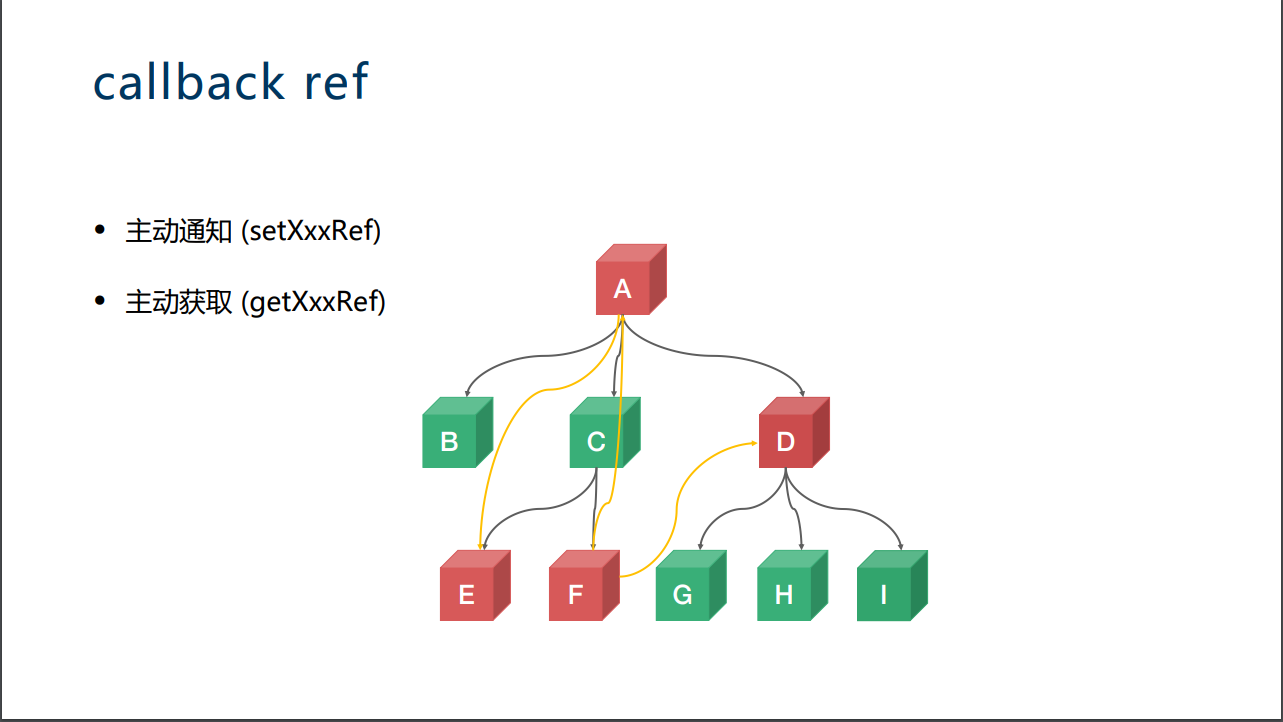
如果e节点更新以后能够调用a节点的钩子函数,主动通知a节点,那么层级的调用就显得容易很多了。
看一下实现的形式,依旧是沿用上一次的节点结构:
<template>
  <div class="border">
    <h1>A 结点</h1>
    <button @click="getEH3Ref">获取E h3 Ref</button>
    <ChildrenB />
    <ChildrenC />
    <ChildrenD />
  </div>
</template>
<script>
import ChildrenB from "./ChildrenB";
import ChildrenC from "./ChildrenC";
import ChildrenD from "./ChildrenD";
export default {
  components: {
    ChildrenB,
    ChildrenC,
    ChildrenD
  },
  provide() {
    return {
      setChildrenRef: (name, ref) => {
        this[name] = ref;
      },
      getChildrenRef: name => {
        return this[name];
      },
      getRef: () => {
        return this;
      }
    };
  },
  data() {
    return {
      color: "blue"
    };
  },
  methods: {
    getEH3Ref() {
      console.log(this.childrenE);
    }
  }
};
</script>
A节点通过provide提供主动获取通知的钩子函数。
子节点D:
<template>
  <div class="border1">
    <h2>D 结点</h2>
    <ChildrenG />
    <ChildrenH v-ant-ref="c => setChildrenRef('childrenH', c)" />
    <ChildrenI />
  </div>
</template>
<script>
import ChildrenG from "./ChildrenG";
import ChildrenH from "./ChildrenH";
import ChildrenI from "./ChildrenI";
export default {
  components: {
    ChildrenG,
    ChildrenH,
    ChildrenI
  },
  inject: {
    setChildrenRef: {
      default: () => {}
    }
  }
};
</script>
最后
以上就是调皮茉莉最近收集整理的关于唐金州的Vue开发实战学习笔记(基础篇)简易的Vue程序组件事件插槽单文件组件双向绑定虚拟DOM与key属性组件更新计算属性和侦听器生命周期的应用场景和函数式组件指令provide/inject跨层级组件实例的全部内容,更多相关唐金州内容请搜索靠谱客的其他文章。


发表评论 取消回复