#使用Image包合成图片 添加文字。 下面将通过实例介绍利用py PIL包对图片进行合成,裁减以及添加文字。 ##原始图片4张

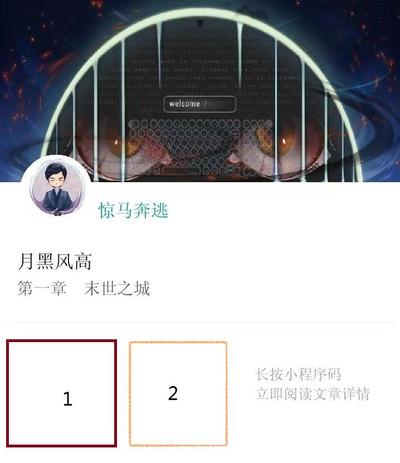
##合成后图片:
#图片处理 ##图片拼接
# 创建空白图片
target = Image.new('RGBA', (width, hight+504), (255, 255, 255))
# 创建header Image对象,paste拼接到空白图片指定位置target.paste(img_h, (0, 0))
img_h = img_header(os.path.join(tasktheme_img_path, task_img))
# 图片合成paste 参数中img_h表示Image对象,(0, 0)表示x,y轴位置 单位像素 target的左上角为原点 y轴向下
target.paste(img_h, (0, 0))
##生成圆形图片 因为头像图片为方形,需要裁减成圆形图片然后拼接。 裁减的原理是在正方形中画出一个内切圆,四个角的像素为对应背景位置的像素 裁减的圆形图片四个角的图片需对应到背景图
# 因为是要圆形,所以需要正方形的图片
r2 = min(size[0], size[1])
if size[0] != size[1]:
ima = ima.resize((r2, r2), Image.ANTIALIAS)
# 最后生成圆的半径
r3 = r2/2
imb = Image.new('RGBA', (r3*2, r3*2),(255,255,255,0))
pima = ima.load() # 像素的访问对象
pimb = imb.load()
pim_back = img_back.load()
r = float(r2/2) #圆心横坐标
for i in range(r2):
for j in range(r2):
lx = abs(i-r) #到圆心距离的横坐标
ly = abs(j-r)#到圆心距离的纵坐标
l = (pow(lx,2) + pow(ly,2))** 0.5 # 三角函数 半径
if l < r3-4:
pimb[i-(r-r3),j-(r-r3)] = pima[i,j]
elif l > r3:
# 大于半径的像素为背景图位置对应的像素,这样显示圆形头像四个角才能正常显示,pim_back为背景image对象
pimb[i-(r-r3),j-(r-r3)] = pim_back[i+35,j+327-50]
return imb
##添加文字,线条 在linux上需要导入支持中文的simsun.ttc字库,否则会乱码 draw.text指定位置开始添加文字 draw.line指定位置开始画线
font = ImageFont.truetype(os.path.join(os.getcwd(),'data','simsun.ttc'),26)
text = u'长按小程序码'
draw.text((457, hight+331), text,fill='#999',font=font)
text = u'立即阅读文章详情'
draw.text((457, hight+366), text,fill='#999',font=font)
draw.line((10, hight+251, width-10, hight+251), fill='#eee')
#完整代码
from PIL import Image,ImageFont,ImageDraw
reload(sys)
sys.setdefaultencoding('utf8')
def img_author(fpath, img_back):
ima = Image.open(fpath).convert("RGBA")
ima = ima.resize((130, 130), Image.ANTIALIAS)
size = ima.size
# 因为是要圆形,所以需要正方形的图片
r2 = min(size[0], size[1])
if size[0] != size[1]:
ima = ima.resize((r2, r2), Image.ANTIALIAS)
# 最后生成圆的半径
r3 = r2/2
imb = Image.new('RGBA', (r3*2, r3*2),(255,255,255,0))
pima = ima.load() # 像素的访问对象
pimb = imb.load()
pim_back = img_back.load()
r = float(r2/2) #圆心横坐标
for i in range(r2):
for j in range(r2):
lx = abs(i-r) #到圆心距离的横坐标
ly = abs(j-r)#到圆心距离的纵坐标
l = (pow(lx,2) + pow(ly,2))** 0.5 # 三角函数 半径
if l < r3-4:
pimb[i-(r-r3),j-(r-r3)] = pima[i,j]
elif l > r3:
pimb[i-(r-r3),j-(r-r3)] = pim_back[i+35,j+327-50]
return imb
def img_header(fpath):
img = Image.open(fpath)
img = img.resize((718,327))
img = img.convert("RGBA")
return img
def img_logo(fpath):
img = Image.open(fpath)
img = img.resize((160,160))
im = Image.new('RGBA', img.size, (255,255,255))
x,y = img.size
im.paste(img, (0, 0, x, y), img)
return im
def img_applicationcode(fpath):
img = Image.open(fpath)
img = img.resize((180,180))
img = img.convert("RGBA")
return img
def wx_get_share_img(data):
task_img = data['task_img']
author_img = data['author_img']
author_name = data['author_name']
task_name = data['task_name']
roud_name = data['roud_name']
aid = data['aid']
tid = data['tid']
width = 718
hight = 327
save_name = str(aid)+'.jpg'
if os.path.exists(os.path.join(wx_share_path,save_name)):
return {'img':wx_share_url+save_name}
try:
target = Image.new('RGBA', (width, hight+504), (255, 255, 255))
img_h = img_header(os.path.join(tasktheme_img_path, task_img))
target.paste(img_h, (0, 0))
img_a = img_author(os.path.join(avatar_img_path, author_img),target)
target.paste(img_a, (35, hight-50))
img_l = img_logo(os.path.join(img_dir,'logo.png'))
target.paste(img_l, (30,hight+296))
# 获取动态小程序码
#img_l = img_applicationcode(os.path.join(img_dir,'applicationcode.jpg'))
img_l = miniprogram.getCodeUnlimit('aid=%s&tid=%s'%(aid,tid),'pages/index/story_detail/story_detail')
img_l = img_l.resize((160,160))
target.paste(img_l, (30+160+40,hight+296))
draw = ImageDraw.Draw(target)
font = ImageFont.truetype(os.path.join(os.getcwd(),'data','simsun.ttc'),32)
draw.text((30+130+15, hight+34), author_name.decode('utf-8'),fill='#009696',font=font)
font = ImageFont.truetype(os.path.join(os.getcwd(),'data','simsun.ttc'),34)
draw.text((30, hight+125), task_name.decode('utf-8'),fill='#000000',font=font)
font = ImageFont.truetype(os.path.join(os.getcwd(),'data','simsun.ttc'),30)
draw.text((30, hight+176), roud_name.decode('utf-8'),fill='#555',font=font)
font = ImageFont.truetype(os.path.join(os.getcwd(),'data','simsun.ttc'),26)
text = u'长按小程序码'
draw.text((457, hight+331), text,fill='#999',font=font)
text = u'立即阅读文章详情'
draw.text((457, hight+366), text,fill='#999',font=font)
draw.line((10, hight+251, width-10, hight+251), fill='#eee')
# print help(draw)
target = target.convert("RGB")
target.save(os.path.join(wx_share_path, save_name))
return {'img':wx_share_url+save_name}
except Exception as e:
traceback.print_exc()
return {}
最后
以上就是健忘百褶裙最近收集整理的关于python文字图片拼接_python PIL Image基本的图片拼接、圆形裁减、添加文字的全部内容,更多相关python文字图片拼接_python内容请搜索靠谱客的其他文章。


发表评论 取消回复