猪年快乐之TensorFlow中实现word2vec及如何结构化TensorFlow模型
导语
今天是2019年新年第一天,首先祝福大家猪年大吉,在新的一年里多多学习,多多锻炼,身体健康,万事如意!
本节学习来源斯坦福大学cs20课程,有关本届源代码已同步只至github,欢迎大家star与转发,收藏!
cs20是一门对于深度学习研究者学习Tensorflow的课程,今天学习了四节,非常有收获,并且陆续将内容写入jupytebook notebook中,有关这个源代码及仓库地址,大家可以点击阅读原文或者直接复制下面链接!
直通车:
今日日程
word2vec
Embedding visualization
Structure your TensorFlow model
Variable sharing
Manage experiments
Autodiff
在本天学习中,尝试基于更复杂的模型word2vec创建一个模型,将使用它来描述变量,模型共享和管理。
Tensorflow中的word2vec
我们如何以有效的方式表达文字?
One-hot Representation
每个单词由一个向量表示,只有一个1,其余为0
例如:
Vocab: i, it, california, meh
i  = [1 0 0 0]
it = [0 1 0 0]
california = [0 0 1 0]
meh = [0 0 0 1]
词汇量可能很大=>大尺寸,低效计算
不能代表单词之间的关系=>“anxious”和“nervous”是相似的,但会有完全不同的表现形式
词嵌入
分布式表示
连续值
低维度
捕获单词之间的语义关系
Tensorflow中实现word2vec
导包
import os
os.environ['TF_CPP_MIN_LOG_LEVEL']='2'

import numpy as np
from tensorflow.contrib.tensorboard.plugins import projector
import tensorflow as tf

import utils
import word2vec_utils
超参数
VOCAB_SIZE = 50000
BATCH_SIZE = 128
EMBED_SIZE = 128            # dimension of the word embedding vectors
SKIP_WINDOW = 1             # the context window
NUM_SAMPLED = 64            # number of negative examples to sample
LEARNING_RATE = 1.0
NUM_TRAIN_STEPS = 100000
VISUAL_FLD = 'visualization'
SKIP_STEP = 5000

DOWNLOAD_URL = 'http://mattmahoney.net/dc/text8.zip'
EXPECTED_BYTES = 31344016
NUM_VISUALIZE = 3000        # number of tokens to visualize
def gen():
    yield from word2vec_utils.batch_gen(DOWNLOAD_URL, EXPECTED_BYTES, VOCAB_SIZE,
                                        BATCH_SIZE, SKIP_WINDOW, VISUAL_FLD)
dataset = tf.data.Dataset.from_generator(gen, (tf.int32, tf.int32), (tf.TensorShape([BATCH_SIZE]), tf.TensorShape([BATCH_SIZE, 1])))
iterator = dataset.make_initializable_iterator()
center_words, target_words = iterator.get_next()
skip-gram模型中的参数是矩阵形式,该矩阵的行向量是字嵌入向量。因此,矩阵的大小为[VOCAB_SIZE,EMBED_SIZE]。通常将相应的参数矩阵初始化为遵循随机分布,其中我们将其初始化以遵循均匀分布。
embed_matrix = tf.get_variable('embed_matrix', shape=[VOCAB_SIZE, EMBED_SIZE],initializer=tf.random_uniform_initializer())
在skip-gram模型中,单词最初是单热编码的并且乘以参数。最终,余数都被计算出来,即使它们都是零。 TensorFlow提供了一个函数tf.nn.embedding_lookup来解决这个问题。因此,只能通过该函数使用与批次的单词对应的行的向量值。
函数原型
tf.nn.embedding_lookup(
    params,
    ids,
    partition_strategy='mod',
    name=None,
    validate_indices=True,
    max_norm=None
)
因此,使用上述函数后,如下:
embed = tf.nn.embedding_lookup(embed_matrix, center_words, name='embedding')
现在我们需要定义损失函数。我们将使用NCE函数作为损失函数。我们已经在tf中使用了这个函数,所以让我们使用它。 NCE功能的结构如下。
函数原型:
tf.nn.nce_loss(
    weights,
    biases,
    labels,
    inputs,
    num_sampled,
    num_classes,
    num_true=1,
    sampled_values=None,
    remove_accidental_hits=False,
    partition_strategy='mod',
    name='nce_loss'
)
(上面函数中的第三个参数实际上是输入,第四个是标签)
要使用NCE损失,我们分别定义nce_weight和nce_bias并定义损失函数。
nce_weight = tf.get_variable('nce_weight', shape=[VOCAB_SIZE, EMBED_SIZE],
initializer=tf.truncated_normal_initializer(stddev=1.0 / (EMBED_SIZE ** 0.5)))
nce_bias = tf.get_variable('nce_bias', initializer=tf.zeros([VOCAB_SIZE]))

# define loss function to be NCE loss function
loss = tf.reduce_mean(tf.nn.nce_loss(weights=nce_weight,
    biases=nce_bias,
    labels=target_words,
    inputs=embed,
    num_sampled=NUM_SAMPLED,
    num_classes=VOCAB_SIZE), name='loss')
现在您只需要定义优化器。梯度下降优化器。
optimizer = tf.train.GradientDescentOptimizer(LEARNING_RATE).minimize(loss)
现在您可以运行定义的图形。让我们通过Session。
utils.safe_mkdir('checkpoints')

with tf.Session() as sess:
        sess.run(iterator.initializer)
        sess.run(tf.global_variables_initializer())

        total_loss = 0.0 # we use this to calculate late average loss in the last SKIP_STEP steps
        writer = tf.summary.FileWriter('graphs/word2vec_simple', sess.graph)

        for index in range(NUM_TRAIN_STEPS):
            try:
                loss_batch, _ = sess.run([loss, optimizer])
                total_loss += loss_batch
                if (index + 1) % SKIP_STEP == 0:
                    print('Average loss at step {}: {:5.1f}'.format(index, total_loss / SKIP_STEP))
                    total_loss = 0.0
            except tf.errors.OutOfRangeError:
                sess.run(iterator.initializer)
        writer.close()
data/text8.zip already exists
Average loss at step 4999:  65.5
Average loss at step 9999:  18.2
Average loss at step 14999:   9.5
Average loss at step 19999:   6.7
Average loss at step 24999:   5.7
Average loss at step 29999:   5.2
Average loss at step 34999:   5.0
Average loss at step 39999:   4.8
Average loss at step 44999:   4.8
Average loss at step 49999:   4.8
Average loss at step 54999:   4.7
Average loss at step 59999:   4.7
Average loss at step 64999:   4.6
Average loss at step 69999:   4.7
Average loss at step 74999:   4.6
Average loss at step 79999:   4.6
Average loss at step 84999:   4.7
Average loss at step 89999:   4.7
Average loss at step 94999:   4.6
Average loss at step 99999:   4.6
如何结构化TensorFlow模型
1.步骤
阶段1:组装图表
加载数据(tf.data或占位符)
参数定义
推理模型定义
损失函数的定义
优化器定义
阶段2:执行计算
初始化所有变量
数据迭代器,初始化feed
运行推理模型(计算每个输入的学习结果)
cost计算
参数更新
2.封装
定义函数进行封装,例如:
def gen():
    yield from word2vec_utils.batch_gen(DOWNLOAD_URL, EXPECTED_BYTES, VOCAB_SIZE,
                                        BATCH_SIZE, SKIP_WINDOW, VISUAL_FLD)

def main():
    dataset = tf.data.Dataset.from_generator(gen,
                                (tf.int32, tf.int32),
                                (tf.TensorShape([BATCH_SIZE]), tf.TensorShape([BATCH_SIZE, 1])))
    word2vec(dataset)
3.命名空间
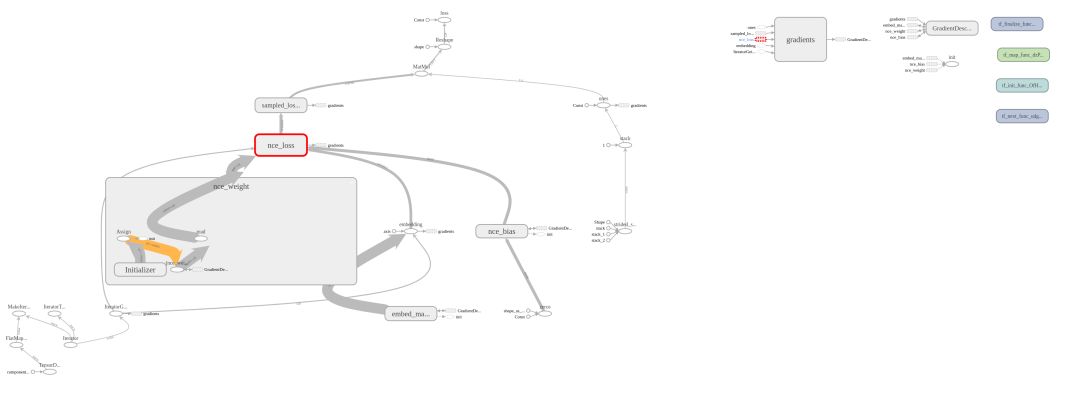
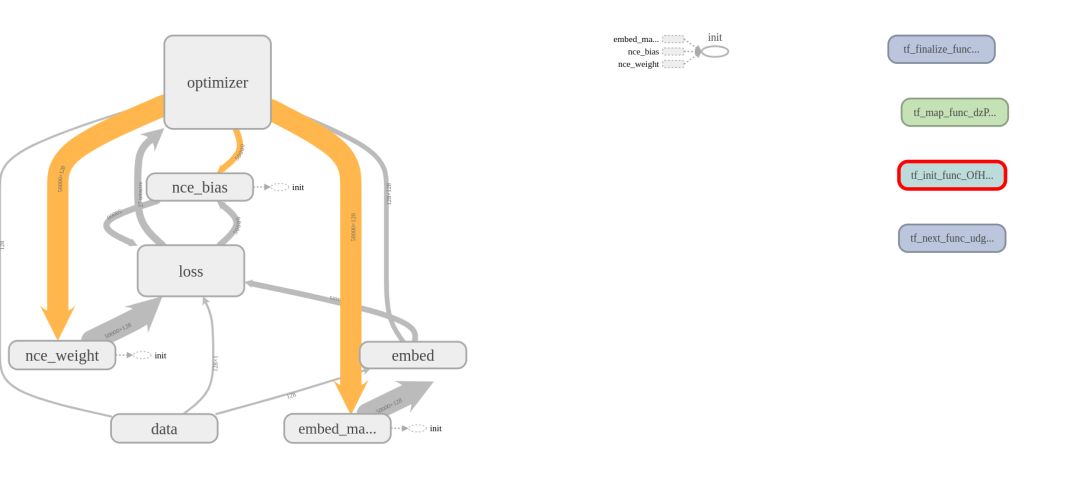
该图显示节点都是分散的。如果模型比word2vec稍微复杂一点,那么很难看到图形。那么如果你能将这些图表更好地组合在一起呢?使用tf.name_scope可以轻松进行分组。
tf.name_scope可以像这样使用
with tf.name_scope(name_of_that_scope):
    # declare op_1
    # declare op_2
    # ...
with tf.name_scope('data'):
    iterator = dataset.make_initializable_iterator()
    center_words, target_words = iterator.get_next()

with tf.name_scope('embed'):
    embed_matrix = tf.get_variable('embed_matrix',
                                    shape=[VOCAB_SIZE, EMBED_SIZE],
                                    initializer=tf.random_uniform_initializer())
    embed = tf.nn.embedding_lookup(embed_matrix, center_words, name='embedding')
使用前:

使用后:

4.变量重复(variable_scope)
使用TensorFlow时,我有时想知道何时使用name_scope和variable_scope。
这一次,让我们来看看variable_scope。考虑具有两个隐藏层和两个输入的神经网络。
然后我们将定义和使用神经网络,每次执行函数时,TensorFlow都会创建一组不同的变量。所以每次调用上面的two_hidden_layers()时,都会执行get_variable来创建一个新变量。因此,出现以下错误消息(ValueError: Variable h1_weights already exists, disallowed. Did you mean to set reuse=True or reuse=tf.AUTO_REUSE in VarScope?),因为它生成重复项。我们使用VarScope来防止这些变量的重复。
我们使用variable_scope来防止这些变量的重复。
def fully_connected(x, output_dim, scope):
    with tf.variable_scope(scope) as scope:
        w = tf.get_variable("weights", [x.shape[1], output_dim], initializer=tf.random_normal_initializer())
        b = tf.get_variable("biases", [output_dim], initializer=tf.constant_initializer(0.0))
        return tf.matmul(x, w) + b

def two_hidden_layers(x):
    h1 = fully_connected(x, 50, 'h1')
    h2 = fully_connected(h1, 10, 'h2')

with tf.variable_scope('two_layers') as scope:
    logits1 = two_hidden_layers(x1)
    scope.reuse_variables()
    logits2 = two_hidden_layers(x2)
5.图集合(Graph collections)
在创建模型时,可能会出现将变量放在图形的不同部分的情况。使用tf.get_collection访问一组特定的变量。
tf.get_collection(
    key,
    scope=None
)
默认情况下,所有变量都在tf.GraphKeys.GLOBAL_VARIABLES中。要使用'my_scope'中的所有变量,您可以使用:
tf.get_collection(tf.GraphKeys.GLOBAL_VARIABLES, scope='my_scope')
如果要将变量集中的变量设置为trainable = True,则可以使用tf.GraphKeys.TRAINABLE_VARIABLES集合。
6.word2vec
我们将word2vec变成了一个较小的数据集,发现结果非常好。但实际上您需要更多数据集,因此需要花费大量时间。
模型越复杂,学习所需的时间就越多。例如,在机器翻译领域,您必须至少学习一天,并且在某些情况下您必须学习更多知识。
如果我们学习一个需要几天的模型,在模型完成学习之前我们不会知道结果。即使您中间有计算机问题,也无法检查结果。
另一个问题是,当通过试验各种因素来试验模型时,很难对这些因素进行比较。
所以能够在任何时间点停止训练并能恢复运行十分关键。让我们来看看我们在试验模型时可以使用的一些功能。让我们看看tf.train.Saver(),TensorFlow的随机状态和可视化。
tf.train.Saver()
您可以使用tf.train.Saver()定期存储模型的参数值。将图形变量保存为二进制文件。该类的保存功能结构如下。
tf.train.Saver.save(
    sess,
    save_path,
    global_step=None,
    latest_filename=None,
    meta_graph_suffix='meta',
    write_meta_graph=True,
    write_state=True
)
例如,如果我们每隔1000步保存一次计算图的变量:
# 定义模型

# create a saver object
saver = tf.train.Saver()

# launch a session to execute the computation
with tf.Session() as sess:
    # actual training loop
    for step in range(training_steps):
    sess.run([optimizer])
    if (step + 1) % 1000 == 0:
        saver.save(sess, 'checkpoint_directory/model_name', global_step=global_step)
在TensorFlow中,你保存计算图变量的那一步叫一个检查点(checkpoint)。因为我们会建立很多个检查点,在我们的模型中添加了一个名为global_step的变量有助于记录训练步骤。
global_step = tf.Variable(0, dtype=tf.int32, trainable=False, name='global_step')
需要将global_step作为参数传递给optimizer,让它知道在每个训练步骤对global_step进行累加。
optimizer = tf.train.AdamOptimizer(lr).minimize(loss, global_step=global_step)
要将变量值保存到checkpoints目录中,我们使用:
saver.save(sess, 'checkpoints/model-name', global_step=global_step)
要恢复变量,我们用tf.train.Saver.restore(sess, save_path),例如用第10000步的checkpoint进行恢复:
saver.restore(sess, 'checkpoints/skip-gram-10000')
但是当然,我们只能在有checkpoint的时候才能加载变量,当没有时重新训练。TensorFlow允许我们使用tf.train.get_checkpoint_state(‘directory-name/checkpoint’)从一个文件夹读取checkpoint。
ckpt = tf.train.get_checkpoint_state(os.path.dirname('checkpoints/checkpoint'))
if ckpt and ckpt.model_checkpoint_path:
     saver.restore(sess, ckpt.model_checkpoint_path)
'checkpoint'文件会自动的跟踪时间最近的checkpoint,它的内容像这样:

所以word2vec的训练循环像这样:
initial_step = 0
utils.safe_mkdir('checkpoints')
with tf.Session() as sess:
    sess.run(self.iterator.initializer)
    sess.run(tf.global_variables_initializer())
    ckpt = tf.train.get_checkpoint_state(os.path.dirname('checkpoints/checkpoint'))

    # if that checkpoint exists, restore from checkpoint
    if ckpt and ckpt.model_checkpoint_path:
        saver.restore(sess, ckpt.model_checkpoint_path)

    total_loss = 0.0 # we use this to calculate late average loss in the last SKIP_STEP steps
    writer = tf.summary.FileWriter('graphs/word2vec/lr' + str(self.lr), sess.graph)
    initial_step = self.global_step.eval()

    for index in range(initial_step, initial_step + num_train_steps):
        try:
            loss_batch, _, summary = sess.run([self.loss, self.optimizer, self.summary_op])
            writer.add_summary(summary, global_step=index)
            total_loss += loss_batch
            if (index + 1) % self.skip_step == 0:
                print('Average loss at step {}: {:5.1f}'.format(index, total_loss / self.skip_step))
                total_loss = 0.0
                saver.save(sess, 'checkpoints/skip-gram', index)
        except tf.errors.OutOfRangeError:
            sess.run(self.iterator.initializer)
    writer.close()
查看'checkpoints'目录,你会看到这些文件:
默认情况下,saver.save()保存计算图的所有变量,这是TensorFlow推荐的。然而你也可以选择保存什么变量,在我们创建saver对象时将它们以list或dict传入。
v1 = tf.Variable(..., name='v1')
v2 = tf.Variable(..., name='v2')
saver = tf.train.Saver({'v1': v1, 'v2': v2})
saver = tf.train.Saver([v1, v2])
saver = tf.train.Saver({v.op.name: v for v in [v1, v2]})
tf.summary
通常我们使用matplotlib来使用TensorFlow可视化我们的损失,准确性等。使用TensorBoard可以轻松地可视化我们的汇总数据。
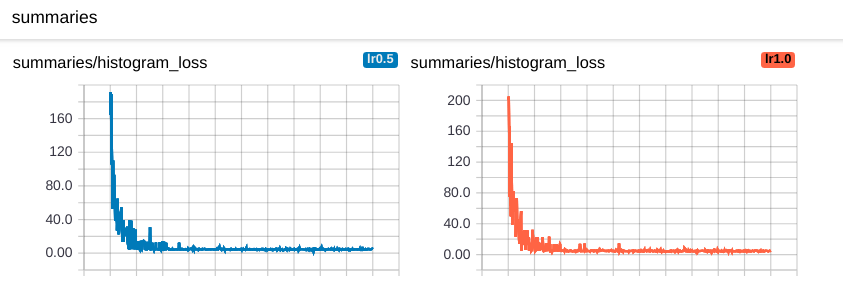
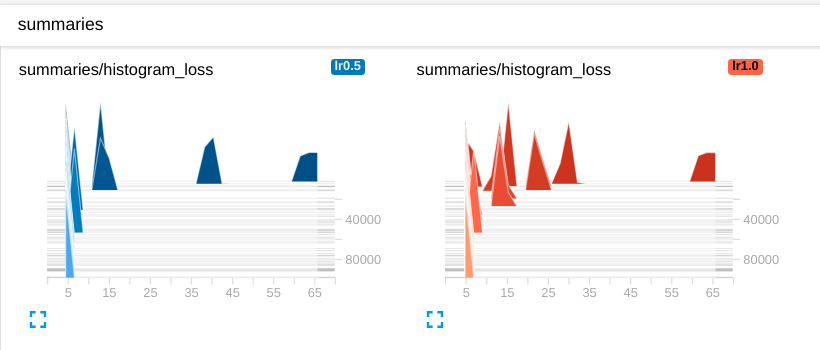
让我们可视化损失,平均损失和准确性,这些通常是可视化值。可视化以标量图,直方图和图像格式提供。
首先,我们在使用摘要操作后定义我们将用作名称范围的值。
def _create_summaries(self):
     with tf.name_scope("summaries"):
            tf.summary.scalar("loss", self.loss)
            tf.summary.scalar("accuracy", self.accuracy)
            tf.summary.histogram("histogram loss", self.loss)
            # because you have several summaries, we should merge them all
            # into one op to make it easier to manage
            self.summary_op = tf.summary.merge_all()
由于summary是一个操作,因此必须作为会话执行。
loss_batch, _, summary = sess.run([model.loss, model.optimizer, model.summary_op],
                                  feed_dict=feed_dict)
现在你已经得到了summary,还需要将summary用FileWriter对象写入文件中来进行可视化。
writer.add_summary(summary, global_step=step)
完整代码
import os
os.environ['TF_CPP_MIN_LOG_LEVEL']='2'

import numpy as np
from tensorflow.contrib.tensorboard.plugins import projector
import tensorflow as tf

import utils
import word2vec_utils

# Model hyperparameters
VOCAB_SIZE = 50000
BATCH_SIZE = 128
EMBED_SIZE = 128            # dimension of the word embedding vectors
SKIP_WINDOW = 1             # the context window
NUM_SAMPLED = 64            # number of negative examples to sample
LEARNING_RATE = 0.5
NUM_TRAIN_STEPS = 100000
VISUAL_FLD = 'visualization'
SKIP_STEP = 5000

# Parameters for downloading data
DOWNLOAD_URL = 'http://mattmahoney.net/dc/text8.zip'
EXPECTED_BYTES = 31344016
NUM_VISUALIZE = 3000        # number of tokens to visualize

class SkipGramModel:
    """ Build the graph for word2vec model """
    def __init__(self, dataset, vocab_size, embed_size, batch_size, num_sampled, learning_rate):
        self.vocab_size = vocab_size
        self.embed_size = embed_size
        self.batch_size = batch_size
        self.num_sampled = num_sampled
        self.lr = learning_rate
        self.global_step = tf.get_variable('global_step', initializer=tf.constant(0), trainable=False)
        self.skip_step = SKIP_STEP
        self.dataset = dataset

    def _import_data(self):
        """ Step 1: import data
        """
        with tf.name_scope('data'):
            self.iterator = self.dataset.make_initializable_iterator()
            self.center_words, self.target_words = self.iterator.get_next()

    def _create_embedding(self):
        """ Step 2 + 3: define weights and embedding lookup.
        In word2vec, it's actually the weights that we care about
        """
        with tf.name_scope('embed'):
            self.embed_matrix = tf.get_variable('embed_matrix',
                                                shape=[self.vocab_size, self.embed_size],
                                                initializer=tf.random_uniform_initializer())
            self.embed = tf.nn.embedding_lookup(self.embed_matrix, self.center_words, name='embedding')

    def _create_loss(self):
        """ Step 4: define the loss function """
        with tf.name_scope('loss'):
            # construct variables for NCE loss
            nce_weight = tf.get_variable('nce_weight',
                        shape=[self.vocab_size, self.embed_size],
                        initializer=tf.truncated_normal_initializer(stddev=1.0 / (self.embed_size ** 0.5)))
            nce_bias = tf.get_variable('nce_bias', initializer=tf.zeros([VOCAB_SIZE]))

            # define loss function to be NCE loss function
            self.loss = tf.reduce_mean(tf.nn.nce_loss(weights=nce_weight,
                                                biases=nce_bias,
                                                labels=self.target_words,
                                                inputs=self.embed,
                                                num_sampled=self.num_sampled,
                                                num_classes=self.vocab_size), name='loss')
    def _create_optimizer(self):
        """ Step 5: define optimizer """
        self.optimizer = tf.train.GradientDescentOptimizer(self.lr).minimize(self.loss,
                                                              global_step=self.global_step)

    def _create_summaries(self):
        with tf.name_scope('summaries'):
            tf.summary.scalar('loss', self.loss)
            tf.summary.histogram('histogram loss', self.loss)
            # because you have several summaries, we should merge them all
            # into one op to make it easier to manage
            self.summary_op = tf.summary.merge_all()

    def build_graph(self):
        """ Build the graph for our model """
        self._import_data()
        self._create_embedding()
        self._create_loss()
        self._create_optimizer()
        self._create_summaries()

    def train(self, num_train_steps):
        saver = tf.train.Saver() # defaults to saving all variables - in this case embed_matrix, nce_weight, nce_bias

        initial_step = 0
        utils.safe_mkdir('checkpoints')
        with tf.Session() as sess:
            sess.run(self.iterator.initializer)
            sess.run(tf.global_variables_initializer())
            ckpt = tf.train.get_checkpoint_state(os.path.dirname('checkpoints/checkpoint'))

            # if that checkpoint exists, restore from checkpoint
            if ckpt and ckpt.model_checkpoint_path:
                saver.restore(sess, ckpt.model_checkpoint_path)

            total_loss = 0.0 # we use this to calculate late average loss in the last SKIP_STEP steps
            writer = tf.summary.FileWriter('graphs/word2vec/lr' + str(self.lr), sess.graph)
            initial_step = self.global_step.eval()

            for index in range(initial_step, initial_step + num_train_steps):
                try:
                    loss_batch, _, summary = sess.run([self.loss, self.optimizer, self.summary_op])
                    writer.add_summary(summary, global_step=index)
                    total_loss += loss_batch
                    if (index + 1) % self.skip_step == 0:
                        print('Average loss at step {}: {:5.1f}'.format(index, total_loss / self.skip_step))
                        total_loss = 0.0
                        saver.save(sess, 'checkpoints/skip-gram', index)
                except tf.errors.OutOfRangeError:
                    sess.run(self.iterator.initializer)
            writer.close()

    def visualize(self, visual_fld, num_visualize):
        """ run "'tensorboard --logdir='visualization'" to see the embeddings """

        # create the list of num_variable most common words to visualize
        word2vec_utils.most_common_words(visual_fld, num_visualize)

        saver = tf.train.Saver()
        with tf.Session() as sess:
            sess.run(tf.global_variables_initializer())
            ckpt = tf.train.get_checkpoint_state(os.path.dirname('checkpoints/checkpoint'))

            # if that checkpoint exists, restore from checkpoint
            if ckpt and ckpt.model_checkpoint_path:
                saver.restore(sess, ckpt.model_checkpoint_path)

            final_embed_matrix = sess.run(self.embed_matrix)

            # you have to store embeddings in a new variable
            embedding_var = tf.Variable(final_embed_matrix[:num_visualize], name='embedding')
            sess.run(embedding_var.initializer)

            config = projector.ProjectorConfig()
            summary_writer = tf.summary.FileWriter(visual_fld)

            # add embedding to the config file
            embedding = config.embeddings.add()
            embedding.tensor_name = embedding_var.name

            # link this tensor to its metadata file, in this case the first NUM_VISUALIZE words of vocab
            embedding.metadata_path = 'vocab_' + str(num_visualize) + '.tsv'

            # saves a configuration file that TensorBoard will read during startup.
            projector.visualize_embeddings(summary_writer, config)
            saver_embed = tf.train.Saver([embedding_var])
            saver_embed.save(sess, os.path.join(visual_fld, 'model.ckpt'), 1)

def gen():
    yield from word2vec_utils.batch_gen(DOWNLOAD_URL, EXPECTED_BYTES, VOCAB_SIZE,
                                        BATCH_SIZE, SKIP_WINDOW, VISUAL_FLD)

def main():
    dataset = tf.data.Dataset.from_generator(gen,
                                (tf.int32, tf.int32),
                                (tf.TensorShape([BATCH_SIZE]), tf.TensorShape([BATCH_SIZE, 1])))
    model = SkipGramModel(dataset, VOCAB_SIZE, EMBED_SIZE, BATCH_SIZE, NUM_SAMPLED, LEARNING_RATE)
    model.build_graph()
    model.train(NUM_TRAIN_STEPS)
    model.visualize(VISUAL_FLD, NUM_VISUALIZE)

if __name__ == '__main__':
    main()
INFO:tensorflow:Summary name histogram loss is illegal; using histogram_loss instead.
data/text8.zip already exists
Average loss at step 4999:  64.1
Average loss at step 9999:  17.3
Average loss at step 14999:   9.1
Average loss at step 19999:   6.3
Average loss at step 24999:   5.3
Average loss at step 29999:   4.9
Average loss at step 34999:   4.8
Average loss at step 39999:   4.7
Average loss at step 44999:   4.6
Average loss at step 49999:   4.6
Average loss at step 54999:   4.6
Average loss at step 59999:   4.6
Average loss at step 64999:   4.6
Average loss at step 69999:   4.6
Average loss at step 74999:   4.6
Average loss at step 79999:   4.6
Average loss at step 84999:   4.6
Average loss at step 89999:   4.6
Average loss at step 94999:   4.6
Average loss at step 99999:   4.5
INFO:tensorflow:Restoring parameters from checkpoints/skip-gram-99999
现在查看TensorBoard,在Scalars页面你可以看到标量摘要图,这是你的loss的摘要图。


random seed in operation level
使用张量流时,有很多时候需要使用随机值。您可以通过多种方式获得随机值。有一种方法可以控制此随机值。种子用于区分两种类型。
这是在操作步骤中分配随机种子的方法。我们来看看下面的几个例子,并学习如何使用它们。
1.在计算层面设置随机种子。所有的随机tensor允许在初始化时传入随机种子。
c = tf.random_uniform([], -10, 10, seed=2)

with tf.Session() as sess:
    print(sess.run(c)) # >> 3.57493
    print(sess.run(c)) # >> -5.97319
3.574932
-5.9731865
2.使用tf.Graph.seed在计算图层面设置随机种子。
tf.set_random_seed(seed)
Autodiff(TensorFlow是怎样计算梯度的)
张量流提供自动微分功能,并且有明确使用的功能。使用tf.gradients(),我们可以将我们想要的函数区分为我们设置的变量。该功能的结构如下。
tf.gradients(ys, xs, grad_ys=None, name='gradients', colocate_gradients_with_ops=False, gate_gradients=False, aggregation_method=None)
ys是导数函数,xs是导数。它可以通过几个变量区分或通过链规则区分。考虑下面的例子。
x = tf.Variable(2.0)
y = 2.0 * (x ** 3)

grad_y = tf.gradients(y, x)
with tf.Session() as sess:
    sess.run(x.initializer)
    print(sess.run(grad_y)) # >> 24.0
[24.0]
x = tf.Variable(2.0)
y = 2.0 * (x ** 3)
z = 3.0 + y ** 2

grad_z = tf.gradients(z, [x, y])
with tf.Session() as sess:
    sess.run(x.initializer)
    print(sess.run(grad_z)) # >> [768.0, 32.0]
# 768 is the gradient of z with respect to x, 32 with respect to y
[768.0, 32.0]
所以问题是:为什么我们还要学习如何计算梯度?为什么Chris Manning和Richard Socher还要我们计算cross entropy and softmax的梯度?用手算梯度会不会到某一天就像因为发明计算器而使用手算平方根一样过时吗?
也许。但是现在,TensorFlow可以为我们计算梯度,但它不能让我们直观地知道要使用什么函数。它不能告诉我们函数是否将会遭受梯度爆炸或梯度消失。我们仍然需要了解梯度以便理解为什么一个模型可以工作但是另一个不行。
学习资料:
1.https://www.jianshu.com/p/d49ae48312d3
2.https://reniew.github.io/36/

最后
以上就是勤劳帆布鞋最近收集整理的关于猪年快乐之TensorFlow中实现word2vec及如何结构化TensorFlow模型的全部内容,更多相关猪年快乐之TensorFlow中实现word2vec及如何结构化TensorFlow模型内容请搜索靠谱客的其他文章。


发表评论 取消回复