摘要:本节主要来进行Android10.0 编译系统的make过程
阅读本文大约需要花费29分钟。
文章首发微信公众号:IngresGe
专注于Android系统级源码分析,Android的平台设计,欢迎关注我,谢谢!
欢迎关注我的公众号!

[Android取经之路] 的源码都基于Android-Q(10.0) 进行分析
[Android取经之路] 系列文章:
《系统启动篇》
- Android系统架构
- Android是怎么启动的
- Android 10.0系统启动之init进程
- Android10.0系统启动之Zygote进程
- Android 10.0 系统启动之SystemServer进程
- Android 10.0 系统服务之ActivityMnagerService
- Android10.0系统启动之Launcher(桌面)启动流程
- Android10.0应用进程创建过程以及Zygote的fork流程
- Android 10.0 PackageManagerService(一)工作原理及启动流程
- Android 10.0 PackageManagerService(二)权限扫描
- Android 10.0 PackageManagerService(三)APK扫描
- Android 10.0 PackageManagerService(四)APK安装流程
《日志系统篇》
- Android10.0 日志系统分析(一)-logd、logcat 指令说明、分类和属性
- Android10.0 日志系统分析(二)-logd、logcat架构分析及日志系统初始化
- Android10.0 日志系统分析(三)-logd、logcat读写日志源码分析
- Android10.0 日志系统分析(四)-selinux、kernel日志在logd中的实现
《Binder通信原理》:
- Android10.0 Binder通信原理(一)Binder、HwBinder、VndBinder概要
- Android10.0 Binder通信原理(二)-Binder入门篇
- Android10.0 Binder通信原理(三)-ServiceManager篇
- Android10.0 Binder通信原理(四)-Native-CC++实例分析
- Android10.0 Binder通信原理(五)-Binder驱动分析
- Android10.0 Binder通信原理(六)-Binder数据如何完成定向打击
- Android10.0 Binder通信原理(七)-Framework binder示例
- Android10.0 Binder通信原理(八)-Framework层分析
- Android10.0 Binder通信原理(九)-AIDL Binder示例
- Android10.0 Binder通信原理(十)-AIDL原理分析-Proxy-Stub设计模式
- Android10.0 Binder通信原理(十一)-Binder总结
《HwBinder通信原理》
- HwBinder入门篇-Android10.0 HwBinder通信原理(一)
- HIDL详解-Android10.0 HwBinder通信原理(二)
- HIDL示例-C++服务创建Client验证-Android10.0 HwBinder通信原理(三)
- HIDL示例-JAVA服务创建-Client验证-Android10.0 HwBinder通信原理(四)
- HwServiceManager篇-Android10.0 HwBinder通信原理(五)
- Native层HIDL服务的注册原理-Android10.0 HwBinder通信原理(六)
- Native层HIDL服务的获取原理-Android10.0 HwBinder通信原理(七)
- JAVA层HIDL服务的注册原理-Android10.0 HwBinder通信原理(八)
- JAVA层HIDL服务的获取原理-Android10.0 HwBinder通信原理(九)
- HwBinder驱动篇-Android10.0 HwBinder通信原理(十)
- HwBinder原理总结-Android10.0 HwBinder通信原理(十一)
《编译原理》
- 编译系统入门篇-Android10.0编译系统(一)
- 编译环境初始化-Android10.0编译系统(二)
- make编译过程-Android10.0编译系统(三)
- Image打包流程-Android10.0编译系统(四)
- Kati详解-Android10.0编译系统(五)
- Blueprint简介-Android10.0编译系统(六)
- Blueprint代码详细分析-Android10.0编译系统(七)
1 概述
上一节,我们理清了编译环境初始化的过程,环境变量已经加载,并配置了编译目标,接下来执行一个make命令我们就能够进行编译。
make之后是怎么完成编译的,这个很有意思,我们一起往下探讨。
2 Android系统的编译历程
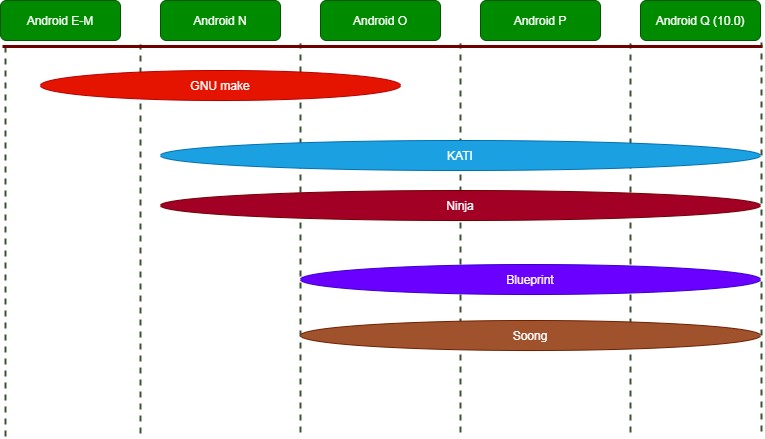
Android7.0 Google引入了soong构建系统,用来逐步替代GNU make的编译,因此在Android10.0 上,make执行后,我们走的是soong构建环境。
Android系统的编译历程:
3 Soong编译系统家族成员
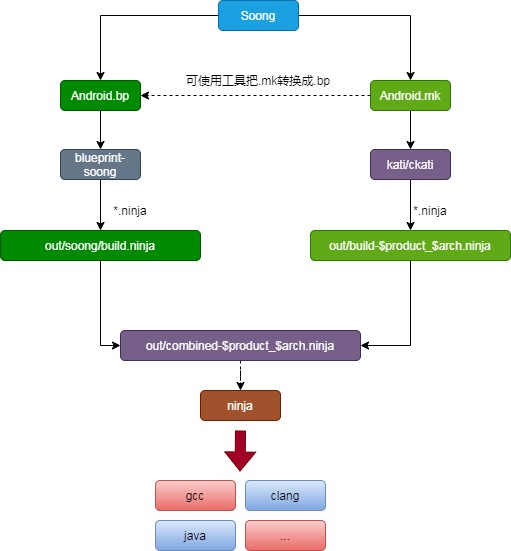
从下图可知,mk文件被编译成了 out/build-aosp_arm.ninja和out/build-aosp_arm-package.ninja,bp文件被编译成了out/soong/build.ninja,这三个ninja文件又被合并成out/combined-aosp_arm.ninja,最终通过ninja工具来编译out/combined-aosp_arm.ninja完成最终的编译。
4 make的流程图
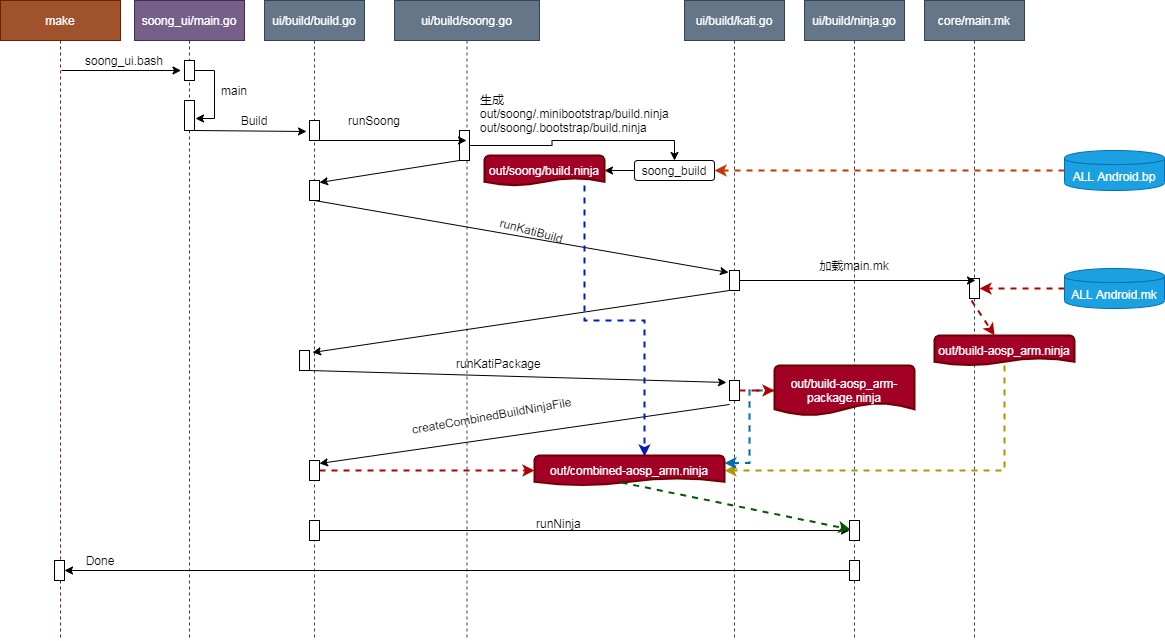
soong构建的流程图如下图所示:
5 make()
执行完make命令后,会调用envsetup.sh的make()函数进行处理。
function make()
{
    _wrap_build $(get_make_command "$@") "$@"
}从get_make_command()可以看出,make后,真正然后执行编译的入口是:build/soong/soong_ui.bash
function get_make_command()
{
    # If we're in the top of an Android tree, use soong_ui.bash instead of make
    if [ -f build/soong/soong_ui.bash ]; then
        # Always use the real make if -C is passed in
        for arg in "$@"; do
            if [[ $arg == -C* ]]; then
                echo command make
                return
            fi
        done
        echo build/soong/soong_ui.bash --make-mode
    else
        echo command make
    fi
}
6 soong_ui.bash
6.1 soong_ui.bash调用栈

soong_ui.bash执行过程:
-
source microfactory.bash,得到一些函数命令, 例如:soong_build_go
-
编译/build/soong/cmd/soong_ui/main.go,生成 out/soong_ui这个可执行程序
-
执行命令:out/soong_ui --make-mode ,执行了make命令,会把"build/make/core/main.mk" 加到构建环境中,同时启动kati、blueprint-soong、ninja的编译。
接下来根据调用栈的流程,来详细分析编译的过程。
6.2 [build/soong/soong_ui.bash]
soong_ui.bash 用来配置一些资源环境,得到一些函数命令,例如:soong_build_go,最终回退到根目录,执行out/soong_ui --make-mode进行真正的构建。
# Save the current PWD for use in soong_ui
export ORIGINAL_PWD=${PWD}
export TOP=$(gettop)
source ${TOP}/build/soong/scripts/microfactory.bash

soong_build_go soong_ui android/soong/cmd/soong_ui

cd ${TOP}
exec "$(getoutdir)/soong_ui" "$@"
6.2.1 [/soong/../microfactory.bash]
得到build_go的函数命令,并提供 soong_build_go的函数执行方法
[/build/soong/scripts/microfactory.bash]
function soong_build_go
{
    BUILDDIR=$(getoutdir)
      SRCDIR=${TOP}
      BLUEPRINTDIR=${TOP}/build/blueprint
      EXTRA_ARGS="-pkg-path android/soong=${TOP}/build/soong -pkg-path github.com/golang/protobuf=${TOP}/external/golang-protobuf"
      build_go $@
}

source ${TOP}/build/blueprint/microfactory/microfactory.bash
6.2.2 [/blueprint/../microfactory.bash]
build_go主要目的就是用来构建生成 out/soong_ui这个可执行程序,用于参与最终的编译
[/build/blueprint/microfactory/microfactory.bash ]
function build_go
{
    # Increment when microfactory changes enough that it cannot rebuild itself.
    # For example, if we use a new command line argument that doesn't work on older versions.
    local mf_version=3

    local mf_src="${BLUEPRINTDIR}/microfactory"
    local mf_bin="${BUILDDIR}/microfactory_$(uname)"
    local mf_version_file="${BUILDDIR}/.microfactory_$(uname)_version"
    local built_bin="${BUILDDIR}/$1"
    local from_src=1

    if [ -f "${mf_bin}" ] && [ -f "${mf_version_file}" ]; then
        if [ "${mf_version}" -eq "$(cat "${mf_version_file}")" ]; then
            from_src=0
        fi
    fi

    local mf_cmd
    if [ $from_src -eq 1 ]; then
        # `go run` requires a single main package, so create one
        local gen_src_dir="${BUILDDIR}/.microfactory_$(uname)_intermediates/src"
        mkdir -p "${gen_src_dir}"
        sed "s/^package microfactory/package main/" "${mf_src}/microfactory.go" >"${gen_src_dir}/microfactory.go"

        mf_cmd="${GOROOT}/bin/go run ${gen_src_dir}/microfactory.go"
    else
        mf_cmd="${mf_bin}"
    fi

    # GOROOT must be absolute because `go run` changes the local directory
    GOROOT=$(cd $GOROOT; pwd) ${mf_cmd} -b "${mf_bin}"
            -pkg-path "github.com/google/blueprint=${BLUEPRINTDIR}"
            -trimpath "${SRCDIR}"
            ${EXTRA_ARGS}
            -o "${built_bin}" $2

    if [ $? -eq 0 ] && [ $from_src -eq 1 ]; then
        echo "${mf_version}" >"${mf_version_file}"
    fi
}
soong_ui最终的编译命令展开为:
$(cd /prebuilts/go/linux-x86/; pwd) /out/microfactory_Linux
  -b "/out/microfactory_Linux"
  -pkg-path "github.com/google/blueprint=/build/blueprint"
  -trimpath "./"
  -pkg-path android/soong=/build/soong
  -pkg-path github.com/golang/protobuf=/external/golang-protobuf}
  -o "out/soong_ui" android/soong/cmd/soong_ui
从上面的流程可知,生成soong_ui经历几件事情:
-
通过/build/blueprint/microfactory/microfactory.go 编译出/out/microfactory_Linux
-
使用/out/microfactory_Linux来编译soong_ui
microfactory是一个增量编译go程序的工具。它类似于“go install”,但不需要GOPATH。包->路径映射可以指定为命令行选项:
-pkg-path android/soong=build/soong
-pkg-path github.com/google/blueprint=build/blueprint
其实microfactory就是一个高级一点的go命令,它自己由go编出来,又代替了一部分go的部分功能,鸡生蛋,蛋生鸡的故事,这里得到了完美解释 ^_^。
microfactory编译示例:
-
准备go的代码
在/home/ingresge/AP/AOSP_Q中创建一个目录hello:
创建hello.go---vim hello/hello.go
在其中打印一个“Hello,Go!”
package main

import (
"log"
"os"
)

func main() {
  testlog := log.New(os.Stderr, "", log.Ltime)
  testlog.Println("Hello,Go!")
}- 使用microfactory 编译hello.go
/home/ingresge/AP/AOSP_Q/out/microfactory_Linux -pkg-path android/hello=/home/ingresge/AP/AOSP_Q/hello -trimpath /home/ingresge/AP/AOSP_Q/hello -o /home/ingresge/AP/AOSP_Q/out/hellogo android/hello/-
运行
执行命令:./out/hellogo
输出结果:
17:18:44 Hello,Go!
6.3 soong_ui
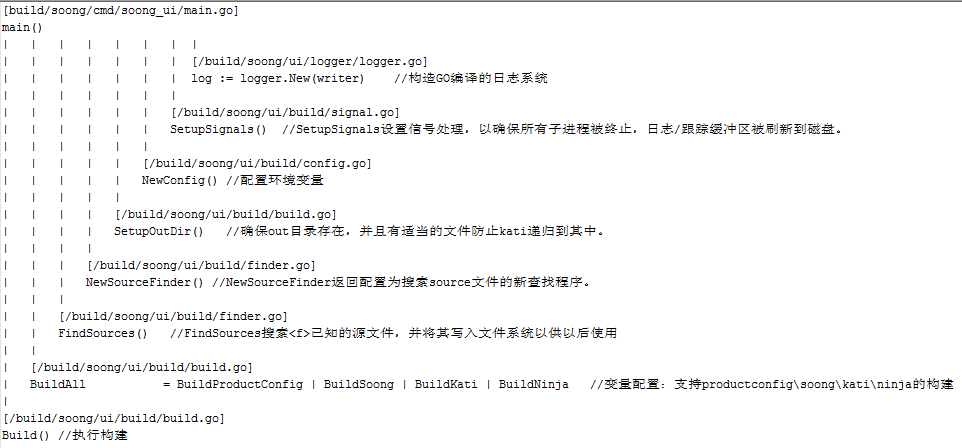
soong_ui 是通过编译 build/soong/cmd/soong_ui/main.go得来,我们接下来分析一下main.go的一些流程
6.3.1 main.go调用栈
6.3.2 main()
soong_ui启动编译的入口
func main() {
       var stdio terminal.StdioInterface
       stdio = terminal.StdioImpl{}

       // dumpvar uses stdout, everything else should be in stderr
       if os.Args[1] == "--dumpvar-mode" || os.Args[1] == "--dumpvars-mode" {
               stdio = terminal.NewCustomStdio(os.Stdin, os.Stderr, os.Stderr)
       }

       writer := terminal.NewWriter(stdio)
       defer writer.Finish()

       log := logger.New(writer)
       defer log.Cleanup()

       if len(os.Args) < 2 || !(inList("--make-mode", os.Args) ||
               os.Args[1] == "--dumpvars-mode" ||
               os.Args[1] == "--dumpvar-mode") {

               log.Fatalln("The `soong` native UI is not yet available.")
       }

       ctx, cancel := context.WithCancel(context.Background())
       defer cancel()

       trace := tracer.New(log)
       defer trace.Close()

       met := metrics.New()

       stat := &status.Status{}
       defer stat.Finish()
       stat.AddOutput(terminal.NewStatusOutput(writer, os.Getenv("NINJA_STATUS"),
               build.OsEnvironment().IsEnvTrue("ANDROID_QUIET_BUILD")))
       stat.AddOutput(trace.StatusTracer())

       build.SetupSignals(log, cancel, func() {
               trace.Close()
               log.Cleanup()
               stat.Finish()
       })

       buildCtx := build.Context{ContextImpl: &build.ContextImpl{
               Context: ctx,
               Logger:  log,
               Metrics: met,
               Tracer:  trace,
               Writer:  writer,
               Status:  stat,
       }}
       var config build.Config
       if os.Args[1] == "--dumpvars-mode" || os.Args[1] == "--dumpvar-mode" {
               config = build.NewConfig(buildCtx)
       } else {
               config = build.NewConfig(buildCtx, os.Args[1:]...)
       }

       build.SetupOutDir(buildCtx, config)

       logsDir := config.OutDir()
       if config.Dist() {
               logsDir = filepath.Join(config.DistDir(), "logs")
       }

       os.MkdirAll(logsDir, 0777)
       log.SetOutput(filepath.Join(logsDir, "soong.log"))
       trace.SetOutput(filepath.Join(logsDir, "build.trace"))
       stat.AddOutput(status.NewVerboseLog(log, filepath.Join(logsDir, "verbose.log")))
       stat.AddOutput(status.NewErrorLog(log, filepath.Join(logsDir, "error.log")))

       defer met.Dump(filepath.Join(logsDir, "build_metrics"))

       if start, ok := os.LookupEnv("TRACE_BEGIN_SOONG"); ok {
               if !strings.HasSuffix(start, "N") {
                       if start_time, err := strconv.ParseUint(start, 10, 64); err == nil {
                               log.Verbosef("Took %dms to start up.",
                                       time.Since(time.Unix(0, int64(start_time))).Nanoseconds()/time.Millisecond.Nanoseconds())
                               buildCtx.CompleteTrace(metrics.RunSetupTool, "startup", start_time, uint64(time.Now().UnixNano()))
                       }
               }

               if executable, err := os.Executable(); err == nil {
                       trace.ImportMicrofactoryLog(filepath.Join(filepath.Dir(executable), "."+filepath.Base(executable)+".trace"))
               }
       }

       // Fix up the source tree due to a repo bug where it doesn't remove
       // linkfiles that have been removed
       fixBadDanglingLink(buildCtx, "hardware/qcom/sdm710/Android.bp")
       fixBadDanglingLink(buildCtx, "hardware/qcom/sdm710/Android.mk")

       f := build.NewSourceFinder(buildCtx, config)
       defer f.Shutdown()
       build.FindSources(buildCtx, config, f)

       if os.Args[1] == "--dumpvar-mode" {
               dumpVar(buildCtx, config, os.Args[2:])
       } else if os.Args[1] == "--dumpvars-mode" {
               dumpVars(buildCtx, config, os.Args[2:])
       } else {
               if config.IsVerbose() {
                       writer.Print("! The argument `showcommands` is no longer supported.")
                       writer.Print("! Instead, the verbose log is always written to a compressed file in the output dir:")
                       writer.Print("!")
                       writer.Print(fmt.Sprintf("!   gzip -cd %s/verbose.log.gz | less -R", logsDir))
                       writer.Print("!")
                       writer.Print("! Older versions are saved in verbose.log.#.gz files")
                       writer.Print("")
                       time.Sleep(5 * time.Second)
               }

               toBuild := build.BuildAll
               if config.Checkbuild() {
                       toBuild |= build.RunBuildTests
               }
               build.Build(buildCtx, config, toBuild)
       }
}
主要执行soong/ui/build/build.go,从build.go就可以看到执行soong的大体流程。
main.go中配置的toBuild为 BuildProductConfig | BuildSoong | BuildKati | BuildNinja,支持productconfigsoongkatininja的构建。
6.3.3 Build调用栈
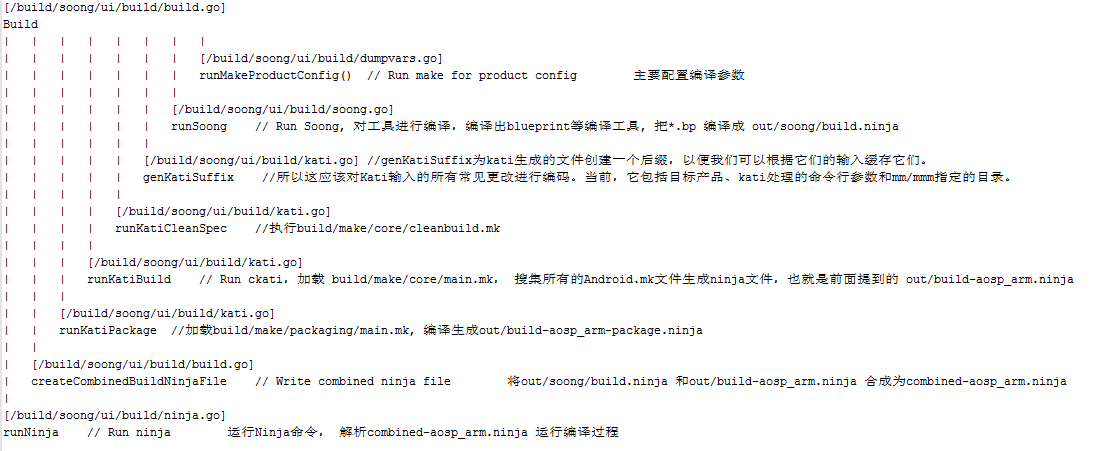
编译步骤如下:
1) runMakeProductConfig 主要配置编译参数
2) runSoong 对工具进行编译,编译出blueprint等编译工具, 把*.bp 编译成 out/soong/build.ninja
/.minibootstrap/build.ninja
- Run minibp to generate .bootstrap/build.ninja (Primary stage) - Run minibp to generate .minibootstrap/build.ninja.in
/.bootstrap/build.ninja
- Build any bootstrap_go_binary rules and dependencies -- usually the primary builder and any build or runtime dependencies. - Run the primary builder to generate build.ninja
3) runKatiBuild, 加载 build/make/core/main.mk, 搜集所有的Android.mk文件生成ninja文件:out/build-aosp_arm.ninja
4) runKatiPackage, 加载build/make/packaging/main.mk, 编译生成out/build-aosp_arm-package.ninja
5) createCombinedBuildNinjaFile,将out/soong/build.ninja 、out/build-aosp_arm.ninja和out/build-aosp_arm-package.ninja, 合成为out/combined-aosp_arm.ninja
6) runNinja,运行Ninja命令, 解析combined-aosp_arm.ninja,执行编译过程
out/combined-aosp_arm.ninja 内容展示如下:
builddir = out
pool local_pool
 depth = 42
build _kati_always_build_: phony
subninja out/build-aosp_arm.ninja
subninja out/build-aosp_arm-package.ninja
subninja out/soong/build.ninja
6.3.4 Build
Build入口
[/build/soong/ui/build/build.go]
func Build(ctx Context, config Config, what int) {
       ctx.Verboseln("Starting build with args:", config.Arguments())
       ctx.Verboseln("Environment:", config.Environment().Environ())

       if config.SkipMake() {
               ctx.Verboseln("Skipping Make/Kati as requested")
               what = what & (BuildSoong | BuildNinja)
       }

       if inList("help", config.Arguments()) {
               help(ctx, config, what)
               return
       } else if inList("clean", config.Arguments()) || inList("clobber", config.Arguments()) {
               clean(ctx, config, what)
               return
       }

       // Make sure that no other Soong process is running with the same output directory
       buildLock := BecomeSingletonOrFail(ctx, config)
       defer buildLock.Unlock()

       checkProblematicFiles(ctx)
       SetupOutDir(ctx, config)
       checkCaseSensitivity(ctx, config)
       ensureEmptyDirectoriesExist(ctx, config.TempDir())
       SetupPath(ctx, config)

       if config.StartGoma() {
               // Ensure start Goma compiler_proxy
               startGoma(ctx, config)
       }

       if what&BuildProductConfig != 0 {
               // Run make for product config
               runMakeProductConfig(ctx, config)
       }

       if inList("installclean", config.Arguments()) {
               installClean(ctx, config, what)
               ctx.Println("Deleted images and staging directories.")
               return
       } else if inList("dataclean", config.Arguments()) {
               dataClean(ctx, config, what)
               ctx.Println("Deleted data files.")
               return
       }

       if what&BuildSoong != 0 {
               // Run Soong
               runSoong(ctx, config)
       }

       if what&BuildKati != 0 {
               // Run ckati
               genKatiSuffix(ctx, config)
               runKatiCleanSpec(ctx, config)
               runKatiBuild(ctx, config)
               runKatiPackage(ctx, config)

               ioutil.WriteFile(config.LastKatiSuffixFile(), []byte(config.KatiSuffix()), 0777)
       } else {
               // Load last Kati Suffix if it exists
               if katiSuffix, err := ioutil.ReadFile(config.LastKatiSuffixFile()); err == nil {
                       ctx.Verboseln("Loaded previous kati config:", string(katiSuffix))
                       config.SetKatiSuffix(string(katiSuffix))
               }
       }

       // Write combined ninja file
       createCombinedBuildNinjaFile(ctx, config)

       if what&RunBuildTests != 0 {
               testForDanglingRules(ctx, config)
       }

       if what&BuildNinja != 0 {
               if !config.SkipMake() {
                       installCleanIfNecessary(ctx, config)
               }

               // Run ninja
               runNinja(ctx, config)
       }
}
6.4 main.mk文件分析
执行runKatiBuild时,有个重要的步骤,就是加载build/make/core/main.mk,main.mk文件是Android Build系统的主控文件。从main.mk开始,将通过include命令将其所有需要的.mk文件包含进来,最终在内存中形成一个包括所有编译脚本的集合,这个相当于一个巨大Makefile文件。Makefile文件看上去很庞大,其实主要由三种内容构成: 变量定义、函数定义和目标依赖规则,此外mk文件之间的包含也很重要。
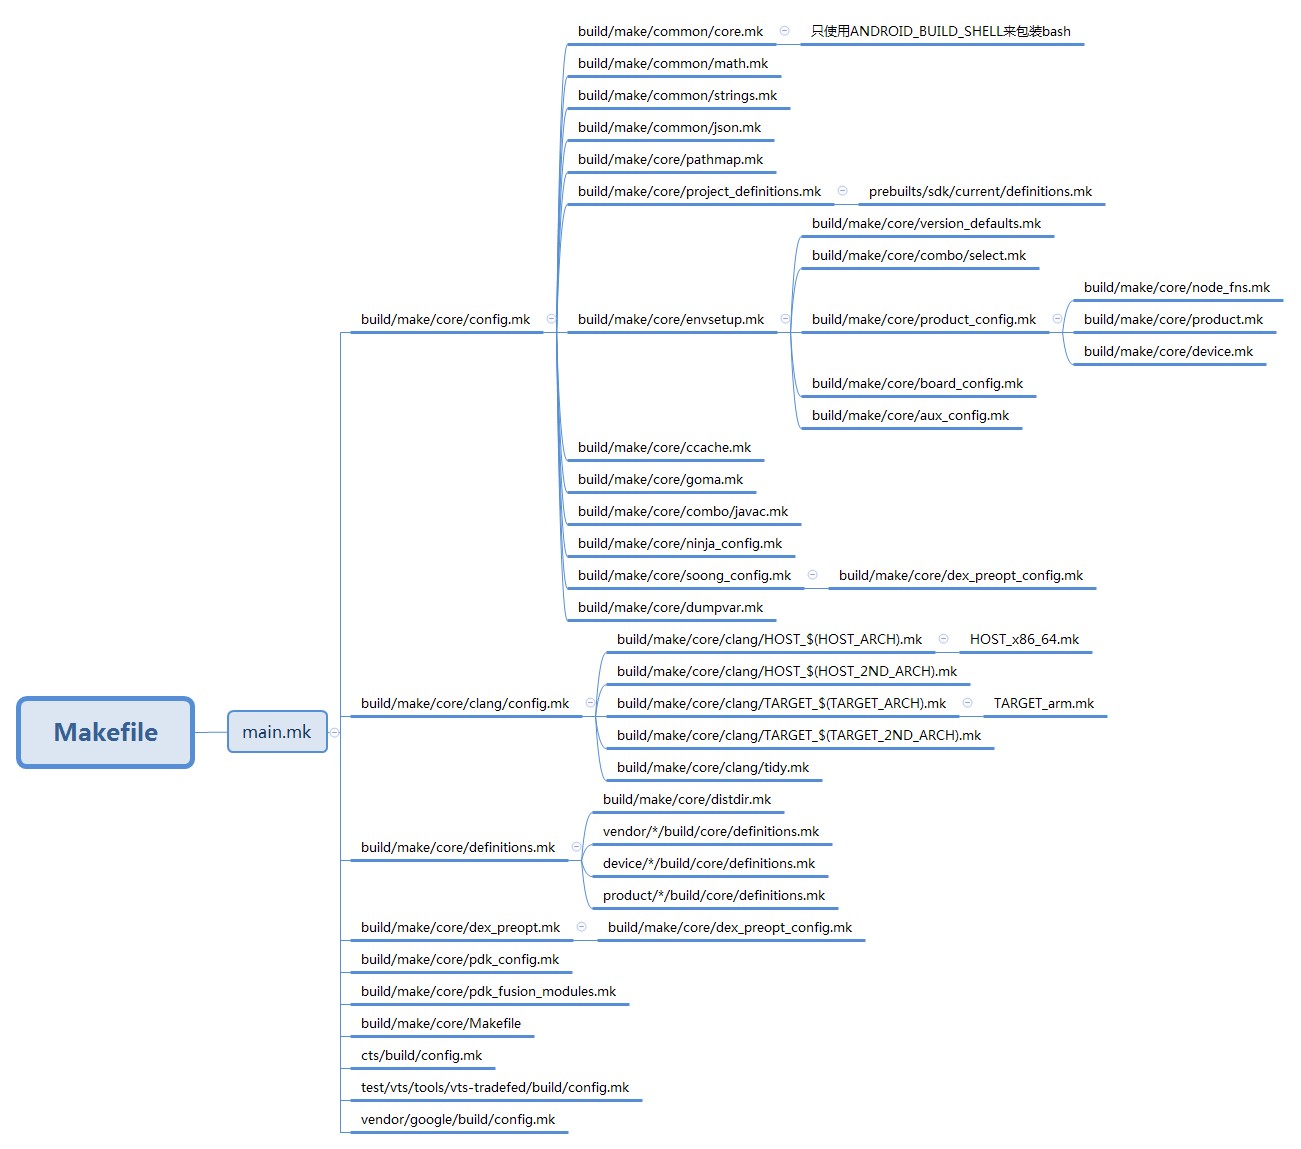
main.mk主要做了以下几件事情:
1.定义编译目标product
2.加载config.mk来初始化相关变量,检测编译环境和目标环境
3.清除规则,清除out目录中的dex文件
4.加载build/croe/definitions.mk,定义了很多通用函数,供编译过程调用
5.加载平台开发工具包 build/make/core/pdk_config.mk
6.加载系统中所有的Android.mk,最终会被存放到out/.module_paths/Android.mk.list
7.Link 类型检查,校验Link
8.要为此产品生成的模块的基本列表由相应的产品定义文件指定,这些定义在"product_config.mk"中
9.运行时APEX库,并进行检查校验
10. 将所有要安装的模块都保存在变量ALL_DEFAULT_INSTALLED_MODULES中,并且将build/core/Makefie文件加载进来。build/core/Makefie文件会根据要安装的模块生成system.img、super.img、boot.img和recovery.img等镜像文件的生成规则
11.定义编译的image目标
12.构建文件,然后将其打包成rom格式
6.4.1 定义编译目标product
流程1:没有KATI命令时,走run_soong_ui执行,通过soong_ui.bash --make-mode 进行编译
流程2:通过kati命令编译时
在Android10.0中,使用的是soong构建,因此直接走流程2
确定了最终的编译目标为droid
ifndef KATI

host_prebuilts := linux-x86
ifeq ($(shell uname),Darwin)
host_prebuilts := darwin-x86
endif

#流程1:没有KATI命令时,走run_soong_ui执行,通过soong_ui.bash --make-mode 进行编译
.PHONY: run_soong_ui
run_soong_ui:
       +@prebuilts/build-tools/$(host_prebuilts)/bin/makeparallel --ninja build/soong/soong_ui.bash --make-mode $(MAKECMDGOALS)

.PHONY: $(MAKECMDGOALS)
$(sort $(MAKECMDGOALS)) : run_soong_ui
       @#empty

else # KATI

#流程2:通过kati命令编译时,走该流程,Android10.0中走该流程
$(info [1/1] initializing build system ...)
....

#1.定义编译目标product
#这是默认目标。它必须是第一个声明的目标。
.PHONY: droid
DEFAULT_GOAL := droid
$(DEFAULT_GOAL): droid_targets

.PHONY: droid_targets
droid_targets:
...
#endif #KATI
6.4.2 加载config.mk
加载config.mk来初始化相关变量,检测编译环境和目标环境,加载clang/config.mk,配置一些编译的环境。
include build/make/core/config.mk
...
#加载out/soong/make_vars-aosp_arm.mk
include $(SOONG_MAKEVARS_MK)

#加载clang编译的一些配置
include $(BUILD_SYSTEM)/clang/config.mk
...
6.4.3清除规则
清除规则,清除out目录中的dex文件。
...
.PHONY: clean-dex-files
clean-dex-files:
       $(hide) find $(OUT_DIR) -name "*.dex" | xargs rm -f
       $(hide) for i in `find $(OUT_DIR) -name "*.jar" -o -name "*.apk"` ; do ((unzip -l $$i 2> /dev/null |
                               grep -q ".dex$$" && rm -f $$i) || continue ) ; done
       @echo "All dex files and archives containing dex files have been removed."
...
6.4.4 加载definitions.mk
加载build/croe/definitions.mk,定义了很多通用函数,供编译过程调用
...
include $(BUILD_SYSTEM)/definitions.mk

#加载dex_preopt.mk
include $(BUILD_SYSTEM)/dex_preopt.mk
endif # KATI
...
6.4.5 加载pdk_config.mk
加载 平台开发工具包
...
include build/make/core/pdk_config.mk

#为userdebug、eng和non-REL生成启用动态链接器警告
ifneq ($(TARGET_BUILD_VARIANT),user)
  ADDITIONAL_BUILD_PROPERTIES += ro.bionic.ld.warning=1
else
#只要user版本不是最终版本,就启用它。
ifneq ($(PLATFORM_VERSION_CODENAME),REL)
  ADDITIONAL_BUILD_PROPERTIES += ro.bionic.ld.warning=1
endif
endif
...
6.4.6 加载系统所有的Android.mk
加载系统中所有的Android.mk,最终会被存放到out/.module_paths/Android.mk.list。
如果环境变量ONE_SHOT_MAKEFILE的值不等于空,也就是我们执行的是mm或者mmm命令,那么就表示要编译的是特定的模块。
这些指定要编译的模块的Android.mk文件路径就保存在环境变量ONE_SHOT_MAKEFILE中,因此直接将这些Android,mk文件加载进来就获得相应的编译规则。
如果环境变量ONE_SHOT_MAKEFILE的值等于空,且dont_bother不为true,会通过out/soong/Android-aosp_arm.mk 来获得Android源代码工程下的所有Android.mk文件的路径列表,并存入到out/.module_paths/Android.mk.list 中。
...
ifneq ($(ONE_SHOT_MAKEFILE),)

#我们可能已经被带有子目录makefile的“mm” shell函数调用了。
include $(SOONG_ANDROID_MK) $(wildcard $(ONE_SHOT_MAKEFILE))
# Change CUSTOM_MODULES to include only modules that were
# defined by this makefile; this will install all of those
# modules as a side-effect.  Do this after including ONE_SHOT_MAKEFILE
# so that the modules will be installed in the same place they
# would have been with a normal make.
CUSTOM_MODULES := $(sort $(call get-tagged-modules,$(ALL_MODULE_TAGS)))


#帮助目标打印出安装路径
define register_module_install_path
.PHONY: GET-MODULE-INSTALL-PATH-$(1)
GET-MODULE-INSTALL-PATH-$(1):
       echo 'INSTALL-PATH: $(1) $(ALL_MODULES.$(1).INSTALLED)'
endef

SORTED_ALL_MODULES := $(sort $(ALL_MODULES))
UNIQUE_ALL_MODULES :=
$(foreach m,$(SORTED_ALL_MODULES),
    $(if $(call streq,$(m),$(lastword $(UNIQUE_ALL_MODULES))),,
        $(eval UNIQUE_ALL_MODULES += $(m))))
SORTED_ALL_MODULES :=

$(foreach mod,$(UNIQUE_ALL_MODULES),$(if $(ALL_MODULES.$(mod).INSTALLED),
    $(eval $(call register_module_install_path,$(mod)))
    $(foreach path,$(ALL_MODULES.$(mod).PATH),
        $(eval my_path_prefix := GET-INSTALL-PATH-IN)
        $(foreach component,$(subst /,$(space),$(path)),
            $(eval my_path_prefix := $$(my_path_prefix)-$$(component))
            $(eval .PHONY: $$(my_path_prefix))
            $(eval $$(my_path_prefix): GET-MODULE-INSTALL-PATH-$(mod))))))
UNIQUE_ALL_MODULES :=

else # ONE_SHOT_MAKEFILE

ifneq ($(dont_bother),true)
FULL_BUILD := true

#包括系统中的所有makefile :out/.module_paths/Android.mk.list
subdir_makefiles := $(SOONG_ANDROID_MK) $(file <$(OUT_DIR)/.module_paths/Android.mk.list)
subdir_makefiles_total := $(words int $(subdir_makefiles) post finish)
.KATI_READONLY := subdir_makefiles_total

$(foreach mk,$(subdir_makefiles),$(info [$(call inc_and_print,subdir_makefiles_inc)/$(subdir_makefiles_total)] including $(mk) ...)$(eval include $(mk)))

ifneq (,$(PDK_FUSION_PLATFORM_ZIP)$(PDK_FUSION_PLATFORM_DIR))

# 加载pdk_fusion_modules.mk
include $(BUILD_SYSTEM)/pdk_fusion_modules.mk
endif # PDK_FUSION_PLATFORM_ZIP || PDK_FUSION_PLATFORM_DIR

droid_targets : blueprint_tools

endif # dont_bother

endif # ONE_SHOT_MAKEFILE
...
6.4.7 Link检查
编译时的Link 类型检查,校验Link
...

#Link 类型检查
#“ALL_LINK_TYPES”包含所有链接类型前缀的列表(通常每个模块一个,但是apk可以“链接”到java和本机代码)。
#链接类型前缀由intermediates dir所需的所有信息组成:
#
#  LINK_TYPE:TARGET:_:2ND:STATIC_LIBRARIES:libfoo
#
#所有未在“允许”或“警告”中列出的依赖关系链接类型都将成为错误
link_type_error :=

define link-type-prefix-base
$(word 2,$(subst :,$(space),$(1)))
endef
define link-type-prefix
$(if $(filter AUX-%,$(link-type-prefix-base)),$(patsubst AUX-%,AUX,$(link-type-prefix-base)),$(link-type-prefix-base))
endef
define link-type-aux-variant
$(if $(filter AUX-%,$(link-type-prefix-base)),$(patsubst AUX-%,%,$(link-type-prefix-base)))
endef
define link-type-common
$(patsubst _,,$(word 3,$(subst :,$(space),$(1))))
endef
define link-type-2ndarchprefix
$(patsubst _,,$(word 4,$(subst :,$(space),$(1))))
endef
define link-type-class
$(word 5,$(subst :,$(space),$(1)))
endef
define link-type-name
$(word 6,$(subst :,$(space),$(1)))
endef
define link-type-os
$(strip $(eval _p := $(link-type-prefix))
  $(if $(filter HOST HOST_CROSS,$(_p)),
    $($(_p)_OS),
    $(if $(filter AUX,$(_p)),AUX,android)))
endef
define link-type-arch
$($(link-type-prefix)_$(link-type-2ndarchprefix)ARCH)
endef
define link-type-name-variant
$(link-type-name) ($(link-type-class) $(link-type-os)-$(link-type-arch))
endef

...
# 验证$(1)是否可以链接到$(2)
# $(1)和$(2)都是上面定义的链接类型前缀
define verify-link-type
$(foreach t,$($(2).TYPE),
  $(if $(filter-out $($(1).ALLOWED),$(t)),
    $(if $(filter $(t),$($(1).WARN)),
      $(call link-type-warning,$(1),$(2),$(t)),
      $(call link-type-error,$(1),$(2),$(t)))))
endef

#验证所有分支/配置都有合理的警告/错误,并删除此重写
verify-link-type = $(eval $$(1).MISSING := true)
...
6.4.8 加载product_config.mk
要为此产品生成的模块的基本列表由相应的产品定义文件指定,这些定义在"product_config.mk"中
...
#列出特定产品安装的大多数文件,包括:
# - PRODUCT_PACKAGES, and their LOCAL_REQUIRED_MODULES
# - PRODUCT_COPY_FILES
# 要为此产品生成的模块的基本列表由相应的产品定义文件指定,这些定义在"product_config.mk"中
define product-installed-files
  $(eval _mk := $(strip $(1)))
  $(eval _pif_modules :=
    $(PRODUCTS.$(_mk).PRODUCT_PACKAGES)
    $(if $(filter eng,$(tags_to_install)),$(PRODUCTS.$(_mk).PRODUCT_PACKAGES_ENG))
    $(if $(filter debug,$(tags_to_install)),$(PRODUCTS.$(_mk).PRODUCT_PACKAGES_DEBUG))
    $(if $(filter tests,$(tags_to_install)),$(PRODUCTS.$(_mk).PRODUCT_PACKAGES_TESTS))
    $(if $(filter asan,$(tags_to_install)),$(PRODUCTS.$(_mk).PRODUCT_PACKAGES_DEBUG_ASAN))
    $(call auto-included-modules)
  )
  $(eval ### Filter out the overridden packages and executables before doing expansion)
  $(eval _pif_overrides := $(call module-overrides,$(_pif_modules)))
  $(eval _pif_modules := $(filter-out $(_pif_overrides), $(_pif_modules)))
  $(eval ### Resolve the :32 :64 module name)
  $(eval _pif_modules_32 := $(patsubst %:32,%,$(filter %:32, $(_pif_modules))))
  $(eval _pif_modules_64 := $(patsubst %:64,%,$(filter %:64, $(_pif_modules))))
  $(eval _pif_modules_rest := $(filter-out %:32 %:64,$(_pif_modules)))
  $(eval ### Note for 32-bit product, 32 and 64 will be added as their original module names.)
  $(eval _pif_modules := $(call get-32-bit-modules-if-we-can, $(_pif_modules_32)))
  $(eval _pif_modules += $(_pif_modules_64))
  $(eval ### For the rest we add both)
  $(eval _pif_modules += $(call get-32-bit-modules, $(_pif_modules_rest)))
  $(eval _pif_modules += $(_pif_modules_rest))
  $(call expand-required-modules,_pif_modules,$(_pif_modules),$(_pif_overrides))
  $(filter-out $(HOST_OUT_ROOT)/%,$(call module-installed-files, $(_pif_modules)))
  $(call resolve-product-relative-paths,
    $(foreach cf,$(PRODUCTS.$(_mk).PRODUCT_COPY_FILES),$(call word-colon,2,$(cf))))
endef
...
6.4.9 运行APEX库
运行时APEX库,并进行检查校验
...
APEX_MODULE_LIBS :=
  libadbconnection.so
  libadbconnectiond.so
  libandroidicu.so
  libandroidio.so
  libart-compiler.so
  libart-dexlayout.so
  libart-disassembler.so
  libart.so
  libartbase.so
  libartbased.so
  libartd-compiler.so
  libartd-dexlayout.so
  libartd.so
  libartpalette.so
  libc.so
  libdexfile.so
  libdexfile_external.so
  libdexfiled.so
  libdexfiled_external.so
  libdl.so
  libdt_fd_forward.so
  libdt_socket.so
  libicui18n.so
  libicuuc.so
  libjavacore.so
  libjdwp.so
  libm.so
  libnativebridge.so
  libnativehelper.so
  libnativeloader.so
  libnpt.so
  libopenjdk.so
  libopenjdkjvm.so
  libopenjdkjvmd.so
  libopenjdkjvmti.so
  libopenjdkjvmtid.so
  libpac.so
  libprofile.so
  libprofiled.so
  libsigchain.so

# Conscrypt APEX libraries
APEX_MODULE_LIBS +=
  libjavacrypto.so

...
#如果下面的检查失败,那么某些库已经在system/lib或system/lib64中结束,而这些库只打算放入一些APEX包中。
#可能的原因是/system中的库或二进制文件已经增长了一个直接或间接拉入禁止的库的依赖关系。
#要解决此问题,请查找库所属的APEX包-在“APEX”构建模块中的“native_shared_lib”属性中搜索它(参见art/build/APEX/安卓.bp例如)。
#然后检查APEX包中是否有应该使用的导出库,即在其“native_shared_lib”属性中列出的库,对应的“cc_library”模块具有“stubs”子句(如art/libdexfile中的libdexfile_external)/安卓.bp).
#如果您找不到适合您需要的APEX导出库,或者您认为/system中应该允许您依赖的库,那么请与包含该库的APEX包的所有者联系。
#如果在APEX中导出的库出现此错误,则APEX可能配置错误,或者生成系统中出现错误。
#请联系APEX包主和/或soong-team@,或android-building@googlegroups.com外部的。
  define check-apex-libs-absence
    $(call maybe-print-list-and-error,
      $(filter $(foreach lib,$(APEX_MODULE_LIBS),%/$(lib)),
        $(filter-out $(foreach dir,$(APEX_LIBS_ABSENCE_CHECK_EXCLUDE),
                       $(TARGET_OUT)/$(if $(findstring %,$(dir)),$(dir),$(dir)/%)),
          $(filter $(TARGET_OUT)/lib/% $(TARGET_OUT)/lib64/%,$(1)))),
      APEX libraries found in system image (see comment for check-apex-libs-absence in
      build/make/core/main.mk for details))
  endef

  # TODO(b/129006418): The check above catches libraries through product
  # dependencies visible to make, but as long as they have install rules in
  # /system they may still be created there through other make targets. To catch
  # that we also do a check on disk just before the system image is built.
  define check-apex-libs-absence-on-disk
    $(hide) (
      cd $(TARGET_OUT) &&
      findres=$$(find lib*
        $(foreach dir,$(APEX_LIBS_ABSENCE_CHECK_EXCLUDE),-path "$(subst %,*,$(dir))" -prune -o)
        -type f ( -false $(foreach lib,$(APEX_MODULE_LIBS),-o -name $(lib)) )
        -print) &&
      if [ -n "$$findres" ]; then
        echo "APEX libraries found in system image (see comment for check-apex-libs-absence" 1>&2;
        echo "in build/make/core/main.mk for details):" 1>&2;
        echo "$$findres" | sort 1>&2;
        false;
      fi;
    )
  endef
endif
...
6.4.10 保存所有模块
将所有要安装的模块都保存在变量ALL_DEFAULT_INSTALLED_MODULES中,并且将build/core/Makefie文件加载进来。
...
#build/core/Makefie文件会根据要安装的模块生成system.img、super.img、boot.img和recovery.img等镜像文件的生成规则
# TODO: Remove the 3 places in the tree that use ALL_DEFAULT_INSTALLED_MODULES
# and get rid of it from this list.
modules_to_install := $(sort
    $(ALL_DEFAULT_INSTALLED_MODULES)
    $(product_target_FILES)
    $(product_host_FILES)
    $(call get-tagged-modules,$(tags_to_install))
    $(CUSTOM_MODULES)
  )
...
#build/make/core/Makefile包含了我们不想污染这个顶级Makefile的额外内容。
#它希望“ALL_DEFAULT_INSTALLED_MODULES”包含当前make期间构建的所有模块,但它还进一步扩展了“ALL_DEFAULT_INSTALLED_MODULES”。
ALL_DEFAULT_INSTALLED_MODULES := $(modules_to_install)
include $(BUILD_SYSTEM)/Makefile
modules_to_install := $(sort $(ALL_DEFAULT_INSTALLED_MODULES))
ALL_DEFAULT_INSTALLED_MODULES :=

...
#这是用来获得正确的秩序,你也可以使用这些,但他们被认为是没有文件,所以不要抱怨,如果他们的行为改变。
#依赖于所有复制头的内部目标(请参见复制_标题.make). 需要首先复制头的其他目标可以依赖于此目标。
.PHONY: all_copied_headers
all_copied_headers: ;

$(ALL_C_CPP_ETC_OBJECTS): | all_copied_headers

# All the droid stuff, in directories
.PHONY: files
files: $(modules_to_install)
       $(INSTALLED_ANDROID_INFO_TXT_TARGET)
...
6.4.11定义编译的image目标
定义了我们编译过程中的所有image目标
...
.PHONY: ramdisk
ramdisk: $(INSTALLED_RAMDISK_TARGET)

.PHONY: ramdisk_debug
ramdisk_debug: $(INSTALLED_DEBUG_RAMDISK_TARGET)

.PHONY: systemtarball
systemtarball: $(INSTALLED_SYSTEMTARBALL_TARGET)

.PHONY: boottarball
boottarball: $(INSTALLED_BOOTTARBALL_TARGET)

.PHONY: userdataimage
userdataimage: $(INSTALLED_USERDATAIMAGE_TARGET)

ifneq (,$(filter userdataimage, $(MAKECMDGOALS)))
$(call dist-for-goals, userdataimage, $(BUILT_USERDATAIMAGE_TARGET))
endif

.PHONY: userdatatarball
userdatatarball: $(INSTALLED_USERDATATARBALL_TARGET)

.PHONY: cacheimage
cacheimage: $(INSTALLED_CACHEIMAGE_TARGET)

.PHONY: bptimage
bptimage: $(INSTALLED_BPTIMAGE_TARGET)

.PHONY: vendorimage
vendorimage: $(INSTALLED_VENDORIMAGE_TARGET)

.PHONY: productimage
productimage: $(INSTALLED_PRODUCTIMAGE_TARGET)

.PHONY: productservicesimage
productservicesimage: $(INSTALLED_PRODUCT_SERVICESIMAGE_TARGET)

.PHONY: odmimage
odmimage: $(INSTALLED_ODMIMAGE_TARGET)

.PHONY: systemotherimage
systemotherimage: $(INSTALLED_SYSTEMOTHERIMAGE_TARGET)

.PHONY: superimage_empty
superimage_empty: $(INSTALLED_SUPERIMAGE_EMPTY_TARGET)

.PHONY: bootimage
bootimage: $(INSTALLED_BOOTIMAGE_TARGET)

.PHONY: bootimage_debug
bootimage_debug: $(INSTALLED_DEBUG_BOOTIMAGE_TARGET)

.PHONY: vbmetaimage
vbmetaimage: $(INSTALLED_VBMETAIMAGE_TARGET)

.PHONY: auxiliary
auxiliary: $(INSTALLED_AUX_TARGETS)
...
6.4.12 构建系统,打包rom
构建文件,然后将其打包成rom格式
...
.PHONY: droidcore
droidcore: $(filter $(HOST_OUT_ROOT)/%,$(modules_to_install))
    $(INSTALLED_SYSTEMIMAGE_TARGET)
    $(INSTALLED_RAMDISK_TARGET)
    $(INSTALLED_BOOTIMAGE_TARGET)
    $(INSTALLED_DEBUG_RAMDISK_TARGET)
    $(INSTALLED_DEBUG_BOOTIMAGE_TARGET)
    $(INSTALLED_RECOVERYIMAGE_TARGET)
    $(INSTALLED_VBMETAIMAGE_TARGET)
    $(INSTALLED_USERDATAIMAGE_TARGET)
    $(INSTALLED_CACHEIMAGE_TARGET)
    $(INSTALLED_BPTIMAGE_TARGET)
    $(INSTALLED_VENDORIMAGE_TARGET)
    $(INSTALLED_ODMIMAGE_TARGET)
    $(INSTALLED_SUPERIMAGE_EMPTY_TARGET)
    $(INSTALLED_PRODUCTIMAGE_TARGET)
    $(INSTALLED_SYSTEMOTHERIMAGE_TARGET)
    $(INSTALLED_FILES_FILE)
    $(INSTALLED_FILES_JSON)
    $(INSTALLED_FILES_FILE_VENDOR)
    $(INSTALLED_FILES_JSON_VENDOR)
    $(INSTALLED_FILES_FILE_ODM)
    $(INSTALLED_FILES_JSON_ODM)
    $(INSTALLED_FILES_FILE_PRODUCT)
    $(INSTALLED_FILES_JSON_PRODUCT)
    $(INSTALLED_FILES_FILE_PRODUCT_SERVICES)
    $(INSTALLED_FILES_JSON_PRODUCT_SERVICES)
    $(INSTALLED_FILES_FILE_SYSTEMOTHER)
    $(INSTALLED_FILES_JSON_SYSTEMOTHER)
    $(INSTALLED_FILES_FILE_RAMDISK)
    $(INSTALLED_FILES_JSON_RAMDISK)
    $(INSTALLED_FILES_FILE_DEBUG_RAMDISK)
    $(INSTALLED_FILES_JSON_DEBUG_RAMDISK)
    $(INSTALLED_FILES_FILE_ROOT)
    $(INSTALLED_FILES_JSON_ROOT)
    $(INSTALLED_FILES_FILE_RECOVERY)
    $(INSTALLED_FILES_JSON_RECOVERY)
    $(INSTALLED_ANDROID_INFO_TXT_TARGET)
    auxiliary
    soong_docs
...

#构建一个完整的系统——默认情况下是构建droidcore
droid_targets: droidcore dist_files
...
7 总结
至此,make的流程我们基本理清了,后面还有ninja是如何把build.ninja编译出来的,image如何打包的,我们后面继续分析。
我的微信公众号:IngresGe

最后
以上就是友好小天鹅最近收集整理的关于make编译过程-Android10.0编译系统(三)1 概述2 Android系统的编译历程3 Soong编译系统家族成员 4 make的流程图5 make() 6 soong_ui.bash6.1 soong_ui.bash调用栈6.2 [build/soong/soong_ui.bash]6.2.1 [/soong/../microfactory.bash]6.2.2 [/blueprint/../microfactory.bash]6.3 soong_ui6.3.1 main.go调用的全部内容,更多相关make编译过程-Android10.0编译系统(三)1内容请搜索靠谱客的其他文章。


![make编译过程-Android10.0编译系统(三)1 概述2 Android系统的编译历程3 Soong编译系统家族成员 4 make的流程图5 make() 6 soong_ui.bash6.1 soong_ui.bash调用栈6.2 [build/soong/soong_ui.bash]6.2.1 [/soong/../microfactory.bash]6.2.2 [/blueprint/../microfactory.bash]6.3 soong_ui6.3.1 main.go调用](https://www.shuijiaxian.com/files_image/reation/bcimg13.png)


发表评论 取消回复