直接anzhuang
sudo apt-get install ffmpeg
不一定好使
Linux下编译安装FFmpeg
##安装yasm
下载yasm源码,链接:http://www.tortall.net/projects/yasm/releases/yasm-1.3.0.tar.gz,并进行解压,然后执行:
cd yasm-1.3.0
./configure
make
sudo make install
##安装依赖
sudo apt-get install libfaac-dev libmp3lame-dev libtheora-dev libvorbis-dev libopencore-amrnb-dev libopencore-amrwb-dev libgsm1-dev zlib1g-dev libgpac1-dev
安装libfdk_aac
http://sourceforge.net/projects/opencore-amr/?source=directory
下载fdk-aac-XXXtar.gz ,解压后执行,
./configure
sudo make
sudo make install
##安装x264
下载源码:
git clone --depth 1 git://git.videolan.org/x264
进入源码目录:
cd x264
./configure --enable-shared
如果提示:
 ./configure --enable-shared
Found no assembler
Minimum version is nasm-2.13
If you really want to compile without asm, configure with --disable-asm.
加上–disable-asm,即执行:
./configure --enable-shared --disable-asm
再执行:
sudo make install
##安装ffmpeg
到ffmpeg 官网 https://ffmpeg.org/download.html 挑选你要升级到的版本,这里下载的是http://www.ffmpeg.org/releases/ffmpeg-3.4.2.tar.gz,解压完成后进行编译安装
cd ffmpeg-3.4.2
./configure --enable-shared --enable-pthreads --enable-version3 --enable-hardcoded-tables --enable-avresample --cc=clang --host-cflags= --host-ldflags= --disable-jack --enable-gpl --enable-libmp3lame --enable-libx264 --enable-libxvid --enable-opencl --disable-lzma

sudo make
sudo make install
对于FFmpeg编译选项的说明可以参照:
https://blog.csdn.net/yzhang6_10/article/details/77104211
动态链接库
vi /etc/ld.so.conf
加入:/usr/local/lib ##示自己的安装目录而定,/usr/local/lib是默认安装位置

#执行
sudo ldconfig
添加ffmpeg到环境变量
vi /etc/profile

#加入以下内容:
FFMPEG=/usr/local ##示自己的安装目录而定
PATH加入:$FFMPEG/bin

#让环境变量生效
sudo source /etc/profile
验证安装是否成功:
#执行
ffmpeg -version
#输出:
ffmpeg version 3.4.2 Copyright (c) 2000-2018 the FFmpeg developers
built with gcc 4.8.2 (GCC)
configuration: --enable-shared --enable-libx264 --enable-gpl --enable-avresample
libavutil      55. 78.100 / 55. 78.100
libavcodec     57.107.100 / 57.107.100
libavformat    57. 83.100 / 57. 83.100
libavdevice    57. 10.100 / 57. 10.100
libavfilter     6.107.100 /  6.107.100
libavresample   3.  7.  0 /  3.  7.  0
libswscale      4.  8.100 /  4.  8.100
libswresample   2.  9.100 /  2.  9.100
libpostproc    54.  7.100 / 54.  7.100
##问题
###问题1
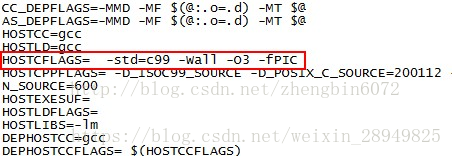
/usr/bin/ld: libavcodec/mqc.o: relocation R_X86_64_32 against `.rodata' can not be used when making a shared object; recompile with -fPIC

libavcodec/mqc.o: error adding symbols: Bad value

collect2: error: ld returned 1 exit status
解决办法:
在config.mak文件Line88(不同版本位置可能不同)加上-fPIC,然后重新编译。
可是重新编译,还是一样无法通过,原因是因为开始编译的时候有生成.o文件,需要先make clean后再重新编译。

###问题2
ffmpeg: error while loading shared libraries: libavdevice.so.52: cannot open shared object file: No such file or directory
#执行,看看软链接是否建立
ldd `which ffmpeg`
        libavdevice.so.52 => not found
        libavfilter.so.1 => not found
        libavformat.so.52 => not found
        libavcodec.so.52 => not found
        libswscale.so.0 => not found
        libavcore.so.0 => not found
        libavutil.so.50 => not found
        libm.so.6 => /lib/libm.so.6 (0x006c3000)
        libpthread.so.0 => /lib/libpthread.so.0 (0x007e9000)
        libc.so.6 => /lib/libc.so.6 (0x00575000)
        /lib/ld-linux.so.2 (0x00557000)
解决办法:
https://forum.ivorde.com/ffmpeg-error-while-loading-shared-libraries-libavdevice-so-52-cannot-open-shared-object-file-no-t129.html
https://stackoverflow.com/questions/12901706/ffmpeg-error-in-linux
也有可能是该库并未安装之类的,只需在./configure时加上该库即可
参考链接:
https://blog.csdn.net/hejjunlin/article/details/52402759
https://blog.csdn.net/A632189007/article/details/78422037
https://blog.csdn.net/zhengbin6072/article/details/78476380
最后
以上就是笑点低电脑最近收集整理的关于Linux下FFmpeg安装教程直接anzhuangLinux下编译安装FFmpeg的全部内容,更多相关Linux下FFmpeg安装教程直接anzhuangLinux下编译安装FFmpeg内容请搜索靠谱客的其他文章。


发表评论 取消回复