首先MainActivity的布局如下所示:
<?xml version="1.0" encoding="utf-8"?>
<androidx.constraintlayout.widget.ConstraintLayout xmlns:android="http://schemas.android.com/apk/res/android"
    xmlns:app="http://schemas.android.com/apk/res-auto"
    xmlns:tools="http://schemas.android.com/tools"
    android:layout_width="match_parent"
    android:layout_height="match_parent"
    tools:context=".MainActivity">

    <Button
        android:id="@+id/btn"
        android:layout_width="wrap_content"
        android:layout_height="wrap_content"
        android:text="Hello World!"
        app:layout_constraintBottom_toBottomOf="parent"
        app:layout_constraintLeft_toLeftOf="parent"
        app:layout_constraintRight_toRightOf="parent"
        app:layout_constraintTop_toTopOf="parent" />

</androidx.constraintlayout.widget.ConstraintLayout>
在kotlin中控件的初始化可以通过以下方式完成:
第一种:用懒加载的方式初始化:
package com.example.mykotlintwo
import androidx.appcompat.app.AppCompatActivity
import android.os.Bundle
import android.widget.Button
import android.widget.Toast

class MainActivity : AppCompatActivity() {
    private  val mBtn: Button by lazy {
        findViewById(R.id.btn)
    }

    override fun onCreate(savedInstanceState: Bundle?) {
        super.onCreate(savedInstanceState)
        setContentView(R.layout.activity_main)
        mBtn.setOnClickListener{
            Toast.makeText(this, "点击了", Toast.LENGTH_SHORT).show()
        }

    }
}
第二种:延迟初始化方式:
package com.example.mykotlintwo
import androidx.appcompat.app.AppCompatActivity
import android.os.Bundle
import android.widget.Button
import android.widget.Toast
class MainActivity : AppCompatActivity() {
private lateinit var mBtn: Button
override fun onCreate(savedInstanceState: Bundle?) {
super.onCreate(savedInstanceState)
setContentView(R.layout.activity_main)
mBtn.setOnClickListener{
Toast.makeText(this, "点击了", Toast.LENGTH_SHORT).show()
}
}
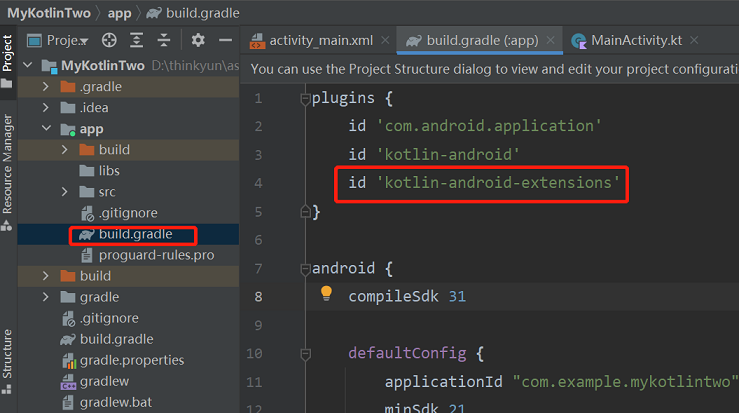
}第三种:使用kotlin-android-extensions插件,省去了 findViewById()来实例化控件。
首先需要在你的app的build.gradle文件添加插件,如下图所示:
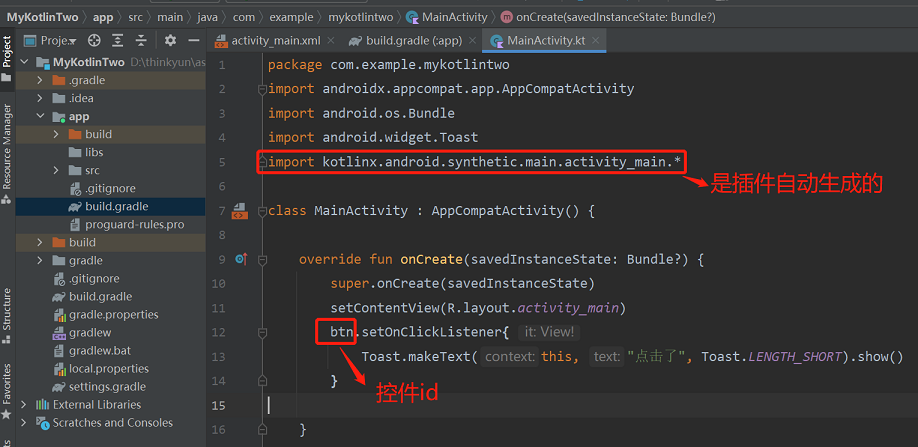
其中kotlinx.android.synthetic.main.activity_main.*是kotlin-android-extensions插件自动生成的
最后
以上就是冷酷悟空最近收集整理的关于Kotlin初始化控件及点击监听事件的全部内容,更多相关Kotlin初始化控件及点击监听事件内容请搜索靠谱客的其他文章。
本图文内容来源于网友提供,作为学习参考使用,或来自网络收集整理,版权属于原作者所有。


发表评论 取消回复