通常我们都是通过CDROM的方式来安装IBM AIX操作系统,但如果服务器没有光驱,或者需要安装多台服务器的时候为了提高工作效率,可以考虑使用这里的方法。这篇文章将详细讨论使用磁盘克隆和U盘安装的方式安装AIX操作系统,这两种方法都需要有已经成功安装的AIX操作系统的支持。
一.磁盘克隆安装操作系统。
1.操作系统环境。
# oslevel -s
6100-04-10-1119
# bootlist -m normal -o
cd0
hdisk0 pathid=0
ent0 speed=auto duplex=auto bserver=000.000.000.000 client=000.000.000.000 gateway=000.000.000.000
# lspv
hdisk0 00cc1ad4ef095bf0 rootvg active
hdisk1 00cc1ad46aff307f None
2.使用alt_disk_install工具克隆磁盘。
# alt_disk_install -OCB hdisk1
+-----------------------------------------------------------------------------+
ATTENTION: calling new module /usr/sbin/alt_disk_copy. Please see the alt_disk_copy man page
and documentation for more details.
Executing command: {/usr/sbin/alt_disk_copy -O -B -d "hdisk1"}
+-----------------------------------------------------------------------------+
Calling mkszfile to create new /image.data file.
Checking disk sizes.
Creating cloned rootvg volume group and associated logical volumes.
Creating logical volume alt_hd5
Creating logical volume alt_hd6
Creating logical volume alt_hd8
Creating logical volume alt_hd4
Creating logical volume alt_hd2
Creating logical volume alt_hd9var
Creating logical volume alt_hd3
Creating logical volume alt_hd1
Creating logical volume alt_hd10opt
Creating logical volume alt_hd11admin
Creating logical volume alt_livedump
Creating /alt_inst/ file system.
/alt_inst filesystem not converted.
Small inode extents are already enabled.
Creating /alt_inst/admin file system.
/alt_inst/admin filesystem not converted.
Small inode extents are already enabled.
Creating /alt_inst/home file system.
/alt_inst/home filesystem not converted.
Small inode extents are already enabled.
Creating /alt_inst/opt file system.
/alt_inst/opt filesystem not converted.
Small inode extents are already enabled.
Creating /alt_inst/tmp file system.
/alt_inst/tmp filesystem not converted.
Small inode extents are already enabled.
Creating /alt_inst/usr file system.
/alt_inst/usr filesystem not converted.
Small inode extents are already enabled.
Creating /alt_inst/var file system.
/alt_inst/var filesystem not converted.
Small inode extents are already enabled.
Creating /alt_inst/var/adm/ras/livedump file system.
/alt_inst/var/adm/ras/livedump filesystem not converted.
Small inode extents are already enabled.
Generating a list of files
for backup and restore into the alternate file system...
Backing-up the rootvg files and restoring them to the
alternate file system...
Modifying ODM on cloned disk.
Building boot image on cloned disk.
Resetting all device attributes.
NOTE: The first boot from altinst_rootvg will prompt to define the new
system console.
Resetting all device attributes.
NOTE: The first boot from altinst_rootvg will prompt to define the new
system console.
forced unmount of /alt_inst/var/adm/ras/livedump
forced unmount of /alt_inst/var/adm/ras/livedump
forced unmount of /alt_inst/var
forced unmount of /alt_inst/var
forced unmount of /alt_inst/usr
forced unmount of /alt_inst/usr
forced unmount of /alt_inst/tmp
forced unmount of /alt_inst/tmp
forced unmount of /alt_inst/opt
forced unmount of /alt_inst/opt
forced unmount of /alt_inst/home
forced unmount of /alt_inst/home
forced unmount of /alt_inst/admin
forced unmount of /alt_inst/admin
forced unmount of /alt_inst
forced unmount of /alt_inst
Changing logical volume names in volume group descriptor area.
Fixing LV control blocks...
Fixing file system superblocks...
执行这个命令需要bos.alt_disk_install.rte软件包。
alt_disk_install -OCB hdisk1
这个命令克隆的盘,可以拿到不同硬件配置的服务器上使用,使用它进行引导时,会删除ODM库里的所有信息,根据硬件重新配置所有设备信息,相当于使用克隆盘重新安装新的系统。
alt_disk_install -CB hdisk1
如果是相同硬件配置的机器,则可以运行这个命令克隆磁盘,保持所有设备信息。
3.查看克隆情况。
hdisk0 00cc1ad4ef095bf0 rootvg active
hdisk1 00cc1ad46aff307f altinst_rootvg
hdisk1对应的卷组名为altinst_rootvg。
# bootlist -o -m normal
cd0
hdisk0 pathid=0
ent0 speed=auto duplex=auto bserver=000.000.000.000 client=000.000.000.000 gateway=000.000.000.000
查看引导列表,未发生变化。
4.重启操作系统。
# lspv
hdisk0 00cc1ad4ef095bf0 rootvg active
hdisk1 00cc1ad46aff307f altinst_rootvg
# bootlist -o -m normal
cd0
hdisk0 pathid=0
ent0 speed=auto duplex=auto bserver=000.000.000.000 client=000.000.000.000 gateway=000.000.000.000
卷组名和引导顺序未发生变化。
5.拔掉克隆磁盘。
关闭操作系统,拔掉hdisk1,重启源服务器,查看服务器情况:
# lspv
hdisk0 00cc1ad4ef095bf0 rootvg active
# lsdev -Cc disk
hdisk0 Available 01-08-00 SAS Disk Drive
hdisk1 Defined 01-08-00 SAS Disk Drive
删除被拔掉的磁盘:
# rmdev -dl hdisk1
hdisk1 deleted
# lsdev -Cc disk
hdisk0 Available 01-08-00 SAS Disk Drive
6.将克隆磁盘移植到新服务器。
将hdisk1插入新服务器,新插入的盘不会自动引导系统的启动,需要在分区启动时进入SMS菜单,手动指定磁盘启动。
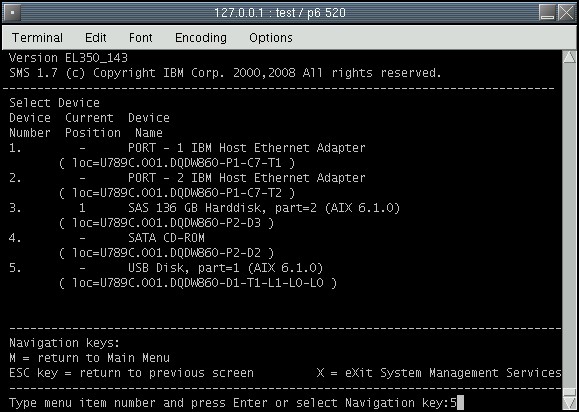
1).进入SMS菜单,选择5:
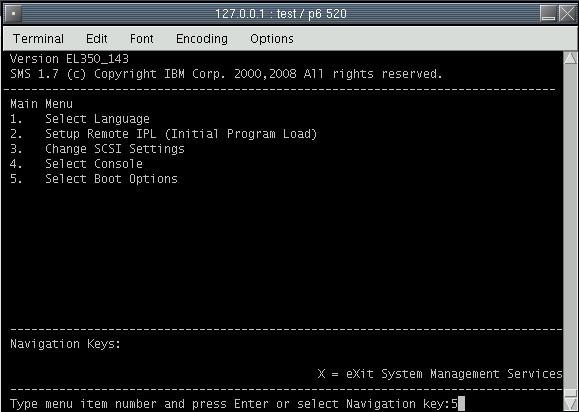
2).选择1:
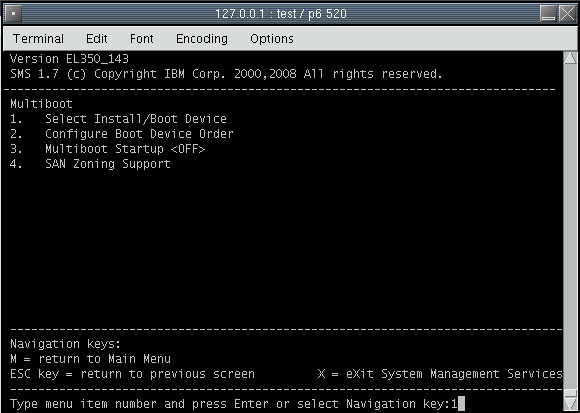
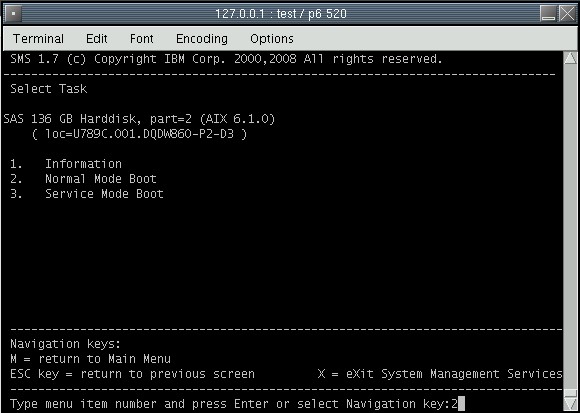
3).选择7:
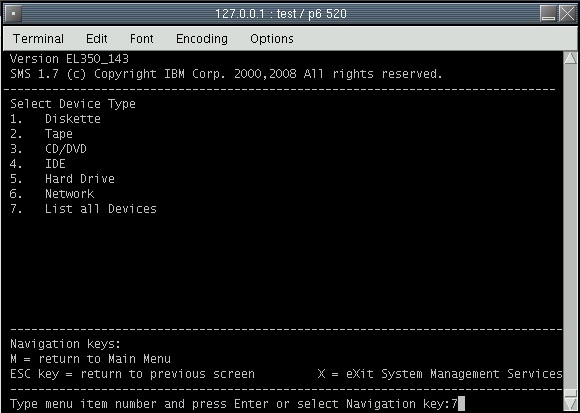
4).选择3引导系统:
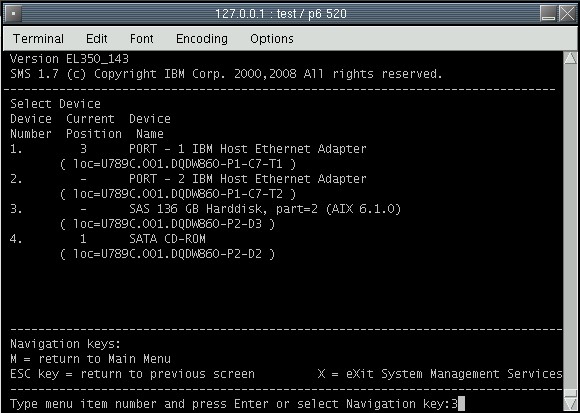
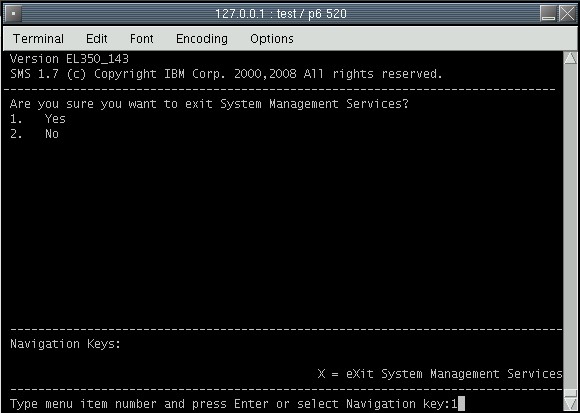
5).选择2:
6).选择1:
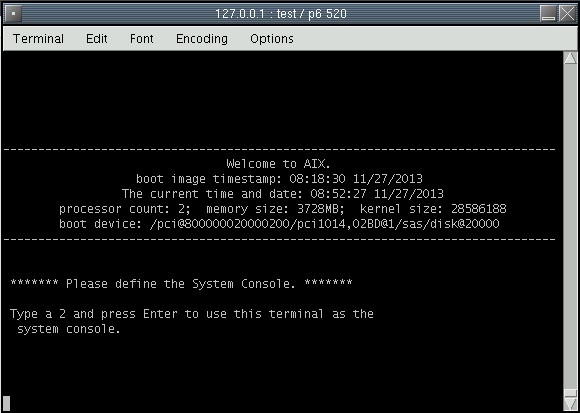
7).选择2:
7.检查系统:
# lspv
hdisk0 00cc1ad46aff307f rootvg active
# lsdev -Cc disk
hdisk0 Available 00-08-00 SAS Disk Drive
# bootlist -o -m normal
cd0
-
ent0 speed=auto duplex=auto bserver=000.000.000.000 client=000.000.000.000 gateway=000.000.000.000
修改引导顺序:
# bosboot -a -d /dev/hdisk0
bosboot: Boot image is 53276 512 byte blocks.
# bootlist -o -m normal hdisk0
hdisk0 blv=hd5 pathid=0
# bootlist -o -m normal
hdisk0 blv=hd5 pathid=0
自此,分区重启即可自动启动。
二.使用U盘安装操作系统。
使用U盘安装AIX的方法描述:
USB flash disk(U-disk)
IZ15299 6100-02
IZ20527 5300-09
add boot support for USB flash memory device.
These APAR announced Nov 2008,3 years ago.
3 type of U-disk are formally supported:
-Lenovo USB2.0 Essential Memory Key, part number 41U4944
-Kingston 4GB DataTraveler, USB2.0
-SanDisk 4GB Cruzer Micro Flash Drive, USB2.0
Procedure to create bootable U-Disk
1)plug U-disk in USB port
2)make sure below filesets installed.
devices.common.IBM.usb.rte
devices.usbif.08025002.rte
3)Configure U-disk
#cfgmgr -vl usb0
usbms0 Available 2.3 USB Mass Storage
#lscfg -vl usbms0
usbms0 U78C0.001.DBJA161-D1-T1-L1 USB Mass Storage
Manufacturer................San
Machine Type and Model......Cru
ROM Level.(alterable).......8.01
4)Copy ISO from DVD
#dd if=/dev/cd0 of=/images/AIX61.iso bs=4096k
make sure iso file is in a large file capable file system and has enough space
#dd if=/images/AIX61.iso of=/dev/usbms0 bs=4096k
Do not use U-disk with write protection switch.AIX will complain the U-disk
is write protected no matter it is write protected or not.(Bug)
Procedure to install from U-disk
1)insert U-disk created in Power computer node USB port
2)activate LPAR to SMS
3)Multiboot -> Select Install/Boot Device -> Select harddisk/USB
# lslpp -l devices.common.IBM.usb.rte
Fileset Level State Description
----------------------------------------------------------------------------
Path: /usr/lib/objrepos
devices.common.IBM.usb.rte
6.1.7.0 COMMITTED USB System Software
Path: /etc/objrepos
devices.common.IBM.usb.rte
6.1.4.1 COMMITTED USB System Software
# lslpp -l devices.usbif.08025002.rte
Fileset Level State Description
----------------------------------------------------------------------------
Path: /usr/lib/objrepos
devices.usbif.08025002.rte
6.1.7.19 COMMITTED USB Mass Storage Device
Software
Path: /etc/objrepos
devices.usbif.08025002.rte
6.1.7.19 COMMITTED USB Mass Storage Device
Software
# cfgmgr -vl usb0
----------------
attempting to configure device 'usb0'
Time: 0 LEDS: 0x2563
invoking /etc/methods/cfgusb -l usb0
Number of running methods: 1
----------------
Completed method for: usb0, Elapsed time = 16
return code = 0
****************** stdout ***********
usbms0
****************** no stderr ***********
----------------
Time: 16 LEDS: 0x539
Number of running methods: 0
----------------
attempting to configure device 'usbms0'
Time: 16 LEDS: 0x25a1
invoking /usr/lib/methods/cfgcdrom_usb -l usbms0
Number of running methods: 1
----------------
Completed method for: usbms0, Elapsed time = 0
return code = 0
****************** no stdout ***********
****************** no stderr ***********
----------------
Time: 16 LEDS: 0x539
Number of running methods: 0
----------------
calling savebase
return code = 0
****************** no stdout ***********
****************** no stderr ***********
Configuration time: 16 seconds
#
# lsdev | grep usb
usb0 Available USB System Software
usbhc0 Available 01-08 USB Host Controller (33103500)
usbhc1 Available 01-09 USB Host Controller (33103500)
usbhc2 Available 01-0a USB Enhanced Host Controller (3310e000)
usbms0 Available 2.3 USB Mass Storage
# lscfg -vl usbms0
usbms0 U789C.001.DQDW860-D1-T1-L1 USB Mass Storage
Manufacturer................SMART
Machine Type and Model......SMART USB 8GB
ROM Level.(alterable).......880C
Serial Number...............880C
# dd if=/dev/cd0 of=/opt/AIX61.iso bs=4096k
946+1 records in.
946+1 records out.
# dd if=/opt/AIX61.iso of=/dev/usbms0 bs=4096k
946+1 records in.
946+1 records out.
在现有AIX操作系统上完成以上步骤之后, 将USB盘插入到新服务器或分区,启动分区或服务器,进入SMS菜单:
参考上面的内容选择USB引导启动,选择5:
成功通过USB引导:
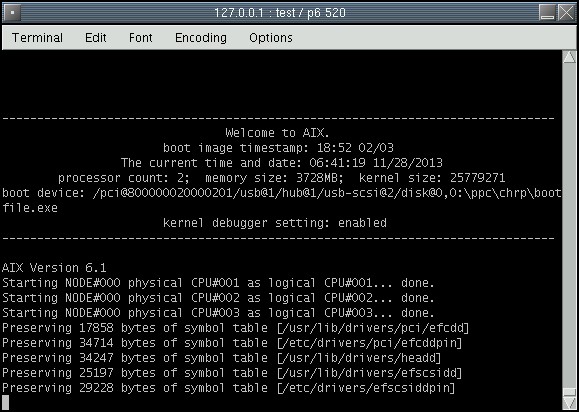
之后的步骤跟CDROM安装是相同的。
--end--
来自 “ ITPUB博客 ” ,链接:http://blog.itpub.net/23135684/viewspace-1061552/,如需转载,请注明出处,否则将追究法律责任。
转载于:http://blog.itpub.net/23135684/viewspace-1061552/
最后
以上就是彪壮中心最近收集整理的关于详解使用磁盘克隆和U盘安装IBM AIX操作系统的全部内容,更多相关详解使用磁盘克隆和U盘安装IBM内容请搜索靠谱客的其他文章。
本图文内容来源于网友提供,作为学习参考使用,或来自网络收集整理,版权属于原作者所有。


发表评论 取消回复