传统的IO操作是同步阻塞IO模式(BIO),数据的读取写入必须阻塞在一个线程内等待其完成。NIO则是同步非阻塞IO模式。BIO面向流操作,NIO面向缓冲区操作。
NIO主要有三大核心部分:Channel(通道),Buffer(缓冲区), Selector。传统IO基于字节流和字符流进行操作,而NIO基于Channel和Buffer(缓冲区)进行操作,数据总是从通道读取到缓冲区中,或者从缓冲区写入到通道中。Selector(选择区)用于监听多个通道的事件(比如:连接打开,数据到达)。因此,单个线程可以监听多个数据通道。
一 Channel(通道)
Chanel通道相当于IO操作的载体,数据通过Channel读取和写入,全双工模式(双向)。Channel类似流,但是又和流不同,流的读写是单向的比如InputStream、OutputStream。但是Chanel既可以从通道里面读取数据又可以把数据写到通道里面去。通道中的数据总是要先读到一个Buffer,或者总是要从一个Buffer中写入。
1.1 FileChannel
FileChannel是一个基于文件的通道。可以通过文件通道读写文件。有一点要注意FileChannel无法设置为非阻塞模式。它总是以阻止模式运行。
FileChannel提供的函数
| 方法 | 解释 |
|---|---|
| open | 打开一个文件,把文件和通道关联起来 |
| read | 从当前通道读取字节序列到给定的缓冲区 |
| write | 从缓冲区向该通道写入字节序列 |
| position | 跳转到文件的指定位置 |
| size | 获取文件大小 |
| truncate | 截取文件 |
| force | 将通道里尚未写入磁盘的数据强制写到磁盘上 |
| transferTo | 将字节从当前通道传输到给定的可写字节通道 |
| transferFrom | 将给定的可读字节通道上的字节传输到当前通道中 |
| map | 将当前通道某个区域直接映射到内存中 |
| lock | 获取此通道文件的独占锁定 |
| tryLock | 尝试获取此通道文件的给定区域的锁定 |
下面我们通过一个简单的实例来看FileChannel怎么使用。
    @Test
    public void fileChannelRead() {

        try {
            // 开启FileChannel
            RandomAccessFile aFile = new RandomAccessFile("D:\job\git\java-study\nio\src\main\resources\fileChanel.txt", "rw");
            FileChannel inChannel = aFile.getChannel();
            ByteBuffer buf = ByteBuffer.allocate(48);
            // 从FileChannel通道读取数据到缓冲区ByteBuffer
            int bytesRead = inChannel.read(buf);
            while (bytesRead != -1) {
                System.out.println("读取到的数据长度 " + bytesRead);
                buf.flip();
                while (buf.hasRemaining()) {
                    System.out.print((char) buf.get());
                }
                buf.clear();
                // 继续读取文件信息
                bytesRead = inChannel.read(buf);
            }
            aFile.close();
        } catch (IOException e) {
            e.printStackTrace();
        }

    }
    @Test
    public void fileChannelWrite() {

        try {
            // 开启FileChannel
            RandomAccessFile aFile = new RandomAccessFile("D:\job\git\java-study\nio\src\main\resources\fileChanelWrite.txt", "rw");
            FileChannel inChannel = aFile.getChannel();
            ByteBuffer buf = ByteBuffer.allocate(48);
            byte[] forWrite = "需要写入的字符串。".getBytes(StandardCharsets.UTF_8);
            buf.put(forWrite, 0, forWrite.length);
            buf.flip();
            // 写入数据
            while (buf.hasRemaining()) {
                inChannel.write(buf);
            }
            aFile.close();
        } catch (IOException e) {
            e.printStackTrace();
        }

    }
1.2 DatagramChannel
DatagramChannel主要是用来基于UDP通信的通道。
DatagramChannel方法介绍
| DatagramChannel方法 | 返回值 | 解释 |
|---|---|---|
| open() | DatagramChannel | 创建通道 |
| bind(SocketAddress local) | DatagramChannel | 绑定端口 |
| validOps() | int | 只支持OP_READ/OP_WRITE两种操作 |
| socket() | DatagramSocket | 获取与其关联的底层DatagramSocket |
| isConnected() | boolean | 检测是否已经建立了Socket链接 |
| connect(SocketAddress remote) | DatagramChannel | 链接remote端 |
| disconnect() | DatagramChannel | 断开通道连接 |
| getRemoteAddress() | SocketAddress | 获取远程地址 |
| receive(ByteBuffer dst) | SocketAddress | 接收数据 |
| send() | int | 发送数据,向指定的地址发送数据 |
| read() | int | 必须在connect()之后调用,接收数据 |
| write() | int | 必须在connect()之后调用,发送数据 |
| getLocalAddress() | SocketAddress | 获取本地地址 |
注意,connect()、send()、read() 三个函数是配套使用的。
接下来我们通过三个例子来说明DatagramChannel的用法,下面的例子都是阻塞模式的,等讲到Selector的时候我们在讲非阻塞的用法。
1.2.1 UDP服务端
UDP服务端需要调用bind()函数绑定本地端口。
    /**
     * UDP 服务端
     */
    @Test
    public void datagramChannelService() {
        try {
            // 获取通道
            DatagramChannel datagramChannel = DatagramChannel.open();
            // 绑定端口8989,作为UDP服务端
            datagramChannel.bind(new InetSocketAddress(8989));
            // 分配Buffer,用于收发数据
            ByteBuffer buffer = ByteBuffer.allocate(1024);
            while (true) {
                buffer.clear();
                // 等待接受客户端发送数据
                SocketAddress socketAddress = datagramChannel.receive(buffer);
                if (socketAddress != null) {
                    buffer.flip();
                    byte[] b = new byte[buffer.limit()];
                    int bufferReceiveIndex = 0;
                    while (buffer.hasRemaining()) {
                        b[bufferReceiveIndex++] = buffer.get();
                    }
                    System.out.println("收到客户端消息 " + socketAddress.toString() + ":" + new String(b, StandardCharsets.UTF_8));
                    // 接收到消息后给发送方回应
                    sendDataBack(socketAddress, datagramChannel);
                }
            }

        } catch (IOException e) {
            // ignore
        }
    }

    /**
     * 给socketAddress地址发送消息
     */
    private void sendDataBack(SocketAddress socketAddress, DatagramChannel datagramChannel) throws IOException {
        String message = "send back";
        ByteBuffer buffer = ByteBuffer.allocate(1024);
        buffer.put(message.getBytes(StandardCharsets.UTF_8));
        buffer.flip();
        datagramChannel.send(buffer, socketAddress);
    }
1.2.2 UDP客户端
如果UDP作为客户端的话,可以直接往UDP服务端发送消息,服务端接收到消息的时候同时获取到了对应客户端的地址信息。又可以把消息发送回来。
    // UDP客户端
    @Test
    public void datagramChannelClient() {
        try {
            final DatagramChannel channel = DatagramChannel.open();
            // 开一个线程一直接收UDP服务端发送过来的消息
            new Thread(() -> {
                try {
                    ByteBuffer buffer = ByteBuffer.allocate(1024);
                    while (true) {
                        buffer.clear();
                        SocketAddress socketAddress = channel.receive(buffer);
                        if (socketAddress != null) {
                            buffer.flip();
                            byte[] b = new byte[buffer.limit()];
                            int bufferReceiveIndex = 0;
                            while (buffer.hasRemaining()) {
                                b[bufferReceiveIndex++] = buffer.get();
                            }
                            System.out.println("收到消息 " + socketAddress.toString() + ":" + new String(b, StandardCharsets.UTF_8));
                        }
                    }
                } catch (Exception e) {
                    // ignore
                }

            }).start();

            int messageIndex = 0;
            // 控制台输入数据,然后发送给指定的地址
            while (true) {
                // 5S发送一次数据
                Uninterruptibles.sleepUninterruptibly(5, TimeUnit.SECONDS);
                sendMessage(channel, new InetSocketAddress("192.168.5.14", 8989), String.valueOf(messageIndex++));
            }

        } catch (IOException e) {
            // ignore
        }
    }


    private void sendMessage(DatagramChannel channel, InetSocketAddress address, String mes) throws IOException {
        if (mes == null || mes.isEmpty()) {
            return;
        }
        ByteBuffer buffer = ByteBuffer.allocate(1024);
        buffer.clear();
        buffer.put(mes.getBytes(StandardCharsets.UTF_8));
        buffer.flip();
        channel.send(buffer, address);
    }
1.2.3 connect用法
DatagramChannel的connect()方法可以和指定的地址绑定起来,配合write()、read()函数在两者之间收发消息。比如下面的实例我们和time-a.nist.gov建立连接获取时间。
    /**
     * UDP connect() 在特定的地址上收发消息
     */
    @Test
    public void datagramChannelConnect() {
        try {
            // 获取通道
            DatagramChannel datagramChannel = DatagramChannel.open();
            // 连接到特定的地址,time-a.nist.gov 获取时间。只在这个地址间收发消息 write,read 方法
            datagramChannel.connect(new InetSocketAddress("time-a.nist.gov", 37));
            ByteBuffer buffer = ByteBuffer.allocate(8);
            buffer.order(ByteOrder.BIG_ENDIAN);
            buffer.put((byte) 0);
            buffer.flip();
            // 发送数据到 time-a.nist.gov
            datagramChannel.write(buffer);
            buffer.clear();
            // 前四个字节补0
            buffer.putInt(0);
            // 从 time-a.nist.gov 读取数据
            datagramChannel.read(buffer);
            buffer.flip();
            // convert seconds since 1900 to a java.util.Date
            long secondsSince1900 = buffer.getLong();
            long differenceBetweenEpochs = 2208988800L;
            long secondsSince1970 = secondsSince1900 - differenceBetweenEpochs;
            long msSince1970 = secondsSince1970 * 1000;
            Date time = new Date(msSince1970);
            // 打印时间
            System.out.println(time);
        } catch (Exception e) {
            // ignore
        }
    }
再次强调下,上面实例代码我们都是用的阻塞模式实现的。等下面讲到Selector的时候我们在讲怎么用非阻塞的方式实现。
1.3 SocketChannel
SocketChannel主要是用来基于TCP通信的通道,它一般用来作为客户端的套接字,它有点类似于java中的Socket类。
SocketChannel方法介绍
| SocketChannel方法 | 返回值 | 解释 |
|---|---|---|
| open() | SocketChannel | 创建SocketChannel通道 |
| validOps() | int | 通道支持的操作,OP_READ、OP_WRITE、OP_CONNECT |
| bind(SocketAddress local) | SocketChannel | 地址绑定 |
| setOption(SocketOption name, T value) | SocketChannel | Socket的选项配置,StandardSocketOptions.SO_KEEPALIVE等 |
| shutdownInput() | SocketChannel | 在没有关闭通道的情况下,关闭读操作连接 |
| shutdownOutput() | SocketChannel | 在没有关闭通道的情况下,关闭到通道的写操作连接 |
| socket() | Socket | 获取与通道关联的socket |
| isConnected() | boolean | 判断通道的网络socket是否连接 |
| isConnectionPending() | boolean | 判断通道是否正在进行操作连接.只有当尚未finishConnection且已经调用connect时,返回true |
| connect(SocketAddress remote) | boolean | 连接通道的socket |
| finishConnect() | boolean | 完成到socket通道的连接任务,一般在非阻塞的情况下用到, |
| getRemoteAddress() | SocketAddress | 返回通道socket连接的远端地址 |
| read() | int or long | 接收数据 |
| write | int or long | 发送数据 |
| getLocalAddress() | SocketAddress | 返回通道socket连接的本地地址 |
setOption():用于给socket设置一些选项配置,比如keep alive。socketChannel.setOption(StandardSocketOptions.TCP_NODELAY, true);socketChannel.setOption(StandardSocketOptions.SO_KEEPALIVE, true);等等。具体可以看看StandardSocketOptions里面的一些标准选项。
关于connect()、isConnectionPending()、finishConnect()三个函数的关系我们稍微屡一下。分两种情况来考虑:
- 阻塞模式:connect()是阻塞的,这个时候isConnectionPending()、finishConnect()两个函数我觉得意义不大,因为你本来就是阻塞状态的,connect()函数成功了,这两个函数值也就确定了:isConnectionPending()->false、finishConnect()->true(如果连接失败他就是false)。
- 非阻塞模式:调用connect()方法底层socket建立连接的时候。因为是非阻塞的如果连接立即建立成功,则返回true,否则返回false。则此后一旦成功建立连接就必须通过调用finishConnect()方法来完成链接。在没有调用finishConnect()之前isConnectionPending()->true,调用之后isConnectionPending()->false。
1.3.1 SocketChannel使用
    /**
     * TCP客户端,阻塞模式
     */
    @Test
    public void socketChannelClient() {
        try {
            SocketChannel channel = SocketChannel.open();
            // 这里使用的是阻塞模式
            channel.connect(new InetSocketAddress("192.168.5.14", 6800));
            // KEEP ALIVE setOption()函数的使用,一定要在连接成功之后设置
            channel.setOption(StandardSocketOptions.SO_KEEPALIVE, true);
            ByteBuffer buffer = ByteBuffer.allocate(1024);
            while (true) {
                buffer.clear();
                int readLength = channel.read(buffer);
                if (readLength >= 0) {
                    buffer.flip();
                    byte[] b = new byte[buffer.limit()];
                    int bufferReceiveIndex = 0;
                    while (buffer.hasRemaining()) {
                        b[bufferReceiveIndex++] = buffer.get();
                    }
                    System.out.println("收到消息 " + ":" + new String(b, StandardCharsets.UTF_8));
                    // 把收到的消息又发送回去
                    buffer.clear();
                    buffer.put(b);
                    buffer.flip();
                    channel.write(buffer);
                }

            }
        } catch (IOException e) {
            e.printStackTrace();
        }
    }
1.4 ServerSocketChannel
ServerSocketChannel也是用来基于TCP通信的通道,它一般用来作为服务端的套接字,它有点类似于java中的ServerSocket类。一般用来接收客户端的连接,在客户端连接的的基础之上做一些收发消息的处理。
ServerSocketChannel主要方法
| ServerSocketChannel方法 | 返回值 | 解释 |
|---|---|---|
| open() | ServerSocketChannel | 建立通道 |
| validOps() | int | 当前通道支持的操作,OP_ACCEPT |
| bind(SocketAddress local) | ServerSocketChannel | 绑定到指定的端口,还可以指定最多多少个连接 |
| setOption(SocketOption name, T value) | ServerSocketChannel | Socket的选项配置,StandardSocketOptions.SO_KEEPALIVE等 |
| socket() | ServerSocket | 获取与通道关联的socket |
| accept() | SocketChannel | 接收客户端的连接 |
| getLocalAddress() | SocketAddress | 返回通道socket连接的本地地址 |
ServerSocketChannel是用于接收客户端连接的,在接收到(accept函数)客户端连接之后会拿到基于客户端连接的SocketChannel。和每个客户端的操作都是通过SocketChannel实现的。
1.4.1 ServerSocketChannel的使用
    /**
     * TCP服务端 -- 阻塞模式
     */
    @Test
    public void socketChannelServer() {
        try {
            ServerSocketChannel  channel = ServerSocketChannel.open();
            channel.bind(new InetSocketAddress("192.168.5.14", 6800));
            while (true) {
                // 接收客户端的连接,之后拿到的就是SocketChannel了,之后都是基于SocketChannel做相应的操作
                SocketChannel clientSocketChannel = channel.accept();
                clientSocketChannel.setOption(StandardSocketOptions.SO_KEEPALIVE, true);
                ByteBuffer buffer = ByteBuffer.allocate(1024);
                buffer.clear();
                buffer.put("hello".getBytes(StandardCharsets.UTF_8));
                buffer.flip();
                // 给客户端发送消息
                clientSocketChannel.write(buffer);
                // 在收下客户端的消息
                buffer.clear();
               int readLength = clientSocketChannel.read(buffer);
                if (readLength >= 0) {
                    buffer.flip();
                    byte[] b = new byte[buffer.limit()];
                    int bufferReceiveIndex = 0;
                    while (buffer.hasRemaining()) {
                        b[bufferReceiveIndex++] = buffer.get();
                    }
                    System.out.println("收到消息 " + ":" + new String(b, StandardCharsets.UTF_8));
                }
            }
        } catch (IOException e) {
            e.printStackTrace();
        }
    }
二 Buffer(缓冲区)
Buffer用于和Channel通道进行交互。如你所知,数据是从通道读入缓冲区,从缓冲区写入到通道中的。缓冲区本质上是一块可以写入数据,然后可以从中读取数据的内存。这块内存被包装成了NIO Buffer对象。
我们先介绍先Buffer里面的三个属性,接着在介绍下Buffer里面主要的方法。
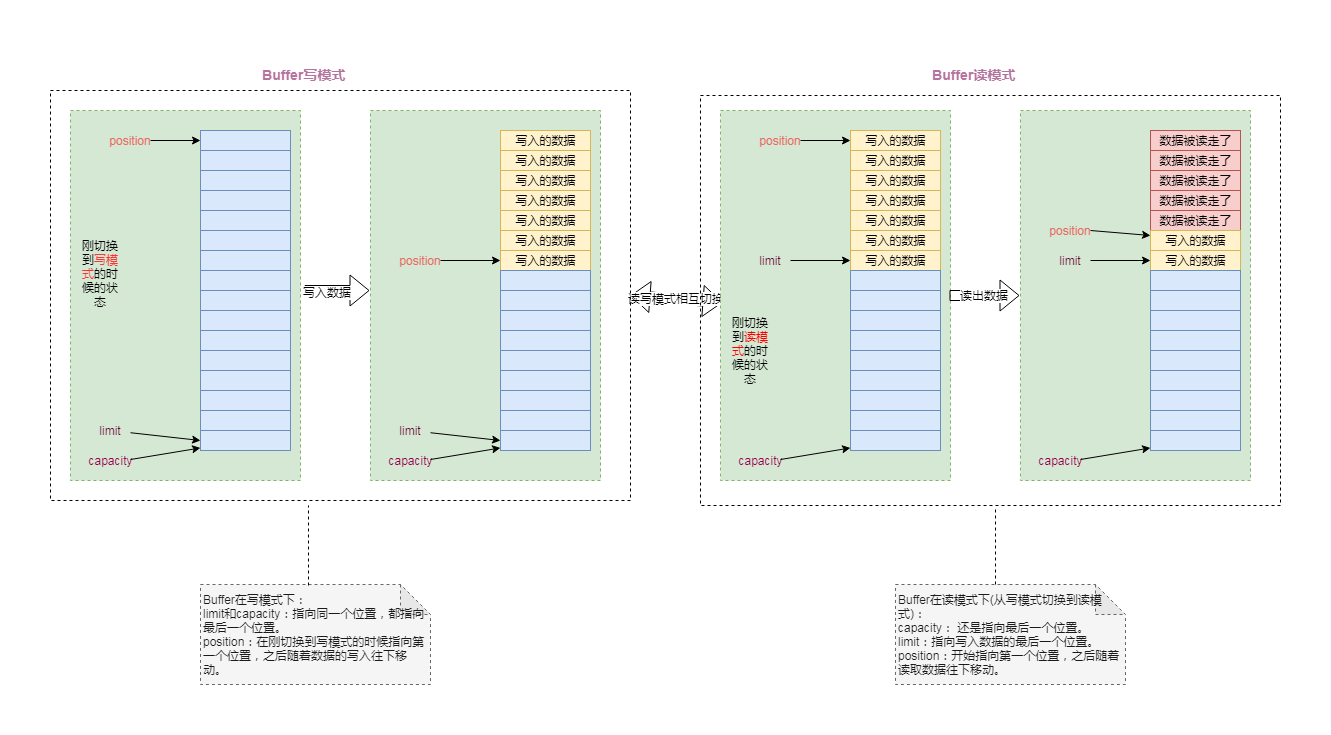
Buffer里面三个属性:capacity、position、limit。
- capacity:作为一个内存块,Buffer有一个固定的大小值,也叫“capacity”.你只能往里写capacity个byte、long,char等类型。一旦Buffer满了,需要将其清空(通过读数据或者清除数据)才能继续往里写数据。
- position:当你写数据到Buffer中时,position表示当前的位置。初始的position值为0。当一个byte、long等数据写到Buffer后,position会向前移动到下一个可插入数据的Buffer单元。position最大可为capacity–1;当读取数据时,也是从某个特定位置读。当将Buffer从写模式切换到读模式,position会被重置为0。当从Buffer的position处读取数据时,position向前移动到下一个可读的位置。position简单来说就相当于游标的作用。
- limit:在写模式下,Buffer的limit表示你最多能往Buffer里写多少数据。写模式下,limit等于Buffer的capacity;当切换Buffer到读模式时,limit表示你最多能读到多少数据。因此,当切换Buffer到读模式时,limit会被设置成写模式下的position值。换句话说,你能读到之前写入的所有数据(limit被设置成已写数据的数量,这个值在写模式下就是position)。
一定要注意position、limit在读模式和谢模式下代表的含义,以及两个模式之间切换的时候position、limit做了那些变化。

Buffer里面常用函数。
public abstract class Buffer {

    /**
     * 获取当前缓冲区的容量 -- capacity
     */
    public final int capacity();

    /**
     * 获取当前缓冲区的位置 -- position
     */
    public final int position();

    /**
     * 设置当前缓冲区的位置 -- position
     */
    public final Buffer position(int newPosition);

    /**
     * 获取当前缓冲区的限制 -- limit
     */
    public final int limit();

    /**
     * 设置当前缓冲区的限制 -- limit
     */
    public final Buffer limit(int newLimit);

    /**
     * mark(), reset()函数是配对使用的,将当前缓冲区的标记(mark)设置在当前位置(position) -- mark
     */
    public final Buffer mark();

    /**
     * 通过调用mark()方法,可以标记Buffer中的一个特定position。
     * 之后可以通过调用Buffer.reset()方法恢复到这个position
     */
    public final Buffer reset();

    /**
     * 	清除此缓存区。将position = 0;limit = capacity;mark = -1;一般在写入数据之前调用
     */
    public final Buffer clear();

    /**
     * flip()方法可以把Buffer从写模式切换到读模式。调用flip方法会把position归零,
     * 并设置limit为之前的position的值。
     * 也就是说,现在position代表的是读取位置,limit标示的是已写入的数据位置。
     */
    public final Buffer flip();

    /**
     * 将position设回0,这个时候你可以重读Buffer中的所有数据。
     * limit保持不变,仍然表示能从Buffer中读取多少个元素
     */
    public final Buffer rewind();

    /**
     * return limit - position; 返回limit和position之间相对位置差
     */
    public final int remaining();

    /**
     * return position < limit,返回是否还有未读内容
     */
    public final boolean hasRemaining();

    /**
     * 判断此缓冲区是否为只读
     */
    public abstract boolean isReadOnly();

    /**
     * 判断此缓冲区是否由可访问的数组支持
     */
    public abstract boolean hasArray();

    /**
     * 返回支持此缓冲区的数组
     */
    public abstract Object array();

    /**
     * 返回该缓冲区的缓冲区的第一个元素的背衬数组中的偏移量
     */
    public abstract int arrayOffset();

    /**
     * 判断个缓冲区是否为 direct
     */
    public abstract boolean isDirect();

}
flip()、hasRemaining()、clear()、rewind()、mark()、reset()几个函数要着重理解下。
要想使用Buffer来读写数据一般遵循以下四个步骤:
- 写数据到Buffer里面。可以从Channel读取出来写入到缓冲区中,也可以调用put方法写入到缓冲区中。
- 调用flip()方法,切换到读数据模式。这个时候position指向第一个位置,limit指向写入数据的最后位置。
- 从Buffer中读取数据。一般从缓冲区读取数据写入到通道中,也可以调用get方法读取到Buffer里面的数据。
- 调用clear()或者compact()方法清空缓冲区。
当向buffer写入数据时,buffer会记录下写了多少数据。一旦要读取数据,需要通过flip()方法将Buffer从写模式切换到读模式。
在读模式下,可以读取之前写入到buffer的所有数据。一旦读完了所有的数据,就需要清空缓冲区,让它可以再次被写入。
有两种方式能清空缓冲区:
- clear():方法会清空整个缓冲区。
- compact():这个方法在ByteBuffer、CharBuffer、ShortBuffer等方法里面提供。 该方法只会清除已经读过的数据。任何未读的数据都被移到缓冲区的起始处,新写入的数据将放到缓冲区。
我们使用Buffer缓冲区。一般使用的都是他的子类:ByteBuffer、CharBuffer、ShortBuffer、LongBuffer、FloatBuffer、DoubleBuffer这些。Buffer的这些子类都是基于JAVA一些基本数据类型实现的一个Buffer缓冲区。我们先看下这些子类一般都会有的一些方法(Buffer里面的方法他们都会有,Buffer里面的方法我们就不重复介绍了)。
出Buffer提供的放方法之外,子类里面额外的方法。
| Buffer子类方法 | 描述 | |
|---|---|---|
| allocate(int capacity) | Buffer实例化方法 | 从堆空间中分配一个容量大小为capacity的对应类型的数组作为缓冲区的数据存储器 |
| allocateDirect(int capacity) | Buffer实例化方法 | 不使用JVM堆栈而是通过操作系统来创建内存块用作缓冲区,它与当前操作系统能够更好的耦合,因此能进一步提高I/O操作速度。但是分配直接缓冲区的系统开销很大,因此只有在缓冲区较大并长期存在,或者需要经常重用时,才使用这种缓冲区 |
| wrap(T[] array) | Buffer实例化方法 | 这个缓冲区的数据会存放在对应数组中,对应数组或buff缓冲区任何一方中数据的改动都会影响另一方。其实Buffer底层本来就有一个对应数组负责来保存buffer缓冲区中的数据,通过allocate方法系统会帮你构造一个对应类型组 |
| wrap(T[] array, int offset,intlength) | Buffer实例化方法 | 在上一个方法的基础上可以指定偏移量和长度,这个offset也就是包装后byteBuffer的position,而length呢就是limit-position的大小,从而我们可以得到limit的位置为length+position(offset) |
| slice() | 常规方法 | 创建新的缓冲区,其内容是此缓冲区内容的共享子序列 |
| duplicate() | 常规方法 | 创建共享此缓冲区内容的新的字节缓冲区 |
| asReadOnlyBuffer() | 常规方法 | 创建共享此缓冲区内容的新的只读字节缓冲区 |
| get() | 常规方法 | 从缓冲区获取数据 |
| put() | 常规方法 | 把数据放入到缓冲区中 |
| compact() | 常规方法 | 清除已经读过的数据。任何未读的数据都被移到缓冲区的起始处 |
关于Buffer的使用,我们以ByteBuffer和CharBuffer来举例说明。其他的Buffer子类适应也都是很简单的。
ByteBuffer的使用
    @Test
    public void byteBufferTest() {
        // 创建一个ByteBuffer实例
        ByteBuffer buffer = ByteBuffer.allocate(1024);
        // 清空
        buffer.clear();
        // 写入数据
        byte[] putByteArray = "hello word!".getBytes(StandardCharsets.UTF_8);
        buffer.put(putByteArray);
        // 切换到读模式
        buffer.flip();
        // 把数据读取出来
        buffer.slice();
        while (buffer.hasRemaining()) {
            System.out.print((char) buffer.get());
        }
        System.out.println();
        // 重新读
        buffer.rewind();
        // ps: 这个时候buffer.limit()就是数组元素的个数
        byte[] retByte = new byte[buffer.limit()];
        buffer.get(retByte);
        System.out.println(new String(retByte, StandardCharsets.UTF_8));
    }
CharBuffer使用距离
    @Test
    public void charBufferTest() {
        // 创建一个ByteBuffer实例
        CharBuffer buffer = CharBuffer.allocate(1024);
        // 清空
        buffer.clear();
        // 写入数据
        char[] putArray = "hello word!".toCharArray();
        buffer.put(putArray);
        // 切换到读模式
        buffer.flip();
        // 把数据读取出来
        buffer.slice();
        while (buffer.hasRemaining()) {
            System.out.print(buffer.get());
        }
        System.out.println();
        // 重新读
        buffer.rewind();
        // ps: 这个时候buffer.limit()就是数组元素的个数
        char[] retByte = new char[buffer.limit()];
        buffer.get(retByte);
        System.out.println(String.valueOf(retByte));
    }
三 Selector(多路复用器)
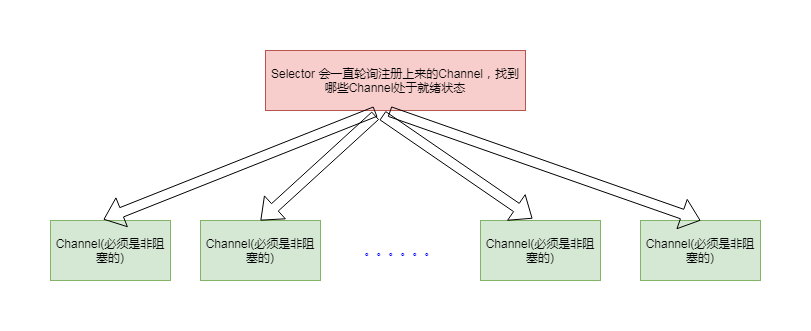
Selector提供了选择已就绪任务的能力,Selector会不断轮询注册在上面的Channel,某个Channel发生读或写事件,则该Channel就处于就绪状态,会被Selector轮询出来。然后通过SelectionKey获取就绪Channel的集合,进行后续IO操作。Selector允许单线程处理多个Channel。如果你的应用打开了多个连接(通道),但每个连接的流量都很低,使用Selector就会很方便。

Selector方法介绍
| Selector方法 | 返回值 | 解释 |
|---|---|---|
| open() | Selector | Selector的创建 |
| isOpen() | boolean | 判断此选择器是否已打开 |
| provider() | SelectorProvider | 返回创建此通道的提供程序 |
| keys() | Set | 返回所有的SelectionKey |
| selectedKeys() | Set | 返回已选择的SelectionKey集合,要在select()之后调用 |
| selectNow() | int | 非阻塞,返回有多少通道就绪 |
| select(long timeout) | int | 阻塞到至少有一个通道在你注册的事件上就绪了 |
| select() | int | 阻塞到至少有一个通道在你注册的事件上就绪了,返回值表示有多少通道就绪 |
| wakeup() | Selector | Selector的唤醒 |
wakeup() 函数稍微讲下。Selector的选择方式有三种:select()、select(timeout)、selectNow()。selectNow的选择过程是非阻塞的,与wakeup没有太大关系。select(timeout)和select()的选择过程是阻塞的,其他线程如果想终止这个过程,就可以调用wakeup来唤醒select()。
3.1 Selector创建
通过调用Selector.open()方法创建一个Selector对象。
Selector selector = Selector.open();
3.2 把Channel注册到Selector
channel.configureBlocking(false);
SelectionKey key = channel.register(selector, Selectionkey.OP_READ);
注册到Selector的Channel是有前提添加的。Channel必须是非阻塞的,必须是SelectableChannel的子类。所以FileChannel不适用Selector,因为FileChannel不能切换为非阻塞模式,更准确的来说是因为FileChannel没有继承SelectableChannel。
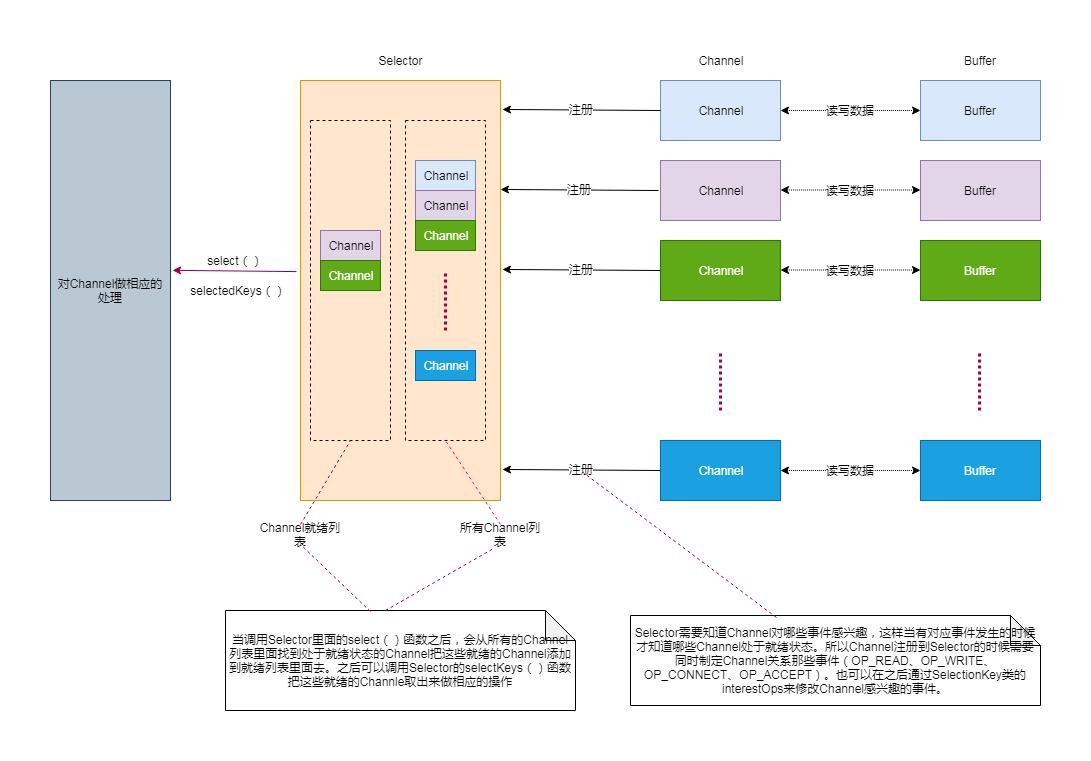
把Channel注册到Selector的时候还得指定监听事件。就是告诉Selector我这个Channel对什么事件感兴趣。当Channel上有这个事件发送的时候这个Channel就会被轮询出来。NIO提供了四个事件:
| Channel注册事件 | 解释 |
|---|---|
| Selectionkey.OP_READ | 读就绪 |
| Selectionkey.OP_WRITE | 写就绪 |
| Selectionkey.OP_CONNECT | 连接就绪 |
| Selectionkey.OP_ACCEPT | 接收就绪 |
我们有两种方式来设置Selector对Channel的哪些事件感兴趣。一个是在把Channel注册到Selector的时候设置。我们上面已经讲了这种情况。另一个是调用SelectionKey的interestOps()函数来修改Selector对Channel感兴趣的事件。
3.2.1 SelectionKey
每个Channel向Selector注册时,都将会创建一个SelectionKey对象。一个SelectionKey键表示了一个特定的通道对象和一个特定的选择器对象之间的注册关系。并维护了Channel事件。
SelectionKey方法介绍
| 方法 | 返回值 | 解释 |
|---|---|---|
| channel() | SelectableChannel | 返回此选择键所关联的通道 |
| selector() | Selector | 返回此选择键所关联的选择器 |
| isValid() | boolean | 检测此key是否有效 |
| cancel() | void | 请求将此键取消注册.一旦返回成功,那么该键就是无效的 |
| interestOps() | int | 判断Selector对Channel的哪些事件感兴趣,OP_READ、OP_WRITE等事件 |
| interestOps(int ops) | SelectionKey | 设置Selector对Channel的哪些事件感兴趣 |
| readyOps() | int | 获取此键上ready操作集合.即在当前通道上已经就绪的事件 |
| isReadable() | boolean | 检测此键是否为"read"事件.等效于:k.readyOps() & OP_READ != 0 |
| isWritable() | boolean | 检测此键是否为"write"事件 |
| isConnectable() | boolean | 检测此键是否为"connect"事件 |
| isAcceptable() | boolean | 检测此键是否为"accept"事件 |
| attach(Object ob) | Object | 将给定的对象作为附件添加到此key上.在key有效期间,附件可以在多个ops事件中传递 |
| attachment() | Object | 获取附件.一个channel的附件,可以再当前Channel(或者说是SelectionKey)生命周期中共享,但是attachment数据不会作为socket数据在网络中传输 |
3.3 从Selector中选择就绪的Channel
从Selector中选择就绪的Channel,其实是去选择SelectionKey,然后通过SelectionKey拿到对应的Channel。通过Channel做相应的操作。
从Selector中选择就绪的Channel也很简单。先调用Selecotor的select()方法选择出已经就绪的通道,Selector会帮助我们把这些就绪的通道放到一个就绪列表里目前。然后我们在调用Selector的selectedKeys()方法把这些通道都拿出来。
3.4 Selecotr完整实例
    @Test
    public void tcpClient() {
        try {
            SocketChannel socketChannel = SocketChannel.open();
            // 连接
            socketChannel.connect(new InetSocketAddress("192.168.5.14", 6800));
            ByteBuffer writeBuffer = ByteBuffer.allocate(32);
            ByteBuffer readBuffer = ByteBuffer.allocate(32);
            writeBuffer.put("hello".getBytes());
            writeBuffer.flip();
            while (true) {
                writeBuffer.rewind();
                socketChannel.write(writeBuffer);
                readBuffer.clear();
                socketChannel.read(readBuffer);
                readBuffer.flip();
                byte[] b = new byte[readBuffer.limit()];
                int bufferReceiveIndex = 0;
                while (readBuffer.hasRemaining()) {
                    b[bufferReceiveIndex++] = readBuffer.get();
                }
                System.out.println("received : " + new String(b));
            }
        } catch (Exception e) {
            // ignore
        }
    }


    @Test
    public void tcpServer() {

        try {
            // 创建一个ServerSocketChannel通道
            ServerSocketChannel serverChannel = ServerSocketChannel.open();
            // 绑定6800端口
            serverChannel.bind(new InetSocketAddress("192.168.5.14", 6800));
            // 设置非阻塞
            serverChannel.configureBlocking(false);
            // Selector创建
            Selector selector = Selector.open();
            // 注册 channel,并且指定感兴趣的事件是 Accept
            serverChannel.register(selector, SelectionKey.OP_ACCEPT);
            ByteBuffer readBuff = ByteBuffer.allocate(1024);
            ByteBuffer writeBuff = ByteBuffer.allocate(1024);
            writeBuff.put("received".getBytes());
            writeBuff.flip();
            while (true) {
                if (selector.select() > 0) {
                    Set<SelectionKey> readyKeys = selector.selectedKeys();
                    Iterator<SelectionKey> readyKeyIterator = readyKeys.iterator();
                    while (readyKeyIterator.hasNext()) {
                        SelectionKey key = readyKeyIterator.next();
                        readyKeyIterator.remove();

                        if (key.isAcceptable()) {
                            // 连接
                            ServerSocketChannel serverSocketChannel = (ServerSocketChannel) key.channel();
                            SocketChannel socketChannel = serverSocketChannel.accept();
                            socketChannel.configureBlocking(false);
                            // 我们又给注册到Selector里面去了,声明这个channel只对读操作感兴趣。
                            socketChannel.register(selector, SelectionKey.OP_READ);
                        } else if (key.isReadable()) {
                            // 读
                            SocketChannel socketChannel = (SocketChannel) key.channel();
                            readBuff.clear();
                            socketChannel.read(readBuff);
                            readBuff.flip();
                            byte[] b = new byte[readBuff.limit()];
                            int bufferReceiveIndex = 0;
                            while (readBuff.hasRemaining()) {
                                b[bufferReceiveIndex++] = readBuff.get();
                            }
                            System.out.println("received : " + new String(b));
                            // 修改selector对channel感兴趣的事件
                            key.interestOps(SelectionKey.OP_WRITE);
                        } else if (key.isWritable()) {
                            // 写
                            writeBuff.rewind();
                            SocketChannel socketChannel = (SocketChannel) key.channel();
                            socketChannel.write(writeBuff);
                            // 修改selector对channel感兴趣的事件
                            key.interestOps(SelectionKey.OP_READ);
                        }
                    }
                }
            }

        } catch (IOException e) {
            // ignore
        }

    }
以上,就是我们对JAVA NIO编程的一个简单介绍。最后我们用一个图来做一个总结。

最后
以上就是忧伤人生最近收集整理的关于JAVA NIO编程介绍一 Channel(通道)二 Buffer(缓冲区)三 Selector(多路复用器)的全部内容,更多相关JAVA内容请搜索靠谱客的其他文章。


发表评论 取消回复