-
目录
1.负载 均衡
2.案例(容灾):读取1111端口数据 数据发送到 2222端口和3333端口 最终数据输出到 控制台
1. 3个agent
2. 启动 (从后向前启动)
3. 容灾
3.flume核心组件
4.案例(one2many 一个接收,发送两个端口)
1.三个agent
2.启动(从后向前启动)
5.案例 many2one
1.四个agent
2.启动
6.channle
7.监控 ①source ②channle ③sink
1.监控手段
2.参数解释·
SOURCE
CHANNEL
SINK
3.如何使用http+json 方式监控 flume
1.数据
2.agent
3.启动agent
4.网站监控
-
1.负载 均衡
- 高可用HA(High Availability)
- 定义:负载均衡是高可用网络基础架构的关键组件,通常用于将工作负载分布到多个服务器来提高网站、应用、数据库或其他服务的性能和可靠性。
- HDFS
- nn (NameNode):维护hdfs命名空间
存储整个hdfs文件块文件的信息 + client读写请求 -
dn(DataNode):存储数据块及块校验
- snn (SecondaryNameNode):合并nn上面的镜像文件 =》 存储 整个hdfs 文件块的信息
默认 1h小时 3600s
- nn (NameNode):维护hdfs命名空间
- sink
- flume 为了防止sink 发生故障 ,负载均衡
负载:failover均衡:load_balance:- 1.随机发送数据 :random
- 2.轮循发送数据 :round_robin
- 容灾:
- sink 出现故障
负载
均衡 - 均衡:load_balance
- 1.将数据分开 提供并行度的功能 减轻sink 压力
- 2.如果 第二个或者第三个 agent挂掉 数据都会发送到 没挂的sink 对应的agent上面
- sink 出现故障
-
2.案例(容灾):
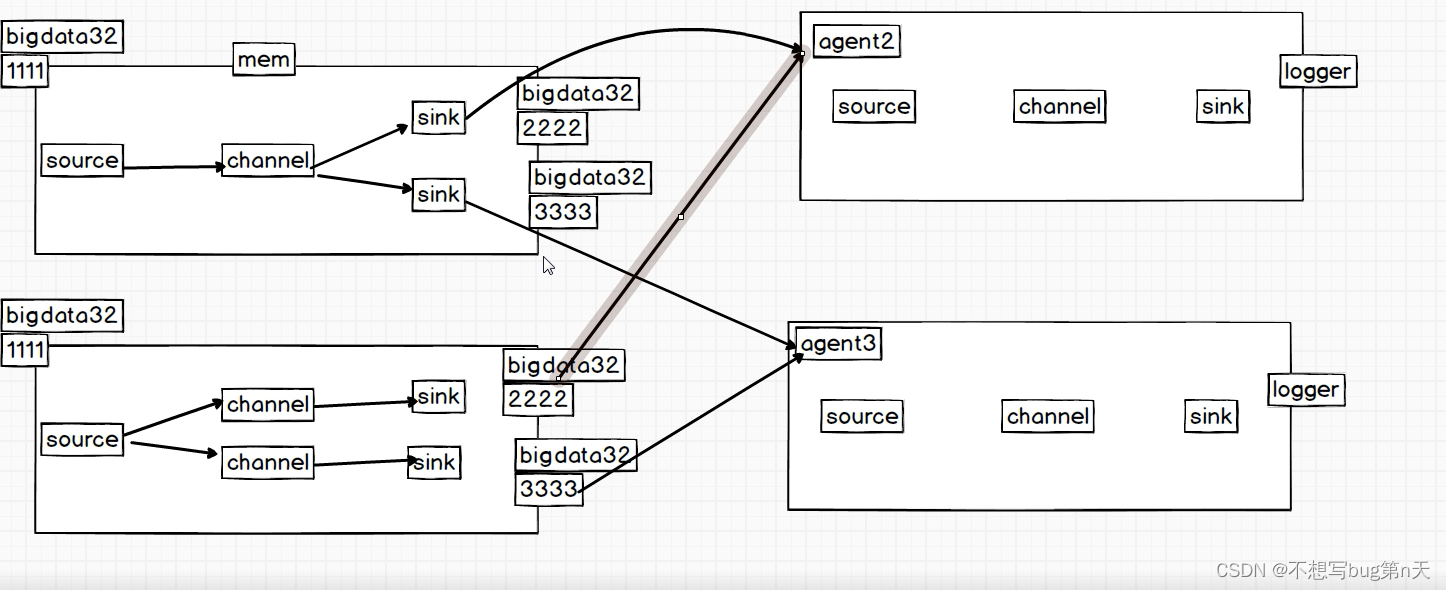
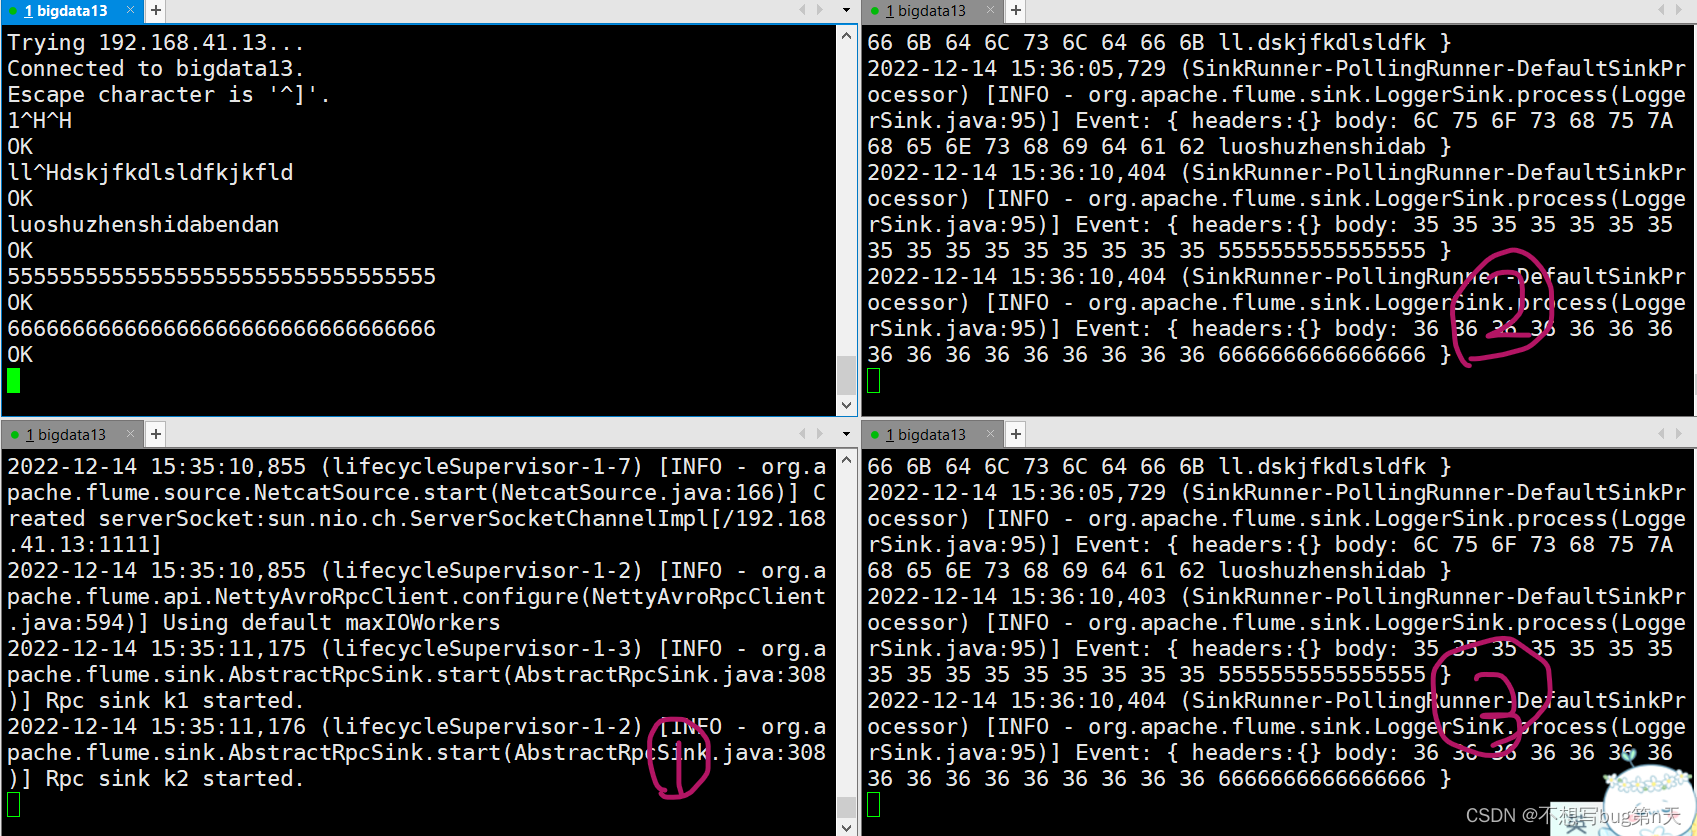
读取1111端口数据 数据发送到 2222端口和3333端口 最终数据输出到 控制台思路3个agent : agent1: source:nc channel :mem sink : avro 两个sink agent2:2222端口 source:avro channel :mem sink : logger agent3:3333端口 source:avro channel :mem sink : logger
-
1. 3个agent
- 配置agent1.conf文件
路径:/home/hadoop/project/flume/sink
[hadoop@bigdata13 sink]$ vim agent1.confagent1.sources = r1 agent1.sinks = k1 k2 agent1.channels = c1 agent1.sources.r1.type = netcat agent1.sources.r1.bind = bigdata13 agent1.sources.r1.port = 1111 agent1.channels.c1.type = memory #定义sink 2222 agent1.sinks.k1.type = avro agent1.sinks.k1.hostname = bigdata13 agent1.sinks.k1.port = 2222 #定义sink 3333 agent1.sinks.k2.type = avro agent1.sinks.k2.hostname = bigdata13 agent1.sinks.k2.port = 3333 #定义sink processers agent1.sinkgroups = g1 agent1.sinkgroups.g1.sinks = k1 k2 agent1.sinkgroups.g1.processor.type = load_balance agent1.sinkgroups.g1.processor.backoff = true agent1.sinkgroups.g1.processor.selector = round_robin agent1.sinkgroups.g1.processor.selector.maxTimeOut=2000 agent1.sources.r1.channels = c1 agent1.sinks.k1.channel = c1 agent1.sinks.k2.channel = c1a1.sinkgroups.g1.processor.backoff = true #如果开启,则将失败的sink放入黑名单
a1.sinkgroups.g1.processor.selector = round_robin (轮询) # 另外还支持random(随机)
a1.sinkgroups.g1.processor.selector.maxTimeOut=10000 #在黑名单放置的超时时间,超时结束时,若仍然无法接收,则超时时间呈指数增长
- 配置agent2.conf文件
路径:/home/hadoop/project/flume/sink
[hadoop@bigdata13 sink]$ vim agent2.conf#agent2:2222端口 agent2.sources = r1 agent2.sinks = k1 agent2.channels = c1 agent2.sources.r1.type = avro agent2.sources.r1.bind = bigdata13 agent2.sources.r1.port = 2222 agent2.channels.c1.type = memory agent2.sinks.k1.type = logger agent2.sources.r1.channels = c1 agent2.sinks.k1.channel = c1 - 配置agent3.conf文件
路径:/home/hadoop/project/flume/sink
[hadoop@bigdata13 sink]$ vim agent3.conf#agent3: 3333端口 agent3.sources = r1 agent3.sinks = k1 agent3.channels = c1 agent3.sources.r1.type = avro agent3.sources.r1.bind = bigdata13 agent3.sources.r1.port = 3333 agent3.channels.c1.type = memory agent3.sinks.k1.type = logger agent3.sources.r1.channels = c1 agent3.sinks.k1.channel = c1
- 配置agent1.conf文件
-
2. 启动 (从后向前启动)
- 启动agent3.conf
flume-ng agent --name agent3 --conf ${FLUME_HOME}/conf --conf-file /home/hadoop/project/flume/sink/agent3.conf -Dflume.root.logger=info,console - 启动agent2.conf
flume-ng agent --name agent2 --conf ${FLUME_HOME}/conf --conf-file /home/hadoop/project/flume/sink/agent2.conf -Dflume.root.logger=info,console - 启动agent1.conf
flume-ng agent --name agent1 --conf ${FLUME_HOME}/conf --conf-file /home/hadoop/project/flume/sink/agent1.conf -Dflume.root.logger=info,console - 启动:[hadoop@bigdata13 sink]$ telnet bigdata13 1111
- 启动agent3.conf
-
3. 容灾
- 1.agent
配置agent1_failover.conf文件
路径:/home/hadoop/project/flume/sink
[hadoop@bigdata13 sink]$ vim agent1_failover.confagent1.sources = r1 agent1.sinks = k1 k2 agent1.channels = c1 agent1.sources.r1.type = netcat agent1.sources.r1.bind = bigdata13 agent1.sources.r1.port = 1111 agent1.channels.c1.type = memory #定义sink 2222 agent1.sinks.k1.type = avro agent1.sinks.k1.hostname = bigdata13 agent1.sinks.k1.port = 2222 #定义sink 3333 agent1.sinks.k2.type = avro agent1.sinks.k2.hostname = bigdata13 agent1.sinks.k2.port = 3333 #定义sink processers agent1.sinkgroups = g1 agent1.sinkgroups.g1.sinks = k1 k2 agent1.sinkgroups.g1.processor.type = failover agent1.sinkgroups.g1.processor.priority.k1 = 5 agent1.sinkgroups.g1.processor.priority.k2 = 10 agent1.sinkgroups.g1.processor.maxpenalty = 2000 agent1.sources.r1.channels = c1 agent1.sinks.k1.channel = c1 agent1.sinks.k2.channel = c1#定义sink processers
agent1.sinkgroups = g1 #申明一个sinkgroups
agent1.sinkgroups.g1.sinks = k1 k2 #设置2个sink
agent1.sinkgroups.g1.processor.type = failover
agent1.sinkgroups.g1.processor.priority.k1 = 5
agent1.sinkgroups.g1.processor.priority.k2 = 10
agent1.sinkgroups.g1.processor.maxpenalty = 2000
k1与k2,其中2个优先级是5和10,而processor的maxpenalty被设置为10秒,默认是30秒。-
agent2和agent3的内容同上
-
- 启动
- 启动agent3.conf
- 启动agent2.conf
- 启动agent1_failover.conf
flume-ng agent
--name agent1
--conf ${FLUME_HOME}/conf
--conf-file /home/hadoop/project/flume/sink/agent1_failover.conf
-Dflume.root.logger=info,console
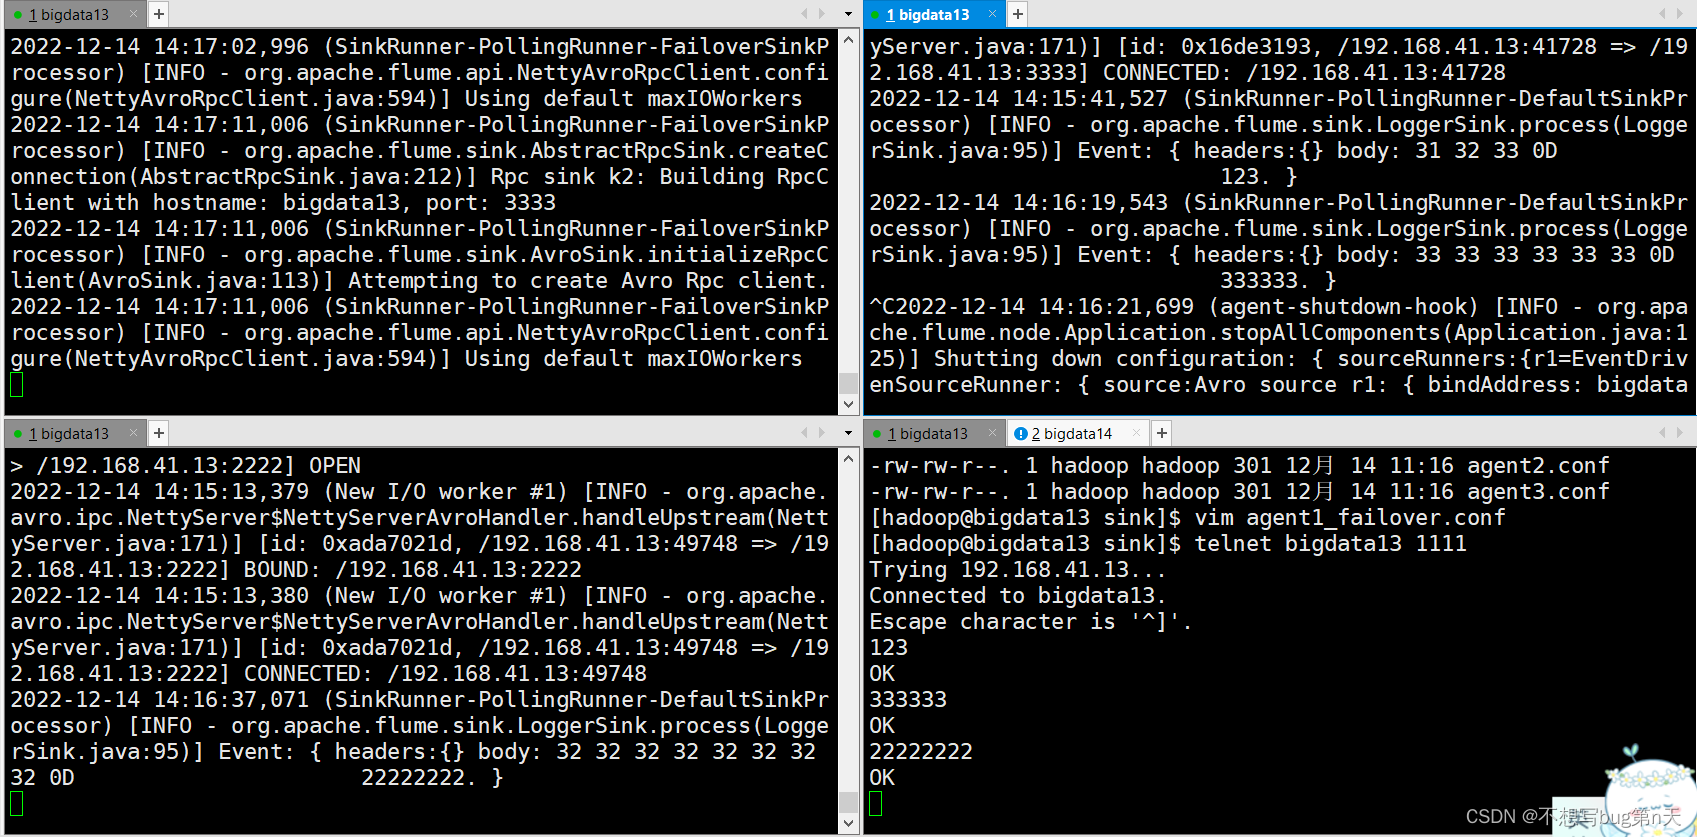
当agent3没挂掉时 发送的33333顺利到达
当agent3挂掉时 发送的22222到达agent2
- 1.agent
-
3.flume核心组件
- sources
- interceptors 拦截器 :主要处理采集的信息 数据转换?数据清洗
- channel selectors :采集的数据 发送到哪个channel
- channels
- sinks
- sources
-
4.案例(one2many 一个接收,发送两个端口)
- 三个agent完成 上面的事情:
agent1: 1111接收数据 发送 2222 和3333端口
agent2: 接收2222 数据发送到 logger
agent3: 接收3333 数据发送到 logger
-
1.三个agent
- 配置agent1.conf文件
路径:/home/hadoop/project/flume/one2many
[hadoop@bigdata13 one2many]$ vim agent1.confagent1.sources = r1 agent1.sinks = k1 k2 agent1.channels = c1 c2 agent1.sources.r1.type = netcat agent1.sources.r1.bind = bigdata13 agent1.sources.r1.port = 1111 #0 配置source channle agent1.sources.r1.selector.type = replicating agent1.sources.r1.channels = c1 c2 #1.配置两个channel agent1.channels.c1.type = memory agent1.channels.c2.type = memory #定义sink hdfs #定义sink 2222 agent1.sinks.k1.type = avro agent1.sinks.k1.hostname = bigdata13 agent1.sinks.k1.port = 2222 #定义sink 3333 agent1.sinks.k2.type = avro agent1.sinks.k2.hostname = bigdata13 agent1.sinks.k2.port = 3333 #定义 连接 agent1.sources.r1.channels = c1 c2 agent1.sinks.k1.channel = c1 agent1.sinks.k2.channel = c2 - 配置agent2.conf文件
路径:/home/hadoop/project/flume/sink
[hadoop@bigdata13 one2many]$ cp agent2.conf /home/hadoop/project/flume/one2many
(和上面的agent2.conf一样,所以采用cp命令)#agent2:2222端口 agent2.sources = r1 agent2.sinks = k1 agent2.channels = c1 agent2.sources.r1.type = avro agent2.sources.r1.bind = bigdata13 agent2.sources.r1.port = 2222 agent2.channels.c1.type = memory agent2.sinks.k1.type = logger agent2.sources.r1.channels = c1 agent2.sinks.k1.channel = c1 - 配置agent3.conf文件
路径:/home/hadoop/project/flume/sink
[hadoop@bigdata13 one2many]$ cp agent3.conf /home/hadoop/project/flume/one2many
(和上面的agent3.conf一样,所以采用cp命令)#agent3: 3333端口 agent3.sources = r1 agent3.sinks = k1 agent3.channels = c1 agent3.sources.r1.type = avro agent3.sources.r1.bind = bigdata13 agent3.sources.r1.port = 3333 agent3.channels.c1.type = memory agent3.sinks.k1.type = logger agent3.sources.r1.channels = c1 agent3.sinks.k1.channel = c1
- 配置agent1.conf文件
-
2.启动(从后向前启动)
- 启动agent3.conf
flume-ng agent --name agent3 --conf ${FLUME_HOME}/conf --conf-file /home/hadoop/project/flume/sink/agent3.conf -Dflume.root.logger=info,console - 启动agent2.conf
flume-ng agent --name agent2 --conf ${FLUME_HOME}/conf --conf-file /home/hadoop/project/flume/sink/agent2.conf -Dflume.root.logger=info,console - 启动agent1.conf
flume-ng agent --name agent1 --conf ${FLUME_HOME}/conf --conf-file /home/hadoop/project/flume/sink/agent1.conf -Dflume.root.logger=info,console - 启动命令:[hadoop@bigdata13 one2many]$ telnet bigdata13 1111

- 启动agent3.conf
-
-
5.案例 many2one
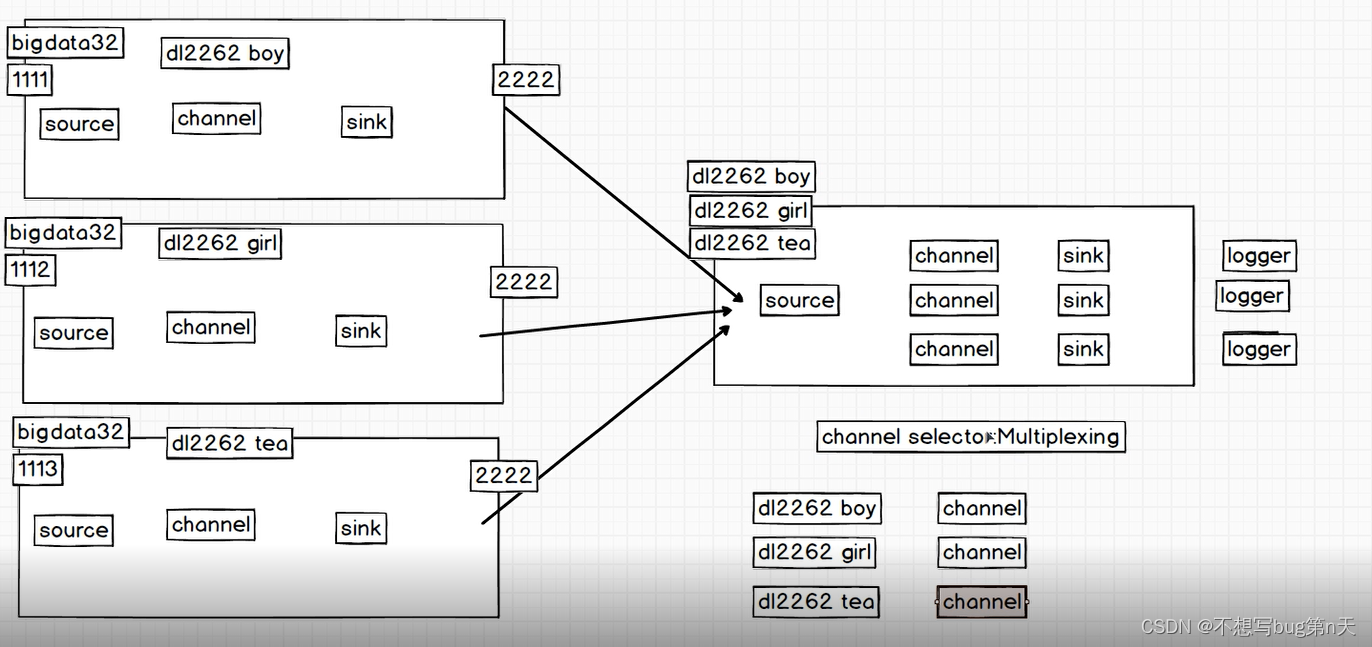
- 需求:多种日志采集到一个agent里面 之后 通过这个agent进行指定数据分发
DL2262班里分为boy、girl、teacher发送数据
-
1.四个agent
- 配置agent1.conf文件
路径:/home/hadoop/project/flume/many2one
[hadoop@bigdata13 many2one]$ vim agent1.confagent1.sources = r1 agent1.sinks = k1 agent1.channels = c1 agent1.sources.r1.type = netcat agent1.sources.r1.bind = bigdata13 agent1.sources.r1.port = 1111 #添加一个拦截器 =》 数据清洗 + event打标签 agent1.sources.r1.interceptors = i1 agent1.sources.r1.interceptors.i1.type = static agent1.sources.r1.interceptors.i1.key = dl2262 agent1.sources.r1.interceptors.i1.value = boy #0 配置source channle agent1.sources.r1.channels = c1 #1.配置两个channel agent1.channels.c1.type = memory #定义sink 2222 agent1.sinks.k1.type = avro agent1.sinks.k1.hostname = bigdata13 agent1.sinks.k1.port = 2222 #定义 连接 agent1.sources.r1.channels = c1 agent1.sinks.k1.channel = c1 - 配置agent2.conf文件
路径:/home/hadoop/project/flume/many2one
[hadoop@bigdata13 many2one]$ vim agent2.confagent2.sources = r1 agent2.sinks = k1 agent2.channels = c1 agent2.sources.r1.type = netcat agent2.sources.r1.bind = bigdata13 agent2.sources.r1.port = 1112 #添加一个拦截器 =》 数据清洗 + event打标签 agent2.sources.r1.interceptors = i1 agent2.sources.r1.interceptors.i1.type = static agent2.sources.r1.interceptors.i1.key = dl2262 agent2.sources.r1.interceptors.i1.value = girl #0 配置source channle agent2.sources.r1.channels = c1 #1.配置两个channel agent2.channels.c1.type = memory #定义sink 2222 agent2.sinks.k1.type = avro agent2.sinks.k1.hostname = bigdata13 agent2.sinks.k1.port = 2222 #定义 连接 agent2.sources.r1.channels = c1 agent2.sinks.k1.channel = c1 - 配置agent3.conf文件
路径:/home/hadoop/project/flume/many2one
[hadoop@bigdata13 many2one]$ vim agent3.confagent3.sources = r1 agent3.sinks = k1 agent3.channels = c1 agent3.sources.r1.type = netcat agent3.sources.r1.bind = bigdata13 agent3.sources.r1.port = 1113 #添加一个拦截器 =》 数据清洗 + event打标签 agent3.sources.r1.interceptors = i1 agent3.sources.r1.interceptors.i1.type = static agent3.sources.r1.interceptors.i1.key = dl2262 agent3.sources.r1.interceptors.i1.value = tea #0 配置source channle agent3.sources.r1.channels = c1 #1.配置两个channel agent3.channels.c1.type = memory #定义sink 2222 agent3.sinks.k1.type = avro agent3.sinks.k1.hostname = bigdata13 agent3.sinks.k1.port = 2222 #定义 连接 agent3.sources.r1.channels = c1 agent3.sinks.k1.channel = c1 - 配置agent4.conf文件
路径:/home/hadoop/project/flume/many2one
[hadoop@bigdata13 many2one]$ vim agent4.confagent4.sources = r1 agent4.sinks = k1 k2 k3 agent4.channels = c1 c2 c3 agent4.sources.r1.type = avro agent4.sources.r1.bind = bigdata13 agent4.sources.r1.port = 2222 #0 配置source channle agent4.sources.r1.selector.type = multiplexing agent4.sources.r1.selector.header = dl2262 agent4.sources.r1.selector.mapping.boy = c1 agent4.sources.r1.selector.mapping.girl = c2 agent4.sources.r1.selector.default = c3 agent4.sources.r1.channels = c1 c2 c3 #1.配置两个channel agent4.channels.c1.type = memory agent4.channels.c2.type = memory agent4.channels.c3.type = memory #定义sink logger agent4.sinks.k1.type =logger agent4.sinks.k2.type =logger agent4.sinks.k3.type =logger #定义 连接 agent4.sources.r1.channels = c1 c2 c3 agent4.sinks.k1.channel = c1 agent4.sinks.k2.channel = c2 agent4.sinks.k3.channel = c3
- 配置agent1.conf文件
-
2.启动
- 启动agent4.conf
flume-ng agent --name agent4 --conf ${FLUME_HOME}/conf --conf-file /home/hadoop/project/flume/many2one/agent4.conf -Dflume.root.logger=info,console - 启动agent3.conf
flume-ng agent --name agent3 --conf ${FLUME_HOME}/conf --conf-file /home/hadoop/project/flume/many2one/agent3.conf -Dflume.root.logger=info,console - 启动agent2.conf
flume-ng agent --name agent2 --conf ${FLUME_HOME}/conf --conf-file /home/hadoop/project/flume/many2one/agent2.conf -Dflume.root.logger=info,console - 启动agent1.conf
flume-ng agent --name agent1 --conf ${FLUME_HOME}/conf --conf-file /home/hadoop/project/flume/many2one/agent1.conf -Dflume.root.logger=info,console - 三个启动
-
telnet bigdata13 1111
-
telnet bigdata13 1112
-
telnet bigdata13 1113
-
-
结果
- 启动agent4.conf
-
6.channle
-
1.默认容量 (capacity 100)
-
2.事务容量 (transactionCapacity >= 100)
写事务: souce => channle (若出错,返回souce)
取事务:channle => sink (若出错,返回channle)
-
-
7.监控
①source
②channle
③sink-
1.监控手段
-
1. flume提供的ganglia框架 【需要安装ganglia】
-
2. 通过agent启动配置一些参数, 通过http方式获取 【推荐使用】
json数据 =》 http接口数据 =》-
1.前端人员 可视化界面展示
-
2.采集 http接口数据 =》 mysql =》 可视化
-
-
-
2.参数解释·
-
SOURCE
OpenConnectionCount(打开的连接数) Type(组件类型) AppendBatchAcceptedCount(追加到channel中的批数量) AppendBatchReceivedCount(source端刚刚追加的批数量) EventAcceptedCount(成功放入channel的event数量) AppendReceivedCount(source追加目前收到的数量) StartTime(组件开始时间) StopTime(组件停止时间) EventReceivedCount(source端成功收到的event数量) AppendAcceptedCount(放入channel的event数量) -
CHANNEL
EventPutSuccessCount(成功放入channel的event数量) ChannelFillPercentage(通道使用比例) Type(组件类型) EventPutAttemptCount(尝试放入将event放入channel的次数) ChannelSize(目前在channel中的event数量) StartTime(组件开始时间) StopTime(组件停止时间) EventTakeSuccessCount(从channel中成功取走的event数量) ChannelCapacity(通道容量) -
SINK
	BatchCompleteCount(完成的批数量)
	ConnectionFailedCount(连接失败数)
	EventDrainAttemptCount(尝试提交的event数量)
	ConnectionCreatedCount(创建连接数)
	Type(组件类型)
	BatchEmptyCount(批量取空的数量)
	ConnectionClosedCount(关闭连接数量)
	EventDrainSuccessCount(成功发送event的数量)
	StartTime(组件开始时间)
	StopTime(组件停止时间)
	BatchUnderflowCount(正处于批量处理的batch数)
-
-
3.如何使用http+json 方式监控 flume
-
1.数据
-
路径:/home/hadoop/tmp
for x in {1..2000}
do
  echo "dl2262,${x}" >> /home/hadoop/tmp/dt01.log
  sleep 0.1s
done
-
-
2.agent
-
配置agent.conf文件
路径:/home/hadoop/project/flume/monitor
[hadoop@bigdata13 many2one]$ vim agent.confa1.sources = r1 a1.sinks = k1 a1.channels = c1 a1.sources.r1.type = TAILDIR a1.sources.r1.filegroups = f1 a1.sources.r1.filegroups.f1=/home/hadoop/tmp/dt01.log a1.channels.c1.type = memory a1.sinks.k1.type = logger a1.sources.r1.channels = c1 a1.sinks.k1.channel = c1 -
3.启动agent
flume-ng agent --name a1 --conf ${FLUME_HOME}/conf --conf-file /home/hadoop/project/flume/monitor/agent.conf -Dflume.root.logger=info,console -Dflume.monitoring.type=http -Dflume.monitoring.port=9527 -
4.网站监控
-
http://bigdata13:9527/metrics
其中内容
{
    "CHANNEL.c1": {
        "ChannelCapacity": "100",
        "ChannelFillPercentage": "0.0",
        "Type": "CHANNEL",
        "ChannelSize": "0",
        "EventTakeSuccessCount": "2553",
        "EventTakeAttemptCount": "2584",
        "StartTime": "1671030728197",
        "EventPutAttemptCount": "2553",
        "EventPutSuccessCount": "2553",
        "StopTime": "0"
    },
    "SOURCE.r1": {
        "AppendBatchAcceptedCount": "32",
        "GenericProcessingFail": "0",
        "AppendReceivedCount": "0",
        "EventAcceptedCount": "2553",
        "StartTime": "1671030728579",
        "AppendBatchReceivedCount": "32",
        "ChannelWriteFail": "0",
        "EventReceivedCount": "2553",
        "EventReadFail": "0",
        "Type": "SOURCE",
        "AppendAcceptedCount": "0",
        "OpenConnectionCount": "0",
        "StopTime": "0"
    }
}
-
-
补充: flume启动有error 尝试重启
监控 pid
监控 json数据
java后端监控页面
-
-
-
最后
以上就是优美钥匙最近收集整理的关于flume day03(容灾、一<=>多)1.负载 均衡2.案例(容灾):读取1111端口数据 数据发送到 2222端口和3333端口 最终数据输出到 控制台3.flume核心组件4.案例(one2many 一个接收,发送两个端口)5.案例 many2one6.channle7.监控 ①source ②channle ③sink的全部内容,更多相关flume内容请搜索靠谱客的其他文章。


发表评论 取消回复